Doing handicrafts with children is a good activity. This will help you develop your child's skills. Also, this is an opportunity to simply spend interesting leisure time together. Don’t rush to throw consumables into the trash. You can make a wide variety of crafts from it. Find out how you can easily make a regular airplane out of plastic bottles with your baby.
Airplane piggy bank
You will need: plastic bottle (0.5 l), colored paper, double-sided tape, pencil, scissors, ruler.
Master Class
- Make a hole for coins in the center of the bottle in this way: make a rectangular slot 2 cm long and 0.5 cm wide.
- Draw the body and tail of the plane in an "L" shape, then cut them out.
- Glue 2 blanks to the bottle using double-sided tape, then cut a hole for coins.
- Make engine stands in this way: draw 2 rectangles measuring 10x3cm on colored paper, roll them into tubes, then glue them to the bottom of the body on both sides.
- Draw the airplane wings, cut them out, then glue them on.
- Create a propeller: trace the cover onto the paper, then make a larger circle and draw the blades.
- Cut out the propeller, place it on the neck of the bottle and close the lid.
- Cut out 8 circles and glue them as windows on both sides.
- Prepare 2 stripes and glue them onto the tail.
The piggy bank airplane made from a plastic bottle is ready! I recommend watching this video!
How to make an airplane from a plastic bottle and colored paper
Paper airplane
For this craft you need little: a sheet of paper and a steady hand. Sometimes also a ruler.
Note! The sheet of paper from which you will make the plane must be completely flat and smooth. Any roughness and defects sharply reduce the flight qualities of the craft.
Simple paper airplane design
It doesn't require anything other than paper. The sheet should be rectangular: from a school notebook or office printer paper. Let's fly!
- Fold the sheet in half lengthwise.
- We bend the corners on both sides. They should occupy approximately one third of the sheet and be in close contact with each other like an “envelope”.
- We bend the resulting “envelope” entirely down. There is still space between his “nose” and the edge of the paper.
- We take the two upper corners of the resulting structure and bend it inward. They fit tightly to each other, from under them the “nose” of the “envelope” is visible.
- We bend the “nose” up.
- Fold the resulting workpiece in half outward. The “nose” is bent in half.
- We bend a “wing” on each side.
That's it, our simple airplane can be launched.
If you want to improve flight characteristics, you can iron the folds not only with your hand, but also with a ruler - this will make them sharp and clear.
War plane
You will need: plastic bottle (0.6 l), caps, cocktail tubes, cardboard, newspaper, PVA glue, brush, gouache, glue gun.
Master Class
- Cover the bottle with pieces of newspaper using PVA, then leave it to dry.
- Cut out the tail, wings and propeller of the airplane from cardboard.
- Cover the workpieces with pieces of newspaper and pva, then leave to dry.
- Make the chassis (wheels) in this way: glue 2 caps and a tube together with a glue gun, as shown in the image.
- Use a glue gun to glue the tail onto the neck of the bottle and the wings just below the center of the bottle.
- Use a gun to glue the cork to the bottom of the bottle, then glue the screw to the cork.
- Glue the chassis.
- Glue cocktail tubes crosswise between each wing.
- Paint the plane and wait for it to dry.
A military plane made from a plastic bottle is ready! I recommend watching this video!
How to Make a Flying Airplane using Plastic Bottle and Cardboard
Do-it-yourself helicopter from almost nothing
Are you still wondering how to make a craft for February 23rd with your baby? Or do you just want to diversify your leisure time and spend it in joint and useful creativity with your children? We have prepared for you another step-by-step photo master class on making a nice helicopter.
To work you will need:
- a small plastic bottle for drinking yogurt;
- ping pong ball (or kinder egg);
- 3 cocktail straws with a bend;
- stationery nail;
- stapler;
- glue gun or superglue;
- scissors.
Punch a small hole in the bottle cap. This can be done with scissors or an awl. Cut the tubes in the middle.
Cut off the round part of the bottle. Cut a thin strip from the remaining part.
The landing gear of our helicopter consists of two halves of bent tubes connected by a strip of plastic using a stapler. Look at the photo to see what it looks like.
Insert half of the tube with a bend into the previously made hole in the bottle cap. It is advisable to fix it with superglue or a glue gun. Attach the landing gear to the helicopter body with a stapler.
The propeller consists of two crossed tubes connected with a clerical nail.
Place the ball into the hole on the body. It is also advisable to place it on glue so that the cabin does not fall off during flights. Pin the propeller onto the top of the body.
Can you hear the noise of the blades? The helicopter is ready to make its first flight to an exhibition of crafts on the theme of February 23 at school or to a place of honor in dad's room.
Simple airplane made from a plastic bottle
You will need: plastic bottle, scissors, knife, colored cardboard, pencil, ruler.
Master Class
- Draw 2 identical stripes for the wing on the cardboard, then cut them out.
- Draw 3 small stripes for the tail, then cut them out.
- Create a propeller: trace the cover onto the paper, then make a larger circle and draw the blades.
- Cut out the propeller, place it on the neck of the bottle and close the lid.
- Using a knife, make 3 cuts in the tail area and 2 cuts for the wings.
- Insert 3 strips into the cuts to form the tail of the airplane.
- Secure the airplane wings.
A simple airplane made from a plastic bottle is ready! I recommend watching this video!
Airplane made from bottles. First flight.
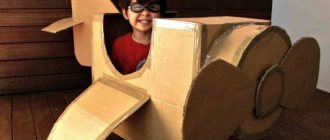
Cardboard airplane
Let's move on to crafts of a different type, non-functional, but aesthetic. I mean, these planes will not fly, but they are quite worthy of becoming an interesting gift for a loved one.
And now we will consider just such a variant of the craft - an airplane made from scrap items.
Airplane in six steps
Prepare:
- glue;
- wooden clothespin;
- ice cream stick;
- cotton swab;
- a piece of colored cardboard;
- scissors.
Manufacturing:
- We clamp the ice cream stick with a clothespin.
- Cut out a propeller with four blades from a piece of cardboard.
- Cut a piece of a cotton swab and put the blades on it.
- Glue it to the front of the clothespin.
- Cut out and bend the blank for the tail.
- Glue it to the back of the clothespin.
That's it, the airplane is ready. It is so easy to make that even a kindergarten student can handle it.
Cool plane that flies for a long time: folding diagram
The pictures below will help you make an airplane that flies several hundred meters. Follow the instructions carefully and fold the piece of paper using a ruler; the folds will be straight. You can draw some lines with a regular pencil.
Let's start folding the plane:
- Fold the paper in half across the sheet.
- Then fold the sheet in half lengthwise.
- We bend the right corner as follows.
We bend the left corner in the same way.
Next, both corners need to be folded again and ironed.
Opening up the corners.
We wrap them inside and iron them.
We bring the lower parts of the corners up.
Fold the corners inward along the fold line.
- Turn the workpiece over and do the same on the other side.
- Fold the corners on the reverse side to form an isosceles triangle.
Fold the triangle in half.
We turn the workpiece over and use a pencil to mark a line at a distance of 2.5 centimeters from the base.
We bend one wing and iron it thoroughly.
We repeat the same procedure with the second wing.
Draw another line on the wings.
Fold the corners up.
To make the fighter fly as far as possible, you can make small flaps.
You can learn about another way to fold a long-flying airplane by watching the video.
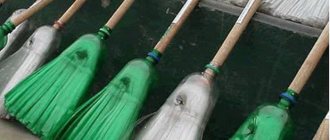
Master class on making a broom
You can make a broom from plastic bottles in different ways. Let's look at the most popular of them.
Option 1
Creating such a product will require a minimum of time and materials.
To work you need:
- 5 two-liter plastic eggplants;
- a stalk or a suitable stick;
- strong wire;
- a pair of nails and a hammer;
- knife and scissors.
Step-by-step instruction:
- Using a stationery knife, cut off the neck of one bottle, stepping back a little from the edge.
- We cut off the bottom in the same way.
- Using scissors, cut the workpiece into strips 1 cm wide, not reaching the edge about 6 cm.
- We repeat all the steps with other containers, leaving only two untouched.
- With one of the whole bottles we do the same as with the others, but we do not cut off the neck.
- On the blank with a neck we place all the other parts of the product without a bottom and neck.
- We flatten the resulting part of the broom, giving it a flat shape.
- Cut the remaining bottle in half and use scissors to make cuts in the half with the neck to the middle.
- We place the part from step 8 on the previously made workpiece. We pierce the future broom in two places with a nail and fasten it with wire.
- We secure the handle and use the broom for its intended purpose.
This broom is the simplest and is suitable even for beginners.
Option 2
Another option for making a broom for the garden is also possible.
For the product you need to prepare:
- 20 eggplants for 2 liters and one for 1 liter;
- holder;
- self-tapping screw
Manufacturing technique:
- We cut two-liter bottles into strips 5 mm wide, for which you will need to make a homemade bottle cutter.
- During the cutting process, we wind the tape onto a piece of chipboard measuring 250x300 mm. The tape should be wound as tightly as possible and tied together with a knot.
- After winding is completed, screw a self-tapping screw into the board and tie the edge of the strip to it.
- To make the tape more rigid, pour boiling water over it. You can also use a hair dryer. As a result, the tape will curl into tubes and become stiffer.
- Having completed the shrinkage, we cut the material one end at a time.
- We hang the ribbons bent in half on a plastic strip of larger width, collect them into a ring and tie them.
- We straighten the bundle and tie it with a ribbon just below the bend.
- Cut off the bottom and neck of a 1 liter bottle and insert a bunch into it. We stuff the workpiece onto the holder.
- We compress the bunch in a yew, level it, and shrink the top bottle using a hairdryer. We fix the broom on the handle with a screw. We cut off the part of the bottle that remains uncrimped with a knife.
- We cut the edge of the broom evenly with scissors so that there are no bends.
This panicle has medium hardness. It works great on smooth surfaces. If you plan to clean asphalt with holes, it is recommended to make the tape 10 mm wide. During heat treatment, it is also twisted into tubes, thereby obtaining higher rigidity.
From the video you can learn more about how to make a broom from eggplants:
From plastic rods
For manufacturing, you will need to assemble a device for cutting bottles into strips, which will then be processed into rods. To build such a product, a slot is made in a small block, the depth of which corresponds to the width of the plastic tape.
We fasten the blade of the stationery knife at an angle with self-tapping screws. We make a small hole in the bar and insert a strong wire, which is used as a bottle holder.
To get strips from the eggplant, cut off the bottom and make a cut with scissors, which will be the beginning of the strip. Then we thread the edge into the slot of the bar and gently pull it towards ourselves.
We make strips from 10-20 plastic bottles, after which we move on to making a broom:
- Using a hair dryer, heat the edge of the tape and twist it a few centimeters. We clamp this edge into a drill or screwdriver, place the tape over the included hair dryer and twist the tape into rods.
- We cut long rods into 70 cm lengths.
- Heat it with a hairdryer and bend each rod in the middle.
- We cut a wide ribbon about 1 m long from a plastic bottle and attach it to the handle.
- We hang the rods on the tape in the form of a garland, after which we wrap the handle with the rods and tightly tighten the entire product with the tape, securing it with a self-tapping screw. To better tighten the rods, the tape can be heated with a hairdryer.
- To make the tool more convenient to use and look like a broom, the rods will need to be slightly fluffed.
As the owner of a summer cottage, a country house, or a workshop, it would be useful to acquire such a useful tool as a broom, but it is not necessary to buy it. All you need to do is collect a dozen plastic bottles, which will make an excellent broom, and interesting ideas and step-by-step instructions with photos will help you figure out how to make one with your own hands for beginners.