Firebird
- this is a fictional bird, such a miracle is mentioned only in Russian folk tales. We can only guess what she looks like, and together with the children we can imagine a feathered creature of extraordinary beauty. The prefix “heat” tells us that this bird is so beautiful that it dazzles with its beauty, its feathers seem to breathe heat, shimmer and sparkle. By re-reading interesting fairy tales, you can continuously fantasize, and realize the fruits of your creative thoughts in crafts. The firebird can be drawn, molded from plasticine, or made into an applique from paper. All this is proposed in this master class, but plasticine will be used. We will draw a figurine of a beautiful bird on paper, but we will make an applique from three-dimensional plasticine parts.
To sculpt crafts you need to take:
- - cardboard - the basis of the drawing;
- - plasticine of red, orange, yellow colors;
- - a thin toothpick or skewer.
How to make a firebird step by step
1. Choose bright cardboard - the basis of a fairy-tale drawing. Since the firebird should be fiery, it is better to use orange, red and yellow colors to sculpt it. These shades will look very beautiful on a blue background. Take some yellow plasticine and knead it in your hands. Make a small oval flat body, glue it to the cardboard, move it up a little to leave room for the bird’s gorgeous tail. Attach a thin neck and a small head from the same plasticine.
2. Prepare bright blanks for sculpting the wings. Pinch off a few pieces of orange and fiery plasticine, gradually reducing the size. Pull each piece into a sausage.
3. Attach the first row of large feathers to form the bird's wings. Start with the largest piece, then attach the shorter ones in order. Clearly join one end of each piece to the body. Press the tip of the toothpick around the entire perimeter of each feather individually to highlight the design.
4. Glue on the second layer of feathers of the second color, also making them fluffy using a toothpick. Make two wings.
5. Proceed to sculpting the gorgeous bird of paradise tail. In this case, plasticine of the same shades is also suitable for modeling elegant feathers. Pull out the sausage. Make one end long, thin and pointed, press the other with your finger, forming a spatula. Glue on top details in the form of diamonds or droplets of other shades, attach a central dot-ball. Pierce the pieces and press down on top with a toothpick to add relief.
6. Make some long feathers and attach them to the tail.
7. Add other similar details to make a beautiful ponytail.
8. Several small feathers can be glued to the head; follow the same method.
9. And finally, show the feathers on the bird’s body and neck. To do this, also use a sharp tool and rinse the entire surface of the plasticine.
This is how you can bring a fairy tale to life. The beautiful one is ready. Firebird
It turned out bright, and the main secret of successful sculpting is using the most beautiful blocks from the set and a good mood.
Bright spring bird made of plasticine
In the spring, you really want to create something unusual, bright and impressive with your own hands with your children. Ordinary figures can be turned into painted ornaments using the same plasticine or polymer clay. The latter option is more difficult to process; the formed product will have to be baked at high temperatures, but with plasticine such problems will not arise. And with children it is better to use the modeling mass.
This lesson shows how to combine in one product the modeling of a three-dimensional object and the painted technique, which allows you to paint with a soft mass, as if with paints. Using the example of a spring bird made of plasticine
The process of sculpting an unusual craft is demonstrated step by step.
To create a painted bird, prepare:
- - bright plasticine of any color as desired, for example, pink, as the main one;
- - additional bright pieces to create a pattern: yellow, orange, red, blue and others;
- - tools - a glass and a toothpick.
How to make a bird
1. Choose several bright shades that will allow you to create a unique colorful craft. The main color will be used to the maximum, so it will be needed the most. Several shades of pink will do.
2. Make the main parts of the bird figurine: the head, which will be replaced by a round ball, the body, which will be replaced by a pink drop, and the tail in the form of several oblong cakes. The size of the tail feathers can be gradually reduced. Press your head against the wider part of your body. If you want to get a bird that looks like a peacock, then it is better to make the tail long. The tortillas should not be too thin to maintain their shape.
3. Make a beautiful pattern on the ponytail. Add brighter plasticine by layering it on top of each other in the form of cakes, as well as in the form of droplets, beads and grains. Set the volume using a toothpick.
4. Form a pink blank for the wings. At first it will be simple and inconspicuous. Roll three sausages, connect them together and bend them. Press down on top until the piece is flat. Then make small bright grain details.
5. Apply a pattern identical to the tail pattern on the wings. You can use plasticine of the same color and similar parts. Experiment to achieve a beautiful result.
6. Glue the wings on the sides. Decorate the top ball-head, make eyes and a small beak. Also, the bird may have a bright crest on its head, and it can be made from several feathers, also decorated with colorful patterns.
7. Glue the orange plasticine feet on the bottom.
The bird is ready. If you plan to use the figurine as part of a three-dimensional postcard or panel, then you can apply the design to the tail and crest on only one side, and not glue the second wing at all. If you are interested in a three-dimensional figure, then all operations should be repeated exactly for the reverse side.
Now all that remains is to figure out where to plant your wonderful plasticine warbler. For example, insert a thin skewer from the bottom and decorate a flower pot on the windowsill.
Ptushko Margarita Vladimirovna, 13 years old. "Firebird". MBOU “Fokino Secondary School No. 3”, grade 7b, Fokino, Bryansk region. Head: Head of the Children's Library of Fokino Nina Anatolyevna Gushchanskaya. Competition work
How to make a rooster from plasticine, see.
More interesting:
See also:
Christmas tree toys made from salt dough
Christmas decorations made from salt dough Author of the article “Salt dough: recipes and secrets” Olga Olefirenko…
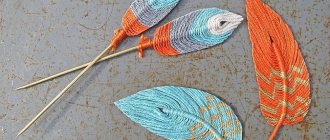
Did you pick up all sorts of feathers as a child? Yes? After all, they are so diverse, attractive, different colors, lengths and shapes, fluffy or thin, neat. Feathers are an incredible work of nature, a symbol of lightness, which is always useful if you are a lover of needlework, if you like to decorate and decorate. But in order not to injure the birds by pulling out the most beautiful feathers from their tails, let's try to make them ourselves.
How to make a feather from paper?
It's very simple, for this we need:
- a sheet of white or colored paper;
- scissors;
- glue;
- toothpick;
- pencil.
How to make feathers with your own hands? Take a piece of paper, for a medium-sized feather, cut out a piece about 15 by 10 cm. Fold it lengthwise and draw an arc with a sharp end near the fold. Feathers come in different sizes, some flare out towards the end and some maintain a flat shape. Draw the shape of the future feather that you like. Cut along the outline.
All that remains is to give the workpiece a finished look. Cut the edges into thin strips, moving from the sharp end at an angle downwards. Do not make too deep cuts, cut into 2/3 halves.
Feathers are fluffy and even. If desired, give your feather fluffiness by twisting several paper fringe ribbons in different directions.
You will need a toothpick for the pen shaft. From the remaining paper, cut a ribbon about a centimeter wide. Apply glue to one side of the ribbon and wrap it around a toothpick. You can also use a match. Glue the finished rod to the product on the inside fold. This way you will get a medium feather that you can easily find a use for.
flying wing
Do you know how to make such a design? In general, nothing fancy. A4 sheet is suitable for this. Bend its corners towards the center (fold down twice).
After this, the structure is folded in half and bent along the lines. Then you need to bend the wings in front and behind. That's it, the flying structure is ready, you can launch it.
Decor
You can, of course, leave the feathers white or cut them out of colored paper. But what if you want something bright, colorful, with shimmer?
The feather needs to be painted. Be careful, it’s not in vain that we pay attention to this topic. To make a bright feather, first color the sheet from which it will be cut. The fact is that if you use markers or watercolors, the liquid will curl or soften your feathers and tear if you move awkwardly. Watercolor is a good way to create a leaf with iridescence. You can also use a sponge or sponge to create a blur between colors.
Add sparkles, stars and inscriptions as soon as you cut out the feather, but it’s better to decide on the color before you pick up the scissors.
Homemade nightingale at the dacha
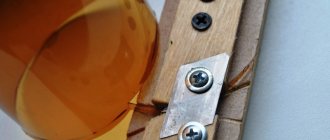
In his youth, he collected various homemade electronic simulators of birdsong - canaries, nightingales. Listening to these toys for a long time did not relax, but rather tired my ears. This was most likely due to a poor and primitive imitation. Once, while searching for the sound of crackling burning wood on a website, I found a recording of a nightingale song. The recording is not of very high quality, so 4-. Here I remembered my efforts to build simulators. What if you broadcast this recording in a forest where the nightingales no longer sing. This idea was implemented on a summer cottage, where many years ago a nightingale actually sang 25 meters from the fence.
Material Variations
Such feathers will definitely come in handy in decorations, in various crafts, and for decorating gifts. How to make a feather attractive, presentable, unusual? What other material can you use to create something interesting? Use foil. It produces iridescent bright products.
Newspapers, pages of magazines and books will come in handy. Try decorating your gift with feathers cut from old American newspapers or a music book.
Combine colors and materials, and then you will get an interesting decoration. Good luck!
A delicate and weightless feather, made with your own hands from paper, looks just as good as a real feather. Paper feathers are widely used in the design of cards, gift wrapping, large feathers are collected into original bouquets and placed in vases, feather garlands are made... I think every craftswoman will find a worthy use for this original decor.
To make feathers you will need:
Thin but fairly dense cardboard, designer paper with a print, or even the thinnest rice paper - the choice of paper directly depends on the further use of the pen; — Scissors with thin and sharp blades or a stationery knife and ruler; — Wooden skewer or metal knitting needle; — Template for the pen; — Paints, glue, glitter and other decorative items (optional).
First, prepare a template for the future pen - use the ready-made templates presented below, or draw your own, then carefully cut it out. Lay out the feather template on the selected paper and, using a wooden skewer or knitting needle, transfer the contours of the feather, pushing through the outlines (the contours of the template can also be transferred to paper using a simple pencil, but in this case the finished pen will not have a very beautiful outline).
Carefully cut out the feather along the pressed outline. If your feather has a more or less even shape, bend the workpiece in half lengthwise, press the fold with pressure with a skewer or knitting needle and, without straightening the workpiece, make very frequent cuts along the edge, not reaching the bend about 1-2 mm, depending on the size of the feather. If your feather is curved, press the central shaft of the feather with a skewer or knitting needle and then make frequent symmetrical cuts along both edges. To get very thin, most realistic cuts, it is recommended to make them under a ruler with a blade.
If desired, after completing the cuts, the feathers are decorated with sparkles, small beads or tinted with paint.
All photographs were found on the Internet, all author's logos were preserved. I propose to consider photographs without indicating the author’s name as folk photographs. If you know the name of the author of an unsigned work, write in the comments and in the near future I will definitely sign his work.
You can make an incredible number of different crafts.
In this collection of master classes you can learn how to make various birds from plastic bottles.
Here you will find simple ways to make beautiful birds that you can use to decorate your home, cottage and/or garden.
You can involve children in the process of creating birds from plastic bottles - they will definitely enjoy doing something new and interesting, and you will be glad that you took them away from the computer, tablet or phone.
DIY chicken from plastic bottles
There are several ways to create a chicken from a plastic bottle. It all depends on the size of the bottle itself and its shape.
If you turn on your imagination and involve children in this creative work, then there are a lot of options.
Here, for example, is chicken, the base of which requires a 5-6 liter bottle.
1. Paint the bottle yellow (on the inside). You can use regular paint.
2. You can cut out a beak and a comb from other bottles.
3. Use a knife to make holes in the bottle and insert everything you did.
4. Take toy plastic eyes or just plasticine and make eyes. You can also color the chicken's eyes.
Non-standard solution
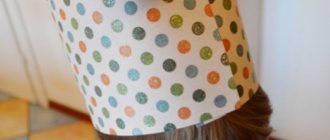
Now you will find out for children using improvised means. For example, a version made from a paper plate. Materials needed:
- plate;
- paints;
- markers;
- scissors;
- colored cardboard or stickers;
- rubber.
One plate will make two masks because it is cut in half. Then you need to decide on a theme and start decorating. To make it clearer, you can start from the examples shown in the picture below.
As you can see, there is nothing complicated in this process. If you decide to make an image of an animal, then simply glue on the ears, nose, antennae and the mask is ready. To attach the base, use an elastic band or a stick (as in the picture). If you use a colored plate, there is no need to paint it, but if the plate is white, you will have to paint it. You can involve kids in this process so that everyone is happy.
How to make a dove with your own hands from plastic bottles
You will need:
Plastic bottles;
Styrofoam;
Scissors;
Wire;
Toy plastic eyes or plasticine.
1. Cut off the neck of the plastic bottle (see image). This blank will serve as the body of the dove. Make the breast.
2. Make cuts on the bottle as shown in the image. Press the cut part inward to form the body of the dove, then tighten the workpiece with wire.
3. Cut out the head of a dove from foam plastic.
4. To make feathers, you should cut the middle part of a plastic bottle. The strips should be of different lengths, and their ends should be rounded.
5. Make 2 holes at the base of each feather.
6. Using wire, screw the feathers to the mesh.
7. Attach the pigeon’s tail to the pigeon’s body.
8. All that remains is to color the dove’s head and make the eyes (glue plastic ones, draw with a marker or use plasticine).
Sewn masks
For children they can become even more interesting and voluminous. The most successful choice would be images of animals. Decide on the image and prepare the necessary materials:
- textile;
- scissors;
- padding polyester or cotton wool;
- beads;
- fishing line
Start by making the base. To do this, draw the desired shape on the fabric, cut and sew, leaving holes for the eyes and filling. It is better to sew along the wrong side. After this, you need to turn out the base and fill it with padding polyester or cotton wool through the hole. After this, you can begin to manufacture additional parts. These could be ears, nose, eyes. Prepare each part separately, then you need to fill the workpiece with padding polyester. At the final stage, you need to sew all the details of the future animal with neat stitches. To ensure that the child's mask fits tightly to the face, use a thick elastic band.
DIY children's crafts from plastic bottles: rooster
You will need:
Plastic bottles
Plastic plates
Plastic glasses
Plastic spoons.
1. Cut off the top of the plastic bottles and secure them with tape as shown in the image.
2. Cut the plastic cups into fringes and place them on the bottle one by one.
*You can use cups of different colors and alternate them.
3. The rooster's tail can be made from plastic plates. After this, attach the tail to the plate.
4. Wings can be made from leftover plastic plates.
5. You can make a rooster's head from a plastic ball. It is attached to a cut cup glued to the bottom of the previous cup.
6. You can cut out a beak and scallop from colored paper. They are attached with tape or hot glue. Eyes can also be made from colored paper, plasticine, or use toy plastic eyes.
Bird crafts have always been very popular among lovers of home crafts. Figures of feathered creatures are especially relevant on Bird Day, which is celebrated in the spring on April 1 in kindergartens and schools. The holiday is dedicated to the return of migratory birds and marks the onset of spring and the renewal of awakened nature. On this day, children of all ages make bird crafts, and older schoolchildren make birdhouses and hang them on trees.
Bird crafts can be made from a wide variety of materials: cotton pads, colored paper, plastic bottles, salt dough, natural and any available materials. There are many options for creating birds - from simple ones for small children to complex ones that schoolchildren can easily master with the help of adults.
We bring to your attention several lessons on creating birds with your own hands with step-by-step instructions, diagrams and tips. We hope that they will help you learn all the intricacies of this fascinating process and be filled with new bright ideas.
Peacock for a summer cottage made of plastic bottles - master class
We will need: plastic bottles of various colors, polystyrene foam, a wooden block as a stand, a metal rod, foil and thin colored plastic, a glue gun.
Step one: Cut out the peacock's body and head from foam plastic, not forgetting to make small indentations in place of the eyes. We attach it to a wooden block using a metal rod, which plays the role of legs.
Step two. We make enough peacock feathers from plastic bottles of different colors. We will need three types of feathers: long for the tail, short for the neck and a little longer for the body. To do this, cut off the bottom and neck of the bottle and cut it lengthwise into 3 parts.
We round one end of each strip with scissors and cut its edges into thin strips so that it looks like a bird’s feather. We decorate the rounded end of the feathers intended for the tail with two or three multi-colored ovals made of foil and plastic. You can attach them using a stapler.
Step three. We cut out a beak from a red plastic bottle and fasten it in place. Next, using a glue gun, we gradually glue the feathers onto the body of the bird, starting from the tail and ending with the neck. Attach the feathers slightly overlapping, as shown in the photo. Don’t forget that medium-length feathers are intended for the body, and short ones for the neck.
Step four. We cut out a tuft of any shape that our imagination dictates from colored plastic and glue it onto the head. Using acrylic paints, draw the peacock's eyes. You can glue eyelashes cut from a transparent plastic bottle to them.
Step five. Let's start making the tail using an abrasive mesh. We make holes at the base of the feathers and attach them to the mesh using thin wire.
We start making the tail from the end, gradually layering feathers on top of each other in rows until the bird’s luxurious long tail is completely formed. After that, we attach it to the body and place the peacock, made with our own hands from plastic bottles, in an area among flowers and greenery.
DIY firebird made from salt dough - master class
For Bird Day, you and your children can make a three-dimensional firebird from salt dough. The work will take little time, require very few materials and will provide the children with a fun and festive mood.
We will need: salt dough, gouache or watercolor paints, colorless varnish.
Step one. Making salt dough. To do this, mix a glass of flour with a glass of salt and knead the dough by pouring 100 ml of brewed starch into it. We prepare it as follows: dilute a tablespoon of starch in 100 ml of cold water and pour a glass of boiling water into this mixture.
Step two. Divide the salt dough into 5 pieces and paint them in different colors. To do this, add gouache or watercolor paints to each piece and lightly knead it again. Next, we draw a sketch of the firebird and sculpt the bird’s details on it: wings and body. Dry them in the oven at low temperature.
Step three. We make the tail of a fairytale bird. We draw stencils of feathers and use them to sculpt them from pink and blue salt dough. Dry the feathers in the oven. Next, we paint all the parts of the bird with paints, cover them with colorless varnish, and connect them. We decorate a colorful festive panel with crafts. The salt dough firebird is ready!
Sketches
The facial expressions of the mask are of great importance. Even the most ordinary characters convey a palette of moods. They can be sad and cheerful, kind and angry, surprised and indifferent. This is achieved by drawing the eyebrows (raised, lowered, like a house), a smile on the face, and the position of wrinkles, if we are talking about a mask of an old man or woman. Emotions are conveyed not only by the faces of people and animals, but also by inanimate images: templates for masks of flowers (bells, roses, daisies), vegetables and fruits (apples, tomatoes, plums).
Grandfather
Robot
Indian
Carrots
Aliens
The mouse as a character is often found in children's stage plays. For example, it is difficult to imagine everyone’s favorite fairy tales Turnip and Teremok without this modest but full of charm character. Therefore, if a child participates in such a production, parents are faced with a problem: where to get a carnival costume.
The best solution would be a cute mouse mask made with your own hands for a child. You can make this little thing together with your baby, then he will be very proud that there is a face made by his own hands on his head.
Birds made from cotton pads - master class
Another very cute craft that is perfect for decorating a kindergarten on the wonderful holiday Bird Day. It's easy, fun and very fast. Young children can be introduced to making birds from cotton pads.
For creativity we will need: cotton pads, wooden skewers, colored paper, narrow colored ribbons, plastic eyes, glue and scissors.
Operating procedure:
- To create one bird we take 5 cotton pads. We cut one disk into two halves, and leave four whole.
- We fix two pairs of cotton pads on a skewer with glue so that it is inside. One pair of disks plays the role of the bird's head, and the other - the body.
- We glue the halves of the cut cotton pad to the body on both sides - these will be our wings.
- Glue the eyes and beak, cut out from a piece of colored paper, to the head and decorate the bird with a ribbon. A cute chick made from cotton pads for Bird Day is ready!
Stuffed Animals
Felt can be an excellent material as the basis for an animal mask for children. This is a soft, dense and natural material that can be found on the shelves of craft stores. The advantages of felt are its elasticity and the ability to easily cut with scissors. Felt makes animals very well because of the bright colors of the material.
Additional parts are attached to the base using superglue. Due to this, the mask for the child will seem voluminous. To make a reliable attachment to the head, it is better to use a thin elastic band. You can complement the look with a felt ponytail and gloves, the baby will definitely not go unnoticed.
Owl made of colored paper - master class
You can make cute owls for celebrating Bird Day at school with your own hands from colored paper. We will need the colored paper itself, scissors, double-sided tape and glue.
Operating procedure:
- We make a cylinder from a sheet of colored paper, glue its edges on one side, as shown in the photo, and press down the middle so that we get ears.
- Cut out a heart from paper and glue it to the bottom of the cylinder - these are the owl's feet.
- We cut circles of equal size and glue them onto the central part of the cylinder as feathers. In order for the circles to give volume to the craft, it is better to stick them with double-sided tape.
- We cut out a triangle of the same color as the legs and glue it to the top of the plumage - this is the beak.
- Lastly, glue on the eyes by cutting out circles for them from black and white paper. Your handmade owl is ready!
DIY bird of paradise made of polymer clay - master class
These adorable birds of paradise are made from air-hardening polymer clay. This modern material is also familiar to us under the names “self-hardening plasticine”, “modeling mass” and “velvet plastic”. To make charming feathered creatures, we will need aluminum wire with a diameter of 1 mm, polymer clay, foil, scissors, pliers, a stack, a glass for rolling out clay, a little patience and diligence.
Operating procedure:
- We create three birds at once - while we are sculpting one, the rest are drying out. We cut the wire twice as long as the planned tail. We wrap half the wire with foil, crumpling it and forming the body of the bird.
- We make legs from wire, as shown in the photo, and insert them into the body. We take a piece of clay, shape it into a sausage shape, then roll it out and flatten it. Carefully remove the wire from the bird, place it inside the clay sausage, rolling it up using a glass. We insert the finished colored tail back into the body. In the same way we prepare the remaining two birds.
- We take a piece of blue, yellow and red clay, roll them out and gradually, smearing them with our fingers, stick them around the birds until the entire foil is covered. We will get three blanks of bright birds.
- Starting from the center, we stick around the paws. Then we take a piece of clay of the appropriate color and make the cheeks, crown and beak. We sculpt eyes from balls of black clay, not forgetting to squeeze out the upper and lower eyelids around them.
- Create a tail and crest. To do this, we cut off several wires of the length we need and roll them into clay. When it dries, we round off the ends using pliers and insert the tail parts into the bird’s body. We make shorter feathers from thin clay sausages by twisting the ends.
- We create the plumage effect by placing pieces of clay rolled out in the form of droplets on the body and working with a needle in the direction of feather growth. Using a needle, we create featheriness throughout the bird’s body. To make the eyes shine, you can coat them with varnish. A wonderful hand-made bird of paradise is ready!