02.02.2020 Cats made of beads Share
Three-dimensional beaded figures are a fascinating activity. When you first get acquainted with the diagrams of three-dimensional figures, it seems that making figures is a difficult task, but we hasten to assure you that this is not the case. One piece of advice - to add rigidity to structural elements, we recommend using thin wire.
Recently, the art of beadwork has become especially popular among needlewomen and craftswomen. This fashionable handicraft gives many people the opportunity to make beautiful and unusual crafts on their own. Beaded products are not only beautiful, they are also varied. Beaded cat figurines are especially popular, because they are the embodiment of affection, peace, comfort and kindness.
There are 2 types of beading: flat and voluminous. Volumetric beading is more complex than flat beading, but the product is more interesting. This type of needlework allows you to develop fine motor skills and creative thinking.
Cat for beginners
To weave a three-dimensional animal from beads (in this case a cat), we need wire (preferably light, since dark wire will stand out on white beads and spoil the look), black and white beads, as well as several beads of red (for the mouth), green (for the eyes), gray (for the tail) colors, as well as a larger pink bead for the nose.
Using the parallel weaving method, we carry out the work according to the scheme proposed above. We start weaving from the nose and end with the tail. If you wish, you can make a larger three-dimensional animal from beads, for example a fat cat, if you enlarge the pattern in proportion to the size of this one.
DOLPHIN made of beads WITH YOUR OWN HANDS / Full VIDEO LESSON
Toys made from fresh flowers: a gift
Figures made from fresh flowers will be an excellent gift for any celebration; it is especially nice to give and receive such an original gift for a birthday, wedding, March 8 and Valentine's Day.
for birthday, photo
on February 14, photo
on March 8, photo
Ginger cat
We will be adding to our collection of kittens with such a cute, funny kitten made of beads. The master class will help you master the technique of three-dimensional bead weaving. The work of beading a cat is greatly simplified by a diagram that clearly demonstrates in schematic form the entire process of work. This master class is perfect for those who are just starting to master this type of work, and for those who already have experience.
For work we will need:
- wire with a diameter of 0.3 mm
- brown, white, orange, pink and green beads 2.5 mm
- fishing line
Let's get to work, first you need to cut a piece of wire, its length should be two meters. First you need to weave one large piece, which will be the head, then the body, then the tail for the kitten. After this, you can start weaving ears and paws, which are made separately.
We weave according to the pattern
We start with the kitten’s head, do not forget that during weaving, insert two pink beads for the mouth, and for the eyes you will need to insert two more green beads. We take two small pieces of wire for the ears and make triangles. In order to attach the ears to the head, you need to stretch the ends of the wire through the beads of the head rows.
Now we make the paws of the cat, for this we take four pieces of large-sized wire and make them according to the diagram, also according to the diagram shown, we attach the paws to the body. After this, we move on to designing the kitten’s face, namely making the eyes. Take black paint and draw pupils on each green bead. We insert small pieces of fishing line through the beads through the muzzle; these will be antennae. This cat can be used not only as decoration, but also made into a keychain or pendant for a backpack or bag.
How to paint plaster
Gypsum products must be painted, because... Over time, moisture evaporates from the surface and the plaster becomes yellow, stains remain on it after touching.
To color the gypsum mass, a coloring pigment is added to it during mixing. It must be added slowly, stirring the composition until a uniform color is obtained.
After drying, the product will have a lighter shade. In order to achieve a bright color, additional coating is used.
To paint a frozen product you will need:
- brushes of different diameters and shapes;
- sponge or cotton swab;
- sandpaper to give an aging effect;
- varnish;
- paints and other means to obtain the intended result;
- acrylic primer;
- a solution of wax with gasoline or turpentine to make the surface glossy.
The paint is applied in several layers. The more there are, the more intense the surface shade will be. It can be primed before painting. After painting, apply varnish and give the desired texture using artistic techniques.
Cat-ball
For work, prepare:
- beads
- fishing line (approximately 4 m)
- wire
- bead (diameter 15-20 mm, this is what we will braid)
We weave a mesh of three beads, the width is 2.5 diamonds.
When half the circumference of the large bead is ready, the fishing line must be secured (along the red line in the diagram). In this case, when we connect the mesh into a ring, the work will not spread out. No need to cut the line! Now we unwind another 1-1.5 meters of fishing line from the reel and weave the second half of the mesh. As you work, don’t forget to try the mesh on the bead. It should be pulled tight.
Before we connect the mesh into a ring, both ends of the fishing line must be on the same side. We don't touch the connection yet. It is performed with the same end of the fishing line that we used to weave the second half of the work. We separate the ends of the fishing line in different directions, threading it through the beads.
We finish the top of the bead with a mosaic. You can weave one at a time on each side so that the mesh does not slip. Here the length of the mesh is 14 diamonds, 4 rows of weaving without decreases, 6 beads are removed in the 5th row and 4 more beads are removed in the 8th row.
Muzzle
Volumetric beading is not at all difficult if you carefully study the diagram. Let's continue. In the photo, stars mark the places where the cheeks and nose are attached. Here you need to sew two or three times, but not tightly, we come out of the pink bead and pull it with two stitches to the very base.
We select the eyes.
At this stage we leave the muzzle. Let's move on to the cat from the end.
We bring the needle to the place where the tail is attached.
Let's move to the ears.
When the ears are ready, secure the tip of the fishing line and cut it off. If the paws are made of fishing line, we leave it that way.
Paws
Finding the axis of symmetry. We select the beads to which we will attach the legs.
To secure, we pass the wire through 2-3 beads. We come out of the beads from the paws.
We make the legs from the fishing line in two passes - on the second we pass the bead closest to the white beads. This is necessary for the cat to stand on its full paw.
The paws are ready.
Mustache
We wind 10-15 cm of fishing line. We tie the skein in the middle with a knot.
Using a small hook, we pull the loops of the skein between the spout and the cheek from the bottom up on each side. One tip must be passed through the bead of the base or spout and tied to the second tip, then tucked towards the skein. Trim your mustache.
That 3D beading lesson is over. Our cat is ready!
Volumetric heart box made of beads. Bead weaving. Beading. Beading
Rules for caring for garden plaster figures
Garden figures and plaster figurines are an affordable option for decorating your site. With proper care they will last for a long time. If the product is painted, then you just need to remove dust and dirt from it with a damp cloth or vacuum cleaner. Treatment with antifungal drugs is recommended. The paint will protect against fading and precipitation.
If the figure is not colored, then:
- First you need to cleanse the pores of dirt. For this purpose, special preparations are suitable that you can buy or make yourself. For example, a mixture of starch: dissolve 70 g of powder in 100 ml of cold water. Then pour all this into hot water (930 ml). The mixture cooled to 45°C is coated with a previously cleaned decorative element and covered with cotton wool for 7-10 hours.
- After cleaning, the item should be protected from moisture. To do this, use a special varnish or a mixture of wax with any solvent in a ratio of 10-15%. Moisture-resistant coatings for gypsum are also produced.
You can fix chips or cracks on the surface of the product yourself by taking plaster and adding a 15% PVAD solution. Prime the area around the damage with PVA glue and then apply plaster.
If there is a lot of damage, then the figure must be sent for restoration.
-Music
—Categories
- hand made (116)
- antiques (3)
- stones (1)
- AIR GRILL (16)
- costume jewelry (47)
- felting (22)
- ribbon embroidery (12)
- knitting (15)
- dacha (17)
- decoupage (100)
- pictures for decoupage (49)
- diets (16)
- diets (3)
- female image (5)
- charging (73)
- bodyflex (10)
- HEALTH (74)
- home ideas (40)
- fur (3)
- interior (12)
- stones (0)
- computer (59)
- cats (6)
- karaoke (3)
- cooking (109)
- Georgian cuisine (15)
- furniture (42)
- mk (122)
- prayer (24)
- music (12)
- soap making (16)
- traditional and alternative medicine (58)
- papier mache (6)
- newspaper weaving (34)
- practices (17)
- programs (38)
- English (22)
- psychology (21)
- travel (7)
- recipes (38)
- drawing (70)
- painting (65)
- fish (0)
- tips (119)
- list of sites with MK (15)
- construction (1)
- dancing (12)
- belly dance (10)
- exercises (87)
- flowers (9)
- scarves (4)
- sewing (191)
- esoterics (13)
—Search by diary
—Subscription by e-mail
—Interests
— Regular readers
—Communities
—Broadcasts
-Statistics
Saturday, October 20, 2012 18:19 + to quote book
Planar gypsum castings of complex shapes. MK.
Words from the author of MK.
When I showed my rainbow cats to friends and acquaintances, many wanted the same ones. But the epic with salt dough really slowed down the desire to please everyone. I began to strain my brains. Plaster castings are quickly made, but the shapes of the cats are so intricate, and I’ve never worked with plaster. What to do? Or maybe cut tin strips, rive them together and somehow attach them to the base, bending them according to the pattern? No, it’s long, energy-consuming and ultimately more difficult than making dough. And then it dawned on me again.
I quickly made a pattern from an inspiring picture (more about the pattern in the Rainbow Cats MK - https://stranamasterov.ru/node/416476) and wound flagella from sculptural plasticine. It is a little denser, does not stain your hands, and does not leave greasy stains.
Flagella flattened into stripes
I placed the pattern under the glass and attached a sort of intricate side of a complex shape to the top along the contour.
I once saw how a master sprinkled the base with talcum powder before casting a mold. I don't know if this is necessary, but I sprinkled it too. There was no talcum powder, but there was baby powder.
Oh, don't hit me with your slippers. Since this was my first experience working with plaster, it became filled with some kind of lumps. I just diluted it with water until it became sour cream. Only later, the craftswoman of our Country Zhachok, with whom we live in the same city, suggested that for strength we could add PVA to the plaster.
Cat and panther
Today we offer you a pattern for weaving keychains - three-dimensional figurines made of beads, a cat and a panther. The diagram is attached. In this case we see what a panther looks like.
Below we describe how to make balls based on a ring and 4 beads, because this is the method used in the technique of weaving our figures. The ball is made with one tip of wire or fishing line, without a base. The diagram for assembling the ball is shown in Figure 111. In weaving we use beads with large holes. We put 4 beads on the fishing line and close them into a ring, cross both ends (working and non-working) in the beads. How to do this is shown in Figure 112 a. Do not tie a knot at the end. We leave a tail 6-7 cm long. Again we collect 3 beads and close them into a ring, draw the end of the line into beads 7 and 2 base rings. See Figure 112 b. Collect 2 beads and close them into the next ring, pass the tip of the fishing line into bead 5 of the previous ring, from top to bottom and into beads 2 and 3 of the base ring (see Figure 112 c).
In the same way, we make another ring, we pass the fishing line into beads 8, 3 and 4, and then into bead 7 of the first ring from the bottom up (Figure 112 d).
We put 1 bead on the fishing line and pass its tip into beads 10, 4, 7 (see Figure 112 d). Now you need to tighten the ball, it will take on a three-dimensional shape. To do this, we pass the end of the fishing line through beads 6, 9, 11, 12. Pull the fishing line tightly. To finish the work, we stretch the fishing line into bead 7 from top to bottom (see Figure 112 e).
Next, we tie a knot from the fishing line of the working and non-working ends, cut the ends of the fishing line and melt them. The result is a ball of three vertical rows of beads, with 4 beads in each row. Total – 12 (see Figure 113).
Here's what we got:
Variety of tasks
Tangram for preschoolers is a fun and useful activity that can be started from the age of 4-5. First, the kids get acquainted with a new set, study its elements, find a triangle according to their parents’ instructions, and show which one is big and which one is small. Next, adults print out the diagram in full size, asking the little ones to put the elements on the drawing. These can be houses, animals, birds, fish, a Christmas tree, a man.
Gradually, the tasks become more complicated, children are offered a hint diagram, which in size may no longer correspond to the real “dimensions” of the figures, and a task to fold something, for example a bird.
Children, as a rule, also become interested in the fact that from a specific number of elements several varieties of birds can be added.
To prevent preschoolers from getting bored, you should come up with a plot - for example, write a fairy tale about animals who would like to live in a house. In order for each of them to occupy their own “room”, you need to assemble the beast from puzzle elements. Next, preschoolers are offered the following scheme:
They make a cat, a hare, a horse, a fish, a duck, a dog. We can “plant” a spruce next to the house to make it beautiful (its diagram is also presented above). Finally, a man built a dwelling for the menagerie - his figure is also on the diagram.
Cat lovers can be invited to compose these animals from puzzle elements according to the following schemes:
The setting is something like this: today is cat day, let's try to collect as many different species as possible. Or another option: a cat came to visit us and told us a lot of new things about her relatives. Let's show her how we can collect cats.
Also very interesting are the houses, of which a huge variety can be made from tangram elements:
Together with the child, you should discuss what kind of house he would like to build, for example, for his pets, and then offer him to work. If something doesn’t work out, don’t be nervous and yell at your child, such an attitude will only destroy his desire to understand the secrets of the Chinese puzzle. It’s best to help, hold, praise for your efforts, then the result will come very soon.
Black cat
Selecting fabric for the toy. Fold it in half and cut it out. The diagram below shows which parts need to be cut and how.
Scheme
We sew together the details of the head, stuff the head with cotton wool, and sew up the hole. Make a small fold at the base of each ear and sew on the ears. We sew on a nose, eyes, embroider a mouth, make a mustache from threads.
Now we prepare the frame, as shown in the diagram below. To do this, you need to take 3 pieces of wire of the required length and twist them together in the center. We do this so that one of our wires becomes a neck, turning into a tail, the other two - paws.
Wrap the cat's body with cotton wool and thread. We attach the trim for the body to the back of the cat, having previously made small cuts on it for the neck and tail. We sew up the lower abdomen. We bend the front and back trim inwards and sew it up so that the edges are not visible.
We string beads onto the neck, paws and tail. We give the desired shape to our frame. The paws are gathered onto a thread, using a seam “over the edge”. We make a hole in the back of the cat's head and insert a neck loop made of wire into it. Sew up the hole.
Our three-dimensional beaded toy is ready!
Bookmark corner
You can do it in a strict form, or with some imagination, add colors and brightness.
Paper of different shapes is used, both square and rectangular sheets. You will need scissors and a ruler.
Consider the option of bookmarking from a square sheet:
Bend diagonally. We get a triangle. Find the middle (bend the triangle in the middle). Fix the middle of the base. Unbend. The anterior upper apex is retracted downwards. The other two are in the center of the base. Straightening
The right top is folded to the top. We do the actions that are in the diagram. We fill the left corner in the same way as the right.
The bookmark is completed. You can paint, glue ears, eyes or other elements of your choice. There is room for imagination to run wild.
Fat Cat
There is no diagram in this toy model, but the weaving principle itself will be presented below with a detailed description.
We need beads for the body of the cat - gray or black, white for the face, paws and abdomen and red for the nose, cotton wool for stuffing, wire for the base, monofilament and “Plastic” for the base.
Ingenuity is always welcome. Therefore, this figurine was made by the author from... chewing gum.
Weaving starts from the muzzle.
Direct weaving or mosaic is used. You can use beads of a different color to weave spots or stripes on the cat’s skin. You can make changes using larger beads, it all depends on your imagination.
The paws and tail are made using the mosaic strand technique; we sew them on separately.
Look at the cat from different angles, this way the weaving technique will become more clear.
Our three-dimensional beaded toy is ready!
What varnish to use for plaster products
The minimum coating for plaster is a layer of varnish. It will fix the natural color of the material, prevent moisture from evaporating, protect the item from destruction and help achieve an attractive appearance. Different types of varnishes can be used.
Shellac
Alcohol based. Can be applied to any paint. It can be transparent and colored. With its help, the effect of aged marble is obtained. The melting point of the varnish is 80-120ºC.
Acrylic
This varnish comes in matte, glossy, and pearlescent. Safe to use, easy to apply, dries quickly. Creates a water-repellent film on the surface that protects against fading.
Resistant to high temperatures: changes color at 180ºC, begins to melt at 260ºC. After drying, it does not change color.
Oil
With the help of artificial resins and plant substances included in the composition, it protects the surface. It comes in matte and glossy. Requires dilution with a solvent before use. After drying, it makes the surface darker than before application.
Glossy varnish brings solemnity to the interior. For those who favor naturalness, matte varnish is suitable.
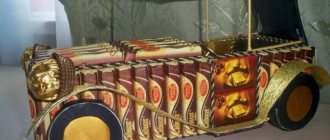
golden cat
We prepare a set of necessary accessories:
- beads of primary color (golden)
- for the color of the belly and paws, silver-colored beads
- green beads for eyes
- for the nose and mouth pink and red beads
- to create the body one large ball
- for the head the ball is slightly smaller than for the body
- wire for tail and paws
- fishing line for ears
- beading tools
- beads to match the thread
First we will make the body of the cat. To do this, you need to paint a large ball to match the main color, which will be the cat. We leave only the white belly unpainted. You can choose a ball in the desired color for the job.
After the paint has dried, we continue working. Along the entire circumference of the ball, we begin weaving a chain onto a thread with beads. For convenience, we secure the ball with improvised means, after that we continue weaving, constantly increasing it, remember that we need to insert silver beads, thus making the cat’s tummy.
When the row along the circumference of the ball is wide, we begin to decrease beads.
Now we begin to make the tail and paws. To do this, take a small piece of wire and fold it in half.
In the middle of the wire we put a bead in the color of the main color of the cat. We string the beads up to half the wire, then put on several silver beads and then golden ones again. You should end up with the same number of beads, now bend the wire in half and twist it. We do the same for all the other legs.
The longest piece of wire will be for the tail; we weave it in the same way as the paws. Using the ends of the wire of the paws and tail, we attach them to the cat’s body. We pass the wire through the bead in the intended place, and twist the remaining wires around the wire. We cut off the remaining ones or wrap them around the paw, while maintaining symmetry.
Now we are making the cat’s head, for this we take the ball that we prepared in advance. If this is not the case, then you can simply take a piece of foil and roll it up, making a ball with a diameter slightly smaller than the cat’s body. We paint the ball to match the main color of the cat with acrylic paint.
We secure it by passing a needle and fishing line through the ball, and begin to braid the head with beads. We start with the belt and weave it like the body. As the final stage, we create a cute face for the cat.
We take two green beads and sew them symmetrically, one next to the other. We weave the nose and mouth through the muzzle beads with pink beads.
For the ears, we create a corner from wire and string beads on it; they can be made in any shape as desired. For the mustache we use fishing lines, which we pass through the muzzle in place of the nose.
It remains to fasten the head to the body, and therefore on one of the two balls we weave one row of bead crosses, so we form the neck. Then we sew the head to the body and tighten all the threads tightly. For decoration, you can make a bow and attach the cat from any braid. Now the cat is ready.
How can you paint plaster?
By painting a plaster product you can achieve the desired look, stylize natural aging, and perform other effects that make the thing extraordinary.
There are special water-based plaster paints on sale that you can use without any special skills:
They create a protective film on the surface and can be used inside the house, because... non-toxic and dry quickly.
To achieve effects, semi-professional products are used:
- Surik. A natural pigment of red-orange or red-brown color.
- Varnish. It can be applied over paint or soaked into an unpainted product. When using varnish, it is possible to obtain the appearance of aged marble.
- Potal. Used if the surface needs to be given the effect of gilding or old bronze.
- Coloring pigments. They are added to the gypsum solution to obtain even coloring throughout the entire mass. Used in the manufacture of decorative bricks.
It is better to apply paint to a fresh product. If time has passed, then you need to use a primer, which will increase the durability of the color.
Cat in love
To make such a voluminous toy made of beads in the shape of a beautiful cat, we need: beads of two colors - for the color and for the tummy and paws. Red beads on the heart. Just a little bit of beads for the mouth, eyes and nose, as well as a ball (for ping pong). Fishing line, wire. Beads for the paws and tail (thicker) and ears (thinner).
We paint the ball to match the color of the cat and leave a circle for the tummy.
Weave a chain around the painted ball with a cross around its circumference. The ball should be pierced crosswise so that the braid does not slide over it.
We weave a strip on both sides of the white spot as shown in the photo. When the row becomes too wide, we decrease it (weave two beads as one).
We get a braided ball. This is the body of a cat.
Next, let's take care of the tail and paws. We put a bead on a wire folded in half and twist it, leaving pieces of 2-3 cm. We make 5 blanks. The longest one is for the tail. The shortest ones are for the front legs.
We attach the tail and paws to the cat’s body in this way: thread it through a bead, twist it and remove the tip (bite it off). You don’t have to bite it, just wrap it around it.
Now the paws and tail need to be braided. We do this using the mosaic rope method. In this case - on 5 beads with 3 beads at the base.
When we reach the bead, weave a cross with an addition onto the edge of the strand. After this we braid the bead itself. This is how we make all the paws and tail. For the head, take foil and roll it into a ball. We braid it in the same way as we braided the ball. There is no need to make any reductions in place of the muzzle.
The heart is made like this: the fabric is woven with a cross in the shape of a heart, we make 2 of these. Calculation – 5x3 crosses. Next we sew it with a cross, insert beads inside and all this must be sewn to the cat’s paws.
We make the muzzle: we sew on beady eyes. The nose and muzzle must be woven between the beads of our braid. Making ears and mustaches.
We braid the head to the body with a cross.
Secure with fishing line using a needle.
The voluminous beaded toy is ready. A cute cat that you wouldn't be ashamed to give as a gift.
Construction materials
The following materials are most often used to build a cat’s home:
- for the manufacture of the frame, chipboard, MDF and plywood sheets, boards made of natural wood are suitable;
- it is possible to sew a soft house for your beloved cat in the form of a comfortable bed from fabric and foam filling;
- simply create cat houses from ordinary boxes;
- To decorate a scratching post for a furry one, you should stock up on jute or sisal rope. Just do not need to secure them with staples or nails, since the animal can damage its limbs;
- PVC pipes or metal and wood products are suitable for the base of the scratching post;
- synthetic winterizer and foam pieces are chosen as filler for pillows and mattresses;
- the interior is decorated with fur, plush or fleece;
- to cover the external facade, the material is selected based on the animal’s habit of tearing its claws: carpet would be a good option;
- adhesive compositions for work should be purchased without a pungent odor, which can scare away the cat.
White cat
For three-dimensional figures, such as a white cat made of beads, fishing line or wire is used; the product turns out better on fishing line. With volumetric beading, the number of beads indicated in the diagram is collected into a closed ring, and then new rows are added.
Using two needles, we collect a chain of 14 pairs of beads (Figure 1), close the chain into a ring, connecting the beginning and end. We bring both needles in one direction, through the pairs of rings located opposite the joint. We weave another chain of 6 pairs of beads. The result is the frame of a cat's head. We make the entire head according to scheme number 2.
We weave the cat's ears according to the pattern in Figure 3, weaving them to the base of the head in the place indicated in Figure 4. On this base of the head with ears, you need to make additional weaves that imitate wool (Figure 5). Mark the nose with 3 beads on the muzzle, make eyes and attach the nose. We weave the whiskers from small pearl beads - 8, 8 and 6 beads in each whisker of the cat (Fig. 6).
We braid the head to the beads and make the body (Fig. 7). After making the body, we braid the paws and tail to it (Fig. 8,9,10).
To make a white cat fluffy, you need to perform additional weaving (Figure 8). By weaving, you can get different figures of cats. You can make a white or a black cat, the choice is yours.
Origami cat craft
We fold paper triangles of the same size and build a circle. Next, we make a circle one smaller triangle and attach it to the previous one.
What types of arcade games are there?About educational toys for babies
- T-shirts with Native American prints
Thus, having created a pyramid, we get the body of the future cat. We make the head using the same principle, but smaller in scale, and attach it to the body.
We construct ears from the same triangles on top and glue the muzzle cut out on paper. The craft can also be painted in any color, giving it uniqueness, and a tail can be drawn.
Chenille wire
Required:
- 2 foam balls with a diameter of 2 cm and 4 cm;
- wire white, brown, pink;
- heat gun.
A hole is made in the ball on one side, glue is applied, and a brown wire is inserted. The ball is wrapped around her. The same actions are performed with the second ball. Then the parts are glued together - these are the body and the head.
For the paws, take white wire and twist it in the shape of a trefoil. One part is glued to the body.
The white wire for the ears is twisted into a spiral, and pieces of pink wire are inserted into the middle.
The ears are attached to the head.
The muzzle is formed from white wire, the tail is made from brown, the parts are glued, the mustache is secured - and the cat is ready!
Other interesting options for making cats
Many people want to learn how to make something beautiful out of paper, we invite you to get inspired by interesting options for making cats.
You don't have to create appliques or use origami, check out the quilling technique.
Before making such a paper cat, prepare:
- strips for quilling work (width no more than five millimeters);
- tweezers;
- quilling stick;
- scissors;
- PVA;
- a nice base to work with.
Now we work following the steps:
- We make turns. The cat's head will require five turns, and the body six. The latter should be slightly elongated.
- Based on this we make a sketch of the future cat. We transfer the made turns to the base and glue them onto PVA.
- Making ears. They need to be twisted in the form of drops. We make regular turns, glue them together, and carefully flatten the top with your fingers. The same principle is used to make cat paws. We glue all the resulting parts to the previously prepared base.
- A cat cannot be left without a whisker. They need to be made from thin straight strips. We wind them onto a stick, straighten them slightly and glue them in the muzzle area. The same instructions are suitable for making a tail.
Now you know how to make such a cat out of paper. With a little practice, the finished products can be framed and hung on the walls. Improved compositions can even be presented as a gift.
Cats can not only decorate your interior, but also your favorite book. To do this, just learn how to make a cat bookmark out of paper. We described the manufacturing principle in detail in one of our articles about bookmarks.
In what other form can paper cats be presented?