The slender, beautiful birch tree is a real symbol of Russia. They loved it at all times not only for its flexible body and branches, but also for its white smooth bark - birch bark.
Since ancient times in Rus', birch bark was the only material available to the common people. That’s why it was used so often on the farm:
- made dishes, household utensils (tueski, boxes, baskets, baskets);
- clothes and shoes (bast shoes);
- toys and musical instruments;
- furniture (chairs, cradles);
- amulets and jewelry;
- boats, tackle, ropes, harness for horses;
- they lit stoves and lit fires;
- covered the roofs of houses;
- recorded important life events (birch bark letters).
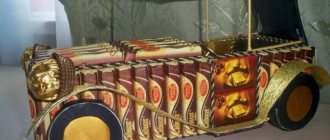
Now the love for natural materials is returning, and making handicrafts from birch bark is becoming popular again. Modern craftsmen make antique utensils, boxes, paintings, artistic panels, souvenirs and much more from birch bark.
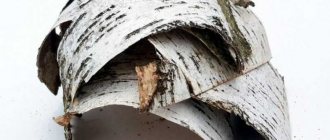
Birch bark and its features
It should be clarified what birch bark is. This has long been the name given to the upper, very elastic layer of birch bark. When wet, this layer of bark becomes flexible and suitable for weaving and bending.
Birch bark has a number of features.
- Thanks to its layered structure, it is able to retain heat.
- The material is flexible and lends itself well to manual processing.
- Birch bark is capable of allowing air to pass through.
- Thanks to the special chemical composition of the natural material, bacteria and microbes do not live in it. For this reason, dishes and various containers made of birch bark keep food fresh for quite a long time.
In Rus', a large number of different products were made from birch bark:
- baskets and tueski;
- boxes, chests and caskets;
- cradles and shoes;
- boat frames and women's jewelry.
Modern craftsmen create a variety of products from birch bark:
- souvenir decorations and picture frames;
- book bindings and boxes;
- original interior items and even flowers.
Of course, children will like birch bark crafts and even find them useful. Such creative activities contribute to the development of creative imagination, perseverance and fine motor skills, and introduce them to ancient folk crafts.
The beginning of time
Birch bark is the bark of a birch tree. In Rus' it was used only in construction. In the future - for the manufacture of household utensils and various crafts. Our ancestors also made roofs, summer houses, and boats using vines and bark. In those days, people mostly wore bast shoes, which were made from exactly this material. In those days, leather cost a lot of money. There was a problem with water resistance, so they used birch. These shoes were suitable for peasants. Of course, the main disadvantage was that you couldn’t wear them in “wet” weather.
Nowadays, products made from this material are expensive. All due to the fact that such an original craft is losing its practical application.
Every housewife used birch bark baskets. They were suitable for harvesting, going into the forest to pick berries and mushrooms. Birch bark has properties that are indispensable for food storage. Instead of bags for flour and cereals, they used wickerwork, because pest bugs did not appear there. Scientists have proven that sugar and bulk products are stored best in them.
Preparation of birch bark
Material for creative works is stocked in June. It is strictly not recommended to harm young and healthy trees. Trees cut down and blown down by the wind are suitable for harvesting.
- Work begins with a cut around the trunk about a centimeter deep. The top layer of bark is cut vertically, then an incision is made again at a distance of 40-80 cm.
- In order to separate the birch bark from the trunk, you need to pick up its edge. In this way, layers of birch bark are stored.
- In order to remove birch bark with strips, the cut is made in a spiral.
The stored material is cleaned, straightened and slightly moistened with water.
Storage is carried out in cardboard boxes, lined with birch bark with sheets of paper. Birch bark ribbons are rolled with the white side out.
Note!
- DIY gifts for February 23rd - a large selection of ideas for creating unusual gifts for Defender of the Fatherland Day
What to give a 2-year-old boy - a list of the best options for an interesting and useful gift (120 photo ideas)
- Papier-mâché - TOP 120 photo reviews of original products. Detailed instructions for beginners on creating beautiful crafts
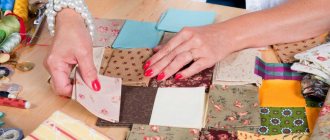
What can you do with young children?
It is best to work with the youngest children using the weaving technique. Moreover, it does not have to be complex or multicomponent. Sometimes a few simple additions are enough to get something original.
For example, if you fold narrow strips of birch bark, you can create a rosebud.
Please note that you can use the macrame weaving technique. You get keychains and bookmarks.
Also, as an experiment, you can use the origami method, but take only thin sheets of birch bark and the simplest figures.
Preparation of material
Before you start making crafts from birch bark, you need to prepare it.
- First of all, the material is cleaned of dust and growths, and the surface is cleaned with sandpaper.
- The wrong side is slightly moistened with a soft sponge or cloth.
- After this, the layers and ribbons are soaked in salt water for a period of 2 to 4 days, depending on the age of the tree.
- The soaked material is sorted into layers.
- The resulting pieces are ironed until they are completely dry and sorted based on their shape and appearance.
To create birch bark products with your own hands, you will need to prepare various tools:
- knife;
- clamps for fixation;
- square and ruler;
- pencil and awl;
- staples and templates.
Additionally, a tape cutter, hole punch, and chisel will be useful.
When working with birch bark, keep dry, clean rags and vegetable oil on hand.
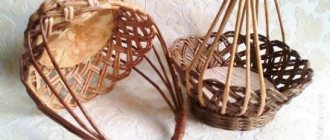
Making a basket
The simplest product is a basket, so inexperienced people should start learning the craft with this item. There are many methods of weaving, but each of them always uses the basic technique of wicker weaving.
Such models are mainly used for collecting and carrying fruits, mushrooms and berries. They often contain food for a picnic. The baskets are quite convenient, and they are not very difficult to make. Start weaving the product from the bottom. Perform step-by-step actions according to the scheme:
- To begin with, take exactly eight rods of medium thickness. Then the middle is measured in four of them and a small hole is cut out using a knife. The remaining branches are inserted into this gap. The result should be a kind of cross.
- This cross is braided with two thin rods. After making 2-3 turns, it is necessary to separate the branches. As a result, the design should look like the sun, which has exactly 16 rays.
- They continue weaving according to the same principle, only now they braid each twig separately. In this case, it is necessary to ensure that the distance between the branches is the same.
- As soon as the rods run out, it is necessary to weave new ones. To do this, take new material, sharpen its tip and insert it into the two previous rows of braid, and simply cut off the remaining tip of the old one with pruning shears.
As a result, the bottom of the basket has 16 rays, but working with such a number is not very convenient, so it’s worth weaving another twig. To do this, you will need an awl. With its help, you need to place a branch between the rods in the two previous rows. Now weaving continues, but 17 elements are already involved in the work. The bottom is woven to the required size.
After the basket has a bottom, they move on to weaving the side part. During the work, medium-thick vines are also used. The process begins with sharpening the tips, then you need to insert the twigs into the weaving, and each knitting needle should have its own willow element. If the branches have a curved shape, then it is better to place them with the concave side.
All old ends are cut off at the very base. Further weaving is performed as follows: the new knitting needle must be bent to the left and passed under two adjacent branches, and then slightly bent upward. The same manipulations are done with the remaining knitting needles. The work process will be much easier and faster if all the rods are collected in a bundle and taken out one at a time.
The vine on the sides of the basket should be thicker than the vine on the bottom
It is best to form the walls into three willow vines, then the base will look more neat. To do this, you need to place them along the knitting needles, which are located next to each other. Now the left branch is taken. It is carefully bent to the right side, placed in front of two adjacent twigs, pulled behind the third and pushed forward. Do the same with neighboring branches. When the basket has two woven rows, the bundle should be untied and work continued in the usual way.
Now, for each knitting needle, one more branch is added; it is advisable to select a vine of the same size and length. The elements are woven one at a time, taking into account that their direction of growth moves along the left hand. The butt end of the twig is laid first behind the first knitting needle, the second is circled in front, and the third is again circled from the back. The next vine is already brought behind the knitting needle on the right and continues to be woven in a similar way. New willow branches are gradually woven in until the row is completely braided.
You can get a good basket if you weave it according to all the rules
They continue to weave with regular knitting, and you can start work from any branch, but you need to braid it first on the left side, using the same technique: forward, back, forward. Then the right element is woven according to the same pattern. Work continues until the basket reaches the required height.
The final stage is tying the edges. There are many ways to help finish braiding, but for beginners it is better to use the simplest one. To perform the binding, you need to perform the following steps:
- one knitting needle is selected and bent down to the right, and it should be behind the next two branches;
- then it is taken out again, but in front of the next two branches;
- Now the knitting needle is held behind one vine back and forward again.
Birch bark crafts
Original and simple products made from birch bark will serve not only as interior decoration, but also as a pleasant souvenir for loved ones.
Crafts made from birch bark for beginners are not difficult, so children can also be involved in creating them.
Birch bark bell doll
Another simple birch bark craft is a bell doll. This product can be a wonderful toy for a small child or just a cute interior decoration. In ancient times, such dolls were considered amulets against diseases and evil spirits, and this is no coincidence, since birch bark has a strong antiseptic and antibacterial effect. If a child holds it in his hands, then it has a healing effect on him.
For the doll you will need a wide birch bark ribbon, 20 to 50 cm long, and additional pieces of bark for the doll's parts, as well as a wooden ball and a stick. Procedure for making a doll:
- Soak the birch bark for 20-30 minutes in water until it becomes soft.
- Prepare the workpiece - glue the ball to the stick with PVA glue.
- Cut patterns on the tape with a knife.
- Twist the tape in a spiral to form a cone. It will be necessary to make 3-7 revolutions, thanks to this the product will be strong.
- The edge of the tape is secured with PVA glue. After this, the stick with the head is inserted into the cone.
- Two slightly smaller cones are made from small pieces of birch bark - these will be the sleeves. They are attached to the body using glue.
- Three thin strips of birch bark are cut out, from which the doll's braid is made. It is also glued to the head.
- At the end, you need to make a handkerchief from birch bark and paint the doll’s face.
For a child, such a doll will become a real friend, especially considering that he made it himself.
Birch bark products
After trying your hand at simple crafts, if you wish, you can move on to more serious creative ideas.
Products made from birch bark are safe for health, practical and original looking. They will not only serve as interior decoration, but will also find their use for domestic purposes.
Body for berries
The product is not difficult to manufacture and will be useful in the household.
To work you need to prepare:
- birch bark leaf;
- birch bark tape;
- knife and scissors;
- awl or hole punch;
- clothespins or office clips;
- pencil.
Operating procedure.
- Cut a rectangular blank of the required size from a birch bark sheet and roll it into a cylinder.
- Fold the edges overlapping and secure with clothespins.
- Punch holes at equal distances from each other.
- Secure the seam with a birch bark ribbon (its length will be 2 times the height of the workpiece).
- At the bottom of the cylinder you need to cut the bark in 4 places and bend it inward.
- The edges of these folds are pierced and connected with ribbons.
- A couple of holes are punched in the upper part opposite each other and the tape is passed through them. This is the body handle.
If desired, it is easy to add a round lid to the box. It’s also easy to make a lid from birch bark by cutting out a round piece of the required diameter.
Casket
A homemade birch bark box is a pleasure to use for storing various small items and decorations. It's not very difficult to make it. It is important to first think through its appearance and design.
You can take this master class as a basis for your work.
- You need to make a template from paper. To do this, cut out 4 identical circles (their diameter is 6 cm) and a pair of strips 35 cm long. The width of the first strip will be 5 cm, and the second will be 2 cm.
- The contours of the blanks are transferred to birch bark and blanks are cut out of it to create a box.
- Round blanks are glued together in twos. This is the lid and bottom of the product.
- Wrap a wide strip of birch bark around the sleeve of masking tape.
- Glue the bottom to the sleeve.
- You can also place a birch bark bottom inside.
- The lid is decorated using a birch bark strip.
The external design of such a box depends only on the imagination of the master. It is easy to decorate the lid with birch bark flowers or carved elements.
The warmth of native nature
Working with birch bark is surprisingly pleasant. It is a living, warm material, flexible and responsive. Under the hands of a master, it takes on any desired shape. Preserving folk traditions, modern craftsmen come up with new techniques and unusual uses of birch bark. Once you try it, it will be very difficult to stop, because birch bark fascinates and inspires you to create beautiful things.
Souvenir magnets
Original and easy-to-make crafts can decorate the interior, adding a touch of originality to it. With such a gift you can please your loved ones with or without a reason.
To work you need to prepare:
- cardboard and birch bark blanks;
- PVA glue;
- knife and scissors;
- pencil;
- awl or hole punch;
- small magnet;
- sharpener;
- birch twig;
- acrylic paint.
Operating procedure.
- Cut a small base from birch bark for crafts of any shape.
- Cut out a base-substrate from cardboard and glue it to the wrong side of the workpiece.
- Glue the prepared small magnet to the cardboard.
- Carefully sharpen a birch twig using a sharpener so that you get beautiful spiral shavings.
- The edges of the birch bark blank will be lightly painted with acrylic paint, emphasizing the texture of the material. This is easy to do with a foam sponge or brush.
- Glue improvised roses from shavings and glue them to birch bark.
By showing a creative approach, it is easy to make various souvenir magnets, complementing them with birch bark ribbons or jute cord.
Fantasy or pictures of birch bark will help you come up with scenes for such souvenirs.
Wall panel
Birch bark panels are a great alternative to art paintings! It will not only decorate the wall of your home, but also bring an element of eco-style to the interior, giving a touch of freshness and unity with nature.
To create a panel you will need:
- thin birch bark blanks and birch bark chips;
- pencil and paper;
- cardboard (can be colored);
- scissors or knife;
- PVA glue and glue gun;
- wooden beads, beads for decoration (optional).
Stages of work:
- PVA glue is applied to the smooth side of the cardboard and birch bark chips are poured. If colored cardboard is used, the color should contrast with the birch bark. A good combination would be light bark and a blue, black or chocolate background.
- While the glue dries, elements of the plot of the future panel are drawn on a sheet of paper.
- They are then cut out and traced onto a birch bark blank.
- The resulting drawings are also cut out on birch bark.
- After that, they are glued with a glue gun, embodying the intended plot.
- To give the panel a 3D effect, it is best to use birch bark of different shades.
- If necessary, you can decorate your creation with decorative elements (beads, seed beads, etc.).
Children's boat
From birch bark you can make an excellent ship that is not afraid of water and can go on a real voyage.
To work you need to prepare:
- birch bark sheets of the required size;
- ship parts templates;
- awl or hole punch;
- pencil, scissors, glue;
- ruler;
- a small sheet of plywood and wooden sticks.
Operating procedure.
- Using a template, cut out two parts of the ship's hull from birch bark.
- Make matching holes on both halves.
- Connect the body parts using birch bark strips.
- Insert spacers made of wooden sticks inside the body, securing them in special holes.
- Turning the workpiece over, glue the bottom of the ship.
- Complete the craft with a deck on which it is easy to attach the mast.
- Mark sails made of thin birch bark on the mast.
- The product can be placed on a plywood stand. It’s easy to add stones and shells to the pedestal.
- Add a cardboard anchor to the sailing ship.
Using a similar technology, it is not difficult to make a play dollhouse or an entire settlement of gnomes from birch bark blanks.
Tools for birch bark crafts
The first experience of creating crafts does not require many tools. You can limit yourself to a sharp knife, scissors, an awl and tweezers.
Subsequently, when you have serious intentions to create masterpieces, you will need knives with different types of blades, pliers, an additional awl with a curved rod for stitching and round pliers for pulling or leveling layers.
Important: All work with cutting and stabbing tools is done on a backing board.
Birch bark craft ideas
Birch bark serves as a malleable material for making a wide variety of items.
- It’s easy to weave original jewelry from birch bark ribbons: belts, bracelets, headbands, or decorate hairpins and handbags with wicker parts.
- You can develop a lot of ideas for creating boxes, boxes and cases by looking at a photo of birch bark.
- Thin birch bark is used to make original flower bouquets and wall panels, colorful home souvenirs and symbolic amulets.
Products made from birch bark will decorate your home, delight your loved ones and be useful in everyday life.