How to make a paper horse: step-by-step master classes for children. A paper horse on clothespins, a jumping rope horse, a bookmark horse and a paper horse using the origami technique, simply and quickly.
Today we will make a horse together with the children. In this article you will find four master classes on making this fun toy with children:
- Paper horse on clothespin x: making a horse with preschool children.
- Horse - jump rope. We make a toy for playing with children.
- Horse - bookmark . Master class for children of senior preschool and primary school age.
- Horse - a mask made of paper using the origami technique.
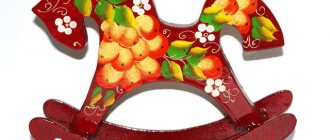
Master class 1. Paper horse on clothespins
The author of the master class is Vera Parfentyeva, reader of “Native Path”, technology teacher, and head of the children’s art group.
Materials and tools for making toys - horses
To make a toy you need:
- thick white cardboard,
- acrylic paint stamps,
- yarn,
- bamboo clothespins,
- hole puncher.
How to make a horse with children: step-by-step description
Step 1. Cut out the horse part from cardboard according to the template.
Step 2. Use stamp paint to paint the part on both sides. Move the stamp from top to bottom abruptly, imitating wool fibers.
Step 3. Draw the eye, the point on the nose (nostril) and the frenulum.
Step 4. Use a hole punch to make several 2-3 holes in the mane area and one in the tail area.
Useful idea. I have a homemade hole punch - a part of a nail is welded to one side of the inside of the pliers, and a hole to size is drilled on the other side. You see this tool in the photo.
Step 5. Cut yarn for the mane and tail.
Step 6. And at this stage we will learn how to tie knots. Using a hook, pull the yarn through the holes and tie knots.
Now the mane is ready!
Step 7. Tie the tail in the same way.
Step 8. And the last step - the horse needs legs! Let's take clothespins. They can be painted the same color as the horse itself. Or you can leave them as they are. Attach clothespins to the horse's body. And the toy is ready!
Clothespins allow our paper horses to stand on their own.
This is what kind of horses the children got.
This is the kind of hippodrome we have!
When making a paper horse craft with your children, remember the poems that describe its appearance, stroke the mane and tail, and tap the clothespins with its hooves. The following poems will help you in making crafts with children:
Skok-skok, skok-skok, tail and mane on the side. How smooth you are, my horse. I will brush with a brush so that your fur shines.
Clack, clack, clack, clack! I am a horse - gray side! I'll knock with my hoof, if you want, I'll give you a ride! Look how beautiful I am, both my tail and mane are beautiful. Clack, clack, clack, clack! I am a horse - gray side!
The horse will ask the foal: “Tell me, my dear, Who has such a mane? Who grows up so beautiful? And he will answer for him: “You, my sweet, yoke!”
I love my horse, I will comb its fur smoothly, I will smooth its tail with a comb, and I will go on horseback to visit.
Creative task for children
What other animals can you make using cardboard and clothespins? And to use knotted yarn?
DIY soft toy horse: how to sew a horse from fabric
A hand-sewn soft horse is not just a product, it is a children's toy that will surely bring joy to your child. This master class on sewing a soft toy represents a standing horse, but you can sew a pillow toy for your baby in the shape of a lying horse.
How to sew a soft horse
To make this toy we will need:
- cotton fabric (plain or multi-colored);
- thread and needle;
- Knitting;
- buttons;
- scissors;
- padding polyester
The pattern looks like this: We cut out the parts, not forgetting to leave seam allowances of 0.5 - 1.0 cm.
We sew everything except the head. Immediately turn out the ears. The unstitched edge can be hidden inside, but this is not necessary.
Now let's move on to the head. We take one part and baste the ready-made ears to the upper part on the front side along the line of the future seam. The result should look something like this:
Now you can stitch and turn out the head itself. Make sure that the tabs only hit the seam where you basted.
We won't need a sewing machine anymore. We turn all the other parts inside out and stuff and sew them up. Please note that the spout does not need padding.
Making a brush-tail. We sew a nose and button eyes to the head of our horse, and legs to the body. The legs are attached through buttons - this will provide additional strength.
Attach the head to the neck and sew in a tail.
The last thing left. We measure how long the mane we need. We find a fairly dense sheet of cardboard of a similar size and suitable width. We wind the thread evenly around it and sew the result along the middle line several times. It is necessary to ensure that all lines overlap each other clearly.
Cut the threads along the edges and remove the cardboard. This will not be difficult to do, since the sewing machine perforated it perfectly.
Sew the mane along the neck and head. We take several threads and bring them forward between the ears. This will be our horse's bangs. Secure with one stitch, as shown in the photo below:
Our soft horse is ready, and most importantly, it is made by hand!
See other interesting horse ideas with step-by-step MKs:
mamaschool.ru
Master class 2. Horse - paper bookmark
In this video master class you will see how you can very quickly and easily make a horse - a bookmark for books out of paper. The horse is made from a small square of paper using the origami technique. It can be done very simply and quickly. And such a horse can be used not only as a bookmark, but also to decorate a holiday table and home.
The video is in English, but it shows the making of the horse step by step in great detail, so everything will be clear. Very simple and original! This horse will appeal to both adults and children. The author of the video is Leyla Torres.
Video on how to make a twitch horse
If you wish, you can decorate the horse by gluing sparkles and stars on it. The twitch horse is ready. Let's go get an A!
Such a cute horse can be made not only for a technology lesson, but also just so that you can have an interesting and useful time and please your parents or younger brothers and sisters with your craft. And if you get creative, you can come up with a whole sea of different twitching animals, drawing instead of a horse’s head, for example, a dog or cat’s face and changing the tail.
Master class 4. Horse - a paper mask using the origami technique, simple and quick
Another great idea is a paper horse mask. The video shows in detail how it can be done. The mask is made using the origami technique, and its production is accessible even to children and beginners in this technique. Video author: Origami 4ik.
Get a NEW FREE AUDIO COURSE WITH GAME APPLICATION
“Speech development from 0 to 7 years: what is important to know and what to do. Cheat sheet for parents"
Click on the link or course cover below to subscribe for free
The author of the course is Valasina Asya, candidate of pedagogical sciences, author of the website “Native Path”
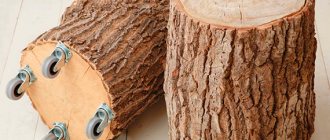
Additions to wooden horses in the garden
The wooden horse on the territory of the dacha looks very beautiful
, but sometimes it’s very lonely. Therefore, you can always complement her figure with some accessories. For example, it could be a carriage or cart, flat or three-dimensional, depending on the type of figure. Also, you can always place a wooden bucket with flowers, made in the same style, a trough with hay, and other additional decor near the animal. But it’s even more interesting to make several figures at once to create a fun company for the cute decor.
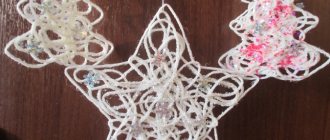
DIY sewn Christmas tree toy pattern
Greetings to all hand made lovers! Today on the DIY time blog there is another New Year’s post - I hasten to share my ideas with you, because... The holiday is just around the corner, and in the near future I will have to abandon the Internet and sit down to sew a New Year's suit for my son. Charming embroidered Christmas tree toys and horses began to appear on the blogs of various craftswomen - it’s simply impossible not to fall in love with them. I really wanted to acquire such beauty, especially since it is a symbol of the coming year! Without hesitation, I drew a pattern and am sharing it with you, dear readers and those who happened to drop by. Calico fabric with a small pattern, a sewing machine and just a little time - that’s all you need to create this little New Year’s miracle. However, don’t force yourself into strict limits: scraps of old jeans, fleece, colorful knitwear - anything will do for creativity! If you use thick or very dense material, the product can be sewn over the edge. Decorate plain work with embroidery, beads, sequins, decoupage...
A small master class, or rather a few tips for beginners. In order to sew a horse, the pattern must be printed on paper, cut out and traced on the wrong side of the fabric folded in half. I did this with an ordinary ballpoint pen. There is no need to make allowances. If you have several toys planned, you can draw them all at once. And now, without cutting (this will greatly facilitate and speed up the process), sew directly along the contour of each animal and rocking chair, leaving holes for stuffing of three centimeters (on the belly) and only after that cut, departing from the machine stitching 3-5 millimeters. In places of sharp bends (the base of the tail and neck), make small cuts and drop a little PVA or textile glue on them (just in case, to prevent the formation of holes). Turn the product inside out, using, for example, a pencil, stuff it with padding polyester or holofiber, sew up the hole with a hidden seam and use it to sew the horse’s legs to the rocking chair. If desired, stitch the mane, having first trimmed it by hand, so as not to make a mistake. That, in fact, is all the wisdom. All that remains is to attach a loop for hanging on the tree. I decorated the toys with melange thread with faceted beads. The knot was tied with a couple of stitches at the base of the neck so that the decoration did not turn into a noose when the craft was hanging.
Well, let's sew a horse? I already have four of them - a small herd, but I’m not going to stop at this number
Today I want to try a slightly different template, if the tests go well, I will also post it on the blog.
You might be interested in their relatives made of cardboard
If you liked the post, please share it on social networks by clicking the buttons below. Thank you!
I am participating in a gallery competition from Natasha. The deadline has been extended until December 27.
Universal task No. 6 “New Year’s decor” from the “Territory of Talents”
4diy.ru