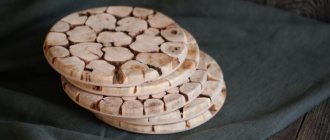
A DIY stump table is an unusual, interesting design. This piece of furniture will enliven any interior and bring it closer to nature. Making such a table will require minimal cash outlay; furniture made from stumps is environmentally friendly, unique and aesthetically pleasing. From hemp you can make a coffee or bedside table, furniture for the bathroom or cottage.
How to make a stump with your own hands for crafts
A few simple methods using available materials will help you create a real forest corner in your home.
Doll stand
The forest throne for Baba Yaga or Little Red Riding Hood is made from corrugated cardboard, PVA glue, toilet paper, rope or old woolen threads.
- Make a mark on the canvas (you can use a cardboard box) 5–7 cm wide and make notches with scissors without cutting the material all the way;
- Leave a hem at the top and bottom of 2 - 4 cm;
- Cut a round tabletop onto the top of the cylinder, and decorate the bottom with a base resembling rhizomes;
Design selection
The design of the entire table can be divided into two components: the choice of tabletop and legs.
When choosing a countertop design, it is important to consider some features of your room and your imagination:
- If you want a round or oval shape, then you should have enough space, because... it has impressive dimensions. Ideal for a large living room or hall, and also harmonizes with the gazebo;
- A small tabletop is a beautiful addition to a small living room;
- The rectangle shape is suitable for all occasions.
When choosing legs, rely solely on your taste. You can make a table with one, two, three or traditionally four legs.
What do you want the final version to look like? This is a purely personal question and depends on your taste and preferences. If you want something unusual, but nothing comes to mind, you can look at photographs of tables made from cut wood and make everything according to the sample.
Decorating a craft made from logs
- Apply acrylic putty to a dry blank. To do this, dilute it with water to the consistency of liquid sour cream. We put two or three layers on top to cut through the “annual rings” of the tree;
- From above, on a still damp surface, we randomly draw a wood pattern with a sushi stick;
- We paint the workpiece with acrylic paints in brown and gray tones;
- Finely chop the green threads and sprinkle on the rhizomes coated with Moment.
When the structure is completely dry, it can be coated with hairspray to better fix the paint.
Master class “How to make a tree stump from cardboard”, watch the video at the bottom of the article
Stumps as chairs
Stumps make excellent stools. You can put small pillows on top of them to make it softer to sit on. Hemp can also be used as decorative chairs, which will be an excellent addition to the interior. The presence of a back will make the stump chair even more comfortable.
If you go to a workshop, you can make an original designer chair or bench.
Papier-mâché craft
If there is no corrugated cardboard in the house, plastic bottles or cups are used for the base of the stumps.
You will need: a drawing of a stump, toilet paper, PVA and Moment glue, acrylic paints. And decorative figurines of mushrooms, insects or animals can be made from polymer mass or cold porcelain.
- Make a sketch of your future craft.
- Degrease the plastic base with an alcohol solution or nail polish remover;
- Dilute PVA in a ratio of 2x2 to part water;
- Tear toilet paper (choose the cheapest gray color) into fragments of 20 - 25 cm and dip, one by one, into the adhesive solution;
- Glue the soaked paper pulp onto the base, pressing it with your fingers so that irregularities are formed that convey the structure of the wood. To make the product expand towards the bottom, start working from the bottom;
- Gently press the top edge with your fingers to form a circle.
Increase the volume of the toy with layers of paper so that grooves are formed. To do this, fold the pieces of paper like an accordion and stick the “bark” horizontally.
Mask the joints with a finishing layer of paper around the perimeter.
Note!
How to make wooden shelves with your own hands - original design options
- Kinusaiga technique for beginners: what is it, a description of creating paintings from threads
- How to weave a figurine from rubber bands: how to learn to weave animals, toys and what you can make from rubber bands on a slingshot
Beautiful examples
Examples of ready-made hemp houses not only inspire, but also help you understand how to make such a garden decoration more original and attractive. Here are some of the most interesting ones.
Forest house
Such a small building will be an excellent decoration for a summer house. It camouflages itself with the surrounding grass and trees, but still attracts the attention of guests. Stone steps lead to a small door; An artificial lantern hangs nearby.
To the left of the door there is a small window in which the light is always on. The house itself is decorated with climbing plants that can be made from polymer clay. To prevent them from being damaged by rain and weather changes, branches and leaves must be carefully coated with several layers of varnish. The same material can be used to create a small chimney.
Additionally, the house is decorated with ordinary moss and stones glued to the base. A single garden gnome will definitely like this building.
Wooden building
The main material used to decorate the house in this case is wood. Doors, windows, balconies, and even the roof are made from it. This cozy building is decorated with small flowerpots with flowers and a figurine of a gnome who admires his possessions from the height of the second floor. The area around the stump is free, but if desired, you can plant flowers there.
Elegant house with lanterns
To make such a house, the stump will need to be uprooted, well processed, sanded and painted. But in the end you will get a real work of art. Unlike previous options, in this house you can see its interior decoration. All the decor is thought out to the smallest detail. There is a small kitchen with a living room, and a bedroom on the second floor.
The steps are cut from the base of a stump. Such a building is installed on a stone slab. There is no need to decorate it, because it is very beautiful in itself. It is enough to attach several mushroom figurines and artificial flowers to the base of the walls - this way the house will look great at any time of the year. If desired, you can supplement it from the inside with several flashlights.
To make the process of turning an ordinary stump into a fairy-tale house faster and more interesting, you can involve children in the work. This is a great way to spend time together and an opportunity to teach your child how to work and develop his imagination.
Cooking cold porcelain
You will need: corn starch, sodium bicarbonate (or baking soda), water, measuring container for bulk products (150g), Teflon-coated frying pan, cutting board.
Step 1
Pour starch and soda in equal proportions into a heated frying pan and pour 200 ml of clean water into the dry mixture.
Step 2
Stir the solution with a wooden spatula until the thickening mixture lags behind the walls of the dish, gradually turning into a dense mass.
Note!
How to properly make a birdhouse with your own hands from scrap materials: we create an original birdhouse according to sketches
How to make candles with your own hands: instructions for making wax, gel, scented, homemade decorative candles with a wick
What you can make from foamiran with your own hands: we create flowers, Christmas tree decorations, snowflakes, three-dimensional paintings (photo + video)
Don't be alarmed by the fizzing soda, this is a normal process of extinguishing it.
Step 3
Transfer the lump to a cutting board, let it cool slightly, and then knead like dough for 5 to 7 minutes.
Step 4
Wrap the finished ball in plastic wrap and leave in a cool place.
Important! To calculate the density and amount of sculpture material, experiment with a small piece.
Model the figures, and when they are dry, paint them with acrylic paints and varnish them.
Stump - teremok
You will need: a stump, a log, a hammer, a saw, a chainsaw, a chisel, a hacksaw, tall grass for a broom, an elastic band or rope, for the path - pieces of roofing felt, fine gravel, a watering can with water, a regular broom, a fence, a brush, paint, toys.
Master Class
- Remove the core from the stump for doors and windows.
- Mow the tall grass and make a broom.
- Place a grass broom as a roof.
- Line the path to the tower with pieces of roofing felt.
- Cut the log into circles using a chainsaw, then lay them out on the roofing felt.
- Fill with fine gravel and sweep the gravel from the wooden circles with a broom.
- Fill with water and leave to dry.
- Put up a fence, paint the tower and place toys as residents.
The tree stump is ready!
Stump in the forest
For little sculptors trying their hand, plasticine can be used for creativity. This material is flexible to work with and allows you to correct mistakes.
First, think about the composition and appearance of the forest inhabitants. There are many interesting pictures of stumps for children on the Internet. Then, decide on the materials.
You will need a set of plasticine (you can use self-hardening mass), cardboard or a thin sheet of plywood for a stand, twigs for decoration, and a set of stacks.
First you need to practice and draw a tree stump and a forest clearing. Once the idea has taken shape, get to work.
Idea #5 – garden sculptures
Anyone can create garden figurines from stumps, but real artists end up with wonderful works of art that amaze with their realism. If you are driven by the desire to simply decorate your area, then you can create a simple image that does not require special skills.
Of course, this magnificent deer calling out in the spring forest was skillfully carved from an ordinary stump by a high-level professional
Making a simple figurine from a stump is not at all difficult. Those who made snowmen in childhood can apply their accumulated experience in this case. The role of hands will be played by twigs, instead of the nose and mouth we will attach twigs, Eyes can be made from brown bottoms from plastic bottles. The role of the pupil will be played by the cork from the same bottles.
All this is attached to the stump with self-tapping screws. On the horizontal surface of the cut, you can simply lay out pine cones, which will imitate hair. This garden guard, which we whipped up, is ready.
But any schoolchild can make such a funny guard for a dacha, and this is precisely why such a garden sculpture is valued
If it happened that you had to cut down a whole row of country trees, do not be sad. This situation also has its positive side. But you now have a large number of stumps located close to each other. And this is not bad at all. Make them into a fairyland for your children, putting into practice all the information that you have already received in this article.
It will be just a wonderful place to play. First you have to clear each stump of bark. For this you will need a chisel and a hammer. The chisel must be inserted between the bark and the tree trunk, then gently tap it with a hammer. The bark will move away from the trunk and soon the stump will completely lose it. Now it can be thoroughly sanded using medium-grit sandpaper for this purpose.
Such an owl could easily become the companion of Baba Yaga herself and settle in her hut, flying out from time to time to hunt
Be sure to remove wood dust formed during work with a damp cloth. The wood prepared in this way should be treated with an antiseptic, which will protect it from rotting.
Now you can start decorating the stump. Let's choose a large stump to turn it into Baba Yaga's real house. Let's take chalk and outline the location of the future windows and doors of the grandmother's hut. Recesses in wood for doors and windows can be made using a chisel and hammer.
We will need pieces of boards from which we will make doors and window shutters. These parts of the future structure can be painted right now, while they are not yet nailed into place. Doors and shutters should be nailed to the places marked on the stump using nails whose heads have been bitten off. When finishing decorating the hut, you can collect branches and driftwood of unusual shapes from the area to stick them around Baba Yaga’s house. Let them portray dense years.
On smaller stumps you can depict heroes of a variety of folk tales or funny cartoon characters. You can decorate these stumps and draw your intended characters on them using paints for outdoor work. The images outside will wonderfully complement the flowers planted directly inside the stumps. How to do this was described in detail at the beginning of the article. You can limit yourself to pots with plants.
Another wonderful composition, made by a professional artist and sculptor, creates a great mood inherent in a small fairy-tale corner of your garden
We'll turn a couple more stumps into children's chairs. To do this, we won’t even cut out the massive back. If you have old chairs, use their backs for this job. They should be carefully freed from varnish, and then, using ordinary nails, nailed to the stump seats. All that remains is to paint the finished chairs in bright colors that children will definitely like.
Simply turn the small remaining stumps into a flock of fly agarics, using bowls or basins of the appropriate size as their caps. Now you know exactly how such fly agarics can be made. That's it, the improvisation on the theme of the fairy tale is ready.
Birch grove
- Roll into a small cylinder from the remaining mixture. There is always little white plasticine, so it can only be used to design blanks;
- Roll the white sausage and flatten it. Wrap the base of the hemp, not reaching the bottom and top by 0.5 cm;
- Form a bark from yellow and brown thin strips: attach the strips tightly to the blank, and then roll on a flat surface to obtain a uniform coating.
Next we arrange the cut of the tree. To do this, roll out two strips, white and black. Place a black ribbon on a white background and twist it into a spiral.
Cool the piece in the refrigerator and cut it into 0.2 cm pieces. Flatten it slightly and secure the top.
Make the rhizomes from white pieces. Make small notches on the roots to make the figure more realistic.
Apply small black dots of plasticine to the bark. Connect the roots to the body.
Make figures of mushrooms or gnomes. Place “Trees” and bushes made of branches on a stand, seat fairy-tale characters around a stump made of plasticine.
Design options
Before you make a house from a stump with your own hands, you need to decide in advance what it will look like.
Door
The main attribute of a garden house made from an old stump is the door. It can be made from a piece of wood. The door can be not only square, but also round or even oval, like in a movie about hobbits. To make it stand out against the general background, it needs to be painted. The most commonly used colors are red, green, yellow or brown. It is best to take acrylic paints, since they are quite stable and are not exposed to moisture.
The finished door must be nailed or glued to the bottom of the house. It can be additionally decorated with a small pen or bell.
Window
A home for a gnome or fairy would not be complete without small windows. It is better to make them match the door. Windows can be painted or decorated with miniature stained glass windows. Pots with flowers or moss attached to the bottom of the windows will look beautiful.
Additionally, you can attach a small wooden balcony to the base of the stump and place a figurine of a gnome or elf on it.
Path to the entrance
In order for the house to fit well with the rest of the garden, there should be a small path leading to it. You can make it from small stones, crushed stone, or simply line the path with moss. If you install garden lanterns on the sides of the path, you can admire your building at night.
Fairy garden
Next to the houses made of tree stumps, you can arrange a whole magical garden. To do this you should use:
- elegant wicker fence;
- flower pots;
- fresh flowers planted around the flower bed;
- garden figures;
- decorative stones of different sizes.
All these ideas can be combined with each other, creating a whole little world on your site.
Crafts made from natural hemp
Wood is an excellent material for making interior decoration items. Sometimes, looking at old driftwood, you don’t even need to come up with a craft. “Artist – Nature” itself suggests ideas for work.
Look at the interesting ideas for DIY driftwood crafts in the photo.
Eco-style seats
Wood can be heavy, so we had to put the ottomans on wheels.
You can make high bar stools.
If you add a little imagination...
And this is the designer’s job.
Lamp from a stump
To make a cozy lamp for your home or garden, you will need dry stump, varnish (best suited is “yacht” varnish, adapted to changes in temperature and humidity), stain, light bulb, socket, and wire.
And also tools: fortune (hand or chainsaw), chisel, sandpaper of various sizes (or grinder), hammer and soldering iron.
Preparing the base
Inspect the structure of the stump for chips and depth of cracks, and then proceed to clear the tree of bark.
- Using a chisel or knife, carefully remove the bark from the stump;
- Use a chisel to knock out the middle from the bottom of the stump to install the light source;
- On the sides of the cylinder, make 3 to 5 cuts in a circle;
- The workpiece is cleaned with sandpaper and then treated with stain (it will give a pleasant shade, plus it will disinfect the log);
- Open the lamp with varnish in 2 – 3 layers;
- Insert the lamp with socket into the center of the product and connect to electricity.
Important! Crafts are made only from dry stumps. Otherwise, the durability of the varnish is not guaranteed. And also the “residents” - bark beetles and other tree lovers.
Making a chair
First you need to decide on the height of the finished product and select or saw off a block of suitable length from a long log. The diameter should be large enough to make it comfortable to sit on. So it’s better to first put the log on its end and try to squat. The simplest option:
- Measure the height of the future seat from the bottom end and make a transverse cut in this place with a chainsaw to the middle or deeper.
- Make a longitudinal cut from the top end to the line of the first cut.
- Remove the cut quarter and sand all the cuts.
If you are making a chair to sit in the forest for a few hours, this design is suitable. But for constant use in the countryside, it is not very convenient: if you make a longitudinal cut exactly in the middle, the seat will turn out to be small, short, and you will have to sit on the edge. If you increase the depth of the seat, you will get a narrow backrest.
And leaning on the flat back is not very comfortable. So it’s better to spend more time and effort to select part of the backrest, making it concave, and making the seat deeper.
If the diameter of the log allows, you can make a chair with a back and armrests, more like an armchair. Various options are possible:
- the top line of the armrests and the side line of the back form an almost right angle, the back is high;
- the armrests smoothly merge into the backrest;
- instead of armrests, a circular back is made, occupying more than half the length of the circumference, its height is the same everywhere.
You can also round the top of the back or give it a more fancy, asymmetrical shape. An irregularly shaped back with uneven edges will look organic if the chair is made not from a smooth log, but from a stump, and its base is not perfectly round, since the trunk branches into roots. In some designs, not only the upper, but also the lower part of the chair is modified. For example, they cut out a part of the log under the seat in an L-shape or U-shape to form 2 supports. Or they choose wood between the seat and the base so that the lower part resembles an hourglass.
The log can be subjected to more thorough transformations:
- make a concave back;
- cut down the front part of the log below the seat and the back part of the back;
- make cross cuts above the base and under the seat and select a piece of wood between them.
Such a chair will be stable and durable, but lighter than products with a monolithic lower part; it can be moved from place to place and put away for the winter. The photo below shows a chair made using this principle by Slovak designer Peter Jakubik. The author worked exclusively with a chainsaw and used a log of considerable size. If you are inspired by this idea, you can try to create something similar using an axe, chisel, or chisel.
Often the bases of chairs are dug into the ground and compacted well, and the area around is covered with gravel. If you plan to make a stationary, sunken chair, when cutting you need to take into account that the height of the finished product will be less than the height of the log placed on the end.
The chairs are made from logs with bark and peeled, and decorated with carvings. To make a chair, you can use not only a large diameter log, but also many small, thin ones. The principle of operation is approximately the same as when making a chair from timber; the seat can be a cut of a thick log, several logs sawn lengthwise and laid with the cut up.
Living flower bed
If there are old or diseased trees left on the garden plot that have not been uprooted, then their stumps can be adapted into an original flower bed, which can become the center of an alpine hill.
When a “vase” for plants is selected, you need to “draw” a stump directly on its surface.
- Step back 5–7 cm from the edge of the surface and draw a circle.
- Mark a hole in a circle with a chainsaw, and then gouge it out with a chisel;
- For 2–3 days, pour saltpeter into the stump. She will “eat out” a place for future landing;
- Add soil mixture and plant the plants.
You can make working with hard materials easier by following simple tips:
- Before working with a chisel, drill as many holes as possible in the center;
- The flower container can be burned out. To do this, saturate the core with gasoline.
Woodcarving craftsmen can show their imagination by cutting out the faces of fairy-tale characters.
Interior items made from branches
Before you start work, select the appropriate material. The main condition is the absence of rot and mold on the branches. In turn, the cracks will add decorativeness to the branches.
- Clean the natural material from excess dust and dirt, and then dry thoroughly. It is best to dry the wood in the shade in a well-ventilated area or even under a canopy, if possible.
- Next, you will need to process the branches with carving. Work in the direction of the fibers, first with a coarse and then with a fine nozzle. Don't forget about the end cuts.
- As already noted, parts can be connected to each other using glue, screws, a wedge, etc.
- After the blanks for the final product are ready and sized for joining, they must be processed. Large cracks that are very embarrassing can be eliminated using epoxy resin in several stages. Once the resin has dried, sand down any exposed areas.
- The next stage is assembling the product.
- The finished piece of furniture must be decorated. To do this, you can use stain, with which you can radically change the color of the wood, without losing all the charm of the texture of the material.
- Finally, it is advisable to use varnish applied in at least two layers.
Your wild imagination, as well as our photos, will help you adapt the branches! Be bold and don’t stop in the face of difficulties!
Pots for flowers
Crafts made from small stumps are in demand among handmade craftsmen. Small flowerpots of different sizes will fit perfectly into an “eco-friendly” interior.
They can be placed on window sills, shelves, or hung on thick ropes or chains.
See the photo for the master class step by step.
Furniture “Three Bears”
Furniture made from sawn wood is very popular. For example, if you screw on furniture wheels and cut out a tabletop from plexiglass, the bedroom will be decorated with two bedside tables or a coffee table.
And chairs made of hemp will fit perfectly into a kitchen in a “rustic” style, which will complement the number of seats when guests arrive.
Stump, as an ornamental material, is very interesting due to its natural properties. It can be decorated to your liking, or you can simply treat it with clear varnish to admire the unique structure of the wood.
Tables and chairs
Untreated wood is an almost ready-made form for creating creative furniture. At the beginning of work, it is advisable to thoroughly dry the wood and carefully process it. Then the products will last you much longer
The simplest option for such fittings is stumps and decks of different sizes. Cut down the stump with an even cut - and the table and chairs are completely ready to perform their direct functions!
The excessive asceticism of hemp stools and benches can be smoothed out by backrests, comfortable seats or soft pillows
In the following photos we will admire the designer handmade collection
Attach the tabletop to a piece of large driftwood and your rustic design will be flawless
For stability, make neat, even cuts on the original stand
If you manage to get a wide log, make a tabletop for a summer kitchen or a surface for a bar counter
Small branches are perfect as components for chairs. Use larger ones for the legs, connecting them into one
Pots made of rotten stumps
Nature itself will give you interesting ideas. Moss and vegetation on the stumps refresh the old tree. Its rotten center inside is an excellent option for a flowerpot. All that remains is to plant your favorite plants, but only in a pot to avoid destruction of the wood. Massive branches with graceful curves give us an idea for fencing. Strength and reliability, together with natural beauty, make wood an ideal environmentally friendly basis for paving. The cuts should be smooth, and it is not at all necessary to process them, then the rough surface will not be slippery during rain
Non-standard spruce
Impressive arch
Stump: photos of crafts made from natural materials
Please repost
0


