Details and structure of the unicycle
The structure of a unicycle consists of a wheel, connecting rods, frame, pedals and saddle. The difference between a unicycle wheel and a bicycle wheel is direct transmission - the axle and hub are combined, so the rotation of the pedals is directly transmitted to the wheel. The frame is similar to the fork of a two-wheeled bike, the saddle mount is located at the top of the frame. The steering wheel does not direct movement, but helps control the unicycle as an additional point of support.
Optional equipment:
- Trunk
- Klaxon
- Headlights
- Wing
- Reflectors
- Brake
Unicycle saddles differ from bicycle saddles; their ergonomics are designed for an upright rider position. There are no foot supports due to frequent jumps when losing balance.
Selecting your type
The main use of unicycles - performing acrobatic stunts in circuses - made it a circus stereotype. But among amateurs he has more and more fans every year. When choosing a bike for your daily walks, consider the terrain you plan to drive through.
Performing a trick
- For jumps and drops, structures made of durable metals are used; they are equipped with wide rubber that serves as a shock absorber.
- Freestyle. Models with a high fork are used here. The wheel diameter is selected according to the driver's height.
- Varieties for walking are equipped with tires with a large radius. This makes it possible to get more wheel revolutions with a small scroll.
- There are also mountain unicycles. Like the previous type, they are equipped with large, tall tires and durable components. Landing cushioning is essential when riding in this type of terrain.
There are less popular models. The simplest of them is ultimate. Essentially, it's a wheel and two pedals, no saddle or frame. The most high-tech ones are equipped with computers and other gadgets.
Modern manufacturers produce one-wheeled models for every taste. You can do it yourself or choose a ready-made design. But don't think you can buy it for half a bike. Professional unicycles cost good money.
Materials used from the site https://unicikl.ru.
Electric motor installation
Using a gasoline engine when creating a motorbike with your own hands “kills in the bud” the idea of an environmentally friendly vehicle. Therefore, models with electric motors are becoming more and more common. The development of modern technologies makes it possible to do this.
The principle of installing an electric motor is similar to that of gasoline engines. For this you will need, in fact, the motor itself, a battery, control parts, and a controller.
How to choose a unicycle?
First you need to decide on the type of ride, and according to this criterion, choose the type of unicycle. The optimal wheel sizes for beginners were discussed above, but this is not the only criterion - the size of the unicycle must match the length of your leg. You need to choose according to the length from the crotch to the floor in the shoes, and not according to the measurement of the trousers:
You also need to decide what you want to do on your unicycle. A short guide to wheel sizes:
- 12″: designed for preschool children, not really suitable for outdoor activities, it needs a flat surface. By the way, the smallest unicyclist was only 18 months old.
- 16″: unicycle for children from 5 to 8 years old, suitable only for ideal road surfaces or indoors.
- 20″: The most popular size, ideal for both training and sports. There are many tires sold in this diameter. Such models are already quite fast and suitable for tricks, but they are also easy to store and transport.
- 24″: A universal size among adult unicycles. Good for outdoors and rough terrain, but great for indoors. It's too big for freestyle and tricks, but it's suitable for training and Muni.
- 29″: a good diameter for long trips, the large wheel is fast and smooth on the road surface. For trained riders.
- 36″: Ideal for long walks, everyday riding and speed riding. Not for beginners.
If the wheel is too small for you, riding it will feel like riding a child's tricycle. With a big one there are other problems - it is difficult to maintain balance and maneuver. The choice of frame height is no less important - a seat stand that is too high will not allow you to control the unicycle steadily, a small stand will make you feel like a clown in the circus and will cause pain in your knees.
A few words about unicycle saddles. The seat for a touring model and regular riding should be wider, like the Kris Holm Freeride Saddle. Stunt models are equipped with narrow saddles, and freestyle ones are also equipped with plastic ones.
Long legs are not a death sentence. Buy a higher frame to suit your dimensions for any wheel. It’s nice that there are no weight restrictions for unicyclists. If you are heavier than 100kg, just choose a Muni or a fortified freestyle.
Popular models of motorized sleds for fishing
The most popular models that are in demand include:
Half of the models will be discussed in more detail below.
Snowstorm
- The unit is quite simple to operate, even a beginner can operate it.
- The model is equipped with a pair of skis that can move on snow without any problems.
- Can be transported assembled in the trunk of a car.
- The transformation from assembled to disassembled takes only 3 minutes and can be done by one fisherman.
- The cost varies from 50,000 – 60,000 rubles and depends on the place of purchase and the manufacturer.
Tourist
- The design is quite durable and at the same time lightweight.
- It does not consume a lot of fuel, which is a definite plus.
- It starts even with a big minus on the street.
- The footrests are suitable for large shoes.
- You can purchase such a device for 80,000 – 95,000 rubles.
Husky
- Unlike the above, the smallest one can fit even in a small corridor.
- The initial assembly takes 2-3 minutes, and later, after getting used to it, this task can be done in a minute.
- It moves through snow that reaches half a meter in length.
- Perhaps an additional trailer attachment with which the motorcycles can transport 300 kilograms.
- Price 50 – 55 thousand rubles.
Free control
Now it’s time to learn how to ride using pedals. Select medium gear and gradually increase your speed while performing the previous exercise (one-leg push off the ground). The distance traveled will increase, and the bike will no longer fall on its side. This is a great time to put your other foot on the pedal and start revving. After several attempts and a couple of rotations, you will definitely understand that the question of how to learn to ride a bicycle is no longer troubling.
In cases where a friend or instructor helps you master the bike, there is another teaching method. They must support the vehicle by the frame or saddle and run behind it. Over time, the bike quietly releases and the movements become completely independent. The main thing is not to panic, otherwise you will fall.
The next step is to learn how to turn. This can be done not only by the steering wheel, but also by tilting the body. The first option is good to use at low and medium speeds, and the second - at high speeds. You need to start with short radii, aiming for wider and longer ones.
Having done all the exercises confidently, increase the distance. Set a goal to drive 100m in one direction, then turn around and get to the start. If everything went well, you can fully enjoy riding, improving your skills in daily walks.
Motorcycles for fishing with riding in the snow - description
It is often used by fishermen and hunters in winter to move long distances on ice. Traveling by car is not only unsafe, but in some cases it is impossible due to the lack of access to the entrance.
Motorcycles resemble in appearance a combination of sleighs and skis with a motor. They are available with both automatic transmissions and CVT, which is more convenient and cheaper.
Design Features
The features include the mandatory components of such a vehicle, without which it will be impossible to move properly:
- The motor is what sets the device in motion. If you make it yourself, an engine from a moped will be suitable, which will be resistant to frost;
- The gas tank is where the liquid is poured. You can use a gas tank purchased in a store or from scrap materials. You should absolutely not use plastic containers that cannot withstand fuel.
- Wheels and skis are what motorbikes use to move around. You can use absolutely any wheel, but a car wheel is best;
- Skis should be stronger, so it is recommended to take mountain skis;
Dimensions and weight
Sizes may vary depending on the model range. The average assembled size is 1500x750x600 mm, in working condition 2700x650x750 mm.
The weight of the product itself also depends on the brand and power, for example from 65 kilograms to 120. The weight that can be transported is 20-40 kilograms.
Movement speed
The maximum travel speed in the minimum configuration is 20 - 25 kilometers per hour, and in the maximum configuration 70 - 80 kilometers per hour.
What does a unicycle bike consist of and its varieties?
When a person unfamiliar with the term “unicycle” hears this word, complex associations may arise in his imagination, even to some unusual motorcycle. In fact, this is the simplest design:
- wheel;
- pedals;
- drive carriage mechanism;
- “frame” – adjustable stand;
- seat.
This is what a classic unicycle looks like, where not only is there no second wheel, but there is also no steering wheel, brake or drive chain. Riding it requires constant pedaling and precise balancing.
However, the classic is just a standard; in fact, there are other varieties:
- unicycle with steering;
- a one-wheeled bike with brakes under the seat;
- combined option – steering wheel + disc brake;
- with chain drive;
- electric unicycle.
The listed options are equipped with additional devices for an easier and safer ride. Another modification of the standard one-wheeler is called the ultimate, which consists only of a wheel and pedals.
A very interesting model is the “hamster wheel”, or introcycle - the cyclist is inside. The drive is located in sliding engagement with the wheel, due to which it moves freely.
The history of introcycles dates back to the 19th century (designer - Lewis Harper)
Unicycles with brakes and steering are equipped with freewheel hubs to allow coasting. The brake is performed only in the disc version, since it is impossible to brake with “pedals backwards” on a unicycle, and there is nothing to hook the rim structure onto. The claw is located under the saddle or on the handlebars (for bikes with steering).
Electric unicycle – wheel motor with footrests
The speed of a unicycle is directly affected by the diameter of the rim, since the geometry of the frame is reduced to a minimum, and in the case of the ultimate, the frame is completely absent. The dependence of speed on wheel size on classic monobikes is especially clearly expressed:
| Wheel size, inches | Average pace, km/h | High pace, km/h |
| 20 | 6,4 | 13 |
| 24 | 8 | 16 |
| 29 | 12 | 24 |
| 36 | 17,6 | 35 |
A unicycle is inferior in speed to a standard bicycle, and only a 36-inch wheel puts it on par with a full-fledged bike.
What are they needed for
To begin with, why install an engine at all?
- The first is, of course, speed. With a good engine, a bicycle can reach speeds of 40-50 km/h without the participation of the cyclist. This is interesting both when walking on a weekend, and on the road from and to work, when you need to get there quickly, inexpensively, and also, preferably, without sweating. Some even go to work with the help of a bicycle engine, and return home pedaling to their heart's content.
- The second is saving energy. Not everyone uses a bicycle as an extreme endurance trainer. You just want to ride for fun, but sometimes this is not so easy to do when the landscape consists of drops, gullies and hills with long climbs. To compensate for the environment unfriendly to poor sportsmanship, the engine is very pleasant to use.
- The third - quite conditional - is the passion of modern riders for progress and uniqueness. The times of homemade mopeds in every yard, described at the beginning of the article, are long gone, and having a motorized bike, and even assembled with your own hands, is very, very cool.
Some more practical tips
Youtube is full of videos where the wheel, after an unsuccessful ride, rushes, somersaulting, for dozens of meters. And with a leash, the wheel will be more intact and passers-by will not be harmed.
- In the last pictures you saw how the wheel rests on your leg. If there are no soft pads on the wheel, you need to either install them or put soft pads (such as knee pads) on your legs to protect the inside of the shin. Otherwise, you are guaranteed to suffer and get some serious bruises during your studies. By the way, while studying, it is advisable to wear protective equipment for the knees, elbows, hands, gloves and a helmet, and at speeds of more than 20 km/h it is already mandatory. With the bones on the feet, the footpegs also sometimes come into noticeable contact - boots or high boots would not hurt first time.
- How to put your foot on the wheel stand? For better handling - close to the wheel. And in the longitudinal direction - in the middle of the footrest. If you move your foot more forward, the wheel will gain speed more actively, but it will be more difficult to brake. If the foot is shifted more back, it will be easier to brake and more difficult to accelerate. (More difficult - I meant you will have to tilt your body more.) Over time, you will determine a comfortable position for yourself.
How to learn to ride a unicycle?
Theory alone won’t do it, but there are several really important details when mastering a unicycle:
- You must learn to keep your weight on the saddle and not on the pedals.
- You need to sit perfectly straight, as if the stand is an extension of your tailbone.
- Once you start moving, keep pedaling—the forward momentum helps you maintain your balance.
- The ideal place for the first training is a narrow long corridor in which you can reach both walls.
- Don't look down, just forward. This rule works wherever it is necessary to maintain balance.
An excellent article on the topic of learning to ride a unicycle on the jugglers website, I highly recommend reading it. The author of the article interviews several professional unicyclists, and each of them describes in detail their method of training. We can say that this link is a comprehensive theory that remains only to be tested in practice. Everyone says that mastering a unicycle is not difficult, but learning is not linear - a breakthrough happens after several unsuccessful attempts and everything goes like clockwork.
Family active holiday on unicycles
Didn't say anything about prices. The cheapest unicycle of the Beginner level costs about $80, the most expensive of the Kris Holm series is $770. I often see almost new used unicycles for sale on flea market sites, for some symbolic money. It makes sense to start even with a used bike to understand whether it is for you or not.
Do-it-yourself motor sleigh
Many people living in cities and villages, where there is more snow than asphalt, are concerned about the question of what to get around on. The ideal option is a snowmobile. But not everyone can afford such a purchase. At such a moment, it is worth remembering what our fathers did in such a situation. And they made motor sleighs. Yes, you can buy them ready-made. But the problem is that not all cities have them on sale, since this is a new product on the market, and besides, homemade ones are always better. Therefore, if you have certain skills and experience, you should decide: “We make our own motor sleighs.”
Learning to keep balance
The baby can learn this in two ways:
- Start straight away with a two-wheeled bicycle. This method is well suited for areas with a lot of unevenness.
- Teach your child to ride a runbike. This is a mini-copy of a bicycle, which is distinguished by the absence of pedals. There are two types of runbikes:
- small-sized, toy ones that you can ride around the yard or apartment;
- large, similar to a real bicycle, suitable for riding in the yard and street, they can be rented in various parks.
Small runbike
Such bicycles look bright and funny, so the child will certainly be captivated by the idea of riding such a vehicle. There is another significant plus - the leg muscles will be prepared for the tension that will arise when pedaling a bicycle.
If you want to teach your child to balance on a simple bicycle, then follow this plan of action.
- When the child is already confidently sitting on a bicycle, teach him how to get on and off it correctly. Then tilt the bike in different directions so that the child places his foot on the ground on the side of the inclination, placing emphasis on it and preventing himself from falling.
- Encourage your child to balance on his own. Let go of the bike and let your baby put his feet on the pedals. When tilting the bicycle, the child must orient himself and lean on the ground with his foot. Provide support if necessary.
- Now start learning how to use the brake. This can be difficult because your child may find it easier to brake with their feet or jump out of the seat than to use the pedal. The brake must be a foot brake, not a hand brake, so that the child does not accidentally press the hand brake at the wrong moment.
- When learning to brake, carry a bicycle with your child sitting on it and ask him to apply the brake and immediately place his foot on the ground. As soon as your child presses the brake pedal, release the bike.
Friction transmission
This type of electric drive, although found on sale, is not particularly popular.
Its principle is simple. The engine is installed directly at the drive wheel, torque is transmitted directly from the stator shaft to the tire. It would seem that everything is simple and obvious. But what may be applicable for children's electric cars and bicycles is of little use in the actual use of transport. Judge for yourself:
- There are no transmission links, that is, the possibility of increasing the angular speed of the wheel through the use of gearboxes is excluded;
- Extremely low efficiency;
- Even a slight drop in pressure in the wheel chamber will dramatically reduce the efficiency of such a drive.
- Constant friction between the engine clutch and the tire tread dramatically reduces its durability.
- In conditions of wet weather, dirty roads, frost, the friction coefficient will decrease significantly, the clutch will slip, which will reduce the already low energy output of the drive.
The only advantage of this system is its ease of installation, which does not require any major modifications to the bicycle.
No, if you are planning a modification with real improvements in the performance of the bicycle, it is better to immediately abandon such a scheme.
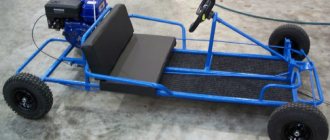
Turning a bicycle into a unicycle
Curious experimenters will certainly be interested in how to make a bicycle with one wheel with their own hands. An unnecessary two-wheeled bicycle sits in the corner of the garage. Throw it away or give it a second life? Let's use the second option and do it in an unusual way - turn it into a unicycle.
To modify a two-wheeled bike into a one-wheeled one, we use the formula:
Bicycle minus front wheel, diamond and handlebars = unicycle
To work you will need:
- keys for removing the steering wheel and fork;
- connecting rod and carriage pullers;
- metal cutting;
- sandpaper;
- welding machine;
- vice.
Since the work will be dusty, we stock up on a set of napkins and kerosene.
Let's get started: 1. Completely free the frame: remove the fork, wheels, connecting rods, chain.
2. Using a metal cutter, cut off the back and front parts of the frame. In our work we only need a seat tube with a carriage and a front fork.
A unicycle is assembled from this
3. Expand the fork in a vice under the rear wheel.
4. Clean the paint from the bottom of the carriage cup, then cut a circle with the diameter of the fork tube.
5. At the upper end of the fork, cut a hole to fit the circumference of the carriage cup. By the way, before welding you need to disassemble the carriage.
6. Weld the front fork with the carriage cup. Next, you need to check the strength of the weld under load: fix the ends of the structure on two chairs, place the welded unit in the middle of the canopy and lay a brick. You can also stand on the structure. The welding must not break, otherwise repeat the procedure.
Be sure to check the weld seam
7. Install the carriage and connecting rods with the drive sprocket.
8. Attach the rear wheel to the fork dropouts.
9. Pull the chain between the sprockets. Remove links on a chain that is too long using a wringer.
The do-it-yourself unicycle is ready - we got a unicycle with a chain drive. In addition to this, this bike can be coasted.
Recommendations
Some tips on how to properly carry out maintenance to extend the life of your motorized towing vehicle, from professionals.
Track Maintenance
- In order for the caterpillar belt to work for a long time, you should adhere to a number of basic recommendations.
- Before you start operating (once a day), inspect the condition of the chassis: “stiff” rollers or loose bolts can become a source of caterpillar failure. After a break in operation, it is necessary to clean the track and elements of the suspension system from the ice crust.
- During winter or summer storage, do not allow the caterpillar belt to be exposed to direct rays of the sun and oils, fuel and other petroleum products for a long time.
- Over time, the track stretches and needs to be tightened.
- You can check the tension by measuring the sag of the track. A sag of 2 to 5 centimeters can be considered standard.
- It is worse to tighten the track too much than to loosen it too much, since this leads to stretching of the element and breakage of the driven and driven axle bearings.
- If the caterpillar has stopped making revolutions, this indicates a breakdown of the chassis. The main factor in its braking is the malfunction of the shaft supports or bogie rollers due to moisture penetration inside.
- You need to regularly inspect the condition of the chassis by rolling the motorized dog with your hands. It should also be easy to ride by hand with the chain and belt removed. Once every 12 months or every 40 hours of operation, maintenance of the undercarriage of motorized dogs should be carried out.
Motor Maintenance
The key rules are easy to learn. The first thing that needs to be monitored, in addition to refueling, is the oil level. To do this, unscrew the plug and look at the dipstick. Add oil to the required level. We change the oil every 5 tanks of fuel used.
A common problem is the air filter becoming clogged with tiny snow particles or the appearance of an ice crust. Signs: unstable operation, smoking, difficult to start. Dry the filter or install a new one.
Chain tension
The dog chain communicates rotational movements from the drive sprocket to the sprocket connected to the driven link; it should not be too tense, since the load on the bearings of the driven part of the CVT gearbox increases, and it should not be allowed to sag. The chain is tensioned by raising/lowering the right lobe of the hub, the driven part of the CVT gearbox. Over time, the chain can stretch and should be tightened.
Transmission Maintenance
Protect the CVT gearbox and its mating part from dirt, monitor the cleanliness and integrity of the aluminum discs, chain and drive belt of the CVT gearbox, wipe with a cloth after completing each drive, and prevent oil from getting on the belt and discs. Lubricate the shaft and cheeks as needed. Excessive amounts of lubricants can cause problems.
The uncovered chain drive requires constant maintenance and adjustment. Keep an eye on the chain tension.
After any trip, wash the chain with gasoline and lubricate or wipe the chain and profiled wheels. It is always advisable to take a backup circuit with you.
Keep an eye on the detachable connections, clean and let the motorized dog dry after any trip, store it horizontally in a dry, ventilated place, and your motorized towing vehicle will serve without breakdowns for many years.
Assembly steps
So, the future unicycle lover should have at his disposal an old two-wheeled bicycle and a set of tools.
Wheel, fork, saddle and pedals
It is important to immediately decide on the method in which you will make your new hobby. There are two generally accepted ones:
- based on an extended front fork;
- using the rear triangle
We will briefly consider the first option. You will need a carriage, pedals, saddle, bearings and some other components. Particularly creative creators design their two-wheeled vehicles with a steering wheel, which is brought forward by welding.
Remove the fork and widen it slightly at the base. Experts recommend a fixed width of about 130 mm. The rear wheel will be installed in it. You can use different wheel diameters, some models have less than 12 mm. We clean the carriage of all unnecessary parts. Only the seat tube should remain on it. The main spare parts for the unicycle are ready. In the next step you will need welding as these parts need to be connected. Drill a hole in the upper part of the fork with a diameter equal to the diameter of the carriage
Use special drills, but if you decide to work with improvised means, then a round file is perfect. At this stage it is important to align the chain line. It should be perfectly straight
Aligns along the axes of the carriage and the top of the fork. Having connected both parts through a pre-made socket, proceed to welding.
The next step in assembling a unicycle with your own hands is to create a fixed gear. If a unicycle has a large number of gears, it will be difficult to control. This implies the absence of stars of different diameters. The pedals are attached to the wheel in both directions. The usual rear brakes are missing. You can ride both forward and backward. Braking on a unicycle requires certain skills. The brake is controlled by changing the direction of pressure on the pedals. Overclocking works on the same principle. Of course, high technology has done its job, you can buy a model with brakes, but we are talking about classics here. The parts that complete the hub are securely attached there: connecting rods, rim, spokes and others. There are several ways to set up fixed gear. The simplest and not the most accurate is to weld a ratchet.
The main problem with unicycles: chain drop
Most products of this kind have one problem. The chain falls on them. Moreover, minor differences in length can make riding a unicycle impossible. So the next step is to add dropouts. Weld them to the bottom and bolt them to the top through special holes. This will fix the straight line of the chain, not necessarily that it will work, but try it.
Additionally, this problem is created by the presence of stars in different planes or their backlash. Professional unicyclists recommend using 28-tooth sprockets.
A good way would be to change the position of the front fork. Adjusting the angle will either tighten the chain or loosen it.
Special attention should be paid to the saddle. On a unicycle, the load goes along the spine and ease of landing is an important component of unicycles
DIY motorfins drawings
Euro-made products - only the best home-made products of the RuNet!
How to make it yourself, master classes, photos, drawings, instructions, books, videos. We make a snowmobile with our own hands - it couldn’t be easier!
I made this snowmobile literally in a couple of weekends in the garage at the dacha. Although its design at first glance looks very simple, nevertheless, in terms of cross-country ability in deep loose or wet snow, it is not inferior to most industrially produced snowmobiles.
Several years ago, I built a snowmobile for my nine-year-old daughter with a homemade track made from conveyor belts and plastic water pipes as lugs. At first I had doubts about the reliability of such a track and how the plastic parts would behave in the cold. But during two years of winter operation, no breakdowns or severe wear of the pipes occurred. This inspired me to create a light snowmobile for myself with the same homemade track.
Understanding full well that the smaller the mass of the snowmobile and the larger the supporting area of the caterpillar, the better its cross-country ability in loose and deep snow, I tried to make the design as light as possible. The operating principle of the snowmobile is very simple (Fig. 1). There are four wheels installed inside the caterpillar, which, when moving, roll along a conveyor belt on which lugs are attached. And the caterpillar drive from the motor is carried out by a chain through the driven shaft using special drive sprockets. I took them from the Buran snowmobile.”
With an engine from a conventional walk-behind tractor with an automatic clutch with a power of only 6 hp. you won't accelerate quickly. I planned to ride the snowmobile not on compacted paths, but on loose snow, so I abandoned the soft track suspension and skis to reduce the weight of the snowmobile and simplify the entire design.
First I made the caterpillar. A plastic water pipe with a diameter of 40 mm was cut into blanks for lugs 470 mm long. Then I sawed each piece lengthwise with a circular saw into two equal parts. Using the device shown in Fig. 2, I used a wood circular saw to cut plastic pipes for lugs lengthwise.
I attached the lugs to the conveyor belt with two 6 mm diameter furniture bolts with a large semicircular head. When making a caterpillar, it is very important to maintain the same distance between the lugs, otherwise they will run into the teeth of the drive sprockets and the caterpillar will begin to slip and slide off the rollers.
To drill holes in the conveyor belt for mounting bolts with a diameter of 6 mm, I made a jig. The holes in the tape were drilled using a wood drill with a special sharpening.
Using such a jig, you can drill 6 holes in the conveyor belt at once to attach three caterpillar lugs.
At the store I purchased four inflatable rubber wheels from a garden cart, two drive sprockets from a Buran snowmobile and two sealed bearings No. 205 for the caterpillar drive shaft.
I asked a turner to make the drive shaft of the caterpillar and supports for the bearings. I made the snowmobile frame myself from 25x25 mm square pipes.
Since the axes of the ski and steering hinges are on the same line and in the same plane, you can use a continuous tie rod without ball ends.
Ski turning bushings are easy to make. I welded 3/4″ female plumbing couplers to the front cross member of the frame. I screwed pipes with external threads into them, to which I welded the bipod of the ski steering rack.
I recommend using skis from the Argomak children's snow scooter. They are lighter and more flexible, but they need to be equipped with corners for attaching to the snowmobile's rotating stand and a metal undercut at the bottom - for better control of the snowmobile when moving on crusty or compacted snow.
The chain tension is adjusted by moving the motor.
Driving a snowmobile is very easy. When you increase engine speed with the throttle handle located on the steering wheel, the automatic centrifugal clutch is activated and the snowmobile begins to move. Since the estimated speed of a snowmobile is low (only about 10-15 km/h) and depends on the density of the snow, the snowmobile is not equipped with brakes. It is enough to reduce the engine speed and the snowmobile stops.
I will share a few tips that may be useful when repeating this design.
1. I cut the pipe for the tracks lengthwise using a hand-held circular saw for wood, first on one side, then on the other. This makes it smoother than cutting both walls at once. It is more convenient to process small workpieces. If you immediately cut a long pipe lengthwise, then the plastic will melt and the saw blade will jam.
2. Caterpillars can be made of any width. And each designer has the right to choose what is more convenient for him: to make a wide but short track or a narrow and long one. Just remember that with a large caterpillar the snowmobile will be difficult to control and the engine will be more loaded, and with a small one it may fail in loose deep snow.
3. Some of my photos show that there are plastics installed inside the tracks.” These are guide stops for the slide, which should prevent the caterpillar from sliding off the rollers. But during the operation of the snowmobile, the caterpillar did not slide off the rollers even without slipping, so “barrels” can not be installed, which will reduce the weight of the snowmobile.
4. At the end of winter, I completely disassembled the snowmobile to determine its weight. The weight of its individual components turned out to be as follows: caterpillar - 9 kg; drive shaft assembly - 7 kg; two pairs of wheels with axles - 9 kg; engine and steering wheel - 25 kg; pair of skis - 5 kg; frame - 15 kg; double seat with posts - 6 kg. In total, everything together weighs 76 kg. The weight of some parts can be further reduced. Nevertheless, the weight indicator for a snowmobile with a track of this size is quite satisfactory.
The geometric dimensions of my snowmobile are as follows: snowmobile frame length - 2 m; the distance between the axes of the support wheels (rollers) is 107 cm; The width of the caterpillar is 47 cm. The pitch of the caterpillar lugs depends on the thickness of the conveyor belt and it must be selected experimentally (I got 93 mm). I do not provide exact dimensions and drawings of the snowmobile parts, since anyone who plans to repeat the design will be guided by those parts and components that they can purchase or manufacture on their own.
Learning to ride a tricycle
The first step is choosing a bike that is suitable for your height. To do this, you need the baby to sit on it. If the child lets his entire foot fall to the ground and can slightly bend his knees, then you have chosen the right bike. Show that if a bicycle is carried like a stroller, it can move. To make it even more convincing, place a teddy bear on the seat. Let your child drive the toy “rider” himself, turning the steering wheel in the process and studying the features of movement. And only then invite the baby to take his rightful place and begin learning. If the area of the apartment allows, open the first highway there. Place your child's hands on the steering wheel and place little feet on the pedals. Hold him by the hips and demonstrate how your legs move as you ride. Now let him try it himself, and you push him from behind. On a tricycle, a child learns a simple skill - movement occurs when the pedals rotate. At the next stage, you can already go for walks. A stadium or school yard with a flat surface and no other transport is best suited for them.
Now children's attention is completely focused on the pedals, so the baby will go anywhere without choosing a direction. The baby will begin to master conscious control only after he has developed the ability to pedal to the point of automaticity. Although some parents first teach how to use the steering wheel, and only then transfer the child’s attention to the pedals
There is not much difference, you just need to teach both skills step by step, since the child cannot yet drive and steer at the same time. Remember that your classes should not last more than half an hour. And if the baby is capricious and refuses to continue training, do not insist. Postpone training until a better time.
Mastering a two-wheeled bicycle
So, the time has come to switch to a more advanced form of transport - a two-wheeled bicycle. Most often this happens at four years of age.
- Adjust the bicycle seat so that the preschooler, sitting on it, can reach his feet to the ground. When the child learns to sit confidently in the saddle, he can again be raised to the required height.
- Some adults use the side wheels for safety. However, in the opinion of many experienced parents, they should not be used, since with them the child does not learn to maintain balance. They are acceptable if the children have not previously trained on a tricycle.
- At the next stage, turn the bicycle into a scooter by temporarily removing one pedal from the iron horse. The child accelerates by pushing off the ground with one foot and leaning on the pedal with the other. At the same time, he must still hold the steering wheel with both hands. In this simple way, the baby improves the ability to maintain balance.
- We return the pedals to their place and try to ride a bike with your support. Do not hold the vehicle by the steering wheel or seat. Just follow your baby, holding him by the shoulders.
- Don't forget to teach your child how to get off the bike correctly. First, teach how to tilt it towards you, while at the same time resting your foot on the ground. Try the same exercise on the other side of the bike.
- Another mandatory point is the ability to brake. Roll the bike with your baby and ask him to brake. Immediately release the vehicle and make sure that the child puts his foot on the ground after braking.
Learning to ride a bike should be a positive and rewarding experience for your little one. Therefore, you should not put off buying an iron horse until later. Perhaps the child’s genuine interest and delight will infect everyone in the household, and soon mom and dad will also become avid cyclists.
READ ALSO: 10 best models of tricycles for children
Where to buy motorfins, their cost
There are several ways to purchase a vehicle called a motor vehicle:
- In a large store dedicated to active sports and fishing. The positive aspects of this choice will be the model range, which can be inspected and tested.
- Order in the online store with home delivery, check can also be done by courier. Only here payment must be either upon receipt or with an initial payment, which should be trusted only to trusted companies;
- At the wholesale base, where the price will be slightly lower than in the above centers. The seller will help you make a choice and tell you the positive and negative sides.