On June 12, Russia celebrates a holiday important for all citizens of a powerful power - Russia Day. Celebrations take place throughout the country and both young citizens and adults take part in them.
Props for the holiday are prepared in advance. A handmade national flag looks very touching. You can immediately see how much warmth ordinary people put into these crafts.
One of the main state symbols is the flag. Adults can prepare for the holiday together with children. For example, you can make a postcard with the Russian flag on it. In addition, such work contributes to the study of state symbols.
Diversity of approaches to the problem
Most often, military-patriotic crafts do not require much material consumption. To make it you need to have:
- scissors;
- cardboard and paper;
- pencil;
- paints;
- glue.
Using all this, with skillful handling of the material, you can even create crafts that can be sent to an exhibition.
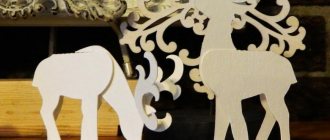
But the patriotic theme is broader than just a military theme. There is a wide field for creativity here. Here, for example, is a model of the Motherland monument. This is difficult for a child to do. But for a high school student, if he sculpts and draws well, this is a feasible task.
Make a model from plaster. And if it works out, parents can be proud of such a son or daughter. Even though gypsum is a soft material, not everyone can create a miniature sculpture from it.
Paper applique for Russia Day
On the twelfth of June, citizens of our country will celebrate the day of one of the most powerful powers in the world.
This day has recently become considered a Russian holiday. In preparation for festive events, together with your children, you can make a bright applique with your own hands - a postcard. Such work will help to study or remember state symbols. One of the main symbols is the tricolor flag. The craft can also be decorated with a white dove - a messenger of goodness and peace. We present to you a master class suitable for the theme of the holiday.
To create an application, prepare:
- Thick cardboard of any color;
- Scissors;
- Crepe paper in red, blue and white colors;
- Plain blue and white paper;
- Glue.
Stages of making a three-dimensional postcard for Russia Day:
Thick cardboard will become the basis of the postcard application. You can take any color; the surface of the cardboard will in any case be hidden under the spools of corrugated paper. The soft paper itself will be needed to imitate the Russian flag. We have selected the appropriate shades. Additionally, we will decorate the craft with a paper dove and flowers to match the flag.
Cut out a rectangle from cardboard. Cut rolls of soft corrugated paper into small squares. You will need three separate portions of red, blue and white paper.
Roll many balls of soft paper to cover the surface of the cardboard. This technique is called clumping because the process involves creating many small lumps.
Generously coat the surface of the cardboard with thick glue and begin pressing the prepared lumps on top, collecting them by color. You need to form three stripes of red, blue and white. You can pre-apply pencil borders for more accurate work. Attach the balls tightly, pressing each subsequent one to the previous one.
Fill the entire surface of the canvas with balls. Now the famous banner is ready. The surface of the applique is rough, the craft looks like a three-dimensional postcard.
To add some extra festive elements, also make some paper flowers to match the overall composition. Cut the paper into squares. Fold each square several times and trim the top edge with a birdie. You will get a blank for a flower.
Glue white and blue flowers from two layers of paper. Glue the red center - a simple spool of corrugated paper - into the center.
Glue flowers at the bottom of the applique.
Cut out a dove figurine from white paper. Glue to the center of the applique.
The craft for Russia Day is ready. This could be an exhibit for a children's exhibition or a fragment of a wall newspaper.
If there is a need to make a product on the specified topic, then the most advantageous option is to model the main state symbols.
Historical veracity
When performing such crafts, it is important to respect historical truth. Even at the very beginning, when making a patriotic craft for kindergarten, you need to help the child separate the fiction. So that the truth of the historical reality of the country and people is preserved for generations
It must be explained that Zoya Kosmodemyanskaya was not crazy when she did not betray her comrades. That she's a heroine. That Matrosov covered the embrasure with the machine gun with himself, saved his comrades consciously, and did not stumble.
As Russia's enemies now write. We must explain to the child that if those exploits had not happened, then we would not have existed.
Symbol of Russia Country of Masters
A rider on a horse is embroidery on satin with a straight stitch, it took 2 hours, I had to constantly turn the hand wheel on an electric sewing machine (very small work). Then the embroidery on the reverse side was smeared with glue; when it had dried, it was cut out and glued onto red satin. Rhinestones are glued along the edge.
We found two plastic bottles. The bottom one is made of sunflower oil, the top one is made of water. We cut them as needed and glued the necks together with hot glue. Two pieces of wire were wrapped in padding polyester and inserted into a cut bottle. The plastic from the bottles itself was wrapped with adhesive tape to make the fabric stick better. We made legs out of wire, wrapped them in yarn so that the yarn wouldn’t fly off, and smeared the wrapped surface with a little glue.
Kanzashki have been prepared. Anyone who does it knows how to do it; there is a manual for making various kanzashkas on the Internet. They started gluing it from the tail, then the legs, and brought it to the place of the wings. We got busy with the wings.
Wings. We found something from the packaging. We cut out the shape of the wings, covered them with kanzashki and glued them to the body of the eagle.
Of course, to do something you always need an idea or a picture, which is what we had before our eyes.
My student is a beauty. For this work she took 2nd place in the All-Russian competition “Knowledge of State Symbols”
Thank you all for stopping by, I hope this is useful to someone.
The continuity of generations
Starting from kindergarten, the topic of patriotism should be present in education. If in the elementary grades a student likes to complete the patriotic craft assignment for school, it means that the child is developing in the right direction.
He grows into a citizen of the country. When many people, especially young, proactive people, feel a sense of belonging to each other throughout the vast expanse of the country, good things will be done, with pure thoughts.
Here is a craft - the Eternal Flame - as a symbol of the continuity of the glorious pages of history. With a live fire made of colored paper. Decorated with a green grass border on the sides. As a reminder that we must cherish the covenants of our ancestors. Take care of your homeland.
Materials and tools
Any safe materials are suitable for making military crafts:
- Paper;
- Cardboard;
- Plastic container;
- Tree;
- Textile;
- Foam rubber.
Tools are selected individually, but the following are used as standard:
- Scissors;
- Glue;
- Paints;
- Jigsaw;
- Scotch.
Photos of patriotic crafts
1+
1
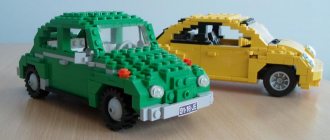
Cars
In a modern war, there is no way without a car.
This means there is a need to make this model as well. One of the original methods is the use of two-layer corrugated cardboard. This material holds its shape well and adheres well.
Note!
Easter eggs made of beads (interesting weaving patterns) - how to weave an egg with beads with your own hands?
- What to give to a classmate: how to make an unforgettable surprise with your own hands (Video + photo master class)
How to make a snowman with your own hands from cotton wool for a window, for a kindergarten, from scrap materials
Thanks to its rigidity, you can cut out the main parts of the car in advance and simply connect them in the desired sequence. The wheels can be folded from 2-3 layers of corrugated cardboard - for greater stability.
This technology is suitable for DIY assembly of any military equipment, including transport vehicles.
A jeep or truck can be created from plasticine. At the same time, the wheels can either be molded or replaced with large black buttons. Plastic or cardboard parts – frames and bumpers – can be attached to the plasticine body.
Alternative gift options
On Defender of the Fatherland Day, it is not necessary to give a military-themed gift. February 23 is the holiday of the male half of humanity.
Therefore, you can come up with a huge number of options to please your loved ones. It is recommended to pay attention to the interests of the person. You can choose a great gift related to your leisure preferences. For example, give a bath set to a lover of extreme relaxation.
It is recommended that a car enthusiast give a nice little thing as a gift for his “iron companion”. This could be a car fragrance or a set of beautiful seat covers.
If you don’t have enough imagination when choosing a gift, you can stick to the standard option. A beautiful case for documents or a smartphone will please any modern person.
You can also give shaving foam or a set of new fishing tackle. It is also recommended to simply say warm words of congratulations. After all, attention and emotional support will bring a storm of positive emotions and lift your spirits.
Making models at home
How to make a military craft at home using materials available in everyday life. For older people, such a task is presented in a more simplified form, which would be easier for the child to cope with.
The easiest and fastest way to make a grenade, pistol or tank, but children sometimes, with great enthusiasm, engage in painstaking work to make a ship, submarine, complex missile launcher or anti-aircraft gun.
The creative imagination of little craftsmen is often supported by the fact that they enjoy playing war games with their peers, competing with each other in the quality of making technical models and military figures.
The paper will be useful for cutting out and gluing armored vehicles or airplanes using the origami method, which can be painted in camouflage or other suitable colors.
Cardboard can be used to make attack helicopters with plastic blades, air fighters with swept wings, and launchers with ballistic missile launchers. Plasticine figures of soldiers with military weapons, grenades and machine guns can be placed in all-terrain vehicles made from matchboxes.
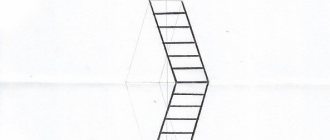
Warship
On Defender of the Fatherland Day, you can give a boat made by yourself. To make it you will need colored paper or a regular landscape sheet. The assembly diagram looks like this.
- Fold a sheet of paper lengthwise into two parts.
- Fold the sheet again along the short side. Expand the landscape sheet.
- Bend the corners at the fold inside the sheet.
- Fold the bottom into a rectangle. Next, unfold the workpiece and bend it again along the fold line. It should be a square.
- Stretch the layout in different directions. The combat frigate is ready.
- Decorate the blank using colored paper. You can also draw patterns and inscriptions with colored pencils if you used a regular landscape sheet.
Rifle
The classic assault rifle in the hands of boys in all games is the Kalashnikov assault rifle. It's extremely easy to do. Initially, you need to take a large sheet of chipboard. On the chipboard you need to draw the rifle itself, its outline. Next, using a regular wood saw, cut out the rifle along the contour.
Next you need to give the craft volume. Corrugated cardboard is perfect for these purposes. Parts for the machine gun are cut from it, such as the fore-end, butt, magazine, pistol grip, rear sight with front sight. There is no need to cut the trunk out of cardboard.
Next, when the parts are cut out, you need to glue them onto the outline of the machine from chipboard. Thus, the machine will gain volume and become more realistic.
How to make Katyusha
Children love to draw, and therefore they often have short pencils. They can be used as missiles for the famous Katyusha rocket. But first you need to create the rocket launcher itself:
- Thick cardboard is cut into two sheets - 60-100 mm and 80x120 mm;
- A matchbox is glued to the edge of a large sheet;
- Lids or plugs are glued to the bottom of the sheet with the “cabin”;
- A short sheet is placed on the edge and box of the truck;
- 4-6 pencils are glued to the edge of a short sheet.
Note!
- Crafts for February 23: master class on creating interesting DIY crafts for Defender of the Fatherland Day
- DIY crafts for February 14th step by step: a master class for beginners, with a description of how to make a craft for St. Valentine's Day. Valentina (140 photos)
- Crafts made from jute: 100 photos of beautiful options. Easy instructions with photos and descriptions on how to make a craft with your own hands
Other rectangular-shaped objects are suitable for making a “booth”. To make the craft as similar as possible to the Katyusha, it is recommended to draw windows, doors, camouflage, etc. in the finished design.
The simplest things of this type are postcards
Traditionally they are made of paper.
To make the card more entertaining, you can paste an image inside - a holiday symbol, a military emblem, or something related to the service of the person being congratulated. When you open such a book, the picture “pops out” and becomes the center of attention. Another type of postcard is a card. It, unlike a book, does not open, but is a small sheet of congratulations. A significant part of children's crafts and compositions on military and patriotic themes are cards. You can decorate such a postcard with your own creation, for example, a warrior with a banner, the main thing is the relief of the image.
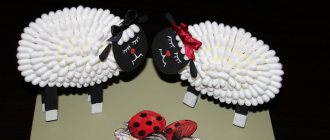
Cotton pads
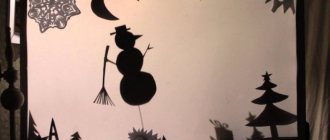
This material is popular in works with winter and New Year themes. Fluffy snow-white “rounds” seem to be asking to be used in an applique with a snowman! They easily become dense snowdrifts and light snowflakes, but can also be a sheep's coat.
Painted discs can be used in narrative pictures and panels in almost the same way as colored paper. But these works will be distinguished by volume, special warmth and softness.
Installation
By making military-themed crafts for school with your own hands, you can create an entire installation from existing crafts. It is recommended to use a thin, medium-sized board as a base. Place several crafts on it, simulating some event or battle. Smoke can be added using cotton wool, distributing it evenly throughout the installation.
It’s easy to make a military-themed craft; you only need a little free time and a few materials (cardboard boxes, plasticine, paper, glue and paints).
Combat ships
This is a creative work that gives the master a lot of scope for imagination. And all because there are many ships, both in type and in armament.
Like other military or military equipment, a ship can be made from paper. All you need is a piece of paper. A ship made from it can be decorated with a flag and an anchor; a match can be used as a flagpole.
The main advantage of such a product is that it floats well, but the main disadvantage is its fragility.
An advanced option for building a ship is the use of wood (pine and spruce - they are easy to process) or plywood. To work, you will need a knife, glue, a jigsaw, sandpaper, work gloves (to avoid cutting yourself) and small pieces of wood.
To make a deck, you can use plywood or corrugated cardboard (at least 3 layers), after cutting out the pointed bow and stern. Next, we simply connect the sanded wooden parts to the base, forming a deckhouse, upper rooms, towers with guns (matches). We decorate the resulting vessel at our discretion.