Lego is a fairly widely known material not only among children, but also among construction enthusiasts in general. As a rule, there are no difficulties in creating fakes from Lego, since absolutely anything can be made from this construction set, and today, the topic of our short review will be such an interesting and entertaining topic “how to make a car from Lego.”
Vase made from designer parts
By collecting a large number of different parts, you can make an original and completely functional vase.
For the base you will need an unnecessary old bottle with a wide neck or a regular glass. The sequence of actions is as follows:
- sort parts by color and height;
- make a base-stand for a glass from flat parts;
- on the sides of the stand, build up the walls of the vase using parts of different colors; you can lay them out in a rainbow order, put a name or any other pattern out of them.
The photo of Lego crafts shows some of the possible options.
What to put inside
First of all, a spreading tree. This can be a living plant, planted in a tub or processed, cut down. Squirrels will happily climb both. A house for squirrels is attached to one of the blank walls of the enclosure. It doesn’t have to be a masterpiece of architecture; a simple box assembled from a sheet of plywood, equipped with a removable roof and having holes for entry, is quite suitable for this role. There, the squirrels will build a nest, which will need to be periodically inspected and food scraps and garbage removed from there.
Squirrels will like a spreading tree in an enclosure
Since movement is life for squirrels, be sure to place a wheel with a diameter of at least 30 cm in the enclosure. In addition to the nest, you can make several more shelters for the squirrels, where the animals can retire.
The wheel is a necessary part of the enclosure furnishings.
Naturally, an enclosure cannot be complete without a squirrel feeder and drinking bowl. They are usually placed on the floor. If you have to buy a drinking bowl, you can construct a feeder with your own hands. For a home enclosure it is not necessary to make it closed. Here you can improvise and hollow out a container from the same log, giving it the shape of a trough, frigate, etc. But this is already a job for professionals. Home-grown Kulibin can start with simpler models.
Squirrel drinking bowl
Lego as a decor for liquid soap
Your favorite construction set will help persuade your child to wash their hands regularly. In a transparent container with liquid soap, the design parts look fascinating. To some, they even resemble fish in an aquarium.
All you need to do is buy a colorless transparent container and remove the stickers from it. Put the details inside, giving preference to bright ones.
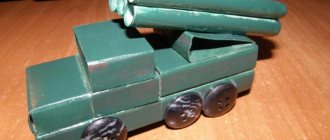
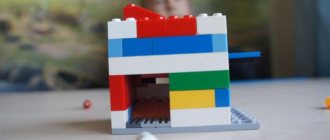
Making a car
The main advice when playing with Lego is to read the instructions. It is there that it is shown that the first step is to build a chassis with front and rear suspensions. Then you need to make the body, carry out the glazing step by step, build holders for auxiliary components and a steering wheel with a seat. The driver is taken separately - a man with movable arms, included in each kit.
What happens if you stop washing your hair frequently?
What happens if you look into a person's eyes for too long?
For example? If you come across a set from the City series, where you need to recreate a robbery and the subsequent pursuit of the robbers, then it will be described with scrupulous pedantry what the robbers should be wearing, and also that the colors of the opaque parts of the police car should be blue and white, and on There should be warning lights on the roof.
Functional key holders from Lego
Such easy crafts from Lego will perfectly help children (and many adults) not to scatter their keys in different places in the apartment. To make a key holder you will need:
- wide flat base of the constructor;
- double-sided tape or nails to attach it to the wall;
- Lego parts with holes for keychains;
- consent of all household members to walk with a Lego keychain on their keys.
The base of the constructor must be attached in a convenient place on the wall or cabinet door. The keys of everyone who returns home are perfectly attached to it.
twisted tree
Nowadays, many hand-made artists are fond of quilling. This is curling strips of paper. This method was also used to create such an unusual three-dimensional tree. The craft master class is described below.
- The compressed brown paper is sold in rolls. It is long and suitable for making such an unusual barrel. The roll needs to be unrolled and the paper rolled into a lengthwise roll. You will get a twisted “rope”. Several of these twisted parts are placed along the line of the barrel, expanding the part towards the upper edge.
- Several layers of grass are glued to the bottom. This is colored double-sided paper with a fringed edge.
- Now the main work on the design of the crown begins. It is made using the quilling technique, only using wide, thick paper. The parts are not twisted tightly. The edge is glued to the last turn. Then the end part of the roll is smeared with PVA glue and glued to its location in the picture by lightly pressing the palm on top.
Night light made from transparent Lego parts
If there are a lot of transparent parts, you can make a portable night light with your child for his room.
Note!
- How to make a rose from paper - the best ideas for DIY crafts + master classes on creating a rose from paper (160 photos)
- Craft letter - TOP 120 photo reviews of craft letter. Simple diagrams + step-by-step DIY instructions
- Crafts made from nut shells: the best step-by-step master classes on creating DIY crafts with photo examples of finished works
The parts are folded into a box, and an LED lighting source is placed inside. This night light has a wonderful ability - you can reassemble it every day, changing patterns, sizes and colors.
You can make a night light with a regular cartridge. In this case, be sure to ensure that the light bulb does not heat the homemade night light body.
Does a squirrel need care?
Definitely. Like any home for rodents, a squirrel house will emit an unpleasant odor and become saturated with bacterial flora. If you don't clean it periodically, the animals will get sick. It is advisable to clean squirrel nests both in the squirrel enclosure and in the garden towards the end of the summer season. Important! You need to work with gloves.
Squirrel colonies are cleaned at the end of summer
As in any home, putting things in order begins with removing trash. Throw away everything, including insulation, if it was placed in the nest. Then all surfaces in the squirrel house are wiped with a damp cloth. After such cleaning, the unpleasant odor should disappear. All that remains is to lay fresh bedding on the floor and return the squirrel’s abode to its place. The squirrels will certainly appreciate the caring attitude and will return to the hospitable garden in the fall.
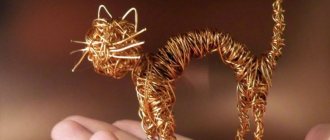
Lego style decorations
From bright elements, needlewomen make original jewelry - beads, earrings, pendants. Small round multi-colored details are well woven with beads in brooches and even paintings.
Schemes of Lego crafts are presented below. To create jewelry you will need:
- dense thread or wire;
- accessories (clasps, locks);
- beads and seed beads (preferably in neutral colors).
You need to make neat holes in the Lego pieces and string them, alternating with beads. The simplest version of the necklace is ready.
Safety
It's a shame and a pity when birds' nests are destroyed. This is mainly done by cats, and also by woodpeckers. Therefore, when you make a birdhouse with your own hands, increase the roof overhang. In almost all drawings it is drawn 5 cm long. In order to protect the birdhouse from the cat, it is necessary to make sure that he cannot reach the entrance. To do this, the roof must protrude by at least 7 cm, and it is better to add a couple more - for large specimens. This ledge will also protect from slanting rain: the likelihood that the chicks will get wet becomes even less.
Another option is to put nails on the lid. The cat is unlikely to get hurt, but he won’t be able to sit comfortably - the nails won’t let him.
Make the roof overhang larger so that the cat cannot reach the chicks with his paw.
There are several ways to protect chicks from woodpeckers:
- beat the taphole with tin:
- drive several nails around the tap hole;
- nail a piece of wood on the taphole area, the fibers of which run horizontally.
All this will prevent the woodpecker from expanding the entrance and getting to the eggs or chicks. The last trick - the cover - will also complicate the cat’s task: it is more difficult to reach the chick through a long entrance.
Measures against enemies: 1 - against woodpeckers, 2.3 - against cats
They still escape from cats and possible invaders with the help of protective belts. They are made either from tin strips or from “brooms”. You will understand everything by looking at the picture. Please note that the distances must be maintained within 3-4 cm. Then the animals will not be able to jump over the protective belts. There should be no twigs, feeders or other possible supports between them and the birdhouse.
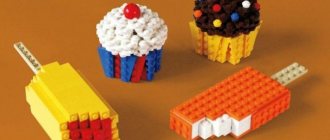
Christmas decorations
You can assemble many unique Christmas tree decorations from this construction set. Some Lego crafts in pictures are shown below. Santa Claus, Christmas trees, balls and hearts, animals and birds turn out to be somewhat abstract, but quite recognizable.
Note!
Mushroom craft - reviews of ready-made DIY crafts + step-by-step instructions and diagrams for children (180 photos)Crafts from toilet rolls: step-by-step instructions for creating crafts. Master classes with simple work schemes (140 photos)
Crafts from corrugated paper - step-by-step master classes on how to create crafts from corrugated paper with your own hands + photo diagrams
The big advantage of such toys is that they cannot be damaged. If a structure falls apart, then literally in a minute it is recreated or converted into a new one.
Selection of materials
When making a hive, you can use various materials:
- Tree. A classic option for building a bee house. Helps create natural conditions for insects. It is best to choose a species of wood - cedar, although you can use linden or aspen, but the structure will have to be additionally insulated. Such hives are dry, breathe well and smell pleasant. You should avoid using pine, spruce and fir - such houses are warm, but moisture and resin accumulate in them, and they also have a pine aroma.
To make a hive, you need to choose wooden boards whose humidity is kept within 15-16%.
- Plywood . It is a durable and environmentally friendly material, but its structure must be painted and insulated from the inside with polystyrene foam to maintain heat and dryness. Plywood is extremely sensitive to moisture, so it requires constant and proper care.
- Expanded polystyrene . A relatively new material in the manufacture of hives. It is attractive due to its low cost and lack of need for additional insulation in winter. Expanded polystyrene has its drawbacks - it is fragile and brittle. When using poor quality material, there is a possibility that the properties of honey will deteriorate.
- Styrofoam . One of the most economical and affordable options, as you can even use packaging from household appliances. The foam construction is lightweight even with the frames filled and has excellent thermal insulation, but is very fragile and requires constant painting to protect it from sunlight.
- Polyurethane . It has good thermal insulation and does not allow moisture to pass through, so fungi and bacteria do not develop inside the hive. This material is practically not chewed by bees, mice and birds, but it has its drawbacks - it is highly flammable and practically does not allow air to pass through.
A hive made of any material should be painted white, as it is better remembered by insects and repels the sun's rays.
Educational games
It has long been known that modern children learn fractions well using Lego cubes as an example. You just need to select a suitable part to represent the whole number, two smaller parts to demonstrate one second, one fourth.
It is convenient to teach children to put letters into syllables, and syllables into words. To do this, cubes of the same size but different colors are selected. You need to write letters on them with a marker - and the didactic material is ready. It is advisable to make several of the most popular letters.
What does a squirrel house mean?
The forest version of squirrel housing is a hollow, in functionality it can be compared to multi-room apartments. This:
1. Food storage (pantry with supplies).
2. Maternity hospital. Squirrels give birth twice a year.
3. Kindergarten. Baby squirrels stay with their mother until they are 3 months old.
4. Protection from bad weather and enemies.
In winter, squirrels can still gather in groups, but in the spring it’s time to have children, so each individual goes to look for and set up its own home. This is the time of natural selection. Stronger animals privatize already inhabited hollows, driving the former owners out onto the street. That’s why you need to put up feeders for squirrels and don’t be lazy about building housing for them.
House for squirrels
No carpentry talent - go to the store. There you can find squirrel houses of any model: from the simplest analogue of a birdhouse to multi-storey cottages. However, the choice should be based not on the beauty of the architecture of the squirrel’s home, but on the material and workmanship.
Holders and stands
Lightweight and portable stands help you store neatly and never lose:
- mobile phone and charger;
- remote controls for air conditioning, TV, lamps;
- gaming joysticks;
- shaving accessories.
For office supplies on your desktop, you can assemble a cup with compartments for paper clips, buttons and other small items.
Punctuality in everything
Lego also carefully matches the components of other sets. Fire trucks are equipped with hoses, ladders and fire nozzles, and the building blocks are red and white. The Lego racing car kit includes not only standard parts, but also special components that are placed on specific landing sites at precisely controlled stages of assembly.
As you may have noticed, the main emphasis is on thoroughness and pedantry; these are precisely the qualities that Lego develops in its little fans. But they really want to show their imagination! And Lego comes to the rescue.
Flash drive update
You can make a unique and inimitable flash drive from several construction bricks. To do this you need:
- disassemble the flash drive and remove it from the old case;
- cut a hole in the Lego piece for the connector;
- insert a flash drive into it and fill it with glue;
- close with the second piece.
The flash drive cover is glued using the same principle. On the main body (optional) you can add airplane wings, a house roof, and more.
DIY bird nest
A nest box is a homemade birdhouse, titmouse, poultry house, made from cutting a log by hollowing out its core. It is installed on an improvised base, closed with a lid on top, and a hole for entry is made in the side wall. Used as an artificial nesting site for birds. Located on a tree in the forest.
A log nest differs from a regular birdhouse in its visual proximity to the tree trunk. In most cases, birds nest in nest boxes. Types of nest boxes vary in several characteristics, determined by the breed of birds for which they are intended.
Watch
Having a working clock mechanism, you can decorate it with Lego. A dial with a hole in the middle is assembled from flat parts, and the mechanism is glued into it. The numbers on the dial are also laid out from the designer.
The hands are decorated only if this does not make the mechanism too heavy and the watch will function accurately.
Manufacturing
Not everyone will decide to make such a house. You need to be patient and diligent. Let's see how this happens step by step.
Procurement of material
The cut log should be moderately dry, since completely dried wood is difficult to process. A too-damp chock from a tree in which sap has recently flowed may be rejected by birds. The wood is in a state suitable for the poultry house in the autumn-spring period.
The ideal option is fresh dead wood, the presence of which prevents damage to the forest for the purpose of harvesting material. If its middle part is rotten, this is not a problem. Birds often settle in hollows formed by the destruction of the middle part of the tree.
From a log with a diameter of 20–25 cm, you need to saw off a log 30–40 cm long. This length will allow you to achieve the best result with minimal effort and time. If there is bark on the surface of the log, it is worth preserving it if possible. It gives the artificial nesting site a natural look and serves as thermal protection.
If the bark is poorly attached and tends to fall off, it is better to remove it in advance.
Hollowing out the core
In order to remove the middle part from the stump, you can use a drill and feather drills. The amount of the latter may vary depending on the density of the wood. If the drill is only available in one copy, it must be periodically sharpened with a grinder or an emery machine. Drilling with a blunt tip can waste a lot of time and increase the load on the drill motor.
Before starting drilling, you should outline the inner circle - the border of the walls of the nest. Their optimal thickness is 2-2.5 cm, excluding the thickness of the bark. The thickness of the wall ensures the durability of the nesting box. And the diameter of the internal “room” affects the population of birds and the number of chicks they can afford.
Drilling is done using the point method. It is necessary that the resulting holes lightly touch each other. The work is carried out in several stages: the core is drilled to a depth of 5–10 cm, which depends on the length of the drill. Then finishing is done with a chisel. The inner side of the walls is given a condition close to flat. After this, spot drilling and manipulation with a chisel are repeated until the inside of the log is completely removed.
Important: during the drilling process, oil materials should not be used to lubricate the drill and reduce friction. There is a possibility that the technical smell will become entrenched within the nest box, which will scare away the birds.
In some cases, it is possible to complete the core excavation at a distance of several centimeters from the end of the stump, opposite the one from which drilling began. In this way, the bottom of the birdhouse will be formed, which is the best solution regarding the “floor” of the house.
The size of the entrance hole of the nest should be determined taking into account what birds are most likely to occupy this dwelling. Tits are representatives of a species of birds that more often than others set up nests in artificial houses. The diameter of the hole for the titmouse should be no more than 30 mm. Exceeding this value can lead to larger birds moving into it or to complete ignoring of the impromptu nesting site. The edges of a round “door” opening should be smooth, polished, rounded, and free of sharp protrusions and splinters.
Lid
The choice of element that covers the upper hole must be approached very carefully. It is advisable to use for its manufacture the same type of wood from which the main body of the titmouse is made.
It is important to exclude the possibility of moisture and drafts getting under the lid. Croaker is a board with a semicircular side that is best suited for covering a poultry house. The rounded shape will ensure moisture drainage during rainy times. It is advisable to choose a lid, the size of which will allow you to create protrusions of the “roof” over the walls of the nest, and a canopy of sufficient length over the inlet. To create a greater angle of inclination of the slab, you can cut the top of the house at a slight angle.
The place of contact between the lid and the walls of the log must be sealed with moss, and in the absence of the latter, with odorless window putty. You can screw the lid to the walls of the bird's home using self-tapping screws. To prevent the wood from splitting at the points where the screws are screwed in, mounting holes should be drilled with a diameter of 2–3 mm. Screw the hanging hook into the center of the lid. It should not stick out from the inside of the cover board.
Important: the roof of the nest must be attached to the body as firmly as possible. When hanging the nest by the hook, the entire load will fall on the mounting screws.
Using screw elements to attach the cover is the best option. This poultry house requires annual cleaning of debris. If you have screw-on fasteners, this will be much easier.
Photos of Lego crafts
Mitsubishi L200
Independent front suspension and leaf spring rear. Electric drive with remote control. Doors (with locks), hood, tailgate open