Angels are creatures without flesh who protect people from misfortunes and protect each person individually. Some people believe in guardian angels, but others don't. In any case, if you crochet and give someone a beautiful, openwork guardian angel, then it can become a real talisman. If the person being gifted does not share your faith, then he can simply hang a crocheted angel on the Christmas tree as a toy. But to be honest, we have never come across people who are indifferent to angels. That's why we decided to prepare a large selection of patterns for crocheting angels.
Can you crochet? Publish your work on kru4ok.ru
Crochet angels can be flat, in the form of appliqués. Such angels can serve as decorations on the wall or on the window during the Christmas holidays.
Volumetric angels, often openwork, are crocheted with thin threads and can be used as a New Year's decoration for the Christmas tree. Or they can become your amulet.
Is it necessary to starch crocheted angels?
On our website and on the Internet we found several detailed master classes on knitting angels. It is worth noting that if you knit a large angel measuring 20-25 cm from thin threads with crochet number 1-1.2, then you will have to strengthen its shape using a solution of PVA glue or starch. You will also need a base on which the angel will dry.
If you take thicker threads and a hook, the angel will hold its shape on its own. Although it won't be as impressive.
How can you decorate an angel with crochet?
- You can crochet an angel from multi-colored threads
- use gold or silver yarn for the binding if it is a Christmas angel
- You can give the angel a heart, a staff, a flashlight, again depending on the theme of the angel
- make beautiful hair (contrasting color) or curl your angel
- beads and sparkles are perfect for New Year's angels
Choose the most beautiful crocheted angels and knit them for the upcoming holidays: New Year, Christmas, Valentine's Day.
Ideas for crochet angels
You can crochet angels according to various patterns with descriptions. Small monochromatic figures can become a decoration for the New Year's tree. You can also use them to make a Christmas garland or decorate a door wreath. Larger items can become decorations for a holiday table. Even larger angels can be given to acquaintances and friends on the eve of the winter holidays.
Usually angels are knitted from white threads, but colored figures can be created. To decorate crafts, craftsmen often use scraps of colored threads and satin ribbons, as well as various beads, rhinestones, sparkles and chenille wire.
What you need to knit angels:
- “Iris” threads (white or colored, depending on the specific pattern);
- hook No. 1;
- sewing threads;
- needle.
Cotton wool or padding polyester is suitable for stuffing.
Selection of yarn and manufacturing features
Crocheted angels always look tender. In order not to disturb such harmony, it is worth choosing the right yarn. There are several special recommendations for each individual case:
- The New Year figurine is usually a visual silhouette of an angel. This type of toy is used to decorate a Christmas tree or interior, so cotton thread is recommended as the main material.
- To make a Christmas angel, you should use cotton thread with silver or gold lurex. You can choose different thread thicknesses.
- If the toy will be knitted for children's games, then it is advisable to use children's acrylic. It is better to take a thin thread to form a neat pattern. Thanks to the use of acrylic, you can get a three-dimensional toy of the desired shape.
- For an “airy” finish, you can use grass yarn and other types of decorative yarn and thread.
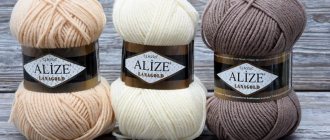
Example of materials for work
A lot of attention should be paid to the color of the yarn. It is better to choose yarn of pastel colors and shades to convey all the tenderness and grace of the symbolic toy.
Abbreviations and symbols for loops in instructions
To make it easier to read the descriptions, you need to know what the letter abbreviations mean.
| Action | Designation |
| Air loop | VP |
| Single crochet | STBN |
| Double crochet | STSN |
| Double crochet stitch | STS2N, STS3N, STS4N (the number indicates the number of yarn overs) |
| Connecting loop | JV |
| Half column | PST |
Further in the article you can consider several master classes on crocheting angels.
Interesting diagrams describing the process
There are several more schemes on how to knit an angel. Such models can be flat. At the same time, a knitted angel can serve as decoration for a Christmas tree. To make such a toy, you need to use a detailed MK. The step-by-step algorithm of work is presented in the crochet pattern in picture 9.
Scheme for making a flat angel
There is also an option for making a crochet angel, the diagram and description of which are presented in picture 10.
Openwork crochet angel
The diagram for making the angel figurine in picture 11 is suitable for both experienced and novice needlewomen.
The principle of forming an angel
Each scheme involves the production of an openwork base. You can get a beautiful pattern thanks to combinations of double crochets, single crochets, cuts and increases. Usually, in all presented options (patterns), knitting begins from the head.
An additional advantage of knitting from the head is that it does not require complex assembly. It is enough to sew the assembled parts and parts of one finished base.
Master class on crocheting an openwork angel
A crocheted angel (patterns with descriptions for beginning craftsmen can be simplified), crocheted from white threads according to this master class, will turn out light and beautiful. The patterns will resemble lace.
Sleeves and bodice
How to knit:
- Close 8 VP into a ring. Knit 18 SC through the hole, tying the loops.
- Link 2 VP, 1 STSN.
- 2 times through the following STBNs, knit 1 STSN.
- Knit a combination of 5 VP and 1 STSN 5 times.
- On the reverse side, knit by analogy.
- In the 3rd row, knit 1 new DC through each DC.
- Every 5 VPs, knit 2 STSN, 3 VP, and 2 STSN.
- Knit the other side by analogy.
- New row: 8 STBN, 3 VP.
- 5 times under each 3 VP, knit the combination: 2 STSN, 3 VP, 2 STSN, 3 VP.
- Knit the other part by analogy.
- In the 5th row: 8 STBN, 3 VP, 1 STBN, 3 VP.
- Knit 5 times: 2 STSN, 3 VP, 2 STSN, 3 VP, 1 STBN, 3 VP.
- Knit the other part by analogy.
- In the 6th row: 8 STSN, 3 VP, 5 VP, 1 STBN, 5 VP.
- Knit 2 STSN 5 times. Make a picot, then: 5 ch, 1 pst, 2 ch p, 2 dc, 3 ch, 1 stb, 3 ch.
Knit the other part by analogy.
Skirt
How to knit:
- Knit 2 VP, 1 DC.
- Knit 2 VP, 2 STSN 3 times.
- Connect both parts of the bodice.
- Knit 2 VP.
- Knit 2 STSN, 2 VP 4 times.
- Attach the remaining parts of the bodice.
- In the 2nd row, knit: 2 VP, 1 STSN, 2 VP, 2 STSN. Knit the combination 2 times: 2 STSN, 2 VP, 2 STSN.
- Knit 2 VP, knit the combination 3 times: 2 STSN, 2 VP, 2 STSN.
- 2 VP, connect the parts together.
- 2 VP, 1 STSN, knit the combination 2 times: 2 VP, 2 STSN, 2 VP, 1 STSN, 1 VP, 1 STSN.
- Knit 3 times: 2 VP, 2 STSN, 2 VP, 1 STSN, 1 VP, 1 STSN, 2 VP.
- In the 4th row, knit: 2 VP, 1 STSN, 2 VP, 2 STSN, 1 VP, 1 STSN, 2 VP, 2 STSN, 2 VP, 1 STSN.
- Knit the combination 3 times: 2 VP, 2 STSN, 2 VP, 2 STSN, 1 VP, 2 STSN, 2 VP, 2 STSN, 2 VP, 1 STSN, 2 VP.
- In the 5th row, knit: 2 VP, 1 STSN, 2 VP, 2 STSN, 1 VP, 1 STSN, 5 VP, 1 STSN, 1 VP, 2 STSN, 2 VP, 2 STSN, 1 VP, 1 STBN, 1 VP.
- Knit 3 times: 2 STSN, 2 VP, 2 STSN, 1 VP, 1 STSN, 5 VP, 1 STSN, 1 VP, 2 STSN, 2 VP, 2 STSN, 1 VP, 1 STBN, 1 VP.
- 6th row. Knit the combination 4 times: 2 STSN, 2 VP, 2 STSN, 3 VP, 9 STSN, 3 VP, 2 STSN, 2 VP, 2 STSN.
- 7th row. Knit the combination 4 times: 2 STSN, 3 VP, 8 times (1 STSN, 1 VP), 1 STSN, 3 VP, 2 STSN, 2 VP.
- 8 row. Knit the combination 4 times: 2 STBN, 3 VP, 7 times (1 STBN, 3 VP), 1 STBN, 3 VP, 2 STBN, 2 VP.
- 9 row. Knit 4 times: 2 STBN, 3 VP, 6 times (1 STBN, 3 VP), 1 STBN, 3 VP, 2 STBN, 2 VP.
- 10 row. Knit 4 times: 2 STSN, 2 times (2 VP, 2 STBN), 3 VP, 5 times (1 STBN, 3 VP), 1 STBN, 3 VP.
- 11 row. Knit 4 times: 2 STSN, 3 times (2 VP, 2 STBN), 3 VP, 4 times (1 STBN, 3 VP), 1 STBN, 3 VP.
- 12 row. Knit 4 times: 2 STSN, 2 VP, 1 STSN, 1 VP, 1 STSN, 2 times (2 VP, 2 STSN), 3 VP, 3 times (1 STBN, 3 VP), 1 STBN, 3 VP.
- 13 row. Knit 4 times: 2 STSN, 2 VP, 2 times (1 STSN, 1 VP), 1 STSN, 2 times (2 VP, 2 STSN), 3 VP, 2 times (1 STBN, 3 VP), 1 STBN, 3 VP.
In the last row, knit 4 times: 2 STSN, 2 VP, 1 STSN, 2 VP, 3 times (1 STSN, 1 VP), 1 STSN, 2 VP, 1 STSN, 2 times (2 VP, 2 STSN), 2 times (3 VP, 1 STBN), 3 VP.
Skirt frill
How to knit ruffles on a skirt:
- 15 row. Knit 4 times: 2 STSN, 2 VP, 1 STSN, 2 VP, 1 STSN, 3 VP, 1 STBN, 3 VP, 2 times (1 STSN, 2 VP), 2 STSN, 2 VP, 2 STSN, 3 VP, 1 STBN, 3 VP.
- 16th row. Knit 4 times: 2 STSN, 2 VP, 1 STSN, 2 VP, 1 STSN, 5 VP, 1 STBN, 5 VP, 2 times (1 STSN, 2 VP), 2 STSN, 2 VP, 2 STSN.
- 17th row. Knit 8 times: 2 STSN, 2 VP, 2 STSN, 3 VP, 1 STBN, 3 VP.
- Knit the next 2 rows in the same way.
20th row: knit 8 times: 2 STSN, picot (3 VP, 1 PST back, through 1st VP, 1 VP), 2 STSN, 5 VP, 1 STBN, 5 VP.
Wings
How to knit wings:
- Close 5 VPs into a ring.
- 1 row. 2 VP, 1 STSN, knit 4 times: 1 VP and 2 STSN.
- 2nd row. 2 STSN, 2 VP, 2 STSN, 2 times knit 1 VP and 1 STSN, 1 VP, 2 STSN, 2 VP, 2 STSN.
- 3rd row. 2 STSN, 2 VP, 2 STSN, knit the combination 2 times: 3 VP, 1 STSN, 5 VP, 1 STSN, 3 VP, 2 STSN, 2 VP, 2 STSN.
- 4 row. 2 STSN, 2 VP, 2 STSN, knit the combination 2 times: 3 VP, 9 STSN, 3 VP, 2 STSN, 2 VP, 2 STSN.
- 5 row. 2 STSN, 2 VP, 2 STSN, knit the combination 2 times: 3 VP, 1 STSN, 1 VP, 1 STSN, 3 VP, 2 STSN, 2 VP, 2 STSN.
- 6th row. 2 STSN, 2 VP, 2 STSN, knit the combination 2 times: 3 VP, 7 times (1 STBN, 3 VP), 1 STBN, 3 VP, 2 STSN, 2 VP, 2 STSN.
- 7th row. 2 STSN, 2 VP, 2 STSN, 3 VP, 6 times (1 STBN, 3 VP), 1 STBN, 3 VP, 2 times (2 STSN, 2 VP), 2 STSN, 3 VP, 6 times (1 STBN, 3 VP), 1 STBN, 3 VP, 2 STSN, 2 VP, 2 STSN.
- 8 row. 2 STSN, 2 VP, 2 STSN, 3 VP, 5 times (1 STBN, 3 VP), 1 STBN, 3 VP, 3 times (2 STSN, 2 VP), 2 STSN, 3 VP, 5 times (1 STBN, 3 VP), 1 STBN, 3 VP, 2 STSN, 2 VP, 2 STSN.
- From the 9th row the wings are divided into 2 parts. 1st half: 2 STSN, 2 VP, 2 STSN, 3 VP, 4 times (1 STBN and 3 VP), 1 STBN, 3 VP, 2 STSN, 2 VP, 2 STSN.
- 10 row: 2 STSN, 2 VP, 2 STSN, 3 VP, 3 times (1 STBN and 3 VP), 1 STBN, 3 VP, 2 STSN, 2 VP, 2 STSN.
- Knit the remaining rows by analogy.
- Row 14: 2 STSN, 2 VP, 2 STSN, 2 STSN, 2 VP, 2 STSN.
- Knit 5 VP.
- Knit the second part of the wings from the 9th row, repeating steps 16 to 20.
- 1 row of wing strapping: alternating 1 STBN, 5 VP.
- At the corners of the wings: 4 VP, 2 STS3N, 4 VP.
Last row of binding: 1 STBN, picot, 5 VP, 1 PST knit back, through the 3rd VP, knit 2 VP.
Head and halo
The head needs to be knitted like an amigurami ball:
- From rows 1 to 6, knit STBN, making 2 increments. Knit up to 36 stitches.
- Knit the next 5 rows with STBN in the round, without increasing.
- Knit the other 5 stitches next to each other, decreasing to 6 stitches.
Stuff the head with filler and sew it to the angel's body.
How to knit a halo:
- Close 5 VPs into a ring.
- Knit 10 SC, alternating with 1 CH, through the ring.
- Knit row 2 alternating SC and 3 VP.
- In the 3rd row, knit alternating 1 STBN, 5 VP, 1 PST, knit back to the 3rd VP, 2 VP.
Starch the part and sew it to the head.
Separately starch and dry the remaining parts. Straighten the hem of the dress and place it on a glass jar or bottle neck so that it holds its shape well. After the starch solution has dried, the wings must be carefully sewn to the angel’s back.
Fixing solution
In addition to the sugar solution, the old proven method of starching the product is used to stiffen the thread. In this case you will need:
- 2 tbsp starch;
- water;
- enamel container.
To create a fixative, you need to dissolve 2 tablespoons of starch in cold water.
Then pour the resulting mixture into an enamel container, which already contains 0.5 cups of heated water. Next, the contents of the dish are heated until the starch thickens completely. After which all the details of the figurine are soaked there and kept in the solution until it cools completely. After “bathing” in starch, the parts of the future Christmas decoration are well wrung out and dried separately, each stretching on its own shape. After the angel parts have dried, they are carefully ironed and sewn into the product.
Mexican crochet angel
A crocheted angel (patterns with descriptions are presented later in the article) in the Mexican style should be colored. The head is knitted from light brown threads. The dress should be dark blue. Green, orange, pink and blue thread scraps are suitable for knitting collars and ruffles.
Head, collar and body
How to knit:
- Close 4 VPs into a ring.
Crochet angel. Schemes with descriptions - Knit 8 pst, passing 2 pcs through 1 loop.
- By analogy, knit 16 PST.
- Knit 2 rows of 24 psts each.
- Fill the workpiece with filler.
- Knit 16 PST with decreases.
- Knit 8 PST with decreases.
- Next begins knitting the body. 16 PST through 1 loop, 2 pcs.
- 3 VP for lifting, connect the last column of the joint venture with the beginning of the row of the adjacent column.
- Knit 16 STSN.
How to knit a collar: Alternate arches of 3 VP with 1 SC, changing the color of the thread in each new row. There should be 6 rows in total.
Continuation of knitting the body:
- 32 STSN, passing them through 1 loop, 2 pcs.
- 2 rows consisting of 32 STBSN.
- Alternate 1 DC and 2 DC from 1 loop.
- 22 STSN.
- Alternate 1 DC and 2 DC from 1 loop.
The last row to knit is 15 DCs.
Dress, frills and wings
How to knit:
- Knit a row of alternating 1 DC and 2 DC starting from 1 point.
- Row of 22 STSN.
- Knit a row of alternating 1 DC and 2 DC, coming from 1 point with increases. There should be 33 columns.
- By analogy, knit the next row, increasing the number of stitches to 50.
- Knit 50 DC.
- Knit a row of alternating 1 DC and 2 DC, coming from 1 point with increases, increasing the number of columns to 67.
- Knit a row of 67 DCs.
Frills need to be knitted alternating arches of 3 VP and 1 STBN, changing the color of the thread in each new row. There should be 6 rows in total.
How to knit wings: 5 VP, close into a ring. Tie half of the ring 7 STSN. Next, knit the fabric with 3 decreases in each row. Knit 12 rows. Change the thread and knit the last row with arches of 5 VP, alternating them with 1 PST. By analogy, tie the other wing.
The product must be soaked in a sugar solution and left until completely hardened. After drying, the angel needs to make hair from dark brown or black yarn.
Three-dimensional figurine with wings
How beautiful and original the three-dimensional figurines of angels look, which can not only be hung anywhere, but also placed, for example, as a holiday decoration on a table or added to a New Year’s composition. The following three-dimensional figure is especially popular among beginners in crocheting, for which you will need:
- hook 1.4;
- "Iris" threads;
- padding polyester or other filler.
First, according to the pattern, the head of an angel is knitted.
To give it the required round shape, it is stuffed with padding polyester or other filler. Next, the cape, hair, arms, wings, and halo are created separately from 100 percent white cotton. After all the parts of the future holiday figurine are ready, they are sewn together with thread of the same color. Crochet angel patterns with a similar description are quite often found on the Internet. The finished angel, which is still soft and unstable, is soaked in a sugar solution or other fixative and dried on a plastic or glass glass to acquire its shape. Sometimes it is recommended to dry a knitted product on cardboard rolled into a cone. In this case, it is necessary to wrap the pressed paper in cellophane so that the light figurine with wings does not get dirty and lose its color, and only then put the angel on the form and dry it.
Crochet air angel
A crocheted angel (patterns with descriptions can be changed by decreasing or increasing the number of loops to get a figurine of a different size), crocheted using this master class, can be done even by novice craftsmen, because the pattern is quite simple.
Head
How to knit a head:
- Close 4 VPs into a ring.
- Knit 10 SC through the ring. Knit STBN.
- In the 1st and 2nd rows knit STBN, with 2 increases.
- In the 3rd row you need to double each column.
- Work 7 rows of STBN.
- Knit a row with decreases. The number of columns should be reduced to 10.
Work the neck from 3 rows of STBN.
Dress
How to knit a dress:
- STSN, doubling each column.
- STS4N, doubling each column.
- STBN.
- STS4N, doubling each column.
- STBN.
Knit another 4 rows like rows 4 and 5, alternating them.
Wings
How to knit wings:
- Score 4 VP.
- A row of 3 arches consisting of 4 VPs.
- Above each arch, knit new arches from the same number of loops. By analogy, knit 4 more rows.
- Next, knit, decreasing the number of arches by 1, until there are 2 arches left in the row.
By analogy, you need to connect the second wing.
All parts need to be starched and dried. After drying, sew with white threads.
Create your own pattern
As a crochet pattern of angels with a detailed description, you can also use various circular patterns of varying complexity. To turn a regular table napkin pattern into a real Christmas symbol, you need to do the following:
- calculate the number of repeats (repeating patterns) in the motif;
- start knitting according to the pattern;
- in row No. 1, knit only half of the loops indicated in the diagram;
- turn the fabric over and start knitting row No. 3 (this manipulation will help create a neat semicircle);
- knit as many rows as required so that both wings become clearly distinguishable;
- visually divide the pattern into 3 parts and then knit only a third of the middle.
Crochet Christmas angels
A crocheted angel (the patterns with descriptions presented later in the article are suitable for execution by experienced craftsmen), crocheted using this master class, can be a good New Year or Christmas gift for loved ones or friends. The craft can be decorated with beads or sparkles. You can choose threads with golden lurex to create hair to make the angel look festive.
Head and torso
Cast on 2 ch, start knitting through the 2nd loop from the hook.
- In the 1st row there are 6 sc.
- In the 2nd row, make 1 increase in all loops.
- 3rd row. 1 sc, increase, alternate combination until the end of the row.
- 4 row. 2 sc, increase, alternate until the end of the row.
- 5 row. 3 sc, increase, alternate until the end of the row.
- 6th row. 4 SC, increase, alternate until the end of the row.
- 7th row. 5 SC, increase, alternate until the end of the row.
- 8 row. 6 SC, increase, alternate until the end of the row.
- From rows 9 to 12, knit STBN, without increases.
- 13 row. 6 SC, decrease, alternate until the end of the row.
- 14 row. 5 SC, decrease, alternate until the end of the row.
- 15 row. 4 SC, decrease, alternate until the end of the row.
- 16th row. 3 SC, decrease, alternate until the end of the row.
- Fill the workpiece with filler.
- 17th row. 2 sc, decrease, alternate until the end of the row.
- 18th row. 1 sc, decrease, alternate until the end of the row.
- From rows 19 to 22, knit STBN, without decreasing.
- 23 row. 1 sc, increase, alternate until the end of the row.
- 24 row. 2 sc, increase, alternate until the end of the row.
- 25 row. 3 sc, increase, alternate until the end of the row.
- 26 row. 4 SC, increase, alternate until the end of the row.
- From 26 to 36 rows knit STBN, without increases.
Separately knit the bottom:
Dial 2 VP.
- Knit 6 SC into the 2nd loop from the hook.
- Increase in all stitches.
- 1 sc, increase, alternate until the end of the row.
- 2 sc, increase, alternate until the end of the row.
- 3 sc, increase, alternate until the end of the row.
- 4 SC, increase, alternate until the end of the row.
- 5 SC, increase, alternate until the end of the row.
- 6 SC, increase, alternate until the end of the row.
Stuff the angel's body with filler and sew on the bottom.
Dress
The dress must be knitted straight from the body.
At the end of each row it is necessary to knit a joint.
- 1 row. Knit 1 DC through each loop, alternating them with 1 VP.
- 2nd row. Knit 1 STSN, 1 VP and 1 more STSN under the VP. Skip 1 VP, 1 more such element. Continue knitting in the same way until the end of the row.
- 3rd row. Knit in 1 and 2 ticks on a new element consisting of 1 DC, 1 VP and 1 DC. Knit a new tick between the ends of the one that comes after the previously knitted element. This is how the increase is made. Repeat the steps, completing the row.
- 4 row. Knit 1 increase, just like in the previous row. Fill the rest of the row with ticks, knitting them under the previous elements.
- By analogy, knit another 9 rows.
How to tie the bottom edge of a dress:
- 1 row. Cast on 6 VP, knit 1 SC under VP from the bottom row.
- 2nd row. Knit 9 STSN under the arch. Under the next arch, knit 1 SC. Cast on 6 VP, knit 1 SC under the next arch. Cast on 6 more VPs and 1 SC, knit with the next arch. Next, knit the combination described in this paragraph first.
- 3rd row. Knit 1 DC and 1 VP over all DCs, placing them between the posts. You should get 9 STSN. Knit 1 SC under the arch. Cast on 6 VP, skip under the arch, knit 1 SC. Repeat the pattern described in this paragraph until the end of the row.
Last row: work 1 sc across each stitch. Knit 1 DC under the first VP from the previous row. Make picot from 3 VP. Work 1 sc under next ch. Knit 1 SC under 1 more VP, make a picot. Alternate picots over the resulting fan (you should get 6 pieces). Under the arch, tie 6 VP and 6 STBN.
Wings
How to knit wings:
- Knit 6 dc through a slip stitch.
- 1 DC, increase, alternate combination until the end of the row.
- In each STSN, knit 1 STSN and make 1 VP.
- In the first STSN, knit 3 VP and another 1 STSN. Knit check marks under all VPs from the bottom row.
- Knit a row of ticks.
- Make 5 VPs and knit 1 SC through the center of the tick under the VP, alternate the combination until the end of the row.
- Knit 9 STSN in an arch. Under the next arch, work 1 SC. Cast on 6 VP, knit 1 SC under the next arch. Knit 6 VP and 1 SC under the next arch. Alternate the combination until the end of the row.
- Above each STSN, knit 1 STSN and 1 VP. Knit 1 SC under the arch. Make 6 VP, knit 1 SC under the next arch. Repeat the combination until the end of the row.
- Work 1 SC into each stitch. We knit 1 DC under the first VP from the previous row. Make picot from 3 VP. Work 1 sc under the next ch. Work 1 sc under the next ch, make a picot. Alternate picots over the resulting fans. Under the arch, knit 5 VP and 5 STBN.
By analogy, tie 2 wings.
How to tie hands: Dial 2 VP. In the 2nd loop, knit 9 SC. Knit 15 rows in the circle with STBN.
Hair can be made from white or colored threads. The yarn needs to be cut into equal pieces, folded into a bundle and tied with a thread in the middle. Sew hair to head.
Starch the wings and arms. After drying, sew them to the product.
It’s easy to learn how to crochet different angels. Beginning craftsmen should stick to the original descriptions in order to “get” their hand. Professionals can change and combine patterns to create a figurine in an unusual style.
Festive Christmas Spirits
The modern world of knitting is rich and diverse.
Some while away the long winter evenings by knitting a scarf or mitten gloves, while others, before the New Year holidays, decide to please their family and friends with handicrafts. Crocheted angels are very suitable for this; diagrams and descriptions of which can be found both in printed publications and on the Internet. According to craftsmen, even a beginner and not very experienced person can knit an angel with knitting needles; the main thing is to follow the tips and patterns. Angels are the brightest and most mysterious creatures. Nothing is known for certain about them, but they have always been and are considered protectors of people and the embodiment of light and goodness. It is an openwork angel given for New Year, Christmas or Valentine's Day that creates a festive mood and gives a piece of magic not only to children, but also to adults.
What kind of things do these Christmas guardians look like? They can be in the form of children, men or long-haired girls dressed in light clothes. To knit such fairy-tale creatures, it is recommended to use light tones of yarn:
- white;
- lactic;
- ivory;
- soft coffee;
- Beige;
- golden;
- silver.
It is these colors that give the product lightness and tenderness. It is also worth remembering that the thinner the thread, the more difficult and painstaking the work on creating an angel, however, the more airy and graceful it will turn out.
Nuances of angels
Any angel crocheted using crochet and yarn has its own nuances. One of the important features is that flat figures need to be starched. But sometimes other nuances are possible that relate to the decor of the finished product.
Do I need to starch the finished toy?
Angels crocheted from soft yarn must be starched. This will help maintain the shape of the product. After one starching, the toy can stand for a long time without the need to repeat the procedure. If the knitted figurine will be used to decorate a tablecloth or curtain, then there is no point in starching such a product, since the plasticity of the knitted base must be preserved.
Often you have to starch only certain parts of the product - the skirt, wings, sleeves. Then the piece of clothing turns out to be rigid and does not require additional processing or finishing, that is, there is no need to make an additional rigid frame.
How best to decorate an angel
A crocheted flat angel can be decorated in different ways. The most popular option is to trim the hem of the skirt and sleeves with beads, beads or small glass stones. This is especially true when decorating an openwork base.
When a doll in the form of an angel is made, there are many more possible types of decoration. For example, you can cover the outline of knitted wings with decorative feathers. You can weave a special wreath or halo on your head from beads, and use satin ribbons to form a beautiful embroidery based on the dress of the finished doll.
Decor options for finished toys
Each option is interesting in its own way and can be used as part of the desired decoration. The main thing is that the decoration is not flashy and does not stand out too much against the background of the overall composition.
Flat knitted angels for decorating other products
Knitting angel figures has a lot of nuances, but the result is a unique product. This toy can be used for decoration, games, and other products and objects. By showing imagination, it is quite possible to create full-fledged compositions on a specific topic.
New Year crafts for school: 4th grade
Well, we have smoothly approached New Year's crafts for school for 4th grade. These guys are already quite old and independent, so simple nonsense will not do. We have selected a dozen fairly complex master classes that will appeal to both girls, boys, and their parents!
Felt Christmas tree
Let's start with the simplest and most obvious - the Christmas tree. The Christmas tree is one of the most integral attributes of the New Year. In 4th grade we suggest making a Christmas tree out of felt, or more precisely from a miniature felt flag garland. For this craft you will need: a base cone (can be made from thick paper or cardboard), felt, scissors, glue. See step-by-step MK below.
Miniature ribbon wreath
You can weave a wreath from ribbons. This product looks very impressive, but in fact there is nothing complicated in its manufacture. Follow the step-by-step instructions and you will succeed!
Crafts from threads and glue: step-by-step MK with photos and descriptions
You can make original Christmas tree decorations from knitting threads and glue. These can be stars, Christmas trees, balls and other figures. The main thing is to master the technology, and then it’s up to your imagination. So, to make it you will need: thick yarn, PVA glue, a disposable tray (thermal box or something similar), safety pins (you can use matches or small nails). Place the desired figure on the tray with pins. Coat the threads thoroughly with glue (better pour the glue into a container and place the thread there). Wrap the thread along the contour of the figure, and then fill the inner space. Wait for the glue to dry completely and remove the pins. Attach a thread and the Christmas tree toy made from glue and thread is ready!
Volumetric paper snowflake
A voluminous paper snowflake is perfect as a school craft for the New Year. You will need six paper squares. Fold the square diagonally. We make cuts at a distance of approximately 1-1.5 cm
It is important not to reach the fold line. Next, glue the strips into rings on one side and the other alternately.
See step-by-step MK below.
Volumetric snowman: exploring polygonal modeling
As a New Year's craft for school in 4th grade, you can make a three-dimensional paper snowman. The craft will help explain to your child the essence of three-dimensional modeling based on a simple New Year's craft. By the way, adults will also find it interesting!
Scheme Scheme
House made of paper tubes
But a miniature house made of paper will appeal to both boys and girls. A paper house will take its rightful place under the New Year tree or will be an excellent decoration for a school classroom. How to make a paper house with your own hands, see below.
New Year's wreath made of plastic bottles
Boys will love a wreath made from plastic bottles. The serious work of cutting plastic bottles and cutting out stars from them is a responsible and, most importantly, interesting task. Well, which boy doesn’t like to destroy and break? And this time everything is legal and even on the initiative of the parents! In general, let's go to the neighbors to collect unnecessary plastic bottles and move on to creating a masterpiece!
Paper garland “Light Bulbs”
An ideal New Year's craft for school for those who have no time left, i.e. for those whose child remembers a creative assignment at 11 at night the day before the deadline. Simple, fast, original! And most importantly - everyone is happy! See the master class on creating a paper garland “Light Bulbs” below.
New Year's ball using artichoke technique
An excellent New Year's craft for school for diligent girls would be a Christmas ball using the artichoke technique (patchwork). The essence of the technique is to sew cut parts onto the base in a certain sequence. In this tutorial you will learn how to make a ball using the artichoke technique from ribbons.
Santa Claus made from salt dough and an old light bulb
If your child has a penchant for modeling, be sure to try this master class. We suggest making Santa Claus from salt dough on a frame made from a burnt out light bulb. As for the dough, you can paint it after making the figure, or you can immediately color it in the desired colors by adding a few drops of food coloring while kneading. Girls may like the idea of creating a Snow Maiden more.
New Year crafts for school: 1st grade
What can you use to make crafts for the New Year for school? In fact, you can make anything from anything and you shouldn’t limit your imagination to paper. Almost anything you can find at home will do: pasta, thread, old light bulbs or CDs, cotton pads and more. First-graders will especially enjoy working with non-traditional materials, and we have prepared for you a dozen cool crafts master classes for the New Year at school!
Village made from toilet paper cylinders
It’s not a shame to present a mini-village made of toilet paper cylinders or paper towels to the judgment of other first-graders. For greater realism, houses can be decorated with cotton wool, which will imitate snow.
Felt Christmas tree bag
An excellent DIY craft for school for the New Year for 1st grade would be a felt Christmas tree-bag for candy, which, by the way, can be used to treat your classmates.
Chanterelles made from cones
You shouldn’t ignore natural materials either; in particular, you can make various animals from pine cones. In addition to the cones, you will also need pieces of felt of a suitable color (depending on the animal you plan to make). We suggest making a fox, and if you have time and desire, you can make other forest inhabitants (hares, wolves, owls)
Thread paintings
First-graders will love making New Year's pictures from threads. If mom helps a little with the winter plot, it could turn out to be a real masterpiece!
Crafts from old light bulbs
Crafts made from old light bulbs will look original at a school exhibition. Not only incandescent lamps are suitable, but also modern energy-saving lamps! Old light bulbs make wonderful snowmen, penguins, owls or favorite fairy tale and cartoon characters.
Snowmen made from cotton pads
If all the previous ideas did not impress you, we suggest making a craft from cotton pads. In this master class we suggest making snowmen with your own hands. You will need: cotton pads, cardboard, glue, ice cream sticks, felt, decorative elements (eyes, buttons, beads, etc.).
Smeshariki from old disks
Due to the development of the Internet, old discs are no longer needed, because songs of your favorite artist or movie can be listened to or watched online. Surely you still have some old CDs that you no longer need. Don’t rush to get rid of them, we’ll make Smeshariki! Decorative elements can be made from thick colored paper or felt. You can download patterns of your favorite cartoon characters below.
Crafts from cotton balls: making a New Year's wreath
As a material for New Year's crafts for school, you can use cotton balls, which can be purchased at any supermarket. To make it you will need: wreath base, cotton balls, mini pompoms, glue.
Yarn horse
If the task is to make a toy for the Christmas tree, you can use this master class and make a horse from threads with your own hands. You will need knitting threads in 3 colors, eyes or buttons, and glue. See step-by-step MK below.
Paper snow globe
As a New Year's craft for school in 1st grade, you can make a snow globe out of paper. In essence, this is an ordinary applique, but in an unusual design. You will need colored paper and paints. You can draw a snowman and snowflakes with your fingers, a cotton swab or an eraser on a pencil.
Garlands made of paper rings
For first-graders, a great New Year's craft idea would be a garland of paper rings. If just a garland is too simple for you, you can make, for example, a Christmas tree.
Salt dough applications
Well, the last idea is crafts made from salt dough. We invite first-graders to make a New Year's applique. To prepare salt dough you will need: 1 part flour, 1 part salt and ½ part water. Next, we work with the dough as with plasticine (it also molds well). After this, we send the workpieces for drying (in the oven or on a radiator). After complete drying, paint and glue on paper. The panel for the New Year is ready!
Alternative patterns for wings
Just as for the figurines of the celestial beings themselves, you can use any circular crochet patterns, so for the wings, patterns such as:
- a pineapple;
- heart;
- butterfly wing.
When creating Christmas angels, the amigurumi technique, popular both among Russian crochet lovers and among foreign representatives, is often used. With its help, both three-dimensional figurines of various fairy-tale creatures and other products are created. The advantage of this knitting method is that it allows you to adjust the diameter of the hole in the center.
In order to knit a proportional angel, you need to clearly calculate and measure everything before starting work. Typically, experts who share advice on a similar topic describe in detail how long the product is. Beginners should remember that the longer the thread in the skein, the thinner it is and the more difficult the pattern will be.
Festive angel figurines will be an excellent gift for any occasion, be it Christmas, birthday or wedding.
Having mastered such crochet techniques, you will always have at hand countless options for both children's toys and decorations, and interior decor.