The dream of flying has haunted every person since childhood. Rarely did anyone not have the desire to get off the ground and rush into the sky. Unfortunately, in nature people cannot fly. They have to use specialized devices for this. A self-assembled quadcopter will help you get closer to your dream.
Of course, it won’t lift a person, but it will make it clear the principles of piloting on which aviation is based, as well as the ability to control, albeit a small, aircraft.
Scope of application
A quadrocopter can also be used for serious purposes. Equipped with a video camera and transmitter, it can transmit aerial images of tracked objects. For example, the location of livestock in a pasture or the condition of roofs and high monuments.
It has the power to scout out ice or rafting jams in rivers and transmit information about traffic jams and traffic conditions. The quadcopter is also used during forest fires, giving an overview of the direction of fire movement. In general, wherever there is a need to obtain a panoramic image from a height, he is the first assistant. Including the areas of life saving and searching for people.
Another obvious method of using a drone is to carry any cargo through the air. The aircraft is not afraid of bad roads or their complete absence, and remote control allows it to be used in any weather without risking the life of the pilot.
Quadcopter with cargo
There are also non-obvious ways to use quadcopters. For example, in some large shopping centers, aircraft of this type replace lighting lamps under the ceiling. The capture is carried out in a special holder, after which the drone rotates, unscrewing the lamp, and transports it to the ground. A whole lamp is installed in it, which moves back through the air with the device and is screwed in. As a result, there is no risk for personnel, and the work is completed.
UPD
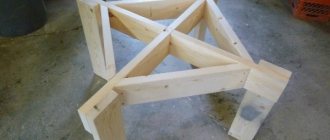
Vulnerabilities were discovered in the proposed frame. Namely, the crosshair was too fragile to bend. In this regard, we rebuilt the frame again. One of the profiles is now solid, and the second is interrupted and connected by an I-beam:
Reinforced Cross
Since we had to redo the frame, we slightly corrected the drawings for cutting the composite material. We made the belly of the copter a little thicker and there were more holes for the wires. The improved drawing can be downloaded here.
Links to the rest of the series of articles about quadcopters: Part 1. What is a quadcopter Part 2. Elements of a quadcopter Part 3. All about batteries for quadcopters Part 5. Illumination of the quadcopter Part 6. Connecting the elements of the quadcopter Part 7. Setting up the Turnigy9x remote control for the quadcopter Part 8. Setting up the brushless motor speed controllers Part 9. Setting up the DJI NAZA flight controller Part 10. Gyro-stabilized gimbal for the SJ4000 camera
We will be very glad if you support our resource and visit our product store shop.customelectronics.ru.
Homemade quadcopter
You can, of course, buy an assembled drone, but this is not as interesting as creating it yourself, even from ready-made components supplied in kits from the manufacturer. In addition, not every ready-made assembly will meet the needs of the buyer.
The most exciting option for obtaining a quadcopter is an individual calculation of the configuration and selection of components corresponding to it, with the installation of all this into one structure. You can purchase the necessary elements, for example, on the E-Bay or AliExpress trading platform by placing an order via the Internet.
Using drones legally
One of the nuances taken into account when making a homemade quadcopter is the restrictions imposed by law on ultra-light aircraft. Which includes drones.
In essence, they only concern the documentary registration of quadcopters weighing over 250 grams. If the device has a large mass, but less than 30 kilograms, then it requires permitting papers from the Federal Air Transport Agency. You can also receive them by mail by sending a photo of the unmanned aerial vehicle and its characteristics to the Federal Air Transport Agency.
Example
So, with all these different comparative features in mind, what information can you get about a flight controller and what might a flight controller include? As an example we chose
.
Main processor
The ATMega2560 used on board the ATMel is one of the most powerful Arduino-compatible ATMel chips. Although it has a total of 100 pins, including 16 A/D channels and five SPI ports, due to its small size and intended use as a flight controller, only a few of them are present on the board.
- AVR vs PIC: AVR
- Processor: 8-bit
- Operating frequency: 16MHz
- Program memory/Flash: 256KB
- SRAM: 8KB
- EEPROM: 4KB
- Additional I/O pins: 3 × I2C; 1 × UART; 2 × 10-pin GPIOs; Servo with 5 × outputs; OLED port
- A/D Converter: 10-bit
Sensors
The Quadrino Nano includes an MPU9150 IMU chip which includes a 3-axis gyroscope, 3-axis accelerometer and 3-axis magnetometer. This helps make the board small enough without sacrificing sensor quality. The MS5611 barometer provides pressure data and is covered with a piece of foam. Integrated Venus 838FLPx GPS with external GPS antenna (included).
Software
Quadrino Nano was created specifically to use the latest MultiWii software (based on Arduino). Instead of modifying the Arduino code directly, a separate, more graphical software was created.
Connection
- Direct input from standard RC receiver.
- Spektrum dedicated satellite receiver port
- Serial (SBus and/or Bluetooth or 3DR radio)
What are the options?
So, let's consider all the possible options for purchasing or independently manufacturing a small aircraft, suitable both as a toy and for performing quite serious tasks.
Quadcopter in flight
Ready to fly (ready to fly)
This definition includes all quadcopters sold assembled. After purchase, to use them, it is enough to supply power to the device components and the radio control panel. The easiest way to get started with piloting.
Almost Ready to Fly (almost ready to fly)
The product range of such models is very large. The manufacturer may provide all the necessary parts in the kit, or only some parts of the drone. For example, a frame or a motor controller. The assembly and purchase of the missing parts is entirely carried out by the owner of such a kit.
The purchase of such a quadcopter is recommended for novice users. It will allow you to introduce a person to the basics of creating an aircraft, while being quite simple to assemble.
One of the assembly kit options
Complete assembly from scratch
One of the most interesting options, with relatively low labor and time costs. When selecting aircraft components, calculations are made depending on the desired characteristics and the available product range for sale.
This means, for example, that a large quadcopter requires both large and powerful spare parts. Their characteristics directly depend on the planned weight of the drone. The larger the frame, the greater the mass of the device, which means it must be equipped with higher-speed engines, large propellers, as well as an appropriate power supply system for all power and conventional electronics on board.
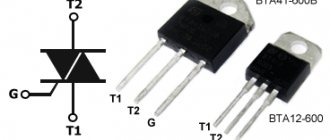
An important detail is the choice of controller that manages this entire facility. It sets the speed of rotation of the propellers, preventing distortions of the device during flight. Its functions also include controlling the movement of the drone, depending on the commands of the operator on the ground.
One of the types of flight controllers
It would not be superfluous to monitor the characteristics of the remote control transmitter and the receiver installed in the device. The more powerful they are, the greater the distance you can control the quadcopter.
And finally, the attachments. Without it, a drone is nothing more than a flying toy. But by mounting a camera with a transmitter on its frame, you can find a more practical use for the quadcopter.
Again, the range of the gimbal’s wireless operation and its power consumption (and therefore the battery range of the entire device) are important. A controlled camera, with adjustable zoom and brightness, will also be a plus for using a drone.
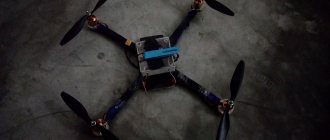
Homemade drone from scrap materials
Completely homemade quadcopter design
Making a quadcopter of this type from scratch is a relatively simple task. Many of its parts can be made from scrap materials. It does not have many design elements that ensure the functionality of the device:
- Support frame. Actually, the “body” to which motors with lifting propellers, batteries, control systems, controller and outboard equipment are attached. It can be either purchased or made independently from wood, PVC pipes, plastic or aluminum. The only requirements for it are lightness and strength.
The frame design can be H and X shaped for four screws, or multi-beam with a large number of them.
- Lifting screws. You can purchase them ready-made or make them yourself. They can have any number of blades and their angles of inclination. Each type of propeller configuration has its own advantages and certain disadvantages. For example, a larger number of blades will lead to increased battery consumption, but their traction function is better.
During the flight, the propellers rotate in different directions to avoid the effect of auto-spin of the device.
Counter rotation of copter propellers
- The engines themselves, according to the number of rays of the quadcopter. The power of each of them must be sufficient for the required speed of rotation of the propeller in order to generate lifting force for the drone. There are geared, commutatorless and brushed options. The former provide greater speed of promotion, but heat up during operation. The latter are considered better suited for drones. The third option is the cheapest, but it also often fails due to wear of the brushes on the commutator.
- Flight controller. The main control device of the UAV. In its essence, it is a mini computer that maintains the required speed on each screw in order to prevent distortions of the device. He also controls the movement process, slowing down the propellers of one side of the quadcopter and speeding up the other in order to achieve a slight angle of inclination of the drone in the direction where the movement is required. It receives information about the current position from specialized sensors - GPS, compass and accelerometer. In homemade designs, you can use Arduino or any other universal microcontroller with additional modules of the necessary sensors.
Drone flight controller
- Electronic Speed Control (ESC). An intermediary between the controller and the motor. It is he who sets the necessary power for the desired rotation speed.
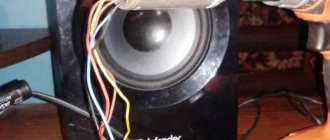
- Receiver and transmitter. The first is installed in the drone to receive commands from the operator on the ground. The second is in the remote control, equipped with two joysticks, with the help of which the quadcopter is controlled. The received signals are converted into commands for the controller, which already provides a sequence of actions for their implementation.
- Screw protection. It would seem like a minor thing, but without this casing around the propeller, it will fail in any collision. Some versions of the supporting frame imply an arrangement of the screw that will protect it in an emergency. In such cases, separate protection is not needed.
Drone propeller protection
- A battery of sufficient capacity to supply power to all aircraft components for the required time. For this part of the device, weight is very important, which directly depends on its type. For example, lithium is much lighter compared to a similar lead-based container of the same capacity.
- Attachments. The most “delicious” part of the quadcopter. The scope of application of the aircraft directly depends on it. Of course, as with everything installed, weight is important here. In addition, it is imperative to pay attention to the power consumption of the attachments, providing the necessary energy supply from a separate source or increasing the capacity of the central battery of the UAV. Various fasteners for transporting goods or video cameras with an image transmitter are often used as additional devices.
Flight modes
Below is a list of the most popular flight modes, however, not all of them may be available in flight controllers. “Flight mode” is the way the flight controller uses sensors and incoming radio commands to stabilize and fly the UAV. If the control equipment used has five or more channels, the user can configure the software, which will allow him to change modes through channel 5 (with an auxiliary switch) directly during the flight.
- ACRO is usually the default mode, of all available sensors, only the gyroscope is used by the flight controller (the drone cannot automatically level). Relevant for sports (acrobatic) flight.
- ANGLE - stable mode; Of all the available sensors, the flight controller uses the gyroscope and accelerometer. Angles are limited. Will keep the drone in a horizontal position (but without holding position).
- HORIZON - combines the stability of ANGLE mode, where the sticks are close to the center and move slowly, with the acrobatics of ACRO mode, where the sticks are in extreme positions and move quickly. The flight controller uses only the gyroscope.
- BARO (Altitude Hold) - stable mode; Of all the available sensors, the flight controller uses the gyroscope, accelerometer and barometer. Angles are limited. The barometer is used to maintain a certain (fixed) altitude when no commands are issued from the control equipment.
- MAG (Heading Hold) - heading (compass direction) blocking mode, the drone will maintain Yaw orientation. Of all the available sensors, the flight controller uses the gyroscope, accelerometer and compass.
- HEADFREE (CareFree, Headless, Headless) - eliminates orientation tracking (Yaw) of the drone and thereby allows you to move in a 2D direction according to the movement of the ROLL/PITCH control stick. Of all the available sensors, the flight controller uses the gyroscope, accelerometer and compass.
- GPS/Return to Home - Automatically uses a compass and GPS to return to your takeoff location. Of all the available sensors, the flight controller uses a gyroscope, accelerometer, compass, and GPS module.
- GPS/Waypoint - allows the drone to autonomously follow pre-set GPS points. Of all the available sensors, the flight controller uses a gyroscope, accelerometer, compass, and GPS module.
- GPS/Position Hold - holds the current position using GPS and barometer (if available). Of all the available sensors, the flight controller uses a gyroscope, accelerometer, compass, and GPS module.
- Failsafe (emergency/fail-safe mode) - if no other flight modes have been specified, the drone goes into Acro mode. Of all the available sensors, only the gyroscope is used by the flight controller. Relevant in case of failures in the drone software, it allows you to restore control over the UAV using previously preset commands.
How to assemble a quadcopter with your own hands: instructions for beginners
One of the prefabricated drones
To simplify the purchase of the first quadcopter, but to give the basics of its creation, it is worth buying kits of drones, which already include all the necessary parts of the device. Their strength, power and capabilities have already been selected according to the structure and weight of the final UAV.
Selection of materials and components
Ready-made kits, with elements selected by the manufacturer, are designed for certain characteristics of the device. Among them are the maximum flight range and distance from the operator, altitude and speed ceilings. The useful weight of the load – the carrying capacity of the drone – must be indicated.
Based on them, they select a set.
Details from Ali Express
One of the budget options presented on Aliexpress for self-assembly without compromising the functionality of the quadcopter is the Flysky i6 F450. Its price is around 12,086 rubles.
The kit contains all the components that allow you to create your own drone, except for the battery and attachments - the camera, although its mounting is provided for by the design of the device frame.
What's included
The set includes:
| Name | Characteristics |
| Frame | Four-radial. Material: fiberglass and polyamide nylon. |
| Engine | 4 pieces, 53 grams each |
| ESC | Simonk 30A, 4 pcs. |
| Flight controller | APM V2.8.0 |
| Sensors | GPS sensor 8n |
| Power module | 5V, 2A |
| Screw | 8 pieces |
| Sound level indicator | |
| Power cables and component connections | |
| Transmitter, receiver and remote control | |
| There are no batteries. You need to purchase it yourself. Users who have already purchased this drone recommend the 3300 mAh 25c. | |
To ensure shooting with a quadcopter, you will need a camera; it must be purchased separately. The first self-assembled drone is usually equipped with a simpler version.
For example, a 5.8G 48CH Wifi camera is good. It already comes with a 4.3“ monitor, which receives the image. The price of such a set is 3705 rubles.
Assembly
The structure is assembled according to the attached step-by-step instructions. All connections are bolted, no glue required.
Installation begins with a frame, onto which the rest of the equipment is subsequently fixed. The screws are installed on the motors before they are placed in the quadcopter body. The position of the structural elements is indicated on the drawing included with the kit.
Finally, the camera is installed in the designated place on the drone frame.
Setup and Debugging
Quadcopter calibration
Like any device, an assembled drone requires configuration. If you purchase a kit, it is minimal, since the location of the sensors, controller software and characteristics of the propellers with motors have already been selected by the manufacturer.
Selecting and installing firmware
Typically the APM will have the latest version of the quadcopter software installed. You can check it according to the instructions for the flight controller by connecting it to the computer. If there is a discrepancy with the latest one on the manufacturer’s website, an update to a new one is performed in the flight controller.
For information! The current firmware version is 3.2.1.
Calibration
The device is configured after it is fully assembled. It is necessary to start the propellers, let it rise above the ground and look at the direction of the UAV's drift with the control knobs in the zero position.
The device must be motionless in the air. If this is not the case, then there is a misalignment in the position of the sensor or the controller itself. Calibration is performed by aligning the sensor and the workstation board to a normal, level position relative to the screws.
Distortions in the mounts of the engines themselves are also not desirable. The controller compensates for insufficient lifting torque, but this is not a panacea for the problem.
Sensors
From a hardware point of view, the flight controller is essentially a regular programmable microcontroller, only with special sensors on board. At a minimum, the flight controller will include a 3-axis gyroscope, but no auto-leveling. Not all flight controllers come with the following sensors, but they may also include a combination of them:
- Accelerometer: As the name suggests, accelerometers measure linear acceleration along three axes (let's call them: X, Y and Z). Usually measured in “G (in Russian Zhe)”. The standard (normal) value is g = 9.80665 m/s². To determine the position, the accelerometer output can be integrated twice, although due to output losses the object may drift. The most significant characteristic of three-axis accelerometers is that they sense gravity, and as such, can know which direction is "going down". This plays a major role in ensuring the stability of a multi-rotor UAV. The accelerometer must be installed on the flight controller so that the linear axes coincide with the main axes of the drone.
- Gyroscope: The gyroscope measures the rate of change of angles along three angular axes (let's call them: alpha, beta and gamma). Usually measured in degrees per second. Note that the gyroscope does not measure absolute angles directly, but you can iterate to get an angle that, like the accelerometer, contributes to drift. The output of a real gyro tends to be analog or I2C, but in most cases you don't need to worry about this since all incoming data is processed by the flight controller code. The gyroscope must be installed so that its rotation axes coincide with the axes of the UAV.
- Inertial Measurement Unit (IMU): An IMU is essentially a small board that contains both an accelerometer and a gyroscope (usually multi-axis). Most include a three-axis accelerometer and three-axis gyroscope, while others may include additional sensors, such as a three-axis magnetometer, providing a total of 9 measurement axes.
- Compass/Magnetometer: An electronic magnetic compass capable of detecting the Earth's magnetic field and using this data to determine the direction of the drone's compass (relative to the magnetic north pole). This sensor is almost always present if the system has a GPS input and one to three axes are available.
- Pressure/Barometer: Since atmospheric pressure changes with distance from sea level, a pressure sensor can be used to get a fairly accurate reading of the UAV's altitude. To calculate the most accurate altitude, most flight controllers receive data simultaneously from a pressure sensor and a satellite navigation system (GPS). When assembling, please note that it is preferable that the hole in the barometer body be covered with a piece of foam rubber, this will reduce the negative effect of wind on the chip.
- GPS: The Global Positioning System (GPS) uses signals sent by multiple satellites orbiting the Earth to determine one's specific geographic location. The flight controller can have either a built-in GPS module or one connected via cable. The GPS antenna should not be confused with the GPS module itself, which can look either like a small black box or like a regular “Duck” antenna. To obtain accurate location data, the GPS module must receive data from several satellites, and the more, the better.
- Distance: Distance sensors are increasingly used on drones because GPS coordinates and pressure sensors cannot tell you how far you are from the ground (a hill, mountain or building) or whether you will collide with an object or not. A downward-facing proximity sensor may be based on ultrasonic, laser, or lidar technology (IR sensors may have trouble functioning in sunlight). Distance sensors are rarely included in a standard flight controller package.
Possible problems and their solutions
Quadcopter after an accident
If the purchased quadcopter kit is assembled exactly according to the diagram, with all contacts connected according to their polarity, but it does not function, then the problem is in some structural element. This is often a motor controller, receiver board, or electronic speed controller.
You can determine a specific problem by the reaction to commands from the remote control. If there is none at all, but power is supplied to the receiver and transmitter, you need to check the connection of the circuit components. There may be no contact between the receiver board and the microcontroller. If everything is in order, then only replacing the faulty kit with a functioning one will help.
If there is a response to commands, but not all propellers work, the cause may be a poor connection between the ESC module and the engine or APM. In the worst case, there is a motor malfunction, which can be checked by temporarily connecting it to another UAV beam line. Accordingly, the solution is to replace the failed component - the motor or electronic speed controller.
Flying quadcopter with camera
Below is a video describing the assembly of the quadcopter kit.
Nutrition
Often, a flight controller specification will describe two voltage ranges, the first being the input voltage range of the flight controller itself (most operate at a nominal voltage of 5V), and the second being the input voltage range of the main microprocessor (3.3V or 5V). Since the flight controller is an embedded device, you only need to pay attention to the input voltage range of the controller. Most multi-rotor UAV flight controllers operate at 5V, as this is the voltage produced by the BEC (see the Powerplant section for more information).
Let's repeat. Ideally, you do not need to power the flight controller separately from the main battery. The only exception is if you need a backup battery in case the main battery is producing so much power that the BEC cannot produce enough current/voltage, causing a power outage/reset. But, in this case, capacitors are often used instead of a backup battery.
UAV size
Drones come in a variety of sizes, from nanos, which are smaller than the palm of your hand, to large ones that can only be transported in the back of a truck. For most users just starting out in the drone hobby, the optimal size range that offers the most versatility and value is between 350mm and 700mm. The frame size is the diameter of the largest circle intersecting each of the motors. Parts for UAVs of this size have a wide range of prices and the largest selection of products available.
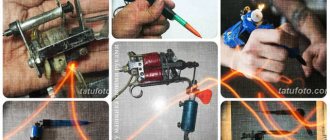
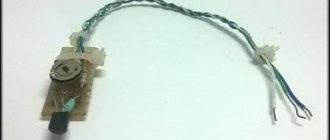
How to replace the remote control antenna
In the video above, the Syma quadcopter is being upgraded to increase its flight range by replacing the standard antenna-wiring with an external one with a larger dBi.
And in this video, installing an external antenna on the FrSky Taranis remote control.
As you can see, the procedure is very simple, it only requires accuracy and the ability to solder, and it practically does not depend on the type of remote control.
If you are just starting your journey into the world of radio control, then see the article Which drone control panel to choose.