Here you can learn about how to assemble (make) a tattoo machine with your own hands at home, get tips and recommendations, and read a lot of relevant and useful information on this topic. And if you don’t want to sweat yourself, you can simply buy a tattoo machine from the FamilyTattoo online store. Bishop, Eikon, Vlad Blad, Iwan Yug, all available - welcome!
Do-it-yourself tattoo machine - tips and photo examples of ready-made machines made at home
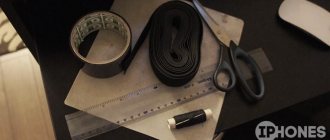
Required accessories
If you can’t buy a beginner’s kit or spend money on a salon, you can cope with the task by relying on your own strength. Not everyone immediately decides to take part in such an event due to the unusualness and novelty of the procedure. But, as in any other matter, with perseverance and setting a goal, you can completely realize your plans!
Handy tools are always available for sale, and many of them are in the master’s home piggy bank. Since the main elements are the needle and the electric motor, you can use a sharpened guitar string No. 1 or No. 6. If you do not have access to the tool, it is replaced with a regular needle included in the bead kit.
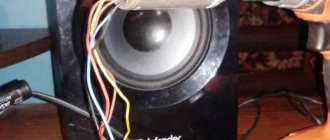
It’s even easier to find an electric motor, which is equipped with toy cars, electric shavers or players for scrolling cassettes. If you don’t have any at home, thank you, you can absolutely inexpensively buy a motor on the market in the radio section or a used spare part. The power must be at least 12 V, the best option is 18.
Advice for those who decide to get a tattoo for themselves
Some practical advice from those who have already walked this path:
- For the first time, choose a place for the design in such a place that the homemade tattoo can be covered up in case of failure.
- Don't get hung up on intricate patterns.
- Before getting a tattoo on your arm, practice on artificial skin.
- Use black paint (cheap colored ones often cause an allergic reaction).
- Google how our skin works.
- Carefully study all contraindications for tattoos.
- Do not use used needles (tips) under any circumstances.
- Do not take alcohol “for courage”, it will provoke bleeding.
- Under no circumstances should you wrap your tattoo with a bandage immediately after finishing the procedure. It will dry out and the pattern will be disfigured.
- To provide first aid, prepare a hemostatic napkin soaked in a 1% aqueous solution of feracryl with a hemostatic effect.
- There is no certainty that everything will work out; it is better to limit yourself to a transferable tattoo.
There is no need to get a tattoo for the sake of self-affirmation in front of your friends (“are you weak?”). It is better to stay away from manipulative people. If you want to have a high-quality tattoo, you need to go to a salon, find out the price and adjust your budget in order to save money for the desired design.
By-products
Additional items you will need:
- A pen or pencil will serve as the body.
- A spoon, aluminum fork or toothbrush for a bracket or tie - to attach the motor to the body.
- Electrical tape or soldering iron, wire cutters.
- The power source is a charger with the required voltage.
- Gear, button.
The list of names may be different. You should proceed from what kind of machine is being created and what exactly you plan to purchase. Knowing how the device works, you can use any suitable parts.
Permanent tattoos
The peoples of different countries used various natural mineral compounds, which could easily be obtained in their area of residence.
Soot, ocher, coal, powder mixtures, and henna were used. That is, everything is natural and this is a big plus.
For permanent tattoos, professional industrial chemical inks are used.
Assembling a rotary machine
The option of a small electric motor is just right for those who are not used to tinkering. Induction machines do not have a motor. Instead, they are equipped with a pair of coils that generate a magnetic field. Without knowledge of the basic mechanics and rules of handling metal, not everyone will be able to make them. This is why it is better to choose a rotary machine.
The list of items from which it is assembled is as follows:
- Electric motor.
- Charger.
- Button with 4 holes.
- Pen or pencil.
- Aluminum spoon.
- Guitar string.
- Insulating tape.
- Antibacterial drug.
Temporary tatoos
For a period not exceeding 40 days:
- henna (Mehndi) with and without oil
- airbrush up to 10 days
- decals
For a period of 1-5 years. Cosmetic (permanent makeup)
Step-by-step instruction
- You should find a gear on the motor shaft. A button is attached to it using superglue so that the holes remain free of glue. It needs to be left for some time to dry.
- The core of a pen or mechanical pencil, cleaned of ink and washed with water, is treated with an antibacterial compound. On the side of the ball, the tip of the rod is slightly filed off for unhindered placement of the guitar string. Its length should match the size of the rod.
- A bracket is made from a spoon to hold the motor and housing together. In this case it is represented by a pencil or pen. The part of the spoon intended for eating is broken off, and the handle is bent into an “G” shape. As a result, a bracket was formed.
- The ballpoint pen and the bracket are held together with electrical tape along the handle. It is necessary that its end and the place of the bend coincide, located at the same level, and you cannot miss. The motor and button are connected in the same way.
- The guitar string is inserted into the handle, the end is bent into the letter “P”. At the end of the process, it passes into the opening of the button.
The algorithm is quite simple. There are no complex manipulations or special parts involved. Next, you need to check the assembly on a piece of leather taken from a jacket or bag and turn on the charger. You can also test the machine on a banana peel. The video on the site will tell you in detail about the sequence of actions.
Preparation of henna
There is ready-made, already mixed henna in tubes, which is most convenient to use. It is better to mix powdered henna in advance, about a day in advance.
To do this, mix a tablespoon of henna with lemon juice (1/4 cup) and stir. Close the container tightly with a lid or plastic wrap and put it in a warm place for 12 hours.
Add essential oil, a teaspoon of sugar and mix everything.
Now the composition must be brought to the consistency of toothpaste, adding lemon juice little by little. For a multi-colored tattoo, you can add basma to henna in the required amount to obtain the desired color.
Machine without strings
It is important to note that the string, unlike other materials, holds paint perfectly and is not subject to deformation or rust. But don’t be upset if you can’t get it. Necessary for the rotary type, it is not suitable for the induction machine. Due to the stronger puncture caused by induction, it breaks easily. A needle specifically used for tattooing will be appropriate here.
Not only guitar strings are suitable for homemade machines. You can choose a needle from a bead kit that does not need to be sharpened. An additional advantage is that they are quite narrow.
All actions are similar to the previous ones, with the only exception - the running part of the needle holder is a steel knitting needle, bent at one end. They are connected by means of a plastic pencil rod, which acts as a nozzle through which the needle is inserted. The curved end of the spoke is attached to the rotor of the engine, which functions like a locomotive piston.
Precautionary measures
Important. You can make drawings on your body yourself that will look like a tattoo. Depending on the design, they will create a romantic or festive mood.
In order not to spoil your holiday, you should take precautions:
- It is necessary to do a test for an allergic reaction in advance. This is important when using synthetic dyes.
- A few days before creating a tattoo, you need to apply the dye that you plan to use to a small area of the skin. If redness, itching or other reaction occurs, this dye should not be used.
Temporary tattoos allow you to decorate your body almost free of charge and without any discomfort. The main thing is to be careful when choosing a dye. It is best to buy products for such tattoos in specialized stores.
Features of the needle
During the operation, it is necessary to ensure tension on the string to obtain an even image. A thin string from a guitar is cut to be 20 mm longer than the tube, in this case the rod from a pen or pencil. One end is sharpened, and the other is attached to the motor, close to the shaft axis. It is this position of the needle that will provide the correct range of vibrations, which affects the accuracy of the pattern.
When carrying out the procedure, one must not forget about precautions by ensuring sterile conditions in the room. Getting a tattoo can damage your skin. You should avoid touching the string, rod or needle to anything, for which you need to work with gloves. After all the manipulations, the needle and pen will no longer be needed.
Watching the video will help you avoid making mistakes. The soft, silent stroke of the machine allows you to achieve beautiful and even lines so that the tattoo looks attractive. With such a device you can create many styles in the world of tattoo painting!
How to prepare and what is the process like?
To really imagine your future tattoo, you need to first draw a pattern with ink. An alternative is to get yourself a temporary henna tattoo and wear it for a while. This will make it possible to satisfy curiosity and understand whether the future drawing will be annoying or not, which is very difficult to draw later.
If the psychological barrier is overcome, the tool is selected, there are no problems with choosing a pattern, the algorithm is as follows:
- find a place in the room where there is a minimum of dust and good lighting;
- if necessary, use an additional flashlight or a lamp with directional light;
- remove everything unnecessary from the table, leave only what is needed to apply the pattern (tools, paints, napkins, antiseptic, Vaseline);
- wipe the table with an antiseptic and cover it with a sterile napkin (oilcloth);
- prepare validol (bad joke);
- carefully examine the needle (is it bent, how sharp is the tip);
- finally decide on the location of the picture,
- shave an area slightly larger than the pattern;
- disinfect the place for drawing;
- draw a pattern with a gel pen;
- Apply Vaseline to make it easier to remove excess paint;
- prepare paint;
Now all that remains is to methodically inflict punctures on yourself along the contour of the pattern, and wipe off excess with a sterile napkin. It is advisable to use special antibacterial soaps, which are offered by manufacturers of tattoo pigments.
If you don’t have drawing skills, you can use a ready-made sketch that is transferred to the skin using special transfer (copy) paper for tattoos.
After completing the tattoo procedure, find money to remove it and throw the used needle in the trash. Care is the same as after visiting the salon. Spread with bepanthen and cover with cling film for several hours. Then regularly change the ichor-absorbing diapers. Keep away from sun, water, dust and dirt.
How to assemble a domestic model of a radio-controlled car
To assemble this model, we need the following components:
- A simple model of a machine of any manufacture;
- VAZ parts for opening doors, 12-volt battery;
- Equipment for organizing radio control;
- Durable batteries with chargers;
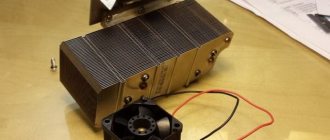
- Radiator;
- Electronic measuring equipment;
- Small soldering iron with solder;
- Locksmith equipment;
- A piece of rubber to provide reinforcement to the bumper.
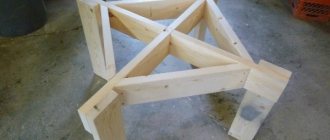
An approximate diagram of assembling a radio-controlled model is shown in the figure.
Let's move on to reading and assembling the diagram, to the exciting process of creating a unique mini-car. First we assemble the suspension. We take VAZ connections and gears to assemble the gearbox. Threads need to be cut on the studs and housing to attach gears and solenoids. We connect the gearbox to the power supply, check it, and then fix it on the machine. To effectively protect the system from overheating, we install a radiator. The plate from it can be firmly fixed using ordinary bolts. Next comes the installation of power driver and radio control chips. We completely install the car body. Our mini-car is ready for real tests.
Types of paper machines
There are a considerable number of options for creating beautiful paper cars. Let's look at the most common of them.
Assembly according to instructions. There are special instructions on how to make a paper machine, which can be easily found on the Internet. In order to make such a machine, you will need to download the diagram, print it on a printer, then you just have to cut it out and glue it together.
Sports option
To create, you will need a rectangular sheet of paper.
It is important that its sides have a ratio of 1:7. The top right corner is bent first and the bottom left corner in a similar manner.
After fixing, the corners return. As a result, we get outlines.
After this, you need to bend the top element, tucking it inside at the same time. Next, bend the triangles again towards the central part of the sheet. The side parts of the sheet are folded, and the bottom part is folded.
Simple option
The part located on top bends down, while obscuring the lower part. The upper right corner must be bent, thereby we will get a windshield. Finally, it is recommended to unfold the figure.
Racing car
You will need a sheet that needs to be folded in half along the long side. Connect the corner to the opposite side. Carry out a similar operation with all corners. This will create two squares with intersecting lines. Triangles belonging to the long side are bent inward.
Next, the long parts are combined using the middle line. One triangle will be needed to create the hood of the car; for this you will need to bend the sides towards each other.
The triangle, located on the other side, is tucked into the folds formed on the hood. All that remains is to bend the fragment that will represent the spoiler.
Fire engine
When creating such a model, paper alone will not be enough, so you should prepare glue and scissors in advance. To create it you will need a special blank made of dense material.
Introduction to professions
By explaining to a child how to make a car out of cardboard with his own hands, parents or kindergarten teachers can easily introduce the child to various professions in the form of a game, develop his research interest, teach him to work, and cultivate attentiveness and perseverance.
It is better to prepare for classes with your child in advance so that his interest does not disappear during the long preparation process. Master classes on how to make a car out of a box will allow adults to better navigate the world of cars.
Together with your children, you can make models for any purpose, simultaneously explaining the intricacies of any profession. For older children, it is necessary to find more complex options. And for kids, it is better to choose designs that are simpler to execute, so that the child does not have time to get tired and lose interest in the creative process. Having studied the details of the upcoming assembly, you can prepare what is necessary without the child, and with him only assemble the model.
Children play with homemade toys with great pleasure. Making a fire truck with your own hands from a box can smoothly transition into a game about firefighters. Classes dedicated to introducing any profession can be conducted using the appliqué technique. So, you can tell kids about the structure of a fire truck and how rescuers train while they glue the parts onto a sheet of paper.
There are a huge number of ideas for joint creativity. There are no restrictions for imagination here. Girls can be offered to make a washing machine for dolls or set up a toy kitchen. This craft is guaranteed to be remembered by the child, and a handmade toy will bring joy to the child for a long time.
You can set up a dollhouse for Barbie or a large garage for cars by covering it with colored paper or painting it with paints. Homemade toys develop children’s aesthetic taste, and the creative process can last more than one day. After all, a dollhouse can be modified and improved for a long time. For example, design and make furniture for dolls from cardboard, add curtains to the windows, assemble a library from tiny books.
Of course, store-bought toys can also be used to organize a story game, but no purchase can replace the joy of creating a toy with your own hands.