I sell decorative wooden products online in my city and region. Even at the beginning of my peculiar career, I needed a jigsaw guide for cuts and cuts at different angles. Recently I saw my competitors... These unfortunate turners made terrible cuts, constantly drawing angles on the boards. Not only did the cuts turn out to be uneven, but this method was also very labor-intensive. This gave me the idea that it wouldn’t hurt to talk about how to make a guide for a jigsaw with your own hands. Hope it helps someone.
Source usamodelkina.ru
Why does a jigsaw cut crookedly?
The saw blade leaving the pre-planned line may be due to several reasons. The operator may not have enough experience in handling the tool, the file may be defective, and the rod and guide roller for the jigsaw may have serious play. In order not to guess from the coffee grounds, it is worth starting to sift out the factors that determine the accuracy and evenness of the cut line in your individual case.
As usual, it’s better to start with yourself and your approach to sawing. Often, novice craftsmen rush things and, wanting to speed up the cutting, apply a lot of pressure to the jigsaw. The tool does not have time to bite evenly into the material and create a clear groove for the file, which begins to follow the path of least resistance and makes unpredictable movements. This problem is especially common when working with thick timber (from 40 mm) and varnished plywood from Soviet times.
This is one of the reasons why the jigsaw moves to the side. What to do about this? The answer is obvious. Apply the minimum pressure sufficient to guide the tool along the line and set the maximum number of revolutions (when working with wood). The pendulum mode usually does not affect the evenness of the cut if its design is in good order.
The quality of assembly and wear of tool parts can be a good reason for the formation of beveled lines when sawing. There are basically no complaints about devices from the budget segment (up to 2,500 rubles), as well as hopes for their conscientious assembly. It’s another matter when original, branded instruments begin to perform such tricks. Often, the cause of a crooked cut is the guide roller, the jigsaw rod or its sole.
You can check the reliability of the element’s fixation by simply tugging it with your hand. Loosening of the rod or roller by more than 1 mm determines that this device is not capable of producing a perfectly even cut. The more play there is in the parts, the less accurate the cutting line they form. This problem should be corrected based on the circumstances. If the part itself is worn out, it can be replaced with a similar one. It is difficult to fix a breakdown if the attachment point to the mechanism is worn out. Not every modern Kulibin undertakes such repairs, and this problem is usually solved by purchasing a new tool.
Unfortunately, the products of many trusted brands are often counterfeited, and jigsaw files are very popular in this regard. It so happens that low-quality and counterfeit products have a rather short service life, which brings many problems to the owner. One of these problems is a crooked cut. An initially smooth blade can bend due to poor-quality metal, which can cause deformation of the tooth set, if it was present at all. In this regard, if your jigsaw cuts crookedly, replacing the saw blade can correct the situation. The process of choosing a high-quality jigsaw file was discussed in detail in a separate topic.
To get an absolutely even cut, you don’t have to be a master or have a professional tool with original consumables. For such purposes, there is a very simple and useful device, which we will discuss below.
Blade clamp repair
Not every manufacturer of power tools uses high-quality materials, which is why their service life may even be disposable. Frequent breakdowns, especially due to pressure on the tool, also occur with the jigsaw blade clamp. Below we will describe the course of action to eliminate a broken block fastening.
During prolonged cutting, the jigsaw block clamp may become deformed, because there is a serious load on the saw attachment. The breakdown may be easily repairable, the file may be slightly deformed or cannot be repaired at all.
To restore the operation of a jigsaw, the easiest way is to buy and install a new block of the same type. This part can be purchased at markets and hardware stores. Of course, this does not mean that the new mount will be better, but the main thing is that the tool can be used.
Jigsaw guide
Measure the width of the jigsaw sole.
This is the width you need to cut the workpiece to fit the jigsaw guide.
We cut out a window in the workpiece itself, such a width that when sawing at an angle, the file does not touch the guide.
Cut out and glue the sides.
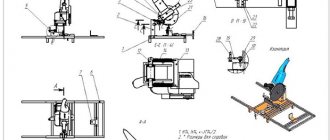
You need to place stops on the edges of the stop by simply gluing rectangles of plywood. A slider-stop for cross-cutting and angular sawing is also manufactured - circled photo.
We move on to making a stop for cross-cutting and sawing at angles. To do this, we cut out two strips from plywood.
We cut a through groove in a narrow strip with a jigsaw. The stop pin will subsequently move along this groove.
Glue the cross stop with PVA glue.
Use a miter box to trim the angle of the stop.
Main stages of work
First of all, it is necessary to make the base of the structure. We saw off four wooden blocks and join them together to form a rectangular frame. We screw a sheet of plywood or chipboard on top of the box.
After this, we assemble a guide platform for the jigsaw from wooden slats. In the central part we leave a gap for the saw blade.
Before fixing the platform to the base, we cut out a longitudinal groove in it, along the edges of which, stepping back a couple of millimeters, we need to drill holes and install furniture nuts.
We also drill holes along the edges of the groove in the guide pad and install guide bushings (from a round pipe).
Next, cut two pieces of threaded rod to the required length. Screw them into the base. We put a jigsaw guide onto these studs and secure it with wing nuts.
At the end, all that remains is to attach the adjustable parallel stop to the base so that you can set the workpieces at an angle of 45 and 90 degrees. The emphasis can be made from a wooden batten.
The device works as follows: we place the workpiece under the guide pad, press it against the stop and press it down with the pad on top, tightening the wing nuts. We install the jigsaw on the platform and make a cut.
Rip fence for electric jigsaws
A mandatory accessory on a power tool is the rip fence. This device allows you to perform a parallel cut relative to the edge of the workpiece. The device is a rectangular rod with a perpendicular stop at its end.
The use of the device consists of installing a stop at a distance corresponding to the size of the future cut and fixing the rod on the base of the tool with a screw. In inexpensive models of jigsaws, a parallel stop is included with the tool; in expensive models, this accessory is usually absent and must be purchased separately. The cost of such a device is rather high, so many craftsmen prefer to make the device themselves.
DIY parallel fence for a jigsaw: instructions
- For manufacturing you will need a metal strip 2 mm thick and 350 mm long. The width of the strip is selected according to the size of the bracket on the sole of the jigsaw. If there is none, you will need to do it yourself.
- To do this, you need to drill 2 holes with a diameter of 4–5 mm in the base of the power tool. Then threads are cut into them. Then, from a 2 mm thick strip, 2 brackets are bent along the profile of the rod, having previously drilled holes in them for fasteners and a fixing screw. A thread is cut into the hole for the screw. The brackets are installed on the sole of the jigsaw and secured.
- After this, a corner 80–100 mm long is welded perpendicular to the rod. The bar is bent in the opposite direction through the upper shelf of the corner. In this case, the distance between the surface of the angle shelf and the bottom side of the rod should be equal to the thickness of the jigsaw sole. The free end of the device is inserted into the brackets on the sole and secured with wing screws.
Workbench table top
The first step is to cut out the tabletop from the workpiece and cut an arc-shaped groove in it. First you need to mark the groove. To do this, we nail the rail with a nail, and with a pencil we draw two arcs at a distance of 6 mm from each other.
Next, drill the beginning and end of the groove and carefully cut out the outline with a jigsaw.
But it’s more convenient and smoother to make the groove with a router. In this case, you don’t even need to mark the contour of the arc. It is enough to take a straight cutter with a diameter of 6 mm, screw the router onto a sheet of hardboard or laminate, secure it with a nail in the center of the circle and make a groove.
At the next stage, you need to cut out an opening for the “guide” with a jigsaw. Use a Forstner drill to drill into the corners.
We cut out the outline with a jigsaw.
Now we screw in the stops, and the guide with the jigsaw will rest on them.
Drill holes for the parallel stop.
We cut out the sides for the tabletop from plywood; they will give the tabletop rigidity, and in addition, the legs will be attached to them. Now we glue them to the tabletop with PVA glue and press them with clamps.
Main stages of work
At the next stage, the master screws pieces of plywood 8 mm thick to one of the ends, as well as on the sides of the guide. These small sides act as stops for the jigsaw.
After this, all that remains is to make a thrust pad from a piece of plywood 18 mm thick. Then we drill holes and connect both parts to each other.
Thus, the guide itself will be movable - it can be moved left and right relative to the thrust pad.
In order for the device to serve you faithfully for as long as possible, it is advisable to saturate the plywood with mineral oil.
For details on how to make a jigsaw guide with your own hands, see the video below. This material was prepared based on a video from the VeterNSK YouTube channel.
Source
Jigsaw Diold: a budget option for the household
Another, no less popular manufacturer of domestic power tools is the Smolensk company Diold. Jigsaws are distinguished by their low price and fairly decent quality. For home work, this is a completely suitable budget option.
Support roller repair
It also has points that are worth paying attention to. The first is the support roller
Over time, which is about a year, it begins to lose its round shape. The reason is the material of the roller or the technology of its manufacture. It lacks hardness.
Its repair consists of replacement. Still, it is better not to reinvent the wheel, but to purchase an original roller from the manufacturer or take the tool to a service center, especially if it is under warranty.
If this option is not suitable or is not feasible, then you can revive the jigsaw using improvised means. To do this you will need a regular M5 bolt with a nut. In this case, the bolt will serve as an axis, so the thread on it needs to be ground off, and the nut with a roller, in which a groove needs to be cut along the generatrix according to the thickness of the saw blade.
It is ideal to do this on a lathe, but you can also use a tool that you have on hand, for example, a drill and an angle grinder disc. The disk must be clamped in a vice, the bolt and nut must be clamped into a drill and a groove must be cut. The repair option is not ideal, but it has the right to life, since it has been tested in practice.
Start Button Maintenance
Another nuance in using a Diold jigsaw is that wood dust gets into the start button. This happens due to the lack of tightness, and dust getting inside the button prevents the passage of current. The solution to the problem is to periodically, at least once a year, clean the contacts.
Guide fence for electric jigsaw
A jigsaw guide can be purchased at the store. It is a special aluminum profile with a T-shaped groove on the bottom side for the unhindered movement of clamps.
On the upper side, the guide has two T-shaped grooves into which devices are inserted to fix the power tool and allow it to move freely along the ruler. Clamps are supplied with the guide; accessories are sold separately.
The ruler is attached to the workpiece with clamps, and the cutting is carried out with a jigsaw. If there is no device for fixing the tool, then during the cutting process the jigsaw is pressed against the guide with the side of the sole.
You can make a guide ruler at home. To do this you need:
- Take a timber without knots, 1.9 meters long. This is a more acceptable size, because the cutting width of chipboard and laminated chipboard sheets is 1830 mm.
- All surfaces of the timber are processed in compliance with strict perpendicularity relative to each other.
- After this, a groove is made on the bottom side and a T-shaped profile is inserted. Clamps will be placed in it to secure the ruler to the workpiece.
- Graduation is attached to the outside. To do this, you can use metal rulers, attaching them with round-head screws.
Cutting is carried out by moving the jigsaw with the edge of the sole resting on the side surface of the guide ruler.
Jigsaw Interskol: correction of sawing curvature
It is worth paying attention to the domestically produced Interskol jigsaw. It is produced in Izhevsk
For domestic use this is a completely acceptable option. It has many positive qualities, and the most impressive is its low cost. But there are also disadvantages.
Replacing the quick release saw blade mount
This is the curvature of the saw. What is the problem, and is it possible to get rid of it? The culprit was the quick-release fastening of the file. The fact is that it is designed for saw blades of maximum thickness. All cutting tools of smaller thickness simply dangle in the mount.
How to get out of this situation? You need to replace the quick-release mount with a simple device with regular bolts. It's not difficult to make. You need to take a square rod, cut two blanks, drill holes in them and connect them with two M5 bolts and nuts. The procedure for attaching the saw blade will become somewhat more complicated, but the tool will produce an even cut.
Refinement of jigsaw design
In addition, you can modify the design of the tool itself and limit the movement of the file in the transverse plane.
To do this you need:
- take sheet aluminum and cut the plate to the size of the jigsaw sole;
- In the front part of the workpiece, it is necessary to make a cut to the size of the working area of the cutting tool. File all edges, make bevels on the inner longitudinal edges of the cutout;
- You need to cut a plate from plexiglass to the size of the working area of the saw blade. File all sharp edges and make reverse bevels on the outer longitudinal edges;
- The aluminum plate must be marked for its installation on the jigsaw base. Drill holes and make chamfers for installing countersunk screws;
- A piece of plexiglass must be inserted into an aluminum plate, having first made a cut at its location.
Now, during operation, the saw blade will be limited in transverse movement almost in the cutting zone, which will give it even greater straightness.
Guide rail for jigsaw
Not every craftsman with straight arms will be able to make a perfectly even cut with a jigsaw without the use of auxiliary devices. Only the most experienced experts who are masters of the tool will be able to get a straight line “by eye”, and only if it is in good working order and has suitable saw blades. Of course, not everyone has the time and desire to become a straight-cut saw with a jigsaw, and purchasing a circular or plunge-cut saw for such a task is quite expensive. If you only have a jigsaw with files at your disposal, then a special guide rail will help you get the desired straight line. The guide for a jigsaw is a simple device, at first glance, similar to a large metal ruler or rule. The main difference between the tire and the above devices is a special groove along which, like on rails, the sole with a jigsaw mounted on it moves. Most guides have rubberized strips that prevent sliding on the surface of the material, and for additional fixation, they are attached with small clamps. The average length of such devices is from 1.5 to 3 meters, and can be increased by another, similar ruler, using an adapter.
Many modern manufacturers of electric jigsaws produce special guide bars tailored to their products. Such devices have rather low versatility, limited to working with tools of only a given brand. Fortunately for owners of non-branded devices, there is an advanced, universal Line Master guide, with an adjustable sole and many useful functions. The average cost of such a line with an adapter will be about 3,000 rubles. The price is higher than some jigsaw models, but a high-quality, universal guide is well worth it. A detailed analysis of the device is clearly presented in the video below.
Typical power tool failures and measures to prevent them
The jigsaw is designed to perform rough curved cuts, so there is no point in talking about ideal sawing. Although this indicator is also different in hand tool models from different manufacturers. When using cheap models, they don’t pay much attention to this, and the cut turns out completely crooked. You need to deal with this in service centers, but you can try to get rid of the curvature at home.
The support roller may break if poor quality saw blades or dull tools are used. Use of cutting tools in inappropriate load conditions. The result may be jamming or cutting of the support roller.
To avoid such a problem, you need to use well-sharpened cutting blades of acceptable quality, observing optimal cutting conditions and following the manufacturer’s recommendations.
As a rule, almost all models of jigsaws are equipped with a tool-free saw blade fixation unit. This simplifies the process of changing cutting tools. But operating the mechanism in conditions of constant dustiness leads to wood shavings getting into it, and this leads to failure of the device.
In order to avoid damage to the unit, it must be constantly cleaned of dust and lubricated with a special compound such as WD-40. During operation, you must use a vacuum cleaner by connecting it to the tool.
Failure of gearbox elements is a consequence of wood dust entering through the ventilation holes. Here, as in the previous case, you cannot do without a dust collector.
Breakage or bending of the support rod occurs during careless use of the power tool. This can happen when it falls or an unintentional collision of the jigsaw body, directly the support rod, with protruding elements of the surfaces being processed.
The destruction of a tooth on the collet of an electric jigsaw can only occur through the fault of the performer. This is caused by an attempt to inadvertently tighten a cutting blade that is not fully inserted.
The armature worm gear will not last long if you start the cutting process before the tool motor reaches optimal power. To extend the service life of the mechanism, do not start work before reaching full engine speed.
Peculiarities
The operation of the jigsaw can be adjusted by the following elements.
- By tilting the sole, due to which you can make oblique cuts. Used quite rarely.
- Stroke frequency, thereby adapting to the material. If they work with wooden materials, then use the maximum frequency, in other cases - the average.
- Pendulum motion of the canvas. This regulates the vertical and longitudinal movements of the tool.
But the accuracy and quality of cuts are ensured and controlled by the jigsaw’s guide elements. These include the following devices: guide rail, support roller, ruler and laser illumination. The latter, however, is not present on all jigsaw models.
Let's take a closer look at the various jigsaw guides.
Support roller
This part of the tool is a wheel that guides the main working body (the file) and at the same time serves as a support for it, absorbing the forces on the file from the process of cutting a particular material. The function is actively revealed when the volume of work and the dimensions of the workpiece are large. When using a pendulum stroke, the saw blades begin to move more efficiently - not only down and up, but also back and forth. At the same time, dust and sawdust are better removed from the groove being cut, which means the jigsaw produces a better quality cut.
The support roller is a necessary part in a jigsaw; without it, neither high-quality cutting nor long-term operation of the engine, files and other elements are possible. Due to frequent jamming and jamming of the saw blade in the material, overheating of the moving mechanisms and overload of the electric motor would occur. And this all leads to their rapid wear and failure.
For the quality of the video to work, the following rules must be observed:
- cutting blades must be of good quality;
- threading modes must comply with the instructions supplied with the tool;
- Do not allow wood shavings to get into the roller, and after use, clean the product from dust and debris.
DIY jigsaw compass
Another device that will come in handy in a carpentry workshop is a jigsaw compass. Not very often, but sometimes you have to cut out round parts. It is quite difficult to make the circle even according to the markings. But a DIY device will help with this.
- You need to take a sheet of thick plywood and cut a strip from it as wide as the sole of a jigsaw. The length of the workpiece is arbitrary. Depends on the size of the radius of the future circle.
- Then you need to install the jigsaw on the edge of the strip. To do this you need to make a cut.
- After installation, the base of the power tool is framed with slats and attached to the strip in the areas of the technological holes.
- A line is drawn from the middle of the canvas on the plywood, the required radius of the circle is measured on it and a self-tapping screw is screwed in.
- After this, install the device on the workpiece with a self-tapping screw in the center of the circle. If necessary, drill a hole for the saw blade.
By moving the jigsaw around the axis of the screw, a circle is cut out.
Linear motion technique. Mechanical components.
Detailed descriptions, catalogs and engineering information are located within individual subsections. If necessary, our specialists will help you select the most suitable products for your task.
Guiding mechanisms:
- High load capacity
- High accuracy
- Self-centering
- Compactness
- In stock
Drive mechanisms and devices:
- High efficiency
- High accuracy
- High load capacity
- In stock
Electromechanical linear actuators
- Actions
- Search for spare parts from other manufacturers
- Go to catalog library
- EcoPRO products - inexpensive solutions for professionals
- Products sorted by category
- Guides
- Ball profile rail guides
- Roller profile rail guides
- Ball bushings
- Linear blocks
- Precision round shafts and bearings
- Spline shafts
- Precision rail guides and tables based on them
- Guide protection systems
- Lubricant for linear guides and ball screws
- Drive technology
- Ball Screws, Roller Screws, Supports
- Racks and Gears
- Actuators and positioning systems
- Coordinate tables
- Linear modules
- Electromechanical Rod Linear Actuators
- Other product groups
- Electric drives and electronics
- Industrial pneumatics
- Ready-made systems
- Other products
LLC "Aketon"
Official distributor of NB in Russia and the former CIS countries. Direct deliveries of industrial goods and components from Japan, Europe, America.
Copyright 2006-2020 Aketon LLC, All rights reserved.
105523, Russia, Moscow, Shchelkovskoe highway, 100, bldg. 6, office 202 (diagram)
Jigsaw: LED cutting line lighting
When operating a jigsaw in poorly lit areas, it is advisable to illuminate the cutting line. You can make such a device yourself.
The lighting design is very simple and will require a few inexpensive parts:
- LED (you can use two).
- Capacitor 0.22 uF, 400 volts.
- Diode.
- Discharge resistor 500–1000 kOhm.
- Resistor 1 kOhm.
The circuit is connected to the power tool power button instead of a 0.22 µF 250 volt interference capacitor. The capacitance could have been left, but our circuit already has a 0.22 uF 400 volt capacitor, so in the fight for free space it is better to remove it.
A discharge resistor from 500 kOhm to 1 mOhm is connected in parallel to the capacitor. At the next stage of work, a diode is connected to the circuit with the cathode to the capacitor and in parallel to it an LED with the anode to the capacitor. A 1 kOhm resistor is installed behind them.
The peculiarity of this resistor is that it can heat up during operation, so it is better not to use low-resistance devices. Heating occurs within 10 minutes of continuous operation of the tool, so install the resistor so that it does not touch anything. It only takes a few seconds to cool down.
Since the circuit is connected to the start button, the backlight starts working even a little faster than the engine turns on. You can also use two LEDs in this circuit, then the light will be much brighter. In this case, the LEDs are connected in series.
After reading the information presented in the article, the master will be able to improve the quality of the cut and make it easier to perform operations using a jigsaw in general by purchasing or manufacturing various devices.
How to choose a good circular saw?
When purchasing a hand-held circular saw, the buyer should pay attention to the following parameters and technical characteristics of the tool:
- engine power. It determines how much work the unit can perform, how successfully it will cope with the task and whether it will cut thick, rough wood;
- cutting depth. It should be enough for the operator to cut the necessary materials and workpieces;
- cut at an angle. This makes the circular saw more functional and significantly expands its capabilities;
- the presence of a lock for accidental pressing of the “start” button, which increases operational safety;
- the presence of additional functions: protection against overheating, connecting a vacuum cleaner, blowing sawdust, etc.
For more detailed selection criteria, watch the video:
DIY jigsaw guide
If a jigsaw cuts crookedly, and it is not advisable to buy an expensive guide, you can completely get by with improvised means. Any smooth edge with a thickness of 5 mm or more can become an impromptu stop: a straight strip, usually a piece of plywood and other straight surfaces of suitable sizes. A pair of ordinary clamps can serve as clamps for the guide to the material. If the condition of the surface of the opposite part of the material being sawn is not of great importance, the guide can be screwed onto a pair of self-tapping screws.
Before installing a homemade stop, you should first mark the line of the required cut and step back from it a certain distance equal to that between the file and the edge of the tool sole. When sawing, you should guide the tool strictly along the edge of the guide so that it is parallel to the sole of the jigsaw. Working vibration can distort the movement of the saw in the material, so the device must be held firmly and pressed against the stop, which must be firmly fixed. To make the line as neat and even as possible, use the optimal file suitable for the material being processed. More visual processes for making and using a homemade guide are demonstrated in the following videos.
List of sources
- pro-instrument.com
- www.novaso.ru
Cylindrical shafts
The design of the cylindrical shafts allows you to maintain the level along the entire length, completely eliminating sagging under the weight of the carriage or your own. Such guides are also called linear support shafts; they are fixed directly to the body of the CNC machine through the threaded holes provided in the supports. Large carriages can move along such guides without sagging.
Disadvantages of cylindrical shafts:
- short service life;
- noticeable play in the bushings.
If linear-type bearings work equally well with loads in different directions, then carriages on cylindrical shafts show less stability. This is explained by the closed surface of the bushings, which carriages do not have. Therefore, you should be prepared for the fact that a small CNC machine with a heavy carriage on support shafts will operate with a greater error than the same CNC machine on conventional round rails.
The technology for manufacturing cylindrical rails is very simple, so they are produced by both well-known companies and handicraft workshops. This explains the variation in technical characteristics and prices. Often, carriages and rails from the same “know name” manufacturer do not match.