Register Login
Publication date: August 2, 2019
How to extract priceless electricity literally from thin air? It’s very simple, all you need is an old screwdriver (maybe a broken one) and all the trash from the workshop.
This will be the simplest model of a wind generator. No special skills or knowledge are required. The hardest part is drilling the holes in the gear. But more on this a little later, but now a little theory to clearly understand how everything works.
Ecowatt: Camping hand generator made from a screwdriver
Generator from a screwdriver
So, the simplest do-it-yourself dynamo machine in our time seems to be made precisely from a screwdriver . This stock power tool has a ready-made design that requires only a little fine-tuning in order to receive electricity in autonomous field conditions.
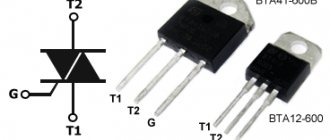
You can select a screwdriver for both 6-volt batteries and 12-volt batteries. For a 12 Volt screwdriver, the voltage of the screwdriver should be at least 18 Volts, and preferably 24 Volts, which is very rare today. But the current can be obtained in the region of 1-3 Amperes. A modern screwdriver is a fairly powerful tool with good windings. Before use, you will need to remove the board with the electronic speed controller inside the screwdriver and install a diode bridge at the output with a larger electrolyte - this will make it possible to turn the generator in any direction and more fully use the generated electrical energy.
Single-body diode bridge
All that remains is to clamp the homemade handle with a standard cartridge and go ahead. You can even attach blades to a screwdriver - you will get an improvised wind generator, you can also come up with many other generating structures from a simple screwdriver that is available in any tool store..
Source
Preliminary preparation
When constructing a windmill with your own hands from improvised means, if the goal is to have a working, useful device for the household, and not a reminder of a thoughtless desire to create something, it is necessary to calculate the dependence of the possible initial power of the installation on the wind speed.
It should be taken into account that the wind power is directly proportional to the area of the surface being blown and the wind speed raised to the 3rd power. The simplest arithmetic will show that the energy received is only sufficient to charge a mobile phone.
Before you begin the process of manufacturing a device “so useful” for home use with your own means and your own skillful hands, you should determine the characteristics of the accompanying parameters:
When building a windmill from a screwdriver, it is advisable to choose a horizontal-axis type of wind generator, since the axis of rotation of a windmill of this type can operate in any wind direction. The tail blade of this design balances and turns the working head of the structure on the mast in the direction of the wind.
The power generated by a horizontal wind generator is directly proportional to the height of its mast, since at a height of 6-10 meters the wind speed is higher than at lower levels. There is also a “but” here, such an installation cannot be located in close proximity to buildings. It is better to place it at a distance of about 300 m from a residential area, where there are no trees, or better yet on a hill, in which case problems with servicing the wind turbine and its safety begin.
Do-it-yourself wind generator from a screwdriver
The rampant rise in prices for electricity from traditional suppliers has led to more and more consumers starting to think about alternative energy sources. People have repeatedly tried, and not without success, to convert the power of wind into mechanical, thermal and electrical forms of energy. Therefore, it is not surprising that today there are powerful wind turbines capable of generating electricity on an industrial scale. The problem is that modern equipment of this type is very expensive and pays off extremely slowly. Therefore, the vast majority of homeowners, especially from rural or hard-to-reach areas, if they decide to make an alternative transition to the electricity supply, then try to make a wind generator themselves. There will be little benefit from a mini-wind generator assembled on the basis of a conventional screwdriver (the maximum is additional lighting of the area), but its design is practically no different from modern wind generators.
Service
Like any mechanism, a wind generator, even one made by yourself, needs some maintenance.
For example, in case of sharp gusts of squally wind, the installation must be equipped with a braking mechanism, purchased in a store or also made by hand, in order to avoid destruction of the structure.
Other protective measures include mandatory grounding of the mast and the presence of switches so that you can approach the structure if necessary.
Harsh climatic conditions in winter cannot be ignored, since during this period the generator blades or pipes may freeze up and cause an accident.
There is no need to talk about lubricating the rubbing parts of the windmill, since the wind generator itself is already a source of noise, albeit small, and the additional grinding and creaking of other parts of the installation can cause upset not only among neighbors, but also among family members of a home-grown designer who, with his own I created discomfort for myself and my loved ones with my hands.
Required materials and tools
Any craftsman who does not want to throw away an old screwdriver with a failed battery can try to assemble such a mini-wind generator. In addition, a novice designer will need:
- a piece of pipe of at least 3 meters for the mast;
- a couple of pieces of board, plywood or plastic for the base and tail;
- coffee tin for the body;
- steel plate for the impeller base;
- a section of pressure sewer propylene pipe for the blades;
- fasteners (washers, nuts, bolts, clamps, stepladders, etc.).
The set of tools you will need is very simple: an electric drill, a set of screwdrivers, a soldering iron with solder and flux, pliers, scissors, a hacksaw or jigsaw, a grinder and electrical tape.
Conclusion
Taking the opportunity and creating a device with your own hands to use practically free, otherwise God-given energy, especially if you are far from civilization or just want to save money, is very commendable, but economic justification begins at a wind speed of at least 4 m/s.
I would like to ask the home-grown Kulibins whether it would be better to buy a standard wind turbine for almost the same money. Such an installation can be assembled in 2-3 hours, generates electricity at a wind speed of 1-2 m/s and has a payback period of 5-7 years.
Source
Principle of operation
The point is to convert mechanical energy into electrical energy.
The wind flow rotates the blades of the wind generator. The blades rotate the rotor, that is, the screwdriver motor. The rotor generates electricity. That's all, actually.
Calculations
Working formula: P=(0.6⋅S⋅V³⋅0.4⋅0.8-20%)/2
S – area of sweep or circle of blades. Calculated using a separate formula: S=πr² (r – radius, π – Pi number, 3.14)
V – wind speed. It is measured by a special device - an anemometer. .You can also assemble it yourself.
The starting formula shows the power of the wind flow. However, even a factory wind generator cannot convert all this power into electricity. A homemade wind generator made from a screwdriver, assembled with your own hands, is very far from this value.
Blades cut by eye in a garage can only absorb 40% of the power of the wind flow.
This 40% goes to the generator. But it can only process 80% of them. The figure depends on the efficiency of your specific engine.
Another approximately 20% will be lost on the wiring and battery.
And the final figure must be divided by 2. This is the only way to get a pessimistic answer, but close to the voltmeter readings.
In an example it looks like this.
- The blade is 97 cm. From the end of the blade to the center of the propeller is 3 cm. This means that the sweeping area is calculated as – 3.14 ⋅1²=3.14 m².
- The wind speed is, say, 10 m/s.
- Starting power – 0.6⋅3.14⋅10³=1884 W.
- We leave only 40% of this figure, which the screw will capture - 1884⋅0.4=753.6 W.
- And from this we leave only 80%, which the engine will absorb - 753.6⋅0.8=602.88 W.
- From here another minus 20% - 602.88-120.576 = 482.304 W.
- And the final reductions are 482.304/2=241.152.
- Total: 0.6⋅3.14⋅10³⋅0.4⋅0.8-20%=482/2=241.
This gives you a fair number that you can count on.
Of course, you can perfectly calculate the angle of the blades, conduct the wiring as needed, solder the controller and compensate for the losses. But this is an article about how to assemble a wind generator with your own hands from a screwdriver motor without any problems. To feel your power over nature and understand how it basically works.
If you want to make a more powerful wind generator, then it is better to forget about the screwdriver and find a more powerful motor. Well, for now, we work with what we have.
Should I do it or not?
Now you know how to assemble a simple wind generator using a screwdriver with your own hands. In stormy weather it will produce 200-240 W. From an economic point of view, such a windmill will justify itself only if all the spare parts were given away for nothing or were lying around in the garage that no one needed.
But we all understand that it’s not about money, but about creating something yourself. Extract energy from nothing using old trash. Isn't this a miracle?
Probably, after this you will want to assemble a more serious unit that will provide light to the entire house. It's more complicated, but you already know the basic principle, so go for it.
You need to be logged in to leave a comment.
Source
Work plan
Preparation
The highlight of the program is the screwdriver. We will need a clamping chuck and a motor from a screwdriver. The remaining parts are not needed yet.
We cut blades out of PVC pipes or something else. Suitable: aluminum sheet, thick plastic or plastic barrels. The main thing is that the blades are strong and light. About a meter long. If you wish, you can tinker with the form. Copy the proportions from the factory wind generator. Then the blades will absorb more air and rotate even without strong wind. But in general, you can do it by eye, as long as it spins.
We cut out a plate to secure them. The plate should come out strong. Material: steel sheet, cutter disc or piece of wood. It greatly affects balance, so do it back to back. There should be a place to securely attach the blades, but nothing more than that.
Components
All that can be useful is the rotor from that same screwdriver.
Other missing parts will have to be purchased, these are neodymium magnets of suitable dimensions, various rectifiers, converters, inverters and charge controllers.
Or find, for example, a chain gearbox to correlate the rotation speed of the rotor and generator.
Something to get - bearings for the blades.
The result will be a wind generator with a power of 30-40 W at a wind speed of 5-7 m/s.
But that’s not all, you need to make it yourself:
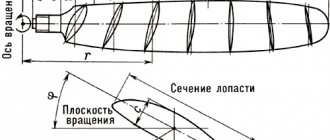
No less important is the issue of manufacturing blades of a certain shape; for this purpose, the problem of aerodynamics is solved.
To obtain useful operating power, the windmill blades must be 1.5-3 meters long, and this requires a useful area. When bolting them to the generator, it is necessary to very accurately calculate the position of the fasteners in order to have a correctly balanced, adjusted rotation of the blades.
Here a reasonable question arises: is a windmill made from scrap materials and a screwdriver worth such labor and effort, especially since its payback tends to zero. If we compare the costs of making a windmill with our own hands and the cost of a ready-made standard wind turbine (wind power plant), the second option is more preferable.