Flash drives often break and, as a rule, the outer shell - the housing - fails. How to reanimate a drive so that it serves you for a long time? Read on to learn how to make a case for a flash drive with your own hands: instructions step by step.
Today we will look at several questions:
- how to properly disassemble flash drives of different designs;
- what tools will be needed for this;
- How to make a case for a flash drive.
In addition, we will tell you which materials at hand can be used to create a new case, and which ones are better not to use so as not to damage the media. At the end there will be small master classes on how to design this device in the form of a Lego cube and a lighter.
Flash drives are an integral part of the life of a modern person. Of course, there are various other types of storage media. Computers and laptops have long been in use; in the end, some even use their smartphones for this. But despite this, these storage media do not lose their relevance: they can store large amounts of information, quickly and easily connect to various devices, and do not take up much space. They are used to store photos, videos, films, music, and for many they are an indispensable thing at work, for transmitting reports, presentations and important documents.
Usually they are in a plastic “body”, sometimes in silicone - manufacturers like to make these types in funny shapes like fruits, cartoon characters and TV series. And much less often they are more impressive, for example, steel. Plastic storage media are easily damaged; they can split from an unexpected fall, bend at a break, or crack when caught under a heavy object.
What is the way out of this situation? Spend money on buying a new device, time to transfer information? Why, if you can just read this article and find out how to create your own original case for a flash drive. In the possible options, you are limited only by the availability of materials and your imagination; the methods and types of homemade cases can be different: starting from a Lego cube or a piece of a block left after repair, and ending with a regular cork. Some craftsmen create real works of art in various styles and even sell them. Since there are many options, we will look at the basic principles - how to properly remove a flash drive from the old “body” and how not to damage it, what tools you may need and what items can be used to create a new design, and what materials should not be used.
Removing the Flash Drive
So, let's begin! First, just in case, transfer all the contents to another device. A flash drive can be:
- whole;
- collapsible.
If the former have a visible gap in the body, then the latter look monolithic. But both of them can be easily disassembled, the main thing is to know how.
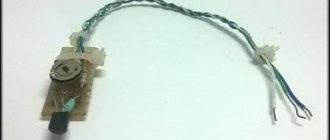
Let's start with the “solid” type. Its connector is connected by a latch to the board, and this latch snaps into place, and it is impossible to disconnect it in the usual way. We will need a thin, flat pen screwdriver. Using this tool we make a hole between the body and the latch. Carefully, so as not to damage anything, lightly pressing, swing up and down. Such holes need to be made in three or four places where the connection is made, now we can easily remove it.
Now let’s talk about how to remove the case from a “collapsible” flash drive. This type of drive is much simpler and its disassembly requires less effort: there is a small slot along the body that makes work easier. We will also need a thin feather screwdriver. Unlike the monolithic type, there is no latch here, but there are latches that we need to open. We insert the screwdriver into the groove and use the same rocking method to open the case. The latches may break, but this will not cause any harm to the drive.
Finally
We talked about simple and clear ways to create a bootable USB flash drive using various programs. We hope that this article helped you understand the principle of creation. Do not forget that if you install (reinstall) the operating system using a bootable USB flash drive, you need to install the initial launch of the operating system from USB, through the BIOS. Otherwise, the device will not recognize your operating system image recorded on the flash drive.
Many modern mobile PC models do not have disk drives. This confuses novice users when they have to reinstall the operating system. This is an inevitable process, as sooner or later it begins to freeze.
What to do in this case, and do without a DVD drive? There is an exit! Let's look at how to make a bootable USB flash drive. In this case, this is the only option, because the USB connectors are also built-in.
Making a case for a flash drive
Well, we've disassembled the flash drive, and now let's move on to the main task - how to make a case for the flash drive? Your homemade version, as mentioned earlier, can have any form - the main thing is to maintain the functionality of the drive. Firstly, the item should be easy to connect to the computer, and secondly, the materials should not damage its components.
That is, protruding edges should not interfere with the connection to the USB port, since a part that is not fully inserted may not work, and collisions of components with hot glue, paint and other aggressive materials must be avoided. The new case must be sealed and prevent moisture from entering the board. The easiest way is to choose plastic. It is much more difficult to create a shell from wood or metal, but it will definitely last a long time and will retain its “sales appearance.”
One of the housing options is made of electrical tape
Making a flash drive body from a lighter
We will look at the simplest option, made from a regular lighter. Almost everyone has an old used lighter lying around somewhere at home, and sometimes they have an interesting design. We will need a utility knife, a glue gun, a lighter of a suitable size, and a screwdriver with a 3 mm drill. A lighter is suitable so that the flash drive without a case fits completely into it and only the USB port protrudes. You can use any glue suitable for plastic.
First you need to release the remaining gas from the lighter, then make two holes in the bottom. Next, use a knife to make a cut along the contour framed by the holes. We install the flash drive inside and glue it to the body, removing the remaining glue. Our new drive enclosure is ready. We now have an interesting and practical flash drive-lighter. As you can see, it is not at all difficult and does not take much time.
Flash drive - Lego cube
Another way to design a flash drive in an original way is to make it in the form of a Lego cube, which almost everyone has. We will need several Lego bricks, a pocket knife, pliers, glue suitable for plastic, polish and sandpaper. First, we select the appropriate size cubes for our flash drive. You can make a case from several cubes of different sizes and colors. We cut off all the internal partitions with a penknife, now we break them out with pliers. We use the second same cube for the lid, cutting everything off to the top. We cut a hole in the end for the USB connector, adjust it, and install the device.
Using the remains of the brick, we fix the flash drive so that it lies parallel. We fill the empty space; for this you can use transparent silicone. So that there is no gap left between the base part and the lid, we rub the joint with sandpaper and glue it together. After the glue has dried, remove the residue using sandpaper. Using polish we finish the job.
Your exclusive DIY flash drive is ready!
So, as you may have noticed, making a case for a flash drive is not that difficult. The main advantage of making it yourself is that it will be truly original. After all, before you begin to implement it, you turn on your imagination, select materials from those at hand and those that are more accessible to you, put them together and in the end you have an original and individual flash drive, which 100% will not go unnoticed. It will certainly highlight your individuality and creativity.
We welcome all beginners as well as experienced life hackers on this site!
We have an electronic magazine in which we write various interesting articles about useful gadgets and unusual concepts.
We also look into the future or make the present more interesting, beautiful and useful. Read the next article of the electronic magazine. Almost everyone has USB flash drives today. But despite all the diversity, the range of housings for such devices is quite limited. Why not make a case for the flash drive yourself? It's not as difficult as it seems, you just need to spend a little time. But you will become the owner of a unique thing.
So let's get started! Following the step-by-step instructions, we will make a case for our USB flash drive from bricks from Lego children's construction sets.
This is what she will look like
Tools and materials
A pocket knife Pliers A few Lego bricks Superglue Sandpaper Metal polish Flash drive
The basis
1.
First you need to decide on the size of the future organizer. I recommend making it so that it fits easily in a drawer or on a specific shelf.
We are looking for a place for the future organizer, measuring the length and width of the space.
2.
Now we need a base that will fit in the allotted space without any problems. As a frame, you can use a board, a very thick piece of cardboard, chipboard/kragis/plywood. A metal plate or plexiglass will do; you can use a DVD box or an old vinyl record (cutting a square out of it) as a base.
There is only one condition for the base - it must ensure the rigidity of the structure and not bend. For example, I found a suitable piece of galvanized steel in the pantry.
3.
To make the finished product look beautiful, I covered it with black tape (to match the color of the rubber bands used). Those who are not interested in the aesthetic appearance of the organizer can skip this step.
DIY flash drive!
I think everyone understands that if these “own hands” grow not from the shoulders, but from another place, then it is best to transfer the construction of the flash drive to your more skillful friend. If your case is the opposite, then here's what you can do.
The essence of creating a new flash drive is to disassemble the old one. Why is this necessary? The fact is that the electronic content of the old flash drive will be the main component of your future product. Although, if you are able to solder a working electronic circuit yourself, you are welcome. So, the first step is to take the contents out of the old flash drive and put it in a new case.
As already noted, this method of making a case is not the only one. Craftsmen who feel confident working with wood can use wooden blocks instead of a ruler. Undoubtedly, such material will be more reliable and durable. Don’t forget that you can make various covers for the flash drive body. These can be metal strips, or plastic patterns from finished household appliances. All in your hands. In addition, you can try your hand at wood carving directly on the finished case, however, this will not be easy, given the very small size of our product.
USB drives have become a part of our lives. With their help, you can transfer information from one computer to another, view images and videos on TVs. The flash drive is compact, durable and lightweight. But most manufacturers offer boring oblong cases that differ only in size and color. Although, the appearance of this gadget is a real field for creativity.
This collection contains original ideas for flash drive cases that you can implement with your own hands.
Rubber
4.
Most likely, you won’t have the required amount of elastic at home; you’ll have to go to a fabric store to get it. There you can choose a ribbon of any color and width.
- divide the length of the base by the width of the tape - we get the number of vertical stripes (we take into account only whole stripes);
- multiply the number of stripes by the width of the base and multiply the resulting length by two (the stripes will encircle the frame on both sides);
- Now we similarly divide the width of the base by the width of the tape - we get the number of horizontal stripes (we take into account only whole stripes);
- multiply the number of stripes by the length of the base and multiply the resulting length by two (the stripes will encircle the frame on both sides);
- we add the two numbers that were obtained in the second and fourth steps and get the required length of the tape.
5.
Now the elastic band needs to be cut into strips (vertical and horizontal). We have already counted the number of stripes, the length of the vertical ones is equal to twice the width of the base, and the length of the horizontal ones is twice the length of the base. In other words, each strip should encircle the frame without overlapping.
6.
The most painstaking process is sewing rings from strips. Pre-singe the edges of the tape on the fire and you can start making rings.
We make a small overlap of 3-4 mm. and sew the ribbon together with a ring. You can ask your wife for help, especially if she has the skills to operate a sewing machine.
Instructions for a homemade USB case
Many people are interested in the question of what a body can be made from at home. A small block of wood, a Lego brick, a keyboard button, a used lighter, or a small children's toy will be suitable for these purposes.
The flash card shell made of amber-colored epoxy glue looks unusual, in which you can wall up a small object or insect. Lovers of polymer clay can mold a body of any shape. And if there are empty cartridges left on the farm, you will get a real military gadget.
And although you can always find available materials at home, you still have to buy some consumables.
Let's shop
When the issue with the drive shell is resolved, it’s time to check the availability of the necessary materials and tools. The minimum set we need:
- an old flash drive for analysis, for example Transcend JetFlash 2 GB;
- sharp knife;
- pliers;
- a heat gun with a minimum power of 20 W and rods for it.
On the Internet you can find photos of homemade flash drives with LEDs. Then you should additionally prepare an LED light bulb, a 300 Ohm resistor, a soldering iron and a screwdriver.
Preparing a new building
For clarity, we will show how to make a case for a flash drive from a children's toy. To do this, divide it with a knife into 2 parts, one of which will be the lid. Hollow rubber or plastic blanks do not require modification.
Another thing is toys with “filling” of stiffening ribs or jumpers. Using pliers, we break out everything unnecessary inside, simultaneously cutting off the sharp edges with a knife. A cavity should form inside the workpiece, sufficient to install the flash board and LED.
In order for the latter to glow during connection, through holes with a diameter of 2-3 mm are drilled in the body of the toy with a screwdriver.
Working on the command line
Let's look at the step-by-step instructions:
In the start menu you need to launch the “Run” function. It can also be launched using the Win+R key combination. This is built-in Windows software.
In the field of the window that appears, you need to write “cmd”. This is the command to launch the "command prompt". All further actions will take place there.
The first command to enter is “DISKPART”, press ENTER (this should be pressed every time you want to run the command). We write the following command “list disk”. It will open a list of drives available on your computer.
For a bootable image, the flash drive must be empty, so the “clean” command cleans it. We install the primary partition using “create partition primary”. The partition that was created must be selected; for this we write “select partition”. We activate the section and enter “active”.
The “format fs=NTFS” instruction formats the drive. We are waiting for completion to 100%.
Assign a letter designation to the flash drive. This is done with the command “assign letter=O”. It is worth paying attention to the letter “O” selected at the end of the command; it is given as an example. You can use any other letter instead.
At the end, the folder with the selected flash drive should open. We finish the operations on the command line by writing “Exit”. The program closes.
You should transfer the OS files to the folder of the created removable disk “O”. There should be no archives! The drive with the image is ready to work!
Assembling a flash drive
The last stage of updating and repairing a flash drive with your own hands is installing and fixing the board in the toy body. We insert a flash card with an LED into the toy and fill the cavity with glue using a heat gun.
Irregularities and excess adhesive can be cleaned with a utility knife, and burrs or sharp edges can be dulled with sandpaper.
In order for the improvised lid - the second part of the toy - to close faster, you can attach a small magnet inside it.
Very beautiful and impressive origami phone
In this video you will see the art of origami in all its beauty. From one sheet of ordinary paper, the master assembles a model of a telephone that is stunningly realistic. It has raised 3D buttons and a cute little antenna. In general, everything that a classic cell phone should have. The device is very nice. Special paper gives an additional design effect. It has a picture. You don't have to look for the same one. You can even assemble it from white paper, and then decorate your mobile phone beautifully with felt-tip pens.
As always, beauty doesn't come easy. And to make such a telephone from paper with your own hands, you will have to try very hard. Assembly will take 20-30 minutes, but what you get will look great!
To assemble you will need: a square sheet of paper.
Mechanical damage
Most often they are the result of user negligence. A flash card used without a protective cap is susceptible to static, and the USB connector may bend. Therefore, portable assistants should only be stored closed or in special cases.
It is not uncommon for a drive to be stepped on or dropped from a height. In this case, the USB pins or contacts on the board responsible for power supply may become unsoldered.
The defect can be eliminated by re-soldering the extreme contacts of the plug. If after this the flash drive comes to life and starts blinking, but still does not work, then the likely reason is that the data transfer pins are coming off. The same soldering iron will come to the rescue.
Weaving
7.
When all the elastic rings are ready, we begin to put them on the base. First we put on all the vertical stripes.
8.
Now we begin to put on the horizontal ones one by one. They need to not just be put on top, but threaded through one vertical one.
Each subsequent strip is threaded in a checkerboard pattern.
9.
The result is a beautiful checkered organizer.
Electrical faults
The most common culprit of electrical damage is water that gets inside a flash drive. Such a device is not recognized on the computer. The flooded device must be thoroughly cleaned of salt and dirt deposits, immersed in isopropyl alcohol and thoroughly dried before use.
Other causes of electrical breakdowns include soldering defects, static discharges, overheating due to poor heat dissipation in the case, and power surges. Here you will have to resort to hardware restoration - replace non-functioning parts, solder defective areas again.
Craft making process
To work you will need three sheets of A 4 paper, as well as colored pencils and markers. The first thing to do is fold one of the paper sheets in half lengthwise and tuck all four corners towards the center. The remaining straight sides of the sheet should also be folded towards the middle. The resulting diamond-shaped figure must be turned over and the sharp edges bent to form a rectangle.
Now you need to take the smallest side of the resulting square and bend it by about one third so that the protruding edge is hidden inside. Next, you need to fold the reverse side in the same way, only the corners of the rectangle should be placed in the pockets of the first edge.
Now you can fold the envelope in half and make a slit at the fold. This is done either with scissors or with your fingers. The main thing is that the entire structure does not break into two parts. The first piece of the paper phone is ready. You can leave it for now and take on the next element.
With a new piece of paper you need to do everything that you did with the previous one, but without putting the edges into pockets. Now we should put this detail aside for a while.
And you can already take the last sheet of paper, fold it three times so that its width easily fits into the holes of the original envelope. Then you need to push it through the outer part and the cut made in the middle of the first part of the craft. Now, on top of the resulting structure, you can place the component that was set aside, and the elongated square ends of the main part must be folded over it, stacked on top of each other.