Bookmarks for books made of paper (diagram): paper heart
You will need:
- colored cardboard or old cover, postcard, magazine page
- a sheet of white paper
- pencil
- scissors
- glue stick or PVA
- envelope.
1.
Take a sheet of plain white paper and fold it diagonally. Use a pencil to draw an arch (see image) - this will be half a heart. When you straighten the sheet, you will get a full-fledged heart.
* You can simply draw a heart on paper; it does not have to have ideal shapes.
3.
Cut out the heart. You have a template.
4.
Place the heart on the edges of the envelope, trace it and cut it out. You now have a corner for a book or notebook. It needs to be decorated.
5.
Draw a smaller heart on thick paper and cut it out.
6.
Glue the small heart to the big one.
Master class on creating an origami corner bookmark
Now there is another popular bookmark model, it is also made using the origami technique, but only in a corner.
We cut out a template from white thick paper: a square measuring 7x7 cm.
We trace it three times on a piece of colored paper as shown below. Using a ruler, draw diagonals at the top and bottom left squares.
We cut off the outer corners of these same squares and as a result we get the following detail.
With the blunt side of the scissors we draw along the lines to make the workpiece easier to bend.
Fold one corner and coat it with glue.
We also fold the second one. You get neat corners.
Using felt-tip pens and white gouache, we draw cute faces on each bookmark.
To start using a bookmark, simply place it on the corner of the page you want to mark. Ready!
This bookmark can be designed in completely different ways.
Look at how unusually the authors of various master classes approached this.
Even I was already thinking about using the idea.
Bookmarks with images of favorite characters for young children will make reading more fun and help instill a love of books.
How to make a felt bookmark for a book: felt heart
You will need:
- sheet of felt
- scissors
- thread and needle.
1.
Fold a sheet of felt in half, draw a heart (or use a paper template) and cut it out.
*You can cut two triangles. Choose the shape of the bookmark yourself, the main thing is that both halves are the same.
2.
Using thread and a needle, sew both halves together, but leave the top of the heart (or the base of the triangle) intact so you can place the bookmark on the page.
Weaving from threads or laces
The simplest craft in five minutes: a braid made of colored laces. It is enough to weave a small braid out of them and secure it on both sides with thread or colored tape.
A more interesting option is a pompom made from knitting threads. It is made from a skein of thread tied together.The threads are cut from both edges and straightened alternately. The finished pompom can be attached to a cord or a piece of cardboard.
How to make a bookmark from toys for a book
You will need:
- small plastic toy
- knife or scissors
- paperclip
- a lighter or matches (to heat the tip of the paperclip).
1.
Cut off part of the toy.
2.
Heat the tip of the paperclip. It is advisable to hold the paperclip with pliers to avoid getting burned.
3.
Insert a paperclip into one of the parts of the toy - since it is hot, it will go into the plastic toy easily (the plastic will melt).
4.
Wait until everything cools down, and you will have an original bookmark - as if the toy is inside a book.
"Glasses", fast and original
Bookmarks are often used to read books so that you can be distracted without losing the right page. And that’s why in this master class we will crochet an original bookmark in the shape of glasses. This bookmark can be linked in just a few minutes. And it takes very little thread. The bookmark in the shape of glasses looks very nice in the book.
To knit bookmarks in the shape of glasses we will need:
- Threads "Iris";
- Hook;
- Scissors.
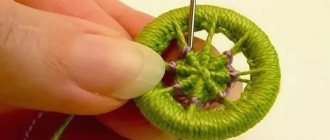
We cast on 20 air loops. And we close them in a ring. It is better to knit such a bookmark in 2 threads. Instead of Iris threads, you can use Floss or any other thin threads. The hook must be selected to match the threads. For “Floss” and “Iris”, a hook number 0.95 is suitable.
photo 1
Next we will cast on another 22 air loops. They are needed for the second part of the glasses to make another ring.
photo 2
Next we will knit a connecting stitch into the 20th loop. Now we have 2 rings and 2 air loops between them. This is a partition. We made the base for the glasses. And now this base needs to be tied.
photo 3
We knit 2 connecting stitches up to the first ring of the glasses.
Next we will knit into a ring. We knit 14 single crochets. Then we knit 1 half double crochet. Next we knit 1 double crochet and make 2 chain loops. This is how we made a corner for the glasses. And then we knit 24 single crochets. We finished tying 1 part of the glasses and reached the partition.
We knit 2 connecting posts along it.
photo 4
Now we will knit into the 2nd ring. We will knit everything the same, but only in reverse order. First we knit 24 single crochets. We make 2 air loops. And we knit 1 double crochet. We perform 1 half double crochet. And we finish knitting in a ring with 14 single crochets.
And we knit 1 connecting column. The glasses are ready and now we will decorate them with a tassel. And the bookmark will be ready.
photo 5
Cut the threads and fold them in half.
photo 6
Now, using a hook, we pull the middle part of the future tassel through the corner of the glasses, that is, where the threads were folded.
And pull out the resulting loop a little. We pull the ends of the threads through this loop and tighten it. This is how we secured the tassel to the glasses.
photo 7
Use scissors to trim the ends of the brush. The brush should be approximately 5-6 centimeters long. And the glasses themselves can be starched so that they are stiffer and do not bend. But this is optional. There is no need to starch the brush.
The original bookmarks in the shape of crocheted glasses are ready!
By the way, you can choose a new book or toy, as well as any goods for your home and garden, on the website shopmatic.ru. Take a look, there are books there for 8 (!) rubles, and not consumer goods, but classics.
What other flowers can be crocheted, see here.
In order not to forget the address of the page and share with friends, add it to your social networks: Do you want to know news about competitions or master classes?
Tags: Crafts for home
Attention! It is better to write urgent questions in the comments on the website (form at the bottom of the page) or, better yet, directly by email. There are no notifications about comments from the VKontakte form! This form is more for feedback. 
Discussion: 3 comments
- Karina:
June 17, 2016 at 08:34 pmA very cute bookmark! Since I don’t know how to knit, I would really like someone to give me such a beauty!
Answer
- Nina:
June 9, 2016 at 11:27 am
What an interesting thing, I would never have thought of this. It looks very unusual!
Answer
- Olga Parfenova:
June 8, 2016 at 4:29 pm
Very original idea!!! It looks beautiful.
Answer
Beautiful bookmark for books and notebooks: bookmark with bracelet
You will need:
- thin wire
- wire cutters
- different beads
- tape (braid)
- scissors.
1.
First you need to make a small bracelet. To do this, cut a small piece of thin wire, put several beads on it, twist the ends and insert them into one of the beads.
*If necessary, cut off excess wire.
* In this example, the diameter of the bracelet is about 4 cm.
2.
Cut a long piece of ribbon (2 times the height of the page). Tie the ribbon to the bracelet.
* Try to take a thicker tape so that it does not slip out of the book.
Panda
For example, how to make a panda bookmark. This animal is made from the same origami blank as the corner. The resulting square is decorated with eyes with large black circles, ears are glued to the back side, and black paws are glued to the front side, which will gently hug the page.
Another option for creating an origami Panda bookmark. It’s difficult, but you’ll get a 3D panda:
Bookmarks for textbooks: bookmark with bead
You will need:
- beads and other decorations that can be threaded
- thick thread or rope
- paper, glue and matches or skewers to create your own bead (if desired).
*You can use purchased beads, you can make your own, or both.
1.
Cut a piece of thread or rope. Its length should exceed the height of the book. Tie a knot at the end of the thread.
2.
Place one or more beads on the thread and tie a knot again.
* To make your own bead you need to wrap a strip of paper (newspaper) around a match, adding glue periodically.
3.
Tie a knot at the other end of the thread, put the bead back on and tie another knot after it.
*If necessary, cut off the excess ends of the thread.
"Peacock feather"
In this master class we will knit an unusual bookmark in the shape of a peacock feather.
For knitting you will need:
- Yarn "Areola" purple, blue and dark green;
- Hook 1.75 mm;
- Scissors.
It is very important to choose the right thread colors. It is not necessary to use exactly those that were chosen for this master class. You can take blue, orange or yellow and turquoise. Or purple, blue and beige. With this palette the feather will look more realistic and natural.
We knit 3 lifting loops into a sliding loop and perform 15 double crochets. Then we knit 3 double crochets. And we perform 1 connecting column in the 3rd lifting loop to close the row.
Photo 1
In the new row we knit with a thread of a different color. We make 1 lifting loop and perform 8 single crochets. Then another 1 stitch and a picot of 4 loops. We finish the row with single crochets. Please note that the picot should be opposite the central column with 2 double crochets on the bottom row.
Photo 2
We also knit the next row with a thread of a different color. We retreat 3 loops from the picot and knit 1 single crochet. Then we form 3 air loops and knit 1 single crochet into the next loop. And again we make 3 air loops. So we knit up to the central column with 2 yarn overs of the first row. That is, to the loop opposite the pico. We make a picot of 4 loops in this place. Next we knit in the same way as we knitted to the picot. We do not knit 3 loops to the picot of the second row.
Photo 3
Now let's tie the lace. We make 25-30 air loops. We unfold the chain and knit the connecting posts not into a loop, but into a vertical thread.
Photo 4, 5
Now we will make a tassel from blue thread. To do this, we wind the thread in several layers around the hand. Then cut on one side. Now we tie the bundle of thread in the center with thread. Tighten it well.
And tie the bun on top. We also tighten it properly. We trim the brush itself with scissors.
Photo 6
Attach the tassel to the lace using the thread that remains from forming the tassel.
Photo 7
Now you need to make several stitches with blue thread from the center of the feather to the picot. It will be enough to make 6-7 stitches. And we attach a lace to the picot.
Photo 8
This is such a beautiful and unusual bookmark.
These bookmarks can be given as gifts to book lovers.
By May 9
Also, using the combined method, you can show how to make a bookmark by May 9th. We take the St. George's ribbon the color of smoke and flame, which symbolizes all the horrors of war that our ancestors had to go through. If you make a ribbon from cardboard, then glue three thin black stripes onto an orange strip, and write wishes to your loved ones on the back side.
On top of it we glue a three-dimensional star cut out of cardboard from the selected angle and tie red threads to it in the middle. This will be the Eternal Flame. An adult can cut a hole or two for the thread using nail scissors or a hole punch. It turns out to be a very colorful craft that grandparents will definitely like.