Craft “Green oak at the Lukomorye”: step-by-step master class with photographs of the manufacturing stages.
The craft “Green Oak Near Lukomorye” is a three-dimensional composition based on the famous lines of A.S. Pushkin, which can be done together with children from six to seven years old and older. Various techniques for working with materials are used in its production. Having mastered them in making this craft, in the future you will be able to apply them in other subjects of your creative works.
The author of the master class is Elena, a mother of two sons, a reader of “Native Path”, a participant in the “Autumn Workshop” competition, and her son Dima.
Making crafts near Lukomorye green oak: step-by-step description
Making green oak for Lukomorye
Step 1. Cover living leaves with acrylic varnish in two layers (or colorless varnish in an aerosol) and dry. It is advisable to place the leaves vertically so that the leaves look natural and not perfectly even.
Step 2. Glue the acorns with a hot glue gun to their caps.
Step 3. We twist the green oak frame from wire. At the base of the frame we leave several wires – “roots” – untwisted. With their help we will attach the tree to the base.
Step 4. Turn the paper bag inside out and roll it into a tube. We insert the wire inside the tube. This is an oak trunk.
Step 5. Make the roots of the oak tree and its branches from a paper bag.
If you use a paper bag from coal to make an oak trunk, then its base must be torn into 6 strips approximately 6 cm long. Each strip must be twisted so that it looks like an oak root.
We tear the top part of the bag into about 8 strips (the number of strips should be equal to the number of branches on the oak wire frame you made). We wrap strips of wire oak branches, crumpling and twisting the paper onto them.
We fix the paper on the wire frame using a glue gun. We also glue leaf cuttings and acorns using hot glue. We mask the attachment points with paper folds.
This is what your oak from Lukomorye will look like in our craft!
Stage 2. Making the sea and the coast in Lukomorye
Step 1. Take a large box - the basis for the craft “Green oak at Lukomorye”. We cover its end with strips of paper towel using PVA glue.
Step 2. Cut out a quadrangle from white cardboard, shaped like a trapezoid. This is a preparation for the sea and the sandy shore of Lukomorye.
Approximate dimensions of this part for a box measuring 35 x 24 cm:
- the larger base is 16 cm,
- smaller base - 6 cm,
- the height of the trapezoid is equal to the width of the cardboard base (that is, equal to the width of your box).
- the right edge of the “trapezoid” is a smooth edge and is located at a right angle to its base, and the left side of the “trapezoid” is a curved line - the line of the coast.
Step 3. Draw the sea in Lukomorye.
We paint the part of the trapezoid that will represent the sea with blue or turquoise paints.
Step 4. Making a sandy beach for Lukomorye.
To complete the sandy part of our Lukomorye we will mix semolina, yellow and green bath salts with PVA glue.
Note: we take more semolina (it makes up most of the mixture). Add a little glue to the mixture to make it thick.
We apply the resulting mixture to the part of the part where we have planned the shore. We press shells and small stones into it. We dry the workpiece in the oven with the door ajar at 50-70 degrees (probably, you can dry the workpiece on a radiator - you need to try this).
Step 5. Make the sea in Lukomorye three-dimensional (with a 3D effect).
The next step is to create the sea for our craft. I discovered the technique for making it on forums among modeling enthusiasts, creators of dioramas and miniatures.
How to make a volumetric sea for Lukomorye:
- on that part of the part where we have planned the sea and have already applied blue paint, we squeeze out silicone sealant. For relief, I applied silicone in two layers.
- using a teaspoon soaked in water, we form waves running onto the shore.
- to imitate white foam, you can place pieces of cotton wool under the silicone wave using a toothpick.
Origami
Cutting out of paper is the easiest way to embody any hero. Use colored paper, pieces of felt, and toy eyes to make the toy more complex and beautiful.
Turn her into a puppet by gluing a popsicle stick on the back: now you can give performances! And if you work hard, you can add moving parts: let the elephant move its trunk, the fox wave its tail, and the cat wash itself with its paw.
Make a craft in the form of a fairy-tale house from a shoebox, decorate and furnish it with furniture cut out of paper. Place Snow White and the Seven Dwarfs in it.
Origami will develop accuracy and fine motor skills: start with simple shapes, gradually becoming more complex.
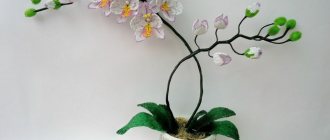
Swan
The Magic Swan, which turns into a princess, is another popular character from Pushkin’s fairy tales among children.
Based on the “Tale of Tsar Saltan, his glorious and mighty hero Prince Gvidon Saltanovich and the beautiful Swan Princess,” you can make a three-dimensional composition.
You will need:
- foam sheet;
- white plastic bags;
- wooden skewer;
- scissors.
Progress:
- Draw the outline of a swan on a sheet of foam plastic and cut it out.
- Cut the bags into 4 cm squares.
- Using the trimming technique, twist the film onto a skewer and thread it into the foam base.
- Fill out the entire swan figure.
- Paint the nose, draw an eye.
- For the substrate, blue film or plexiglass is useful.
Although trimming is a simple technique to perform, it still requires accuracy, so it takes enough time to create a craft.
It is interesting to make appliqué using the trimming technique. To do this, you need to cut white napkins into squares with a side of 1 cm. The background is made of blue napkins or plasticine.
The swan made using the applique technique of cotton pads and feathers looks beautiful and is worthy of taking part in the competition.
The neck and head of the Swan drawn on a thick base are filled with cotton pads glued to PVA. The body is decorated with white feathers.
An older child will be interested in trying the origami technique.
How to choose a place for flowerpots?
The most common location for pots is the porch of a house. Planters with lush flowering living decorations will decorate the entrance, emphasizing the architectural style of the house.
The second most popular installation location is occupied by terraces, gazebos, and wells.
For private buildings with a wide blind area, it would be appropriate to place flowerpots along the house - they will emphasize the line of the foundation and make it more contrasting.
When choosing a location, you should follow some tips:
- Oversized forms will look awkward in a small area, just as small pots will get lost in a spacious area.
- When installing flowerpots, their mobility plays a role: portable types should be lightweight, and stationary ones should be positioned in such a way that the plants feel comfortable in them.
- When selecting structures, it is recommended to pay attention to the material of the architecture. For example, tubs are suitable for wooden log houses, while garden flowerpots cast from concrete will be inappropriate.
How to grow a miniature oak?
Determine where the oak tree will grow. Choose a wide container with a shallow depth (3–50 cm). When the tree begins to grow, it is transplanted into a larger pot. Avoid plastic; the best choice would be fireclay or ceramics. Place drainage at the bottom.
Peculiarity! Transplantation is carried out in the spring every 2-4 years. The need for this is determined by the roots: if they have filled the pot, the tree needs a new place.
How to do root pruning?
Remove long roots with pruning shears. Trim thick superficial roots at an angle. The beveled ends look organic at ground level. Carry out pruning when replanting - once every 2-4 years. Remove grown roots, leaving small to medium roots 10-15 cm long.
Formation
In the second year of life, when the oak tree has grown, it is given the desired shape. The procedure is carried out in early spring or autumn, when it has dropped its leaves. Cut off any excess branches with pruning shears, bend the remaining ones with wire.
Formation rules:
- Think about how the bonsai should look, make a sketch, and be guided by it as you work. Use a vertical or slanted style. Curved, grotesque shapes are not suitable for oak. Buy clamps, flexible copper wire.
- Proceed to wrapping the trunk and branches. Pull the wire from bottom to top in a spiral.
- Secure the end with a fork in the place where the branch grows from. Make one turn around the trunk, then wind the wire parallel, around the branch towards the tip. Bend the edge of the wire down.
- Prevent damage to the bark by placing strips of rubber or fabric under the wire.
- To set the position of the branch to the left, wind clockwise, to the right - vice versa.
- When bending, proceed carefully, work with both hands, keeping your thumbs on the inside.
- Secure branches that are designed to be more bent with clamps.
- Work until the entire bonsai is covered.
The wire structure is designed for a period of 1 month to six months. Control it otherwise it will damage the developing bark of the plant. When the desired shape has been achieved, leave the oak for 2 years. If you remove the structure earlier, it will return to its previous position.
Important! From the end of February to the beginning of spring, trim large branches and shoots in accordance with the designed sketch. Do this annually. Remove young shoots at any time.
Fertilizer
Use organic and special fertilizers. They will help strengthen the standard, it will be thicker. Frequency – once a month. Don't fertilize too often. The plant will give an unacceptable effect: it will stretch, create large internodes, and large foliage.
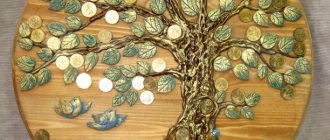
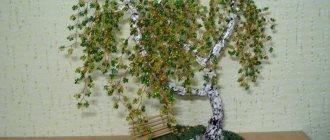
Step-by-step master class oak made of beads
The sequence of formation of a mighty tree from branches
Before proceeding with the next steps, try to connect the branches together not evenly, lower the branches down a little with each fastening. We make them in this sequence, connect the branches together and secure them with tape.
We leave three branches one at a time.
We make branched branches - two out of two and two out of three; three out of seven and one out of five.
We collect the tree from small branches, wrapping it tightly with tape and beautifully bending the resulting clusters.
Upon completion of assembly, we separate the wire to the sides for stability.
Weaving pattern
For beaded oak leaves, a simple pattern is used - a loop pattern. It involves creating loops from a certain amount of beads. It is a large number of such loops that will form the branches and the entire tree.
Beaded acorns are woven using a three-dimensional technique. They are not necessary, but they will greatly decorate the plant. The volumetric method is weaving in rows.
The technique is similar to parallel weaving, but the rows go in a circle, creating any three-dimensional shape.
Oak leaf and oak tree cutting templates
Oak is a beautiful and powerful tree, with a recognizable silhouette and shape of leaves, so it can be easily made from colored paper in the form of a three-dimensional craft or applique. Carved oak leaves from paper can be used to create autumn bouquets, home decoration, or used in scrapbooking to design notebooks, cards and albums. If a child loves Pushkin’s fairy tales, you can make a large paper oak tree with him, decorate it with a gold chain (also made of paper) and “populate” it with the inhabitants of Lukomorye.
Tips for needlewomen
- You can cover the wire with the buds with foil before putting on the base.
- Bend the branches as the shape of the tree allows.
- It is possible to make a powerful, thickened trunk using masking tape.
- If you want to depict creeping roots, then dip the cut pieces of bandage in a gypsum solution and wrap them around the tree trunk, and then treat the surface with plaster again.
- In order to create the appearance of an old tree, twisted and wrinkled, scratch the surface of the trunk with a fork onto the mixture that has not yet hardened.
Decorating elements can include stones (glued), decorative moss. In the example photo, see how tree pallets are decorated. The beaded oak tree will now become a gift for someone or a decoration for your interior. We wish you new creations and achievements in your plans!
Using bog oak
In order to create products from bog oak, it must be properly dried and stored. International and state standards for ordinary wood are not suitable for bog oak. Special requirements affect its cost. Properly soaked and dried bog oak is expensive, which reduces the demand for it. Unfortunately, illiterate miners of this value, neglecting all the rules, throw the trunks in the sun or leave them in open-air areas for the winter, store them on barges, etc. As a result, most of the material becomes unusable and is used for firewood, and the remainder, which can be used elsewhere, is sold at a low price.
In the 90s, there were many cases when hundreds of cubic meters of bog oak were lifted from the water, sent wet abroad by wagons, and as a result it went into the furnace, because... upon arrival was not suitable for manufacturing products. Because of this, Western investors have lost interest in running such a business for a long time. Sometimes some of the raised trunks were thrown back into the reservoir. It is extremely difficult to return such material to normal condition when re-lifted.
Even in our time, there are very few specialists who can properly process wood. But if no mistakes are made, products made from bog oak truly become masterpieces of art in the hands of skilled craftsmen. For centuries, stunning and unique things were created from it - a variety of furniture, boxes, caskets and figurines - and was called “black gold”. Wealthy people could even afford parquet flooring for exorbitant amounts of money. Carving on bog oak was trusted only to trusted “blacksmiths”. Oak sets adorned the best houses, and men walked pompously with pipes made from this tree. Making it into veneer or covering it with varnishes, plastics and synthetic resins is absurd.
Bog oak is a valuable material that cannot be replenished, like any fossil. Hundreds of years must pass for new specimens to appear. But they will no longer be environmentally friendly due to environmental pollution. A thoughtless, superficial attitude towards the material leads to a reduction in stocks, but for now there is time to purchase products from centuries-old trees. They will serve more than one generation and will inspire awe among true connoisseurs of the natural beauty that nature has created.
Assembling a craft near Lukomorye green oak from prepared parts
— Using a glue gun, we glue the element prepared in the second stage with a sandy shore and sea onto the cardboard—the basis of the entire craft—in the right corner.
— Glue on a rug with grass. Using scissors, we adjust its edge to the curves of the sandy shore.
— We attach the oak (see the first stage) to the base with grass. To do this, we pierce it through and insert a wire into the hole. We secure the wire by bending it from the bottom.
— We wrap the chain around the oak tree. We place a mermaid and a scientist cat on the oak tree. We fix everything with hot glue using a glue gun.
— We mask the shortcomings with pebbles, if there are any. The shortcomings include sloppy places and places where the joints do not match exactly. We also mask the junction of the shore line with the grass with stones.
- The ends of the cardboard - the bases of the craft - are tinted with paints.
This is what you will get at this stage (see photo - top view of the craft).
Stage 5: making a hut on chicken legs
Step 1. As the basis for the craft - a hut, we take a box of suitable size. We took half a box of medicine.
Step 2. Make 2 holes in the box, bend the box into an arc and insert 5 wires down the box.
Step 3. We twist the wire, forming 2 legs of the hut from it. To do this, we shorten 4 wires to fit the toes of the chicken legs of the hut, and leave the fifth wire long, since it is needed to attach the hut to the base.
Step 4. Cut the skewers and glue them with a glue gun, imitating a log house. We glue the roof separately.
Step 5. The hut can be slightly tinted with paints.
Step 6. Attach the hut to the base of the craft, piercing it right through along with the grass. We fix the wire at the bottom of the base, bending it in the same way as we previously attached green oak to the base.
Step 7. We make bushes around the hut. To do this, we glue dried herbs - oregano and yarrow - with hot glue to the base next to the hut.
So our craft “Near Lukomorye has a green oak tree” is ready! It turned out truly fabulous and amazing!
You will find more master classes on making crafts based on famous fairy tales in the articles on the site:
— Children's crafts made from natural materials — 25 ideas: little corn men, an old forest man, a fairy-tale composition based on the fairy tale by V. Suteev “Under the Mushroom” and other ideas
Get a NEW FREE AUDIO COURSE WITH GAME APPLICATION
“Speech development from 0 to 7 years: what is important to know and what to do. Cheat sheet for parents"
Click on the link or course cover below to subscribe for free
The author of the course is Valasina Asya, candidate of pedagogical sciences, author of the website “Native Path”
We make Koschey: there King Koschey languishes over gold
The composition with Koschey in the craft about Lukomorye consists of three elements: a chest of gold, Koschey and magic flowers.
Element 1. The chest “with gold” is a painted trash can from a broken garbage disposal machine. Inside the chest is a wad of gold foil. The coins are made from play dough and have rhinestones glued to them.
Element 2. Koschey is a kinder gargamel. Koshchei's crown is made of modeling dough. The raincoat is made of lining fabric. The edges of the lining fabric are treated with a regular lighter to prevent them from falling apart. The design on the lining fabric is painted with acrylic paint.
Element 3. Magic flowers. We take dried flower cups on a high stem (we find them in the forest in advance and dry them). We glue rhinestones on them.
We glue three elements and stones under the oak tree with hot glue using a glue gun.
Our craft about Lukomorye was supplemented by another sketch to the lines of A.S. Pushkin.
Decoration and planting of a tree on a stand
Mix a mixture of gypsum and water (1:1). We lay it on the surface of the stone and fasten the tree (within half an hour the plaster will set).
We will need a mixture of plaster, PVA glue and some water to process the trunk and branches. We give it a day to completely harden.
We wait for the craft to dry, paint it with gouache, then carefully wipe the treated parts with a damp foam sponge.
We also paint the tree roots with chestnut color, but not completely. We decorate the surface in green, imitating grass, and sprinkle with a little beads.
At the end of everything, when the paint dries, you need to open the trunk and branches with colorless varnish.