Money tree painting is one of the most sought after DIY projects. Such a picture is a solid gift for any holiday and just for the joy of loved ones. Money tree is perfect for any interior, as it has a neutral color without energetic colors.
There are various techniques for producing such images. It is generally accepted that the painting “Money Tree” with a crown of coins brings prosperity to its owners in the financial sphere.
Money tree: what does the flower symbolize
The money tree is a houseplant, Crassula, which belongs to the Crassulaceae family. South Africa is considered the homeland of the Crassula or Crassula. There, wild species thrive during periods of drought or prolonged rain.
Crassula plants require moist, nutritious soil to grow. They cannot grow in the presence of strong winds due to the fact that their developed root system does not go deep enough into the soil. Therefore, the proximity to vines and tall palm trees completely suits them. They are maximally protected from external influences by branches, crowns or shoots of neighboring trees.
The plant has several additional names by which collectors find it. Crassula is called the currency plant, the flower of happiness and money, and the dollar bush. The plant owes its name to its appearance:
- leaves: small, shaped like coins, in some species they can be elongated, which makes them look like rolled banknotes;
- trunk: thick, short, dense;
- roots: branched, strong, gathered into a tight knot at the base;
- flowers: small, formed in the axils of the leaves.
There are several theories that explain the basic symbolism of the flower:
- Similarity of leaves. The shape of the round or elongated leaves resembles banknotes, so many supporters of this version are of the opinion that this is a symbol of the accumulation of coins.
- Barrel thickness. This version is based on the density and diameter of the stems. If the crop is grown in bonsai style, leaving one stem, then it noticeably thickens, expanding slightly towards the base. Such a trunk is compared to a thick wallet full of money.
- Belonging to succulents. Succulents are thrifty crops. They accumulate moisture in the leaves and roots due to their structural features. This property has been compared to accumulating money and saving it for emergencies.
It is not known exactly which version formed the basis of the Chinese theory of space delimitation. For some time now, the fat woman has become one of the symbols of the philosophy of Feng Shui - this is an ancient teaching that combines elements of religion and philosophy. It is based on the symbolic exploration of space and the correct organization of the state of things, according to certain rules. Many supporters of the theory believe that things made with their own hands according to the basic rules of special techniques can attract positive energy and influence the course of events.
Crassula, according to the theory, attracts wealth and brings good luck and success to the home. This is a kind of money talisman, which, unlike a houseplant, is made with your own hands once, and then does not require special additional care. The only condition is its correct placement, selection of a suitable neighborhood and control over the purity of the elements. To attract financial well-being, the product is traditionally placed on a red stand. A red cloth napkin can serve as a stand.
Attention! According to Feng Shui, the southeast side is responsible for the wealth sector; this should be taken into account when placing.
There should be no old or damaged items near the product. It is recommended to supplement the zone with artificial waterfalls, fountains or images of water. This will symbolize watering and care. A figurine of a toad or frog will become an additional element to attract money. It is customary to talk to the tree, explaining or planning upcoming expenses.
Craft ideas
You can make various accessories and decorative items from coins; the choice of crafts is extremely wide.
- Photo frame;
- Souvenirs with a monetary message;
- Floating cup;
- Panels and flower pots;
- Hot pads;
- Topinary;
This is just a small part of what can be made from the most ordinary coins. Various photos of crafts made from coins will help you choose the right option and start making it.
How to make a money tree with your own hands
Creating a money tree with your own hands can have several main goals:
- attracting wealth and good luck;
- making a symbolic gift for a wedding, housewarming or anniversary;
- creating handmade products for sale.
To start creating a money tree, they determine what material, what size and for what purpose the craft needs to be made. There are many options for creativity, as well as techniques for implementing ideas. In addition to classical methods, there are unusual approaches: money trees are made from beads, stones, twigs, corks, and paper. An unconventional approach is considered valuable; the most unexpected materials are used: egg shells, nuts, dried pumpkin seeds.
From paper money
The simplest option is to use a houseplant as a basis for placing the selected materials. Usually, for this purpose, rolled banknotes are prepared and secured on the leaves of a living plant using golden threads. This idea looks very attractive in photos or videos, but has a lot of disadvantages. Do not place anything other than paper money on living leaves, otherwise the plant may be damaged. Paper limits watering and does not allow spraying.
This option is used as a gift, so that in the future the hero of the occasion can collect money and grow the plant in the usual way. A living houseplant with money is not suitable as a symbol of attracting wealth or as a meaningful souvenir; it is used as an effective method of presenting monetary rewards.
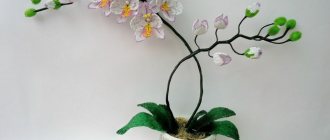
From beads (required materials)
A do-it-yourself beaded money talisman is a source of special pride. It’s not easy to make, and it’s even harder to make it attractive. Typically, a beaded product is not at all large; its height can reach 30-35 cm. The higher the product, the more beads it will need. For a souvenir you need:
- beads (several shades of green and yellow);
- wire (size 0.3-0.4 mm);
- thick wire (for making a barrel);
- decorative pot;
- gypsum;
- acrylic paint or gouache, brushes;
- varnish;
- red and brown ribbons.
To weave you need to master simple skills. The leaves are woven using a loop technique: the more leaves are woven, the richer the tree’s crown will be. To avoid getting confused when weaving, use patterns. This is the basic beading technique and can be mastered in a few days. For leaves and branches, use pieces of thin wire, the diameter of which matches the diameter of the bead holes. At the base, the wire is twisted 2-3 times, this creates the feeling of an increase in the thickness of the branches closer to the trunk.
The trunk is assembled from thick wire. It is twisted several times until the planned volume is obtained. One of the options for making a barrel is to braid a suitable frame from other materials with dense wire. The installation of the base is carried out using a mixture of gypsum and PVC glue. The mixture is poured into a pot, and the frame is installed there. The trunk is systematically treated with this solution. After complete drying, it is painted with brown gouache or acrylic paint.
Then, using a thin wire, they begin to collect the prepared branches with leaves onto the frame. To do this, many recommend using the thinnest wire (less than 0.3 mm) so that it is not noticeable in the future. After complete assembly, the product is sprayed with varnish to fix the parts and give them a glossy shine. Many manufacturers place Chinese coins on the bead tree. To do this, they are hooked onto the fold of leaves or branches at the very first stage of production.
Branches from stones are constructed in the same way. The complexity of the technique lies in the fact that a thin hole is made at the base of small pebbles or super glue is used to attach the stones to the wire. This method is not always suitable for home production, as it requires more careful preparation and the availability of auxiliary tools. Trees made of beads look impressive. To make one medium-sized product, about 400 pieces are required. The beads are strung on wire, which can be bent at different angles to create the appearance of branches.
How to make a craft from coins: step-by-step instructions
In order to start making crafts from coins, you need to choose a base. You can attach coins to a wire and get a branched product with sheets of small money that will jingle when shaken. The second option is to make it on a round base, to which the coins are attached using glue.
Information! The craft can be a symbol of good luck, wealth and success in office spaces. It is often a decorative element on desktops or bookshelves.
Coins are attached to the wire using glue or special holes are made. Chinese coins are sold with holes ready-made, so to make them with Chinese money symbols of good luck, you just need to collect them in the right quantity. The coin product is made from thicker wire, which can withstand the weight of small money. They are strung on wire according to the principle of alternation. After each coin, twist the wire 5 times. Up to 6 pieces are placed on each branch. Tree collection is carried out according to one of the selected scenarios:
- the simplest method: collecting in the form of a bunch;
- complex method: gradual placement of branches on a trunk made of thicker wire.
The assembled tree is decorated with additional materials after installation on the stand and the plaster has hardened at the base. A product created according to this principle is activated by regular shaking. The coins begin to tremble a little, which, according to adherents of the Feng Shui technique, attracts positive flows of energy. Products are often complemented with stones, beads, and ribbons. Branches from these materials are alternated or distributed in the planned ratio.
A step-by-step master class on making the second option begins with preparing the base: a foam ball is selected depending on the size of the pot or stand on which the product is placed. The crown should be larger in volume than the base. Technology:
- Coins of the same size are attached to the ball using a glue gun. Money is usually placed so that there are no empty spaces between them. The best option is overlapping placement.
- Depending on the size of the ball, a holder is selected. It is stuck into a foam ball and the joint is covered with glue.
- The trunk is fixed in a decorative pot using glue and plaster, and covered with a golden-colored aerosol.
- The junction of the trunk and the ball is decorated and draped with a ribbon. It is tied with a bow.
- The finished and dried product is sprayed with varnish to add shine.
Advice! To create, you can use souvenir plastic money. To string them, they are pierced with a hot needle at the base.
Interesting ideas
Above are the most popular options for making a money symbol, but there are even more original and unusual examples.
- You can give the wood a natural color. For the summer version, the coins are painted green and the barrel is painted brown. You can also create a winter landscape: to do this, the coppers are sprayed with white paint - this technique will create a snowy, light, delicate effect.
- Using coins you can design a Christmas tree. To do this, we roll up pieces of cardboard in the form of cones, cover each of them with iron money and decorate with cotton balls. The resulting figurine will attract wealth in the coming year.
- Another original idea is a tree with a round crown. Cover a small foam ball with coins in several layers, leaving space for the future trunk. Cover an ordinary branch with decorative tapes, insert it into the hole left in the ball, having first pierced a hole in the foam rubber, and secure it with glue. Pour a mixture of sand, alabaster and water into a beautifully designed glass, fix the previously obtained structure vertically.
Making topiary from banknotes: master class, video, photo
Topiary is the name of a product that is made by hand and is a tree made from various materials. It symbolizes happiness, prosperity and prosperity. These are similarities between the philosophy of Feng Shui and the classification of handicrafts by basic type. Any materials are suitable for making such topiaries. They can be made from sweets, decorative flowers, coffee beans, tea leaves, dry leaves, and living plants. Money topiary from souvenir bills or paper money is made in several ways:
On a plastic, glass ball. For this option, souvenir bills are rolled up. Fastening begins from the top center point. Using a hot-melt gun, drops of glue are applied, and the slightly bent base of a banknote bag is placed on them. The first bill should be directly in the center. Adjacent bills are attached to it, in this way the entire surface of the ball is filled. Unlike a foam ball, which is used to attach coins, the diameter of a ball for bills should be small, since the paper crown will significantly increase the volume of the product. Then the trunk is installed, the base is secured and the craft is decorated.
On a figure of any shape made of foam. A cone is cut out of polystyrene foam. Banknotes are attached to it using small needles, folded in half to form a void along the fold. Fastening is carried out in symmetrical rows in one direction. The top is decorated additionally.
No additional base. In this case, the main basis is the trunk. They begin to attach banknotes to it, rolled up randomly in different directions. In this case, they can be connected to each other using paper clips or wooden toothpicks. Then they decorate the base and complement the product with ribbons and beads.
Advice! You can make a topiary ball yourself from papier-mâché.
Topiaries made from hard materials require additional care. They are regularly wiped to remove dust, and the safety of parts is monitored. Based on the results of master classes on making topiary, one can draw basic conclusions on the methods of rolling banknotes and the use of additional materials.
| How to prepare souvenir bills | What auxiliary components can be used |
| Folding in half | Beads |
| Trimmed to square or oval shape | Beads |
| Shaping a tube or corrugated track | Rhinestones |
| In the form of a bag | Coins |
| In the form of leaves with a downward direction towards the base | Nut shells, coffee beans |
There are other options for making symbols. This applies to panels or paintings, as well as crafts not included in the usual classification.
From dollars
This option for making topiary is often made. Dollar branches are usually made from souvenir bills with the addition of green decorative leaves. To do this, rolls of banknotes are covered with green leaves on 4 sides, and then connected to each other and attached to a cone or ball. The dollar mascot is called green because of the color of real paper money.
Necessary materials
Below are the two most common options for making a money tree: a panel and a three-dimensional figure. To create a picture you will need:
- base (wallpaper, burlap, fabric are suitable);
- coins;
- napkins;
- water;
- acrylic paints: black, golden, silver;
- sponge;
- pencil;
- scissors;
- cosmetic shine;
- Frame;
- glue (PVA, quick-drying, heat gun are suitable).
To make a three-dimensional figure of a money tree, prepare:
- paint;
- souvenir coins with slots;
- varnish;
- coil of wire;
- copper wire;
- FUM;
- threads;
- glue;
- scissors;
- gypsum mixture;
- alabaster;
- plaster;
- cement.
DIY panel or painting
An interesting solution would be to make a money panel. This is a creative piece that can be hung framed on the wall or placed on a stand. Coins are used for the money panel. Step-by-step instructions for making a panel of coins will look like this:
- A suitable piece of burlap is placed on a cardboard insert from a regular frame.
- The drapery is glued to the cardboard using PVC glue.
- The contours of the trunk are outlined on the burlap using a pencil or chalk.
- Parts of twine soaked in glue are glued along the contours (the more threads, the thicker the trunk).
- A crown is collected over the barrel (each coin must be cleaned of dust and dirt).
- The trunk and crown are varnished and decorated as desired.
- The panel is inserted into the frame and secured on the back side.
The material for the money panel can be very different. Numerous photos of handmade items show money trees made of stones, beads, rhinestones, real twigs, seeds, and bottle caps. The painting can be decorated in a different way. To do this, at the last stage of manufacturing, the crown and trunk are not varnished, but painted with brown acrylic paint. After complete painting, the craft should dry. Then, using a dishwashing sponge, they begin to carefully remove the top layer of paint from the surface of the coins. This usually takes more than an hour. The trunk is left brown. The paint removed in this way is brushed off with a clean, dry brush.
Then the coins are coated with a gold or silver color. This decorative option makes the panel more attractive and effective. The method of changing the structure of the material gives the painting the appearance of something that was made a long time ago. The effect of antiquity is always highly valued in works that include the “handmade” direction.
Advice! Not only burlap, but also any other dense material is suitable for the background of the panel.
A painting or panel made of coins is often given as a housewarming gift. The occasion for a gift can also be a wedding. It is generally accepted that such things attract good luck and become a wish for prosperity for a young family. The panels are decorated with additional details. They can be thematic and related to the theme of the holiday or express the main thoughts of the one who worked on the creation. Adding a drawing always makes a craft special - the hand of the master immediately becomes visible. Watch the video on how to make a panel yourself.
Nuances of collage technique
What we need in our work:
- base for wood, burlap or any other;
- napkins or toilet paper;
- acrylic paints in gold, black, silver;
- ordinary water;
- coins of any denomination;
- foam sponge;
- pencil and scissors;
- cosmetic shine;
- picture frame or photo frame with plywood without texture damage;
- quick-drying glue and PVA glue.
A fabric base for the future canvas is cut from the prepared material. It must be placed on the plywood from the back of the photo frame or any other picture. The fabric is cut exactly to the size of the lining used and secured with glue. When the fabric base is no longer sticky and dry, a rough sketch of the tree is drawn.
PVA glue and plain water are diluted in a medium-sized container. The amount to be diluted should be 1:1. Paper napkins of any color are cut into strips 2 and 3 cm wide. The finished cut pieces are lightly dipped one at a time in a container with diluted glue.
The resulting strips are carefully and tightly rolled into tubes. Soaked strips of different widths will be used for different parts of the tree, thicker ones for the crown, thinner ones for the branches.
Therefore, when twisting, you should pay attention to this and not confuse it. When a sufficient number of flagella are ready, leave them until completely dry.
On a fabric basis, at the location of the tree sketch, a small amount of glue is applied to the place where the crown is formed. Dried strands of paper are laid out on a layer of glue, forming roots, branches, and crown. The work is left until completely dry.
After preparing the wood, you can start gluing the coins. Coins must be pre-cleaned and degreased with alcohol tinctures or any detergents. To securely attach coins, it is better to use quick-drying glue. Glue banknotes as you wish, but be sure to cover all ends of the branches. The tree is ready.
The next stage is the design of the painting, that is, its painting. For this purpose, black aerosol paint is used, sprayed throughout the entire exhibition.
The top layer of gold paint has a wonderful combination. It is imperative that each coat of paint requires drying time.
To give a light shine, you need to go over the entire exhibition with a foam sponge with silver-colored acrylic paint, but without painting, but only dipping the work. After allowing time to dry, the final touch is performed - shading with acrylic gold paint, but only in coins. For shine, you can apply cosmetic gloss over the entire work, before it dries completely. The product is ready, left until completely dry.
Fix the finished fabric blank with a completely finished coin tree in a frame, and you can enjoy your individual work.
– Decorative cake
Is everything wrong? Then look at how unusual it is to give money for a wedding. Then make a money cake for your wedding day; the newlyweds will definitely love it.
How to do:
- Prepare a round cardboard base.
- Now carefully roll the bills into a tube, then lay them out in three rows.
- Next, you need to tie the “layers” with ribbon, and decorate the cake with flowers (think about the design in advance). The gift as a gift will undoubtedly surprise and delight you. Don’t forget to say congratulatory words upon presentation. You can prepare such a surprise for your sister, girlfriend or friends.
On a note:
You can make a ship in the same way.
A detailed description of creating a decorative wedding cake is presented in the video tutorial.
Or give a “money cake with wishes”!
- You need to print and cut out a template of one segment of the cake (we will use it as a template). Trace this template on colored sheets of thick cardboard (preferably double-sided), in total you need 12 blanks of segments of the future cake.
- Using a non-writing pen and ruler, draw strips along the dotted lines to bend the cardboard more evenly.
- On the square, where there will be a gap (for closing), cut this very gap with a stationery knife along the marked line, so that later this piece of cake can be closed.
- Apply glue to the “allowances” of the workpiece and glue well. Do not glue the entrance to the “piece of cake”; we will put wishes and mini-gifts there.
- Decorate each resulting piece of cake at your discretion, it can be sparkles, flowers made of satin ribbons, buttons, beads.
Place pre-printed wishes for the newlyweds in each piece of cake.
- A trip to the sea (you can additionally put small seashells in a piece of cake);
- Prosperity and abundance (here we put the most important gift - money);
- Sweet daughter (you can put tiny baby booties, socks or a pink pacifier);
- Four sons (here you can place 4 keychains depicting: a soccer ball, a basketball ball, a tennis ball, an American football ball);
- Good luck (you can put lottery tickets here);
- Love (candle in the shape of a heart);
- Health (vitamins from the pharmacy);
- Sweet life (candies, you can fill the whole box with M&M's);
- Many true friends (write the phone numbers of mutual friends and laminate them; or make a paper garland of people);
- Lots of energy and vigor (put on the energizer batteries);
- Happy family holidays (pipe with a spinning tube, balloons, confetti, streamers);
- Golden wedding (50 years) diamond wedding (60 years) (image of a Swarovski bar or stones).
When all the cake pieces are filled, place them on a tray or wooden plate (available at Ikea) and tie them with satin ribbon to prevent them from moving apart. Place the plate itself in a transparent gift bag and tie it with a huge bow.
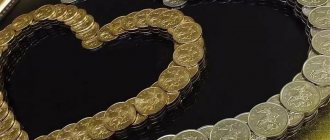
Composition design options
When making a money topiary with your own hands, you are not limited not only in materials, but also in the design of the finished composition.
- Banknotes can be folded not only into a bag, but also into an accordion, an airplane, a fan, a tube, etc.
You can fold a banknote for topiary in any way you like
- The crown can be decorated not only with paper money, but also with a combination of bills and coins, both in the crown of the tree of happiness and on the trunk or in a pot.
Money topiary can combine paper bills and real coins
Kinder surprise wedding gift
Let's start with, perhaps, the simplest and easiest to implement. You will need 1 kinder surprise (of course you can have many kinders) and your money
It is necessary to carefully open the foil and take out the chocolate egg, cut it and remove the plastic container with the toy. You can give the toy to the baby, you won’t need it
Next, place the money in the empty egg and return it to the chocolate halves. To ensure that the Kinder Surprise halves fit neatly together, run a warm spoon along the seam. And, of course, we wrap it back in foil.
All these operations must be performed as carefully as possible so that the newlyweds cannot visually notice the substitution.
Now it's up to you! You need to beautifully present your surprise at the wedding. For example, joke that you are not capable of a more expensive gift right now. And to a gift horse, as they say... In general, show all your imagination. And of course, don’t forget to congratulate the newlyweds on their wedding day.
Is it possible to throw away the fat plant?
Everyone who has purchased a Crassula sooner or later is faced with the question of whether it is possible to throw away the money tree. Particularly impressionable individuals are so afraid of signs and superstitions that they refuse to throw away amulets when they become unusable, citing the fact that happiness will leave the house.
But a broken talisman will also not bring the expected benefits. The best thing to do in such a situation is to get rid of the amulet to prevent negative energy from spreading throughout the house.
But how do you know whether it’s worth saying goodbye to the fat woman or whether there’s still an opportunity to revive it? Experts do not give specific instructions on this matter, so you can only act at your own discretion. When a tree is sick, try to cure it. Find more detailed guides on caring for this plant or talk to fellow gardeners.
If you can see from the Crassula that it won’t last long, then you have several options:
- completely get rid of the plant;
- leave a sprout for yourself to grow a new tree;
- give it to another person (but it is better not to do this for the reasons given in the previous paragraph).
Never throw the money tree in the trash or landfill. Mascots are not treated that way. If you don’t want to re-gift the plant or keep the sprout for yourself, just bury the fat plant in the ground away from the house.
Interesting tips
- Artificially aged coins that are made using various acids look very interesting.
- To make coins shine, they must be varnished.
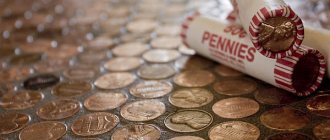
- To make a coin table, it is best to use epoxy resin.
The strength and correct shape of the coins, combined with the author’s imagination, will help you create a real work of art. From coins you can create both designer and household items that will serve for a long time.
Coin jewelry
Jewelry from coins began to be made many centuries ago. These were all kinds of bracelets and necklaces that could always be exchanged for the necessary things. You can make a lot of stylish jewelry out of coins, but to do this you need to drill holes in them.
From coins you can make a stylish set of earrings, necklace and bracelet, which are strung on wire, chain or leather laces. To make a bracelet, you need to drill two holes in the coin from different sides, into which metal rings are threaded. The clasp is attached separately to the rings.
Wedding gift first aid kit
A first aid kit is purchased as a gift for newlyweds, and you can come up with your own wish for each of its components. Or choose lines from the options below.
- Here's efferalgan for you - so that your husband doesn't come home drunk. - take effervescent aspirin so that you can love each other with a burning love. - We’ll give you a bandage so that there are no offenses. - and here’s a sterile bandage for you, so that your husband will be loving in bed. — I want to give iodine in a bottle so that they don’t forget to give birth to a girl. - and here’s some green stuff for you so that the baby boy will be born first. - a bactericidal adhesive plaster (given to the bride) so that you have an enviable husband. - here's some cotton wool to live richly. - take a remedy from supervision so that you can work yourself and not wait for an inheritance. - heart drops, so that your love will be eternal. - take shiny tweezers - so that your wife will be a real Venus. - cough tablets so that the husband does not run to the neighbor. - a drug for diarrhea so that they don’t listen to what the grandmothers say. - Take oral contraceptive, hubby, so that you will always be a sexy bride. - a syringe so that the daughter-in-law will be adored by the mother-in-law. — vitamins so that my mother-in-law calls for pancakes more often. - take analgin so that your husband... is alone. - ammonia, so that something stands like a pin. - a syringe so that they don’t hide happy faces from us. - a pipette so that the groom often carries the bride in his arms. - and also take mustard plasters so that the children will be excellent students. - and finally, here’s a first aid kit - so that you can always greet your friends on the porch.
After such a comic congratulation, in addition, you can give the newlyweds an envelope with money.
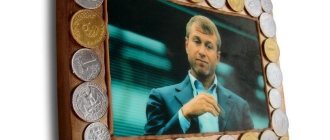
Frame of coins
To make the interior more unusual and interesting, you can make a beautiful frame for photographs or mirrors from coins. It is necessary to prepare the following materials:
- Base (frame).
- Glue gun.
- Coins.
Coins are glued to the base, which must be strong. You can stack them one on top of the other so that there are no gaps. Once the glue has dried, you can use gold or silver spray paint to paint the frame.