Laser cutting is the most advanced, but also expensive technology. But with its help you can achieve results that are beyond the power of other metal processing methods. The ability of laser beams to give any material the desired shape is truly limitless.
The unique capabilities of the laser are based on the following characteristics:
- Clear directionality - due to the ideal directionality of the laser beam, the energy is focused at the point of impact with a minimum of losses,
- Monochromaticity - the laser beam has a fixed wavelength and a constant frequency. This allows it to be focused with ordinary lenses,
- Coherence – laser beams have a high level of coherence, so their resonant vibrations increase the energy by several orders of magnitude,
- Power - the above properties of laser beams ensure that the energy of the highest density is focused on a minimal area of material. This allows you to destroy or burn through any material in a microscopically small area.
Design and principles of operation
Any laser device consists of the following components:
- energy source;
- working body that produces energy;
- an optical amplifier, a fiber-optic laser, a system of mirrors that amplify the radiation of the working element.
The laser beam produces precise heating and melting of the material, and after prolonged exposure, it evaporates. As a result, the seam comes out with an uneven edge, evaporating material is deposited on the optics, which reduces its service life.
To obtain smooth thin seams and remove vapors, the technique of blowing melt products from the laser impact zone with inert gases or compressed air is used.
Factory laser models equipped with high-grade materials can provide good indentation rates. But for household use they are too expensive.
Models made at home are capable of cutting into metal to a depth of 1-3 cm. This is enough to make, for example, parts for decorating gates or fences.
Laser cutting of metal
Depending on the technology used, there are 3 types of cutters:
- Solid state. Compact and easy to use. The active element is a semiconductor crystal. Low-power models have quite affordable prices.
- Fiber. Glass fiber is used as the radiation and pumping element. The advantages of fiber laser cutters are high efficiency (up to 40%), long service life and compactness. Since little heat is generated during operation, there is no need to install a cooling system. It is possible to produce modular designs that allow you to combine the power of several heads. The radiation is transmitted via flexible optical fiber. The performance of such models is higher than solid-state ones, but their cost is higher.
- Gas. These are inexpensive but powerful emitters based on the use of the chemical properties of gas (nitrogen, carbon dioxide, helium). With their help you can weld and cut glass, rubber, polymers and metals with a very high level of thermal conductivity.
Homemade household laser
To carry out repair work and manufacture metal products at home, do-it-yourself laser cutting of metal is often required. Therefore, home craftsmen have mastered manufacturing and successfully use hand-held laser devices.
In terms of manufacturing cost, a solid-state laser is more suitable for household needs.
The power of a homemade device, of course, cannot even be compared with production devices, but it is quite suitable for use for domestic purposes.
How to assemble a laser using inexpensive parts and unnecessary items.
To make a simple device you will need:
- laser pointer;
- battery-powered flashlight;
- CD/DVD-RW writer (an old and faulty one will do);
- soldering iron, screwdrivers.
How to make a handheld laser engraver
Laser cutter manufacturing process
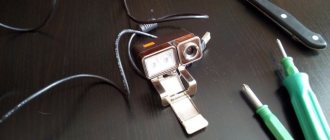
- You need to remove the red diode from the computer disk drive, which burns the disk when recording. Please note that the drive must be a write drive.
After dismantling the upper fasteners, remove the carriage with the laser. To do this, carefully remove the connectors and screws.
To remove the diode, you need to unsolder the diode mountings and remove it. This must be done extremely carefully. The diode is very sensitive and can be easily damaged by dropping it or shaking it sharply.
- The diode contained in it is removed from the laser pointer, and the red diode from the disk drive is inserted in its place. The pointer body is disassembled into two halves. The old diode is shaken out by picking it up with the tip of a knife. Instead, a red diode is placed and secured with glue.
- It is easier and more convenient to use a flashlight as a body for a laser cutter. The upper fragment of the pointer with a new diode is inserted into it. The glass of the flashlight, which is an obstacle to the directed laser beam, and parts of the pointer must be removed.
Laser pointer
When connecting the diode to battery power, it is important to strictly observe the polarity.
- At the last stage, they check how securely all the laser elements are fixed, the wires are connected correctly, the polarity is observed and the laser is level.
The laser cutter is ready. Due to its low power, it cannot be used when working with metal. But if you need a device that cuts paper, plastic, polyethylene and other similar materials, then this cutter is quite suitable.
Drive disassembly
Having the drive in front of you, first remove the top cover by unscrewing 4 screws. Then the movable mechanism, which is located in the center and connected to the printed circuit board with a flexible cable, is removed. The next goal is a laser diode, securely pressed into a radiator made of aluminum or duralumin alloy. It is recommended to provide protection against static electricity before dismantling it. To do this, the leads of the laser diode are soldered or wrapped with thin copper wire.
Next, there are two possible options. The first involves operating a finished laser in the form of a stationary installation together with a standard radiator. The second option is to assemble the device in the body of a portable flashlight or laser pointer. In this case, you will have to apply force to cut through or saw the radiator without damaging the radiating element.
How to increase laser power for metal cutting
You can make a more powerful laser for cutting metal with your own hands by equipping it with a driver assembled from several parts. The board provides the cutter with the required power.
The following parts and devices will be needed:
- CD/DVD-RW writer (an old or faulty one will do), with a writing speed of more than 16x;
- 3.6 volt batteries – 3 pcs.;
- 100 pF and 100 mF capacitors;
- resistance 2-5 Ohm;
- collimator (instead of a laser pointer);
- steel LED lamp;
- soldering iron and wires.
You cannot connect a current source to the diode directly, otherwise it will burn out. The diode draws power from current, not voltage.
Laser collimator
The beams are focused into a thin beam using a collimator. It is used instead of a laser pointer.
Sold at an electrical goods store. This part has a socket where the laser diode is mounted.
Where can I get a diode for a laser?
The working element of any laser is a laser diode. You can buy it at almost any radio store, or get it from a non-working CD drive. The fact is that drive inoperability is rarely associated with failure of the laser diode. Having a broken drive in stock, you can get the necessary element without extra costs. But you need to take into account that its type and properties depend on the modification of the drive.
The weakest laser, operating in the infrared range, is installed in CD-ROM drives. Its power is only enough to read CDs, and the beam is almost invisible and is not capable of burning objects. The CD-RW has a built-in more powerful laser diode, suitable for burning and designed for the same wavelength. It is considered the most dangerous, as it emits a beam in a zone of the spectrum invisible to the eye.
The DVD-ROM drive is equipped with two weak laser diodes, the energy of which is only enough to read CDs and DVDs. The DVD-RW burner contains a high-power red laser. Its beam is visible in any light and can easily ignite certain objects.
The BD-ROM contains a violet or blue laser, which is similar in parameters to the analogue from the DVD-ROM. From BD-RE recorders you can get the most powerful laser diode with a beautiful violet or blue beam capable of burning. However, finding such a drive for disassembly is quite difficult, and a working device is expensive.
The most suitable one is a laser diode taken from a DVD-RW drive. The highest quality laser diodes are installed in LG, Sony and Samsung drives.
The higher the DVD drive's writing speed, the more powerful the laser diode installed in it.
Assembly Tips
To check the operation of the driver, use a multimeter to measure the current supplied to the diode. To do this, connect a non-working (or second) diode to the device. For most homemade devices, a current of 300-350 mA is sufficient.
If you need a more powerful laser, the indicator can be increased, but not more than 500 mA.
It is better to use an LED flashlight as a homemade housing. It is compact and convenient to use. To prevent the lenses from getting dirty, the device is stored in a special case.
Important! A laser cutter is a kind of weapon, so it should not be pointed at people, animals, or given to children. Carrying it in your pocket is not recommended.
It should be noted that do-it-yourself laser cutting of thick workpieces is impossible, but it can cope with everyday tasks.
Assembling a pocket laser
In this post I will describe how I assembled a purple laser pointer from junk I had on hand. For this I needed: a violet laser diode, a collimator to converge the light beam, driver parts, a housing for the laser, a power supply, a good soldering iron, straight hands, and the desire to create.
If you are interested and want to dig deeper into electronics, please refer to cat.
I came across a dead Blu-ray cutter. It was a shame to throw it away, but I didn’t know what could be made of it. Six months later I came across a video that showed such a homemade “toy”. This is where Blu-ray comes in handy!
The drive's read-write system uses a laser diode. In most cases it looks like this:
Or like this.
To power the “red” diode, 3-3.05 volts are needed, and from 10-15 to 1500-2500 milliamps, depending on its power. But the “purple” diode requires as much as 4.5-4.9 volts, so powering it through a resistor from a lithium battery will not work. We'll have to make a driver.
Since I had a positive experience with the ZXSC400 chip, I chose it without hesitation. This chip is a driver for high-power LEDs. Datasheet. I didn’t bother with the wiring in the form of a transistor, diode and inductance - everything is from the datasheet.
I made a printed circuit board for the laser driver, known to many radio amateurs as LUT (Laser Ironing Technology). For this you need a laser printer. The diagram was drawn in the SprintLayout5 program and printed on film for further transfer of the drawing to textolite. You can use almost any film, as long as it doesn’t get stuck in the printer and it prints well. Film from plastic envelope folders is quite suitable.
If there is no film, no need to be upset! We borrow a women's glossy magazine from a friend or wife, cut out the most uninteresting page from it and adjust it to A4 size. Then we print.
In the photo below you can see a film with applied toner in the form of a circuit layout, and a piece of PCB prepared for transferring the toner. The next step will be preparing the PCB. It is best to take a piece twice as large as our diagram, so that it is more convenient to press it to the surface during the next step. The copper surface must be sanded and degreased. Now you need to transfer the “drawing”. We find an iron in the closet and turn it on. While it is warming up, we place a piece of paper with the circuit on the PCB.
As soon as the iron heats up, you need to carefully iron the film through the paper.
This video shows the process very clearly.
When it “sticks” to the PCB, you can turn off the iron and move on to the next step.
After transferring the toner using a regular iron, it looks like this:
If some tracks were not transferred, or were not transferred very well, they can be corrected with a CD marker and a sharp needle. It is advisable to use a magnifying glass, the tracks are quite small, only 0.4 mm. The board is ready for etching.
We will poison with ferric chloride. 150 rubles per jar, lasts a long time.
We dilute the solution, throw our workpiece there, “stir” the board and wait for the result.
Don't forget to control the process. Carefully pull out the board with tweezers (it’s also better to buy one, this way we will save ourselves from excess mat and “snot” of solder on the future board when soldering).
Well, the board is etched!
Carefully clean it with fine sandpaper, apply flux, and tin it. This is what happens after servicing.
You can apply a little more solder to the contact pads than everywhere else, to make soldering the parts more convenient, and without applying additional solder.
All that remains is to cut off a little further than the outlined contours and file away the excess with a file. I made the driver in duplicate - just in case. It is convenient to cut textolite with metal scissors.
We will assemble the driver according to this scheme. Please note: R1 - 18 milliohms
, not
megaohm
!
When soldering, it is best to use a soldering iron with a thin tip; for convenience, you can use a magnifying glass, because the parts are quite small. For this soldering, flux LTI-120 is used.
So, the board is practically soldered.
The wire is soldered in place of the 0.028 Ohm resistor, since we are unlikely to find such a resistor. You can solder 3-4 in parallel (they look like resistors, but labeled 0), they have about 0.1 ohm of real resistance.
But there weren’t any, so I used regular copper wire of similar resistance. I didn’t measure it exactly - just the calculations from some online calculator.
We are testing.
The voltage is set to only 4.5 volts, so the light is not very bright.
Of course, the board looks a bit dirty before the flux is washed off. You can wash it off with simple alcohol.
Now it’s worth writing about the collimator. The fact is that the laser diode itself does not shine with a thin beam. If you turn it on without optics, it will shine like a regular LED with a divergence of 50-70 degrees. In order to create a beam, you need optics and a collimator itself.
The collimator was ordered from China. It also contains a weak red diode, but I didn’t need it. The old diode can be knocked out with a regular M6 bolt.
We unscrew the collimator, unscrew the lens and the back part, and unsolder the driver from the diode. We clamp the remaining fastener in a vice. You can knock out the diode by hitting it. The diode is knocked out.
Now you need to press in the new purple diode. But you can’t press the legs of the diode, and it’s inconvenient to press them in any other way. What to do? The back of the collimator is great for this. We insert the new diode with its legs into the hole in the back of the cylinder, and clamp it in a vice. Smoothly tighten the vice until the diode is completely pressed into the collimator.
So, the driver and collimator are assembled. Now we attach the collimator to the “head” of our laser, and solder the diode to the driver outputs using wires, or directly to the driver board.
As a body, I decided to use a simple flashlight from a hardware store for a hundred rubles. It looks like this:
All hardware for the laser and collimator.
A magnet is attached to the clothespin for easy attachment. All that remains is to insert the laser device into the housing and tighten it.
Sprint layout 5, printed circuit board layout files in the archive.
PS This pocket laser is a rather dangerous “toy”. Class I-II lasers are not particularly dangerous for humans and eyes, unless the diode accidentally gets into the eye if assembly is unsuccessful. But classes III-IV can damage or deprive vision altogether. It is necessary to use glasses. It is impossible to direct the beam towards people, and especially into their faces.
.
The Chinese red pointer shines with a power of 0.5-1 mW. This laser has a power of 150-200 milliwatts. Imagine that 150-200 pointers were pointed at you at the same time!