The straight lines of potato bushes look very beautiful, showing order and creating comfort for self-hilling or using a cultivator. An unpleasant routine activity with the help of certain devices for self-planting can become a fun, unpretentious and enjoyable activity, and designing your own necessary manual equipment is a process of technical creativity.
Today there are special devices - marker, scriber, hedgehogs, plow for planting and weeding potatoes. They will greatly facilitate the work of the gardener. The work, when using these simple devices, happens much faster, and the result is the same effective and high-quality if it was done by hand.
Hand hiller. Manual potato hiller
Potatoes have always been considered one of the main vegetables in the kitchen.
It is used for preparing first and second courses, desserts, etc. Growing this vegetable requires a lot of labor, because to get a good harvest you need to hill up the potato bushes several times a season. Thanks to hilling, oxygen access to the roots improves, channels in the ground are destroyed, as a result of which less moisture evaporates, and the number of tubers increases.
Hilling up bushes is carried out in summer cottages mechanically using a hoe. However, this is a long and difficult process.
To help farmers and gardeners specializing in growing potatoes, a special tool called a hiller has been created.
Advantages and disadvantages of hillers
The use of mechanisms always allows you to increase labor productivity on farms and summer cottages.
Manual hiller
Advantages:
- reduces labor costs and increases farmer efficiency;
- can be a multifunctional tool that can additionally be used for loosening the soil, planting potatoes, and also during harvesting;
Flaws:
- in order to use the device, you need to purchase it, which means that material costs will be required for the purchase and further maintenance;
- When working with the device, you must follow safety regulations.
Types of potato hillers
Depending on the design, the following types of devices are distinguished:
- lister;
- disk;
- propeller
Disc hiller
Propeller mechanisms make it possible to move the soil between the rows into the furrows.
The most common are lister and disk devices.
Lister mechanisms
Interesting! Devices of this type are available with a fixed working width. Otherwise they are called plows, as they look like a plow.
They are produced with an adjustable angle of attack (the angle of inclination of the cutting part of the hiller to the ground) and fixed.
Adjustable ones allow you to change the depth of loosening and, accordingly, the gripping area.
Advantages of the device:
- consumes less energy compared to disk devices;
- simpler in design;
- the price is less than for a disk device;
- It is light in weight, so it works great on low-power machines (walk-behind tractors and cultivators).
Lister hiller
Flaws:
- does not work well on wet and heavy soil;
- Potato planting should only be level, with strictly fixed row spacing.
Disc hillers
Structurally, they consist of two disks with a sharpened edge. As the hiller moves, the discs rotate and crush the soil. They have a convex shape. Due to this shape, the soil is simultaneously loosened and an earthen ridge is formed.
The disks are attached through ball bearings to the racks, which are located on a horizontal holding frame.
Note! They can be adjusted vertically, less often horizontally. With vertical adjustment, the angle of rotation of the disks changes, due to which the amount of earth needed to form the ridge also changes.
Horizontal adjustment moves the discs vertically (raises or lowers). In this way, the angle of attack is adjusted.
Advantages:
- better performance of hilling, the ridges are smoother and higher;
- can be used with different row spacings;
- allows hilling on heavier soil.
The disc hiller can be used with different row spacings
Flaws:
- higher price;
- higher fuel consumption.
Depending on the volume of work performed and the degree of mechanization, the potato hiller can be:
- manual;
- automated.
Fact! Manual - designed to perform only hilling, automated - used to perform several types of work: hilling, loosening, planting, harvesting.
Manual - moves due to the fact that a person pushes or pulls the mechanism.
An automated potato hiller is an additional hanging device for a walk-behind tractor, cultivator or tractor.
Manual potato hiller
Allows you to process potato beds, regardless of the presence of a walk-behind tractor or a tractor. For manual types, the most common designs are lister and disk mechanisms.
How to make work easier and faster when planting potatoes using a cultivator
Planting and caring for potatoes is a difficult and tedious process. Typically, the areas allocated for potatoes are quite large, so planting, hilling and harvesting potatoes requires a lot of time and effort. And, of course, this process needs to be automated. There are many devices that make the life of a gardener easier. These include both mechanized devices and manual equipment. There are plenty to choose from, given the area of the plot and financial capabilities.
Related article: What to do if potatoes are frozen - how to process tubers
Tips and warnings
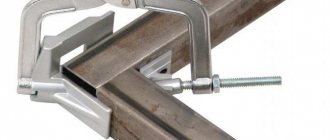
Fastening the footrest, handles and valve is best done by welding. Fastening structural elements with bolts or self-tapping screws may be no less strong, but in those places where their ends stick out inside the body, obstacles will form for the passage of potato tubers.
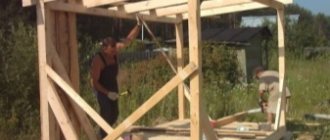
Assembly of the structure
Before assembling the entire structure, make sure that the total weight of all elements will not pose a problem for you during operation.
The device should not be too heavy, otherwise you risk not making your work easier by slightly mechanizing and speeding up the process of planting potatoes, but on the contrary, complicating your life by moving a non-lifting device.
At the same time, the pipe body must be strong enough to withstand many cycles of inserting and removing the device from the ground. Depending on the preferences of a particular designer, individual design elements of a manual potato planter can be made in different ways.
Some equip the valve mechanism with an additional hook so that you can reliably control the process of opening and closing with your foot. This is, of course, the simplest and most primitive agricultural tool. However, this is where its beauty lies.
Anyone can make a potato planter; the material for this will probably be found in any household, and the efficiency of the device is very impressive.
Potato planter made from two-wheeled trolley
Separately, I would like to talk about another design of a homemade apparatus for planting potatoes. This is a two-wheeled cart, on top of which there is a box for tubers prepared for planting.
In the lower part, between two running wheels, there is a device for uniform feeding of potatoes into a pre-prepared furrow. Such a cart rides over the furrow and, while moving, lays out potato tubers at regular intervals.
A shield covering the furrow can be located behind such a device, but in this case, moving the cart will require more effort, or the help of a second person.
Such a device can hardly be called a manual potato planter, but it is also a simple home-made unit that can collect any old and unnecessary items.
When moving the wheelbarrow, potato tubers fall into the recesses on the wheel and with the movement of the wheel they move down into the prepared furrow. To prevent the tubers from falling out along the way, there is a protective wing in front of the wheel.
Shovel-harvester
Another design used for planting potatoes is called a harvester shovel. These are two handles that can move closer and further away from each other, opening and closing a cone-shaped container into which potatoes are placed for planting.
When closed, the container is stuck into the ground, after which the handles are brought together, the container opens and the potato tuber ends up in the ground. It’s convenient, but you have to bend down and put one potato into the cone each time.
As you can see, people have come up with many convenient and practical devices that make life easier for gardeners. Some of them can be called successful, some not so much, but they all help and, with varying degrees of success, replace the classic shovel.
It’s almost as easy to construct a feed cutter with your own hands.
Manufacturing stages
First you need to make a drawing in which all the details should be displayed. Then you can start creating the frame. It is important to remember that this is the most basic part of the potato box, so it must be stable. All parts must be firmly connected to each other. The frame is constructed from wooden boards or chipboard. They begin to form the container by attaching the walls one by one.
Then vertical posts are made to give the structure stability. Iron corners are screwed into the joints of the walls. To seal the structure, you can use glue. After this you can attach the cover. This could be a folding mechanism or sliding doors.
A design with drawers is considered more reliable, but it requires more experience in carpentry. Each wall in the potato storage box is lined with sheets of plywood from the inside. The outer side must be insulated with mineral wool or foam sheets. They are sheathed on top with sheets of plywood. The protruding ends of the screws can be sawed off with a grinder.
Hand Tools Overview
Now, indeed, it will be easier to plant potatoes using original devices, and in this case a shovel will no longer be needed. The tools that replace the spade not only make the process easier - thanks to them, the rows are perfectly even.
The plantation looks neat, and it is more convenient to hill up the bushes. Each of the proposed devices allows you to maintain the planting pattern, so potato harvesting will actually be carried out using a mechanized method.
The device can be bought in a store or ordered online, but it is cheaper to make it yourself. No special material is required here - improvised means will do. The drawings of homemade tools are simple, so even a person without skills can make them.
Which of the summer residents has at least once seen this device in action and is interested in how to make a marker for planting potatoes with your own hands. Craftsmen have invented several types of convenient devices. It is suggested to use metal pipes, wooden stakes or a durable board as the material.
A hand plow will become a homemade machine for planting, hilling, and loosening the soil. It can be operated by two people. It takes effort to make a plow.
For production you will need:
- Meter-long hollow pipe with a diameter of 2.5 cm.
- Hollow pipe with a diameter of ¾ inch.
- Metal sheet 2 mm thick.
- A metal plate with holes or a lanyard.
- Gas-burner.
- Bulgarian.
- Welding machine.
The small pipe needs to be bent. To adjust the height, you need to make holes on the vertical post and on the top edge. The height of the stand is made individually so that the person who will hold the plow will be comfortable. It can be adjusted with bolts.
Design Features
Making a box is not difficult
The front wall of the potato storage box should be collapsible. This is a necessary move in order to be able to quickly get root vegetables from the bottom, because you will need to sort it out periodically, although, of course, this will depend on how many kg the box is designed for.
All self-made vegetable storage facilities intended for loggias or balconies have one feature. These are two structures inserted into one another with gaps between the walls from 80 to 100 mm. A wooden grate should be placed at the bottom of a larger container to ensure ventilation of the tubers from all sides.
The outer container can be made of high-quality plastic sheets. If the loggia or balcony is not glazed, you need to additionally treat the external surfaces with waterproof paint. All internal surfaces must be made of wood to avoid the absorption of toxic substances by roots.
Manual potato planter. Quick manual potato planter
In this publication, we will first consider the simplest version of a manual potato planter, which will be useful for those who would like to quickly build an affordable tool and not spend money on complex designs.
Garden tools and other products in this Chinese store.
The second part presents more complex structures that will have to be tinkered with, but for perfectionists and, at the same time, manual labor enthusiasts, these will be the most interesting developments.
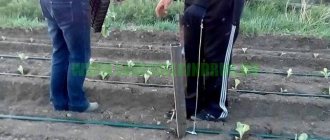
On the first video
The simplest manual potato planter in the form of a wooden handle and a ledge for the foot. According to the author of this mechanism, the potato yield does not suffer at all with this method of planting, but on the contrary, it is higher.
Craftsmen buy inventions at their best
The device, which is presented in this video, is not particularly or even at least some kind of sophistication. The gardener simply called it “digging stick.” But, for the purposes of this publication, it would be fair to consider it as a manual potato planter. With its help, you can plant potatoes without a shovel practically with your own hands. This method is called “heeled” among gardeners.
The field was previously plowed with walk-behind tractors. First, a 70X20 field is marked. Or they simply stretch the threads at a distance of 70 cm from each other, and during planting of potatoes, 20-30 cm are measured each time using a potato planter.
Holes are made every 20 centimeters and potatoes and peas are thrown into them. All this is immediately covered with earth. The soil must be moist, because if it dries out, the holes will crumble. Therefore, you need to plant potatoes using this manual potato planter immediately after plowing the field. Peas do not interfere with potatoes; they grow in symbiosis. The fact that holes are made and the earth is compacted does not have any consequences for the harvest. On the contrary, it helps collect moisture after rain. This simple mechanism, made in haste, has served for 7 years. In another publication about what kind of potatoes should be planted.
Electronics for DIYers in
Second development.
When planting potatoes, after they are laid in the furrows, it is necessary to cover them with soil. Many people suffer when working with shovels, rakes or hoes. The furrows were pre-cut using a walk-behind tractor with a special device for cutting furrows. Planting material was placed in the furrows. A homemade heel was made in front of the hiller to adjust the constant depth and to make it easier during work. Now we will show how the potato planter works. Thus, there are no more problems with planting potatoes and covering them with soil. The planter is also convenient when moving it around the field. You just need to turn it to the top with the working part and move it on the wheel.
Another development is also shown, which is sometimes called Tykalka.
Homemade devices: types
Folk homemade craftsmen have come up with many mechanisms that will help plant potatoes. The most common are:
- A simple marker.
- Mittlider marker.
- Improved marker.
- Potato planter.
- Hand plow.
We'll tell you how to make them yourself.
Having asked yourself the question: how to make a manual potato planter with your own hands, you must first of all look at its diagram. You can easily find drawings of a potato planter on the Internet. They show that the design of the potato planter is essentially a hollow pipe with an open top and a sliding valve at the bottom.
Device
A sliding valve is attached to the beveled lower edge, which opens at the moment when the device with a potato tuber inside is stuck into the ground to the required depth.
To ensure that the potato planter sticks in at the same desired depth all the time, a flat stop is welded at some distance from the bottom edge. With its help, it is convenient to stick the potato planter into the ground, pressing on it with your foot. The top edge of the potato planter is open.
You can attach a container to it for a small number of potato tubers for planting and a simple dispenser for directing them one by one towards the bottom of our device.
The simplest device is a marker. Its purpose is to mark the ridges in such a way as to make the plantings even and suitable for subsequent processing with motor cultivators. For homemade markers, the distance between the cones coincides with the track dimensions of the existing equipment that will subsequently be used to process the plantings.
How to make a hand plow
Making a simple marker is easy. It is enough to have a regular board and wooden pegs on hand.
A marker for planting potatoes is a wooden stake with a diameter of about 65 mm. The height of the stake must be at least 90 centimeters. A transverse strip is attached at a height of about 15 cm from the sharp edge. It will serve as a stop that limits the depth of the hole.
Before planting with this tool, you must first mark the locations of the holes using a rope. The ropes are pulled along the rows at a distance of 40-80 cm from each other. Everyone sets the distance independently; it depends on whether the hilling will be carried out with a walk-behind tractor or manually.
Why is a homemade device better than a purchased device? In the marker you can set the exact distance, which will be equal to the distance between the wheels of the cultivator or tractor.
Pegs are made from thick spruce branches. They are processed, sharpened, and made into handles. Wooden transverse strips are nailed to them. Make a distance of about 60-65 centimeters between the stakes if the planting will subsequently be processed with a cultivator or mini-tractor. The distance should be no more than 55 cm if the processing is manual.
The bottom board should be with a reserve; a note is made on it using a narrow strip at the same distance as the stakes. It will help determine the beginning of the pits.
How to use this device? Place the device on the ground, holding it by the handles in front of you. Press down to make holes. You immediately get two ridges of holes, the third will become a note, they follow it in the opposite direction. The second person will follow the marker and plant the potatoes.
A hand plow will become a homemade machine for planting, hilling, and loosening the soil. It can be operated by two people. It takes effort to make a plow.
For production you will need:
- Meter-long hollow pipe with a diameter of 2.5 cm.
- Hollow pipe with a diameter of ¾ inch.
- Metal sheet 2 mm thick.
- A metal plate with holes or a lanyard.
- Gas-burner.
- Bulgarian.
- Welding machine.
The large pipe is bent, departing from the beginning by 30 centimeters. To facilitate this procedure, you can use a pipe bender. Use a blowtorch if there is no pipe bender.
The small pipe needs to be bent. To adjust the height, you need to make holes on the vertical post and on the top edge. The height of the stand is made individually so that the person who will hold the plow will be comfortable. It can be adjusted with bolts.
To plant potatoes in a field or bed in a short time, it is best to use automated or manual equipment. In any case, planting with a potato planter takes less time than doing all the work simply by hand.
A preliminary drawing of the devices will visually show how to make a device for planting tubers. Most of the special equipment makes it possible to immediately determine the distance between the holes and the number of rows processed simultaneously. Easy-to-use homemade machines can be carried by hand or attached to a motor cultivator.
You will need:
- steel sheet profile to form the base;
- several pipes with a diameter of 5 centimeters for a “lift” or cone;
- fastenings connecting the device to the walk-behind tractor.
In this case, the marker drawing for the potato planter can be changed depending on the selected size and depth of planting of tubers. The diameter of the “elevator” pipes varies if necessary to fill vegetable gardens with small potato seedlings.
The diameter can be changed using a simple manual planting cone.
Making any potato planter begins with drawing up a drawing. Next, elevators are formed. When the cones are made, the distance that will separate each planted tuber is determined. It will be 25–50 centimeters depending on the selected variety and soil type.
The next step is to determine the height of the stand, depending on the parameters of the beds. If the structure is placed on a platform, it is connected with M8 bolts with nuts and wheels. As a base, you can use a device for a trimmer or a walk-behind tractor, on which platforms with cones and a container for tubers are attached.
To determine the length of the hand-held device used to carry the container with tubers, the height of the owner of the site is taken into account. For ease of use, the handle of automated or manual equipment is placed so that it is convenient for the worker to perform all actions with a straight back.
Design requirements
A potato storage box must meet several requirements:
- only safe materials should be used for production;
- the box must be maintained at optimal temperature and humidity;
- the box must be equipped with a basic ventilation system;
- the container should not allow daylight to pass through.
All these requirements make it possible to preserve potatoes in their original form for a long time. If you do not ensure normal air circulation in it, the root crops will begin to rot one after another and you will have to throw them in the trash. To be able to control the air temperature and humidity level, you need to equip the potato storage box with a thermometer and a humidity meter.
The humidity in the box can be reduced by placing a layer of beets on top of the potatoes. It will absorb excess moisture. Root vegetables should be checked regularly and rotten and spoiled ones should be discarded, in which case it will be possible to maintain the freshness of the fruit until the end of winter.
What is a hiller, how is it designed?
made in the form of a fork of the same width as the rear link. The difference is in size. The length of the front link handles should be such that the front person can freely stand between the handles and comfortably grab them.Adjusting the angle of attack.
plumbing for a vertical stand with a diameter of 1 inch and a length of 900-1000 mm; Sprouted stems should be covered with soil on top. This procedure will need to be repeated in a week. This will allow the formation of strong stems, which will have a positive effect on yield. If the planting date was later, then the depth of the hole increases by 3 cm (this rule especially applies to dry periods). Early ripening varieties should be grown at a distance of 60-75 cm;
When choosing a potato planting method, it is based largely on the type of soil, as well as the availability of specialized equipment at your disposal. If everything is done correctly and all the nuances are taken into account, you can achieve a high-quality harvest. Using a hoe or chopper, form the ridges. Their height is approximately 15 cm
The distance between adjacent ridges is 70 cm (a distance of 50 cm is allowed); When using Dutch technology, much attention is paid to calculating the planting density of potatoes. Seed material is obtained by thickened planting, in which there are at least 30 bushes per square meter
Only those tubers that have five or more eyes are selected for further planting. Next, the planting map suggests planting six tubers per square meter.
The Dutch potato planting technology is based on a whole complex of various agrotechnical techniques. This includes:Use of straw. We plant potato tubers in pre-loosened and moist soil. In this case, the planting should be shallow - about 5-7 cm, and lay a layer of straw about 15 cm on top. After the shoots appear for the first time, increase the layer of material to 25 cm. The main thing is to lay the straw so as not to crush the plants. It is important to observe here a few basic rules
So, for example, the layer of material immediately after planting root crops should not be too thick, otherwise this will lead to the soil simply not warming up. The ease of harvesting in this case is also pleasing - carefully lift the straw and take out the tubers. The only negative is that mice can grow in the straw, which means you will need to think about how to get rid of them: install mousetraps or use mouse poison. So, we weld the halves and create an even weld at the place where they meet
We sand it with a grinder to make it smooth and sharp enough.
You can also equip a front linkThe angle of attack will be adjusted by tilting the central post relative to the horizontal plane of the ground. We will achieve this by changing the angle between the front link and the vertical post. The front link is hinged to the central post and adjustment is carried out via a turnbuckle, which will allow you to smoothly change the angle depending on the soil conditions and the height of the front person. If you do not have such a mechanism as
a hollow pipe with a diameter of ¾ inches for front and rear rods;Also, the depth of the hole depends on the type of soil. For heavy soil, this parameter should be about 8 cm. In light soils, the depth of the hole should be about 10 cm. And for clay soils, the hole is made with a depth of 5 cm.
Late-ripening varieties should be planted in rows, the distance between which should be no more than 90 cm (minimum 70 cm).The video demonstrates the process of planting potatoes using a walk-behind tractor. Tubers are planted in these ridges. The ridges protect the tubers from possible soaking.
Scheme for hilling potatoes on ridgesprocessing a plot of soil using special milling tools. As a result, the soil becomes looser;
Storage rules
At home, the temperature in the potato storage box should be maintained between 3 and 5℃. If there is sub-zero temperature on the loggia in winter, it is recommended to move it to the kitchen during the cold season. In order not to carry the potato storage box from place to place, you can install an incandescent lamp inside it. This way, you can increase the temperature if necessary.
The lamps are mounted in a special protective casing made of tin. The casing must be painted with heat-resistant varnish. To prevent light from damaging the fruits, the lamps are installed in the center of the container.
There is another option that allows you to increase the temperature in the potato storage box. A tube is installed in the bottom of the inner container, into which warm air blown by a fan enters. A lattice plug is installed on the surface of the pipe so that the vegetables do not block the path of air. The process of turning the hair dryer on and off can be automated if you integrate a relay with a heat sensor into the electrical circuit. If necessary, the system will operate and turn on the hair dryer; when heated to the desired temperature, the equipment will turn off itself.
Hedgehog cultivator for weeding
They remove grass with roots, unlike flat cutters, which only cut the stems. Hedgehogs rake the soil between the rows, which creates distinct rows and beautiful beds. Loose soil allows oxygen and liquid to pass through well, which increases the growth of potato roots, and this is a guarantee of an excellent harvest.
Hedgehogs for weeding potatoes
Weeding with a walk-behind tractor is done using certain paws or a rotating cutter. The cutter is rotated by the power take-off shaft. The advantage of the paws is ease of installation and thoroughness in loosening the soil. They loosen the soil at a depth of 4-7 centimeters, depending on its condition.
To operate, the presser feet need to be secured in certain fasteners at a distance equal to the width of the row. The fastener should have a slight overlap that will cover both legs. Devices can be either single-sided or double-sided. If the device is one-sided, then the legs must be attached so that the blades are located towards the row spacing.
The paws, which have one-sided blades, can be installed in another way, which makes it possible to process the bed on both sides simultaneously.
There is another device for manual weeding called a weeder. This is a frame, with a knife and a drum. Its wheels are placed between the rows, the knife chops the grass, and the spinning drum catches it and throws it back.
There are manual and electric cultivators with a gasoline engine. For weeding, devices with 2 knives are used, which are attached at an angle of 45°. It is best to carry out weeding with a cultivator, which has three-pronged mini forks installed instead of knives.
For comfort, these devices are installed on wheels: the summer resident pushes it, pressing it as close to the garden bed as possible.
Weeding cultivator on wheels with two blades
Using a device with a hedgehog attachment, they immediately weed and hill up the potatoes. The hedgehog consists of 2 cones mounted on a frame. The cone is made of 3 steel wheels of different diameters. Pointed spikes are welded onto the wheels. 2 hedgehogs are attached to the frame, spinning, they hook the grass in parallel and rake the soil from row to row.
Cultivator with hedgehog attachment
Electric cultivators are more dynamic and are used for small gardens. Their main drawback is the need to pull the cable from the outlet, which is not always comfortable. It is more rational to use cultivators with a gasoline engine. But such cultivators are less dynamic than manual ones, but the most productive. All types of cultivators are equipped with hedgehog attachments. The strength of the engine is selected depending on the condition of the earth; the heavier it is, the stronger the device.
Storage rules
General requirements for long-term storage of potatoes:
- dark room without access to natural light;
- good ventilation;
- temperature from +2°С to +7°С;
- humidity up to 80%;
- potatoes are dried and sorted.
It is advisable to treat the storage room or container before storage.
Important! For long-term storage, only late varieties of potatoes are used. Early varieties are stored for no more than a few months.
If storage rules are not followed, there is a risk:
- infection of potatoes with fungal diseases;
- the tubers turn green;
- potato growth is activated;
- Due to low temperatures, a sweetish taste appears, and due to high temperatures, a crust forms.
If all storage rules are followed, the tubers will remain suitable for eating for as long as possible, retaining their taste and nutritional value.
LiveInternetLiveInternet
-Music
–Categories
- Fashion history (52)
- English.Training (51)
- Arana (180)
- Architecture (22)
- Aerobics (77)
- Batik (30)
- Jewelry (126)
- Bonsai (4)
- Boho (206)
- Paper (149)
- Bottles (31)
- Felting (81)
- Videos (16)
- Vintage (190)
- Stained glass (34)
- Delicious treats (94)
- Parenting (15)
- Sundries (4)
- Baking (286)
- Cakes and cupcakes (12)
- Bread (16)
- Embroidery (2700)
- Ribbon embroidery (7)
- Crazy quilt, embroidery (34)
- richelieu (34)
- Knitting knits (3754)
- Machine knitting (14)
- Knitting with fur (18)
- Knitting, needs (84)
- Gymnastics for the face (76)
- Cities and villages (30)
- Country ideas (143)
- Decoupage (59)
- Wood (8)
- Diary (37)
- Longevity (319)
- Pharmacy drugs (20)
- Longevity Qigong (91)
- Housekeeping (75)
- Spiritual practices (16)
- Food (329)
- Diets (29)
- Cheese making (13)
- Eat and treat (97)
- Woman (41)
- Painting, pictures (13)
- Earn money! (28)
- Health, beauty (694)
- Herbs (65)
- Toys (454)
- Felt (25)
- Out of nothing (48)
- Interior (186)
- Yoga (72)
- Mantras (4)
- Quilt, patchwork (245)
- Stitch lessons (17)
- Books, magazines (68)
- Rugs (85)
- Leather (73)
- Cosmetics (149)
- We paint (43)
- Crochetwork (697)
- Irish lace (95)
- Romanian lace (9)
- Napkins (161)
- Dolls (391)
- Modeling (106)
- Papier-mâché (14)
- For kids (545)
- Massage (45)
- Master classes (5)
- Furniture (4)
- Copper plating (14)
- Fur, leather, sheepskin coat (2)
- Fashion, style (42)
- Mudras (21)
- Music (52)
- Soap (63)
- Cream makers (21)
- New Year! (167)
- Easter preparations (16)
- Socks, slippers, footprints (271)
- He and she (76)
- Alterations (55)
- Blankets (283)
- Weave (16)
- Pillows (120)
- Tailoring (73)
- Wire (136)
- electroplating (5)
- Religion, rituals (27)
- Painting (146)
- Rus' (45)
- Homemade products (55)
- Wedding (30)
- Candles (28)
- Simoron (16)
- Society, etiquette, psychology (94)
- WALLS (70)
- Poems (30)
- Haircuts (19)
- Construction (28)
- Bags (99)
- Tarapunto (109)
- Movies (3)
- Photo exhibition (41)
- Photo salon (29)
- Photoshop (25)
- Flowers (75)
- Watches (22)
- Something special (61)
- Shawl (426)
- Hats (387)
- Sewing (572)
- Sewing. Necessities. (77)
- Caskets (23)
- Curtains (5)
- Humor (14)
- To young Michurinets (316)
- Razvodilovo (5)