Homemade products for the apiary
The main equipment of an apiary is a beehive. Professional beekeepers make them with their own hands from boards. However, without tools and equipment, the beekeeper will not be able to maintain the hive, care for the bees, pump honey, or melt wax. Beekeeping accessories are available for free sale, but they are often overpriced. Another disadvantage is the inconvenience of working with factory products. Sometimes apiary equipment is ill-conceived and made of poor quality materials.
The beekeeper creates the most convenient beekeeping devices with his own hands. They are completely free, and in terms of quality they can compete with their factory counterparts.
Advice! On the forums you can find amazing homemade products for beekeeping, which have no analogues for sale. The only way a beekeeper can get hold of such a thing is to construct it with his own hands.
Choosing a design
During the construction of a cottage or a large house, it is impossible to do without temporary housing where the builders could relax. Its installation should be quick and cost-effective. An excellent option for solving this problem is to install a 3x6 m frame shed with your own hands. In the future, it can also serve as a spacious place for storing old things, household equipment and a bicycle.
To do this, you can do the following.
Buy a ready-made container. You just need to install it on a gravel bed. This type of cabins is considered the most affordable and simple. The only thing is that difficulties may arise during transportation.
Make a frame structure. This is the most optimal solution, since construction will not require large financial costs. The frame can be made of wood or metal. Wooden structures are easily fixed to the foundation, quickly disassembled and look attractive in the landscape design of the site. Metal structures have a welded frame and are characterized by strength and durability.
Use the prefabricated panel method. This is the simplest option for making a change house, for the installation of which a shield is first assembled from frames and boards. The frames are assembled on the ground, after which they are covered with boards, resulting in a box. The production of the cabin is completed by laying the floors and covering surfaces such as the ceiling and walls, for which sheets of chipboard or plywood are usually used. In addition, doors are installed.
Once the type of construction is selected, it remains to resolve the issue of preparing documentation. For this purpose, a project for the future change house and an estimate are being prepared. A 3x6 m building is considered universal, since it can serve as a place for relaxation, a bathhouse, or a workshop or storage room. Usually, when creating projects, a standard scheme with a living space and a vestibule (13.5 and 4.5 m2) is selected. If desired, you can add partitions that will separate the storage room, kitchen and bathroom from the living room. The drawings must indicate window openings and internal doors.
As for the estimate, in order to correctly calculate the entire cost of constructing a change house, you need to take into account not only the costs of purchasing building materials, but also the cost of their delivery and installation.
How to make a frame nose
It is difficult and dangerous for the beekeeper to carry the frames with honey to the honey extractor in the presence of bees. It is similarly inconvenient to deliver foundation to the hives. A frame cutter helps simplify the task. The apiary device resembles an ordinary wooden box that can hold from 6 to 10 frames. It is equipped with a handle for carrying. You can make a simple bee frame with your own hands according to the presented drawing.
The DIY assembly process consists of the following steps:
- First, the size of the apiary frame-noser is determined. It must accommodate the frames used in hives. The frame frame consists of two side walls, a front and a back wall, a bottom, and a lid. In total, you need to put together 6 elements of the box with your own hands.
- For the frame, slats with a cross section of 20x45 mm are used. Do-it-yourself cladding is done with fiberboard. The slats are nailed to the outside of the walls so that it is convenient for the apiary frame carrier to grasp the protrusions with your hands. Inside the box, 2 slats are similarly nailed to form a stand for the frames.
- The bottom is nailed last and the lid is secured with hinges. It should lean to the side. A ventilation hole is drilled in the front panel, but it is optional. Many beekeepers refuse ventilation. Staples are attached to the frame frame, and a handle is hooked from the belt.
- If necessary, beekeepers quickly adapt a self-designed apiary frame to catch a swarm.
The video shows an example of a frame plant:
Langstron-Root hives
If you rummage through the layers of history, the founder of frame beekeeping is P.I. Prokopovich. It was he who led the revolution, abandoning the swarm method. His direction made it possible to offer a multi-body standardized hive. Its creator, Langstron, was involved in its improvement. Then positive changes were made by the manufacturer, Ruth's compatriot. The result was a good Langstron-Ruth combination, which instantly conquered the entire Western Hemisphere. It took almost 100 years for it to be popularized throughout the USSR.
The advantages of the Langstron-Root hive are as follows:
- The nest is more consistent with the natural vertical position. Working women willingly master interchangeable hive bodies
- Owners are impressed by the lightweight weight. It should be noted that in the USA they still maintain inch (25-26 mm) wall thickness. To avoid damage, each part is impregnated with paraffin. Amazing weather resistance. The warranty period is at least 50 years. We have different parameters for the thickness of the hive walls - 35-40 millimeters.
- Owning separating grids greatly facilitates the selection of sweet products. They do not allow queens to worm on a given land where pure honey is stored
- Operated by one person
- Picking is carried out in winter, autumn
- Labor costs are reduced. This makes it possible to have (in America, Canada) up to 1000 bee colonies at the same time. With our weak Russian mechanization, such a volume is difficult to imagine.
A disadvantage for wintering is the reduced vertical height of only 230 mm instead of 300 mm like the Dadan. When wintering in 2 buildings, the bee colony will have to cover an impressive distance when moving from the lower to the upper building. Let's count: 22 is the top bar, 10 is the bottom bar, the same amount is the inter-frame space. Total - 42. Yes, plus another gap to the honeycombs. If -20-25 °C remains in the wild for a long time in January, the helpers are doomed to freeze from lack of food. Especially among weaker families.
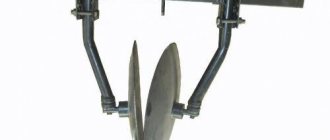
Bee remover
The functionality of the apiary bee remover resembles a check valve. Bees from the honey housing move into the nest through special channels. They cannot return back. Having installed the bee remover in the evening, the beekeeper can safely maintain the insect-free frames the next day.
Among the factory-made apiary devices, bee removers from Krasnov and Quebec are popular among beekeepers. The latter is made in the form of a dividing diaphragm and resembles a labyrinth. The basis of the apiary bee remover is four-layer plywood. At the bottom, two triangles are fixed from slats. Their sides do not meet at the corners, but form a gap of 8-10 mm. A hole is drilled in the center of the triangle. The total area of the triangles is covered with a mesh on top.
Advice! 10 hours after installing the bee remover, the beekeeper can observe the movement of bees from the honey housing to the nest.
Assembling a bee remover with your own hands is no more difficult than an apiary frame carrier. You will need drawings. The dimensions must correspond to the internal parameters of the hive so that the bee eliminator can be installed. Plywood thickness – from 10 to 25 mm. The diameter of the hole in the center of the triangle is up to 50 mm.
Triangle slats are used with a width of 20 mm. The distance between the elements forming the channel is about 18 mm. Additionally, you will need bars for the frame.
The DIY assembly technique is simple. Triangles are formed from slats. The blanks are glued or shot with staples. A hole is drilled in the center of the triangle with a feather drill. The edges of the plywood blank are framed with bars with your own hands. The triangle area is covered with a fine-mesh steel mesh.
Advice! It is not necessary to assemble a triangle on an apiary bee remover. If desired, the figure can be a circle, hexagon or other figure.
Building a cabin on your own
You can build a temporary structure for living on your own. Its construction will not take much time if you prepare the necessary material, drawings of the future change house and make your own efforts.
When building a change house for a short period of time, you can avoid performing interior finishing work, install partitions, and use inexpensive materials. For longer use of the house, it is necessary to provide a sanitary and hygienic area.
Some essential points during the construction of a building should be foreseen in advance:
- foundation construction is required. To do this, it is worth using pillars that will serve as the basis. They are laid in the corners and across the long sides of the building at intervals of no more than 2.5 m;
- arrangement of a gravel cushion on which the pillars are laid. It will protect the base from unwanted vegetation sprouts;
- the construction site should be located on a hill, which will help avoid possible flooding during rainy periods or melting snow. If there are no hills on the site, it is worth considering a storm drain;
- it is better to place windows and doors on one side or on adjacent ones, in their east or south direction;
- By installing a change house near an electrified line, you can save on laying an electrical cable.
Pollen collector
Pollen is a useful beekeeping product. To collect it with his own hands, the beekeeper places pollen collectors on the hives. Professional beekeepers do not like store-bought apiary devices. They have many extra holes or their diameter is too small. The most popular are beekeeping homemade products that help the beekeeper collect a lot of pollen.
A special feature of hand-assembled apiary devices is the presence of a shaped hole. A bee crawling through it is guaranteed to leave all the pollen in the collection.
It’s easy to assemble the apiary device with your own hands according to the drawing. First, for the pollen collector, prepare a bar with holes with a diameter of 5 mm with your own hands. A fishing line will help make them curly. The veins are passed into the holes, braiding them in a ring. Overcoming the obstacle, the bees will cling with their paws and push the fishing line apart. Actions will lead to the tearing off of the pollen.
The apiary pollen collector is placed on the front of the hive so that the lower cut of the entrance coincides with the upper edge of the arrival bar. A strip is placed in the slot on the lid of the beekeeper's pollen trap. The landing board is covered with a mesh with 3x3 mm cells. The torn-off pollen will roll into the ditch.
Advice! The beekeeper regulates the quality of pollen collection with his own hands by changing the length and thickness of the fishing line.
The groove of the apiary pollen collector can be used to install a dividing grid to prevent the queen from flying out.
Collect and install a bottom pollen collector with your own hands in the bee pavilion when the bees bring the maximum amount of pollen. On unfruitful days, the apiary device cannot be used.
The design of the bottom pollen collector consists of a valve. When it is lifted, the bees enter the nest without passing through the grate. When assembling the pollen with your own hands, the valve is lowered.
Features of the pavilion
Each such pavilion for bees has advantages. Disadvantages are possible. You can purchase a finished product. But many beekeepers prefer to build them themselves, using the remains of an old van or trailer. This gives you a chance to create a mobile apiary and move it to places where the best honey plants grow.
The features of the products are obvious. Thanks to them, it is possible to achieve improvements in the following indicators:
- high bribes due to movement to places of large concentration of flowering honey plants;
- collecting various varieties of honey;
- simple pumping;
- saving space in the apiary;
- simple care of bee colonies, maintenance of the premises itself.
Such pavilions for bees cannot be called a new product. Two dozen hives occupy several hundred square meters of usable land on their own property. Having such a mobile hotel premises, 20 bee houses are compactly placed on an area of several square meters. Each family is separated by a wooden partition. The hives are reliably protected from snow, rain, wind and are easily insulated for wintering.
There are several types:
- stationary;
- mobile;
- covered;
- closed;
- nomadic.
Cassette pavilion
Today there are several known manufacturers of cassette pavilions for bees. They are designed to support different numbers of families (from 15 to 50). The pavilion for housing 16 families can even be moved on a car trailer. To avoid unnecessary costs, it is not difficult to make such a room yourself. There are not many drawings, but they will help when creating a pavilion yourself.
The number of sections must be compared with the number of hives. Experienced beekeepers do not recommend using such structures for no more than 20 hives. With a large number of colonies, bees begin to interfere with each other.
Stationary pavilion
This type is often used to save space on the site and ease of care, access to hives and families. A stationary pavilion for bees is made of wood or other materials with exceptional thermal insulation qualities. This structure provides for the presence of a stove or heaters that can maintain the optimal temperature during the cold season. Such a solution makes it possible to create strong families and obtain large harvests.
The installation of a permanent structure is carried out away from human habitats and fields for walking livestock. There are several options for constructing stationary bee “dormitories”. This depends on the number of hives and the location of the apiary.
Uterus caps
Special caps are used for placing queens. Beekeepers can improve factory models with their own hands by making a hole and equipping a lid. The device is pressed into the area of the honeycomb where there is honey, empty cells and young growth.
You can quickly create caps for queen bees in the field with your own hands from PET bottles. First, cut off the bottom with scissors. An awl is used to pierce up to 20 holes with a diameter of 2 mm. Three days after installing the cap, the exit is covered with wax, drilling a hole for the queen. If the queen does not come out on her own, she is released by lifting one edge of the cap.
Preparation for the construction of the pavilion
Before creating such a structure, you must carefully select the type, determine the dimensions, and study the drawings. Without a thorough approach, it will not be possible to take the process seriously.
At the preparatory stage it is also worth considering:
- number of families, optimally up to 20 for one room;
- for a stationary one, carefully choose a place closer to where honey plants grow and away from noise;
- prepare material and tools.
Properly constructed bee housing makes it possible to optimize the complex process of honey production in an apiary. It is enough to open the entrance to start the active work of the worker bee.
Bee scales
Apiary weighing equipment is expensive, and you can’t do without it. It takes a beekeeper's ingenuity to build a bee scale with his own hands. The design is made according to the principle of a suspension system. You will need to hang a set of blocks from a solid ceiling, pull a cable through them and attach scales.
You can get more convenient scales for hives yourself by converting a factory device with a strain gauge. The scales are being dismantled. The removed electronics are taken outside and secured in a convenient place.
The movable scale platform is mounted on levers connected to the frame by springs. To re-equip, you need to weld a frame from a corner with your own hands and equip it with four bearings. The homemade frame is attached to the main frame with four screws.
To lift the scales, a nut is welded onto the frame and a handle is screwed in. For weighing, 55 mm thick bars are placed under the bottom of the hive. Roll the scales into the gap and press the power button. When zeros appear on the display, turn the handle to raise the movable platform by 20 mm. After weighing the hives, the beekeeper turns the handle in the opposite direction.
The bearings of the bee scales are rolled synchronously. To raise or lower the platform, turn the handle about 20 times.
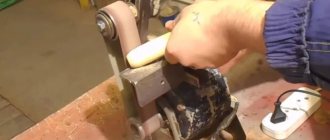
Making the chisel comfortable
A chisel is a must-have tool for any beekeeper. It is used instead of a lever. It is used to lift stuck frames, and with its help, second cases and magazine extensions are dismantled. And in the spring, a chisel is indispensable when cleaning bee houses.
The only drawback of this equipment is the inconvenience in cleaning the corners in bee houses with a solid bottom, as well as the places where the walls meet the bottom, folds, and the inner sides of the slats on the frames. For this reason, metal “helpers” are used - various scrapers and knives, which significantly lengthens the cleaning time and complicates the work.
From Vinnytsia region from P.M. Slobodyanika received advice to do the following:
And G. Moskvin from Solikamsk advises equipping the flat end of the new tool with steps 5 millimeters deep. Notches allow you to correctly adjust the distance between frames depending on the season:
If the chisel is thick enough (0.3-0.4 cm), turning it slightly to the right or left will further increase the inter-frame distance by another 1 millimeter.
And the third modernization option is to combine an ordinary chisel, a beekeeping knife and a convenient saw in one tool:
This convenient design was developed by F.I. Zyryanov from Manzovka, Primorsky Territory.
Chisel template for arranging frames
The template was developed by G. Moskvin from Solikamsk. It is made exactly according to the dimensions required for placement:
Electrical booster
To simplify the work with wax, beekeepers created an apiary waxer with their own hands. Its peculiarity is that it runs on electricity. To assemble an electric generator with your own hands, you will need an old working battery and 2 wires with clamp terminals.
The essence of the apiary device is that the terminals are connected to the wire on the frame. When the circuit closes, it begins to heat up. The foundation is placed on a hot wire and pressed with glass. Through the transparent sheet you can see how the strings are soldered into the wax.
Homemade electric knife
An electric knife is the dream of many beekeepers. It does not need to be heated in water, which means that additional moisture will not get into the honey.
You can assemble the tool yourself using an old scythe:
- A blade 150 mm long and 50 mm wide is made from the blank.
- Two holes are made at one end of the workpiece. Here, with the help of small rivets, the rod of the electric soldering iron will be attached. The bottom side of the rivet will have to be ground flush - the surface should be smooth!
- The knife is attached to a regular electric soldering iron, the rod of which is bent - you get two elbows. The end is made flat and two holes are punched on it for rivets.
- After assembly, the tool is sharpened on both sides - the cuts are directed slightly upward, which will make it easy in the future to cut off the beam on uneven frames that have depressions on the honeycomb.
To prevent the device from overheating, during breaks (while the honey is pumping in the extractor), it is lowered into a bowl of water, which completely covers the blade.
Conductor for assembling frames
It’s easy to assemble a small number of frames with your own hands. For a large apiary, mass production is being established. Special templates - conductors - help speed up the process. Apiary devices can be made of wood or metal. The easiest way is to construct a jig for assembling hive frames with your own hands from wood.
The template is assembled in the shape of a box without a bottom or lid. The internal size corresponds to the dimensions of the frame. Holes are cut out in the side walls of the template, slats are inserted so that a gap is formed between them and the elements of the conductor, equal to the thickness of the blank for the frame.
Planks with eyelets, which are the side elements of the frame, are inserted into the gaps. The side jumpers are inserted into the grooves of the planks, first from above and then from below. The elements are nailed down. The finished frames are removed from the conductor. Usually a beekeeper can make up to 10 pieces at a time with his own hands.
Making the chisel comfortable
A chisel is a must-have tool for any beekeeper. It is used instead of a lever. It is used to lift stuck frames, and with its help, second cases and magazine extensions are dismantled. And in the spring, a chisel is indispensable when cleaning bee houses.
The only drawback of this equipment is the inconvenience in cleaning the corners in bee houses with a solid bottom, as well as the places where the walls meet the bottom, folds, and the inner sides of the slats on the frames. For this reason, metal “helpers” are used - various scrapers and knives, which significantly lengthens the cleaning time and complicates the work.
From Vinnytsia region from P.M. Slobodyanika received advice to do the following:
And G. Moskvin from Solikamsk advises equipping the flat end of the new tool with steps 5 millimeters deep. Notches allow you to correctly adjust the distance between frames depending on the season:
If the chisel is thick enough (0.3-0.4 cm), turning it slightly to the right or left will further increase the inter-frame distance by another 1 millimeter.
And the third modernization option is to combine an ordinary chisel, a beekeeping knife and a convenient saw in one tool:
This convenient design was developed by F.I. Zyryanov from Manzovka, Primorsky Territory.
Chisel template for arranging frames
The template was developed by G. Moskvin from Solikamsk. It is made exactly according to the dimensions required for placement:
How to make a bee analyzer
The beekeeper's complex apiary homemade products are based on electronics. An experienced radio amateur can solder them with his own hands. The most common apiary electronic device is the bee analyzer. The device helps monitor the activity of bees. The apiary analyzer reacts to noise. The frequency spectrum in a normal hive ranges from 260 to 320 Hz. In the event of swarming, disease, or loss of the queen, the activity of the bees decreases. The spectrum of noise frequencies is in the range of 210-250 Hz, which serves as a signal to the beekeeper.
A self-assembled apiary analyzer reacts to the frequency of noise in the hive. LEDs serve as signal indicators. One light bulb signals “Yes” and the other “No”.
In Fig. 1 diagram of the apiary analyzer, and in Fig. 2 – power supply. The numbering of radio components in the second diagram is a continuation of the numbering of the first diagram.
Stages of construction of a cabin with shower and toilet
As an example, let’s look at the stages of building a square shed under a hipped roof, equipped with a powder-closet type toilet, a shower with a dressing room and a small utility room. At the first stage, we find a place for construction in accordance with sanitary and hygienic standards and make a schematic drawing of the future structure. This will help determine the dimensions and cost estimate for construction.
1. Change house with shower and toilet. 2. Well. 3. Residential building. 4. Trees. 5. Fence
A shed with a toilet must be at least 12 m away from residential premises. In the case of a dry powder closet, the minimum distance is 5 meters. From a well, borehole or reservoir, the minimum distance to a toilet is 25 m, regardless of the type and design of the latter.
Device for stretching wire onto frames
Manually stretching the wire onto the frame with your own hands does not always end successfully for the beekeeper. The string breaks or sags. A special apiary device helps to carry out quick tensioning with your own hands under the required force.
To make your own bee tensioner, you will need an old tabletop or a piece of chipboard. The size of the workpiece should be larger than the frame. On the tabletop, stops are made from 5 blocks to stop the frame. The tensioning mechanism is a lever rotating on a pin with an eccentric. When turning down, the eccentric presses the side rail of the frame. After releasing, the installed string is tensioned.
Why do you need a chisel?
Using this tool you can perform the following manipulations:
Types of beekeeping chisels
One of the most characteristic properties of honey bees is propolising. They secure everything in the hive with propolis and wax: individual frames, bottom, walls. By the way, they also thickly cover their dead relatives with propolis if they cannot take the bodies outside. Of course, this is not done just like that: this substance has an excellent disinfecting effect, which helps the bees keep the nest and brood clean.
At the same time, frames and pallets glued together by bees significantly complicate the work of the beekeeper. If you try to separate the stuck together elements with your bare hands, there will be a lot of noise, the bees will get agitated and turn against the inept owner. With the help of a chisel, used as a lever, the nest can be disassembled easily, silently and quickly.
How to make your own uterine insulator
To isolate the queen in the nest, beekeepers use a special apiary device - an insulator. The simplest cell is made with your own hands in the field from two necks of plastic bottles. First, they are sawed off with your own hands using a hacksaw. The blanks are connected with tape so that the threaded necks point in opposite directions.
A piece of plastic cut from the side of the bottle is inserted into one of the corks. Ventilation holes are cut in all necks and the inserted piece. Kandy food is pushed into one stopper, covered with a napkin with a small hole, and screwed onto the neck. The second plug is made with a hole so that the isolated queen does not suffocate. When replanting the uterus, it is unscrewed and the neck is covered with wax, lightly greased with honey.
The cage is hung inside the hive with the plug down. The bees gradually gnaw through the foundation and free the queen from the insulator.
Siphon sprayer
For treating insects and honeycombs with warm syrup, a regular siphon used to produce soda at home is perfect.
A tube of suitable diameter with a plug equipped with nine small holes, located 0.5 centimeters apart from each other, is placed on its tip. A nipple from a bicycle is mounted on the reverse side, through which air is pumped into the sprayer.
This container holds up to two liters of syrup. A siphon sprayer is used:
You may be interested in other information on this topic:
Source
Hive covers
Inside the hive, beekeepers cover the frames with honeycombs with special canvases. It won’t be difficult to make them with your own hands, cutting them to size from natural fabric. Linen or cotton material is ideal. The fabric retains heat well, allows air to pass through, and removes steam from the hive.
Beekeepers cut polyethylene canvases with their own hands. Artificial material retains heat well, but does not allow air to pass through. For the winter, it is better to lay canvases made of breathable material.
What other homemade products can you make for beekeeping with your own hands?
There are many other apiary devices for a beekeeper, and you can make them with your own hands without much difficulty.
A convenient apiary attribute for a beekeeper is a box stool. The base is knocked off the bars. The seat is cut out of the board with your own hands, and a hole for the handle is sawn through. The body of the box is knocked off the plywood. It is convenient for the beekeeper to sit on the stool while servicing frames and hives. All the tools are always at hand in the box.
Beekeepers assemble intra-hive feeders with their own hands from frames. First, the honeycomb and wire are removed. The frame is covered with plywood, the joints are sealed with wax.
Beekeepers make over-frame ceiling feeders in the form of boxes. They are made with their own hands, wooden or plastic.
Important! The feeder is equipped with a floating raft to prevent the bees from drowning in the syrup.
Site selection and site planning
The building can be connected to an existing bathhouse or garage, or installed separately. Basic requirements when choosing a site on the site:
- the structure should be conveniently located in relation to the house and other outbuildings;
- do not occupy the area for designated gardening plantings;
- fit harmoniously into the complex of surrounding outbuildings;
- comply with fire and sanitary safety standards.
The owner can resolve the first 3 points independently. But according to the requirements of urban planning and sanitary standards, there are certain restrictions. If you plan to keep poultry or small pets in the barn, you need to retreat:
- from the neighboring property at least 4 m;
- from a residential building at a distance of 15 m;
- from the drinking water well 30-50 m.
The place should be elevated enough so as not to be flooded by melt or rainwater. To protect the area from winds, you can place the shed on the windward side.
The structure should not interfere with neighbors and block access to sunlight to their site. Otherwise, they can file a complaint, and the court will force the building to be demolished or moved to another location.