Societies › Do It Yourself › Blog › Thrust control lock washer. With my own hands :)
Good health to everyone.
I apologize that I’m talking about cars again :)) I came across this kind of garbage... It was necessary to remove the rack, it turned out that the lock washer for the control rod was completely missing. Others are able to take it off and throw it away. Everything is arranged there simply.
The washer rests against the slots of the rack with 2 antennae. After tightening the nut on the rod, its edges are bent onto the nut to lock it so that the rod does not turn out along the way and the wheels do not move in different directions.
It looks like this on a Honda. In fact, almost the same as on all cars.
But the new one takes at least 2 weeks to move and costs $6 apiece)) and this is not funny. I realized that no one buys them and there is no demand for them) There is not a single replacement for the chord... only the original...
I walked around the central Kiev car market... all the traders (including VAZ, GAZ, IZH and ZAZ) just shrugged their shoulders))
I thought for a couple of days about how and what to make it from. Well, I don’t have time to wait 2 weeks for her. The shape is a grommet, the middle part of which can simply be ground off. But I couldn’t find any strong eyelets... I stopped using this technology. The original thickness is approximately 1.2-1.3 mm. In the garage I found a piece of soft Russian steel 1.15mm.
the size of the original is almost 1 in 1 one Ukrainian hryvnia)
we cut it with a grinder, you can do it right on a coin)
There is still a thick washer between the washer and the rack and we mark the workpiece on it.
Then we draw the honda logo, the letter H in the center.
We draw it with something sharp.
We sharpen a screwdriver or a small chisel and carefully cut out the letter H. First on one side, then on the other.
Place the washer and cut it)
Then we find in the garage some kind of heration with a diameter of 12 mm or whatever is needed for the diameter of the thrust, preferably a cone shape. And we break through.
In fact, the lock washer is ready))
My antennae are 6mm wide, it is better to “cut out” the antennae with an extra width of + 1 mm, later it is better to sharpen them with a ratfile/grinder. In the center hand made on the right honda original second hand)
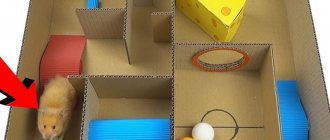
Let's try it on the rail.
Everything can be put on a typewriter unsurpassedly.
I decided to create the next one more precisely.
You literally need to draw a circle with a compass and mark it with a ruler, then it works out perfectly and literally cut through it.
Maybe someone understands a method to create such a puck more elegantly? Please share. Production time for one puck is 20-30 minutes. The cost is virtually zero. Otherwise, 6$ and two weeks... the yakozunas scoff))
see also
Comments 38
It’s more elegant - you can drill holes at either end and in the corners of the letter “H”, before cutting, with a small drill. Is it not allowed to use thread locker there?
This is not a bad idea! Because The main problem is that the tendrils bend differently after cutting, because cutting identically is not possible. In case of drilling it must be identical))
The latch is unsafe, who understands how it will behave. After all, there are constantly shock-pulling overloads and not small ones.
It turned out fine. It is more elegant only on the press with a mandrel.
... and it’s better not to cut your hair...
These lock washers come complete with control rods, but the original Honda ones are enough for a couple of replacements, especially if the rack was removed, it is more convenient to bend the washer on the removed one than when it is on the car
They happen, but occasionally, sometimes even with unique ones...
Today, almost all brands of cars do not need this washer. Everything came from the “French”... Just tighten it with the required tightening torque, and that’s it...
A friend from the dromoforum once wrote from the news. The dude, after the service, (on a Honda), went somewhere. There was an accident along the way, apparently with fatalities, the car lost control at speed and flew into a ditch. With all the consequences. Later it turned out that at the service center the rod was tightened with a torque without installing the lock washer; on the way, the rod was unscrewed and the wheel turned against the direction of travel.
I had the option of the finger sticking out at the ball tip. Thank God at low speed. The feelings are still the same)))
A friend from the dromoforum once wrote from the news. The dude, after the service, (on a Honda), went somewhere. There was an accident along the way, apparently with fatalities, the car lost control at speed and flew into a ditch. With all the consequences. Later it turned out that at the service center the rod was tightened with a torque without installing the lock washer; on the way, the rod was unscrewed and the wheel turned against the direction of travel.
The wheel cannot turn against the movement when rotating. It tends to rotate along the axis of motion of the car. In addition, the process of self-unscrewing the control rod does not occur simultaneously. But, if the process has begun, then this inevitably affects the alignment of the wheels. That any driver will obviously see. The maneuverability of the car, extraneous knocks, etc. will change. In the end, the steering wheel spoke will deviate from the horizontal position at an angle noticeable to any driver. So, it looks like a fairy tale...
Source: www.drive2.ru
How do they do it?
To understand how hockey pucks are made, let’s look at the technological process, it has been worked out for years. First of all, rubber enters the kneader, since it is the basis for creating rubber. Next, special antioxidants are used to reduce rubber wear and extend their service life. The next step is to add the first oil for easier mixing of the composition, and then the second one, to add rigidity. In order for the mass to harden faster, calcium carbonate and sulfur are added. And carbon black completes the kneading process.
The second stage can be divided into pre-kneading, which lasts about 15 minutes, and re-kneading. When re-mixing, the mixed raw materials pass through special rollers, between which another layer of natural rubber is placed. On the second pass, hard rubber is added to give the puck a round shape. It is this technology for preparing raw materials that allows you to create washers that are not afraid of repeated impacts.
After each mixing, a control sample is sent to the laboratory for measurements with a rheometer. There, the stiffness curve of the material is analyzed and compared with the standard. If the tests are successful, the material can be used.
At this stage, the rubber can be molded, because it is not vulcanized, which means it can be easily deformed. To form a puck of the required size, a special apparatus with a diameter of 7.5 centimeters squeezes out the composition, and horizontal knives cut it at a height of 2.8 centimeters. But the product is not ready yet. Next, it is sent to a special press, which carries out vulcanization.
In order for the rubber to harden, a special machine heats the blanks to 149 degrees and compresses them under pressure. After 18 minutes of “hardening”, an almost finished product is obtained, which cools for 24 hours. To complete the process completely, it is necessary to cut off the excess mass that has adhered during the vulcanization process, which is done manually by workers (the excess is used to prepare new raw materials). Also, a special press makes notches on the edge and makes a logo.
This is how you get a real hockey puck. The process is not too complicated, but technologically advanced. This allows you to enjoy a quality product on ice!
Source
Homemade plastic washers. Simple, quickly simple.
If you need to make plastic washers of an unusual size, and you do not have a lathe, then the method I want to show may be useful. Its distinctive feature is that there is no need to make additional equipment.
]( “Plastic washers - easy and fast.”)
An old trick. But you can’t forget about it.. Iron washers can also be cut like this - just instead of a chisel - dracheva ratfil..
People are suffering. I just cut it out when necessary. =)))
rumb; wisely, you can’t make a hole literally in the middle of the washer with the second cut.
Or you can take a crown with a centering drill. And you will be happy.
4eh wrote: you can’t make a hole literally in the middle of the washer with a second cut.
There are various notches, I had a double one lying around somewhere, it immediately cuts a hole in the center, and for the washer, IMHO, a deviation from the center of 0.5-1 mm is not critical, it’s not a gasket. With perforation, naturally, it is limited in size, but using the above (well-known) method you can create any size.
Victorych wrote: and using the above (well-known) method
What could be written in the 5th line of text stretched out for 12.. minutes. I liked the hurry-up acceleration of playback. just like Charlie Chaplin
Victorych wrote: With a perforation, naturally, limited in size,
The largest notch I have is 60mm, which immediately makes the washer for release. I’ve been doing this for a long time, in the 90s there were no gaskets for sinks, and there was a lot of sheet rubber. All the cuts I made were for a drill or drilling machine - this way the edges are neater, without bevels. For vehicle washers, the cutter that comes with parking sensors would be suitable.
The bachelor wrote: My biggest hole is at 60mm
I didn’t mean the largest dimensions, a notch can be made from 1420 mm pipes, but about the fact that for any size you need to have your own notch (although how many of these sizes are really needed?) But the method described a little higher is not suitable for soft materials like rubber, cardboard, paronite, etc.
Viktorich wrote: a notch can be made from 1420 mm pipes
Viktorich wrote: and about the fact that you need to have your own cutout for any size (although how many of these sizes are really needed?
For faucet axle boxes: Czech, Russian, 1/2″. For hoses” 22.1/2″, for faucet 3/4, for Soviet herringbone (external) - 2 crescents are made with an additional notch. For release from the sink, and rings for siphon. Here is my entire arsenal. I haven’t used half of it for a long time, even more
Viktorich wrote: But the method described a little higher is not suitable for soft materials such as rubber, cardboard, paronite, etc.
When I need to create extraordinary pieces of rubber, I use a drill and sandpaper.
The bachelor wrote: For faucet axle boxes: Czech, Russian, 1/2″. For hoses” 22.1/2″, for faucet 3/4, for Russian herringbone (external) - 2 crescents are made with additional notching. For release from the sink Well, and rings for the siphon. Here is my entire arsenal. I haven’t used half of it for a long time, even more
so plumbing gaskets are a dime a dozen at the moment, no need to bother
Mikael wrote: so plumbing gaskets are a dime a dozen at the moment, no need to bother
The bachelor wrote: I’ve been doing this for a long time, in the 90s you couldn’t get gaskets
Bachelor; and I think I wrote it at the moment
Installation of crossbar and chipboard
Measure the middle of the frame and cut out the locks for installing the central jumper. If the plank is 4 cm wide and 2 cm thick, then make the lock 4*2 cm with a recess in the frame of 1 cm. Based on the frame width of 40 cm, the lintel should be 42 cm long.
In the middle bar, installed on the edge, cut a 4 * 1.5 cm rectangle in the center for the passage of the washer.
Glue the connections and tighten them with screws. Place the chipboard on top with the smooth side facing inward and fasten with self-tapping screws.
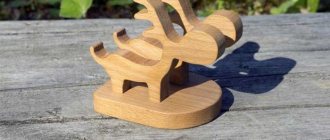
DIY puck bracelet
In this article I will show you how to create with your own hands a very ordinary but excellent bracelet from washers and strips of leather, the whole process will not take much time, but at the same time the finished bracelet will look fashionable and maybe you will make it for your friends who will want it for themselves the same.
DIY puck bracelet
What you will need to create such a bracelet:
- A piece of leather or a finished leather strip, you can also use paracord or a polyester strap;
- Washers (internal diameter 12 mm);
- Stationery knife;
- Glue;
- Spring clamps (clothespin).
DIY puck bracelet
DIY puck bracelet
DIY puck bracelet
How to create a bracelet from washers and a leather strip, step by step {instructions}:
I had a piece of leather, this is the standard for covering a leather sofa. It is not large in length and I had to cut two strips of similar width and then glue them together. To do this, I slightly scraped off the ends of the glued surfaces with a knife, smeared one end with glue for gluing leather, wood, alloy and squeezed this space with clamping clothespins until the glue completely dried , I cut off the thin protruding edge with a stationery knife so that it wouldn’t stand out so much. The strip was 61 cm long. The width of the leather strip should be slightly larger than the diameter of the washer hole.
Exercises to increase the speed of a hockey player
Exercises and tips to increase speed in hockey. Hockey is a dynamic game that requires a certain range of skills from hockey players. Hockey is primarily a spectacular and exciting sport because the movement occurs at high speeds. So, hockey players who want to succeed need to think about how to increase and develop maximum speed in hockey.
To do this, it is worth attending individual hockey training camps or summer hockey camps for children and adults, which will improve your skating technique, and with it will come your skating speed. And also include elements of self-preparation to achieve a full result. The principle of movement in hockey is frequent acceleration and changes in direction of movement. Because of this, the maximum skating speed of a hockey player, which he is able to develop at the moment of acceleration, is of great importance. The best way to improve your starting acceleration is with shuttle running and short sprints, as well as a special set of plyometric exercises “on the ground.”
Exercises to increase the speed of a hockey player - the basics of hockey skating include learning to focus attention while moving on the opponent, and not on the puck. This makes it possible to play ahead in time and wipe the opponent off the puck. This skill is especially valuable for a striker, who will be able to put pressure on the opposing team's defenders in their zone to put pressure on the opponent and force them to make mistakes. It should be understood that the speed of skating in hockey depends not so much on the fast movements of the legs, but on the power of the kicks. A hockey player must learn to develop high speed by sliding; this requires not “fast” but “powerful” legs.
Hockey puck bottle opener
Dedicated to all hockey fans! There are a huge number of bottle openers in stores, reflecting any of the hobbies. How do you like the idea of making your own hockey opener? The base of the opener will be a real hockey puck!
So, to make a bottle opener from a hockey puck, in addition to the puck itself, prepare:
- a piece of solid wood larger than a washer;
an ordinary opener with a diameter of 3 inches;
ring drills of various diameters (3, 3.4 and 1.8 inches);
wood drills;
hex bolt;
hexagon socket wrench;
alloy hacksaw;
- tools for wood and alloy processing.
Step 1. Making the washer holder
You will need to drill several holes in the washer. For accuracy, this will need to be done on a professional drilling machine. In such a situation, you will not be able to hold the puck firmly with your hands. It is for this reason that before starting production of the opener, it is necessary to create a washer holder. To do this, take a solid piece of wood. Use a 3.4-inch hole saw to cut a hole in it. Its depth must be the same as the height of the washer.
You need to drill two holes along the edges of the wood holder so that they go into the sawn circle. Insert hex bolts into these holes. Next, by inserting a washer into the wood holder, you can fix it by adjusting the bolts.
Step 2. Marking the washer
Remove the washer from the package. Take a ruler and a pencil and draw a few lines to find the center of the washer. Set the washer aside.
Step 3. Trimming the handle of the opener
In this case, the opener had a handle and needed to be cut off. To do this, you need to take an alloy hacksaw and a file. After sawing off the handle, file the edges of the opener.
Step 4. Making holes in the washer
First, you need to create a hole 3 inches in diameter in the washer. To do this, insert the washer into a wooden holder and secure it firmly with bolts. Make the depth of the huge hole according to the size of the iron opener. After the hole is cut, make another one with a ring drill of the smallest diameter. The depth of the second hole also does not have to be large.
Step 5. Gluing the opener
Take glue for iron surfaces. Squeeze it out of the tube into the syringe. Degrease the surface of the washer and opener for the best adhesion. Squeeze out the glue from the syringe around the circumference of a huge circle. Press the iron opener firmly and leave it under pressure for another half hour or the time specified by the manufacturer. After this you can remove excess glue.
Your washer opener is ready. And this is how it looks in action.
Source: rukikryki.ru
HOCKEY LUBRICANT Stiga:
When buying a new hockey game, be sure to lubricate it with silicone grease; this will extend the life of the Stig board game several times, and it will be much more enjoyable to play on it. It is necessary to lubricate: player rotation gears, player movement guides and player control rods (Fig. 1). You need to spray the lubricant from a distance of 10-15 cm. Avoid getting the lubricant on: rubber handles, the playing field, and also on the rubber hockey feet. A little silicone lubricant gets through the slots onto the field, which improves the sliding of the puck. There is no need to specifically apply lubricant to the field. Silicone lubricant is produced in the form of an aerosol, and can be purchased at auto stores.
Make your own puck
Good health to everyone. I apologize that I'm talking about cars again :))
I came across this kind of garbage... It was necessary to remove the rack, it turned out that the lock washer for the control rod was completely missing. Others are able to take it off and throw it away. Everything is arranged there simply.
The washer rests against the slots of the rack with 2 antennae. After tightening the nut on the rod, its edges are bent onto the nut to lock it so that the rod does not turn out along the way and the wheels do not move in different directions.
It looks like this on a Honda. In fact, almost the same as on all cars.
But the new one takes at least 2 weeks to move and costs $6 apiece)) and this is not funny. I realized that no one buys them and there is no demand for them) There is not a single replacement for the chord... only the original...
I walked around the central Kiev car market... all the traders (including VAZ, GAZ, IZH and ZAZ) just shrugged their shoulders))
I thought for a couple of days about how and what to make it from. Well, I don’t have time to wait 2 weeks for her. The shape is a grommet, the middle part of which can simply be ground off. But I couldn’t find any strong eyelets... I stopped using this technology. The original thickness is approximately 1.2-1.3 mm. In the garage I found a piece of soft Russian steel 1.15mm.
the size of the original is almost 1 in 1 one Ukrainian hryvnia)
we cut it with a grinder, you can do it right on a coin)
There is still a thick washer between the washer and the rack and we mark the workpiece on it.
Then we draw the honda logo, the letter H in the center.
We draw it with something sharp.
We sharpen a screwdriver or a small chisel and carefully cut out the letter H. First on one side, then on the other.
Place the washer and cut it)
Then we find in the garage some kind of heration with a diameter of 12 mm or whatever is needed for the diameter of the thrust, preferably a cone shape. And we break through.
In fact, the lock washer is ready))
My antennae are 6mm wide, it is better to “cut out” the antennae with an extra width of + 1 mm, later it is better to sharpen them with a ratfile/grinder. In the center hand made on the right honda original second hand)
Let's try it on the rail.
Everything can be put on a typewriter unsurpassedly.
I decided to create the next one more precisely.
You literally need to draw a circle with a compass and mark it with a ruler, then it works out perfectly and literally cut through it.
Exercises to increase the speed of a hockey player
The exercises below are ideal for training at home and do not require any specific equipment.
Single leg pistol squats
This is one of the popular (and at the same time useful) types of training for developing leg strength in hockey. This exercise for hockey players helps develop coordination and strength in the lower body muscles. In the initial phases of training, the exercise is done with the help of an auxiliary cube or bench, which serves as a support when squatting. When the muscles become stronger, it is already possible to remove auxiliary objects and work without them.
The pistol exercise is performed for 3-4 sets of 6-8 repetitions on each leg. The “pistol” should be included in the list of regular exercises for a young hockey player to increase the speed of skating in hockey.
Back Lunge on a Slide Board
This workout helps increase strength to develop skating speed using your own body weight. In the initial stages, you need to do exercises without weights, and later you can add weights. This exercise is useful because it involves the groin.
Typically, hockey players do not like groin stretching exercises. However, this is a very important element for developing the speed of a hockey player. When the muscles are tense, when they are weak and/or short, the working leg does not move through the entire full range of motion, and when there is still not enough muscle strength, then the player is seen to lose speed.