Recently I had a real tragedy - the monitor holder broke. I had to urgently come up with a backup option. In the end, I made the tripod itself out of wood, which turned out even better than the factory one. Now I can adjust the height of the monitor and also rotate it left and right.
Consumables:
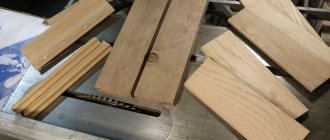
- plywood 2 cm thick;
- wooden dowel 2.5 cm;
- wood glue;
- screws;
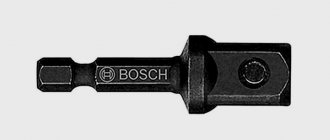
- T-nut 0.8 cm;
- Bolt 0.8 cm.
Purchase and delivery.
There is nothing special to write about delivery - I ordered from a Russian warehouse. Sent on July 16 with the track JNTCUххх, which after some time turned into a Russian postal track and arrived at the post office on July 23. Regarding the purchase, the seller sets a low price for the product, but charges almost the same amount for delivery - therefore the real price is almost twice as high. Be careful. Also, I took it from another link (https://ru.aliexpress.com/item/32778770085.html), but they are now selling a dual-monitor version.
Making a homemade stand
The monitor was given a two-year warranty, so I didn’t want to make changes to the design of the holder by cutting out part of its stand. I had to make my own stand.
There were two ways to attach a homemade stand to the back of the LG 22MK600 monitor: - to a protruding metal element using two screws, to which the standard stand was attached, or using four threaded holes according to the VESA 75x75 standard.
Making a homemade stand according to the VESA standard was impractical for two reasons. It would require more material and more complexity in its design due to the location of the D-Sub and two HDMI ports to connect the monitor to the computer below the VESA square for mounting.
Therefore, it was decided to attach a homemade stand to an element for attaching a standard leg. The distance in the element between the mounting holes with M4 metric thread was 14 mm. The tilt angle of the monitor was adjusted by vertically rotating the element within 20°, which simplified the task.
Instead of traditional keys, the LG 22MK600 monitor has a joystick, which turned out to be very convenient. It is located at the bottom center of the monitor and is visible in the photo in the lower left corner. This fact also had to be taken into account when developing the design of the stand.
The weight of the LG 22MK600 monitor without a standard stand is 2.3 kg, height – 239 mm, width – 489 mm, thickness – 67 mm. The necessary information for designing and manufacturing the stand has now been collected.
How to make a stand - 105 photos with your own hands to make a stand for various phone models
Unlike cardboard, which can be cut with a knife or scissors, these materials require a jigsaw. But it will turn out to be a very strong and stable stand.
Have you chosen the grumpy cat shape? Great, draw its outline as if looking at it from the front. The ears are strictly on the top of the head. Insert the lower part into the slot of the rectangle on which the cat will sit.
Designer furniture for the interior: examples of beautiful combinations and successful placement
How to make a box from wood or plywood with your own hands? Box components, instructions and drawings. Box manufacturing sequence
Expert opinion
Strebizh Viktor Fedorovich, leading construction foreman
In order to build a simple and budget-friendly version of a cooling pad for a laptop, you should take care of the purchase in advance. If you want to clarify something, please contact me!
Monitor and laptop mount Viozon
Image via Viozon
Gaming laptops are more affordable, accessible, and capable than ever. But sometimes it's hard to be tied to a single gaming laptop screen, no matter its size. Viozon aims to solve this problem while also saving laptop screen real estate with its laptop monitor combo mount. One arm is equipped with your standard VESA mount and can handle a monitor up to 32 inches and weighs 19.8 pounds, while the other arm is a dedicated laptop arm that can handle a laptop up to 17 inches. So, if you want to play dual-monitor games on your laptop, you don't have to sacrifice ergonomics to do so. And the entire setup is secured using a standard two-pole tabletop clamp.
If you're the kind of person who loves having two monitors but hates wasting all the desk space that a second screen takes up, then dual monitor stands are an easy solution. When choosing one, be aware of the size and weight limitations of the respective stand you're considering, as overloading it can lead to disastrous results. But the feeling of having a nice, clean desktop and monitors that you can finally customize to your liking really makes for a wonderful experience.
For more hardware recommendations, check out the 5 Best Budget Microphones for Streaming in 2021 | Budget streaming microphones and the 5 best gaming TVs of 2022 for PlayStation 5 at Pro Game Guides.
Usage
Was:
Became:
So immediately there was no free space, but the amplifier will soon go away, then I’ll move the stand a little further. Well, what’s more important to me is that now I can move the second monitor closer without touching anything on the table.
Or rotate:
Well, or just turn it away altogether.
Degrees of freedom: The lower half of the stand rotates 220 degrees, it doesn’t allow you to make a full turn, the stops are fixed. Made for safety reasons and to prevent cables from getting tangled around the stand. The upper half rotates 360, but you shouldn’t abuse it - again, cables. The monitor can be tilted 35 degrees forward or 50 degrees backward. In the vertical plane, you can rotate the monitor 360 degrees - but again there is a cable, so you shouldn’t go far beyond 180. Although personally, a 90-degree turn is quite enough for me.
Wood as a base for a stand
A wooden laptop stand is an interesting and necessary thing by today's standards. You can make such a device yourself using suitable carpentry tools and nails. Additionally, you may need a tape measure and sandpaper. If you have a couple of fans and a board and connecting wires, the structure will be assembled quite simply and quickly. Don't forget about insulation tape and USB.
Conclusion
Now you know about all the features of choosing desktop brackets for a computer and have become familiar with all the currently popular varieties. The video covers some important aspects of the topic in more detail to help you understand it even better. If some points are not covered in sufficient detail or you have questions, do not hesitate to write in the comments under this review.
If a thought gets firmly stuck in your head, you won’t throw it away so easily. Recently, the idea of hanging a monitor on the wall using a bracket has firmly settled in my head. A monitor stand takes up a lot of space on the table, and even more so if there are two monitors.
Having visited the habitats on the Internet and studied the anatomical structure of the above-mentioned brackets, I was convinced that I could very well create such an individual on my own and at a lower cost.
VIVO Dual Mount Stand
Image from VIVO
More traditional is the VIVO stand, which comes with a clamp mount to mount to the side of your desk. It has the same limitations as the WALI mounts: 27 inches and 22 pounds per arm, as well as height and tilt adjustment (where the height is adjusted up and down the vertical post). Notably, it also comes in white for those of you who want to color coordinate your desk setup, and also offers grommet installation for those of you who don't mind drilling into your desk to protect your monitors.
Related: 5 Best Gaming TVs of 2021 for Xbox Series X/S
Advantages and disadvantages
A laptop stand with cooling is good because:
- very easy to make. Using the recommendations and gleaning the necessary information from the Internet, it is absolutely easy to make such a stand specifically for your laptop;
- the cost of the material is the most budgetary;
- good performance characteristics.
Disadvantages of this design:
- not strong enough;
- Reduces the temperature by just a couple of degrees. This can be corrected. The bottom of the computer unscrews and the air is drawn directly from the heating tubes;
- the presence of a noise effect, which mainly depends on bearing wear.
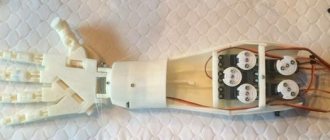
Assembly
I won’t describe everything in detail, I’ll just point out a few points.
If you want more details, then just above the link there are photographs of instructions, everything is clearly written and illustrated there. The only tool you need is a Phillips screwdriver. Yes, you still need to turn the hexagons, but there are keys for them in the kit. It all starts with installing USB ports. I initially thought that there would be a hub here, but everything turned out to be much simpler. Since the ports are optional, a plug is installed here. You need to unscrew it and break off a couple of parts.
I decided not to look for a second usb3 cable and install a second usb2. They are simply “pressed in”, then pressed with a plug.
The bolt in the center needs to be loosened somewhere around this stage, otherwise the bottom half of the stand will not rotate.
If everything was done correctly, the stand stands level on the table. Although the connectors look a little sloppy on the curved body.
Next, if you plan to mount it on a table top, then install a clamp. Alternatively, you can drill a hole in the tabletop, then the second fastener is used (see instructions). But I don’t want to drill anything yet.
After screwing the clamp, a plastic cable guide cover is attached.
According to the instructions, the monitor must be mounted on a stand screwed to the table - that’s why the mount has lugs to hook the bolts screwed into the monitor and tighten the second pair. But it was more convenient for me to first screw the monitor on, then install the stand - fortunately, the monitor is lightweight.
Installed. To prevent the cables from dangling, there is a fastening on the upper half and a groove in the lower half where you can push the cable. I haven’t completely tidied them up yet - there will also be a VGA cable. Then I’ll pull it up once I’ve finally installed everything.
The place where it is attached to the table, you can still see a free groove for the cable.
And the last step is to adjust the spring force, because by default it lifted the monitor to the upper position and did not allow it to lower. The adjustment is made by rotating a semi-hidden bolt (it becomes accessible if you slightly lower the monitor down).
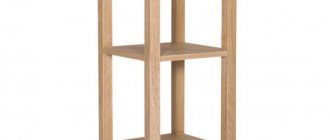
Monitor stand design
There are two types of monitor stands: straight and angular.
Straight stands
designed to install the monitor directly in front of the PC user. Such a stand can stand either in the center of the tabletop or slightly to the right (to the left), depending on the model of the computer desk. Attention to the picture:
As you can see, there is nothing complicated in the design of a straight monitor stand. This module is quite stable and functional. We recommend that you use similar straight stands in your products.
Corner stands
very popular among PC users. They are installed in the left or right corner of the tabletop. Such designs have some features. Look at this model here:
This product has one significant drawback - if you place the monitor very close to the front edge of the stand, then this design loses stability under the weight of the monitor, which can lead to its fall and, as a result, failure. It goes something like this:
By the way, I would like to draw your attention to the fact that the model discussed above is not a figment of my imagination, but a real module that was put into mass production by one well-known furniture factory. Therefore, be careful, gentlemen, carefully analyze the designs of future products, since even leading furniture manufacturers make miscalculations and mistakes.
I recommend using this angular design:
This model has the following advantages:
- 1. High stability.
The internal vertical bulkhead runs down the center of the stand and ends very close to the edge of its top cover. Thanks to this, you can safely place the monitor anywhere on the stand cover and be sure of the stability of the entire structure. - 2. Effective release of space.
Compared to the previous model, our product is more functional and simplifies access to things located under the top cover of the stand. To be honest, I would not call this access ideal, but of the many design options for corner monitor stands, in my opinion, this is the most optimal and convenient.