Have you noticed that even the most inept image of the sun makes you smile and evokes pleasant emotions? So, on a gloomy day, why not make a simple craft with your children that imitates the sun?
While working, kids, in addition to developing fine motor skills, will gain an understanding of the world around them and become familiar with geometric shapes, while older children will be interested in experimenting with various materials and will be able to realize their own creative ideas.
Moreover, a variety of materials are suitable for realizing fantasies: paper, sushi sticks, laces, balls, candies. In general, the sun is a craft that can be made from what is “at hand”.
Sun from disks
We will need:
- colored and corrugated paper;
- CDs for computer;
- PVA or TITANIUM glue;
- strong threads;
- ruler, felt-tip pens and a simple pencil.
How to make a sun
- Colored sheets of A4 paper should be marked with a simple pencil into strips 1 cm wide.
- Cut the sheets into equal strips along the lines. These will be rays.
- Grease the edges of our disk and glue strips of paper in a circle, for example, 5 yellow, 5 blue, 5 green, 5 orange. You can alternate stripes.
- Fold the strips in half to form loops and glue them on the other side of the disk.
- Taking another disk, we trace it with a pencil on yellow paper.
- Use scissors to cut the circle.
- We draw a mischievous face for the sun: bangs, eyes, plump cheeks, mouth and nose. Let him laugh or smile, wink, etc.
- Glue the painted yellow circle onto the disk.
Decoration of the sun from disks
- Fold the corrugated paper like an accordion.
- Using a simple pencil, draw semicircular flower petals of 2-3 shades, 5-6 petals each.
- Then you need to cut along the lines with scissors. You will get several petals of the same color, for example, red and lilac.
- To make voluminous petals, wind them on scissors until the middle of the petal and set aside.
- We collect 5-6 petals of the same color into a flower, with 2 yellow petals in the center (middle).
- At the bottom of the flowers we secure the petals tightly with threads so that they hold well.
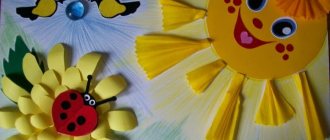
- We glue the finished flowers (3-4 pieces) to our sun - this will be a forelock. You can add a green leaf and beads, as in the picture.
- We fold the colored thread in half, about 2 times the size of the rays of the sun.
Read here: Crafts from plywood: a master class on making beautiful things and the best ideas for using plywood to decorate your home and garden (90 photos)
An elegant little sun can be hung by a thread on the wall or in a convenient place.
Master class on making a stage costume “Sunny”
Master class “Sun Costume”.
Preparing for the next children's event, we needed a Sunny costume. Since it was not possible to buy a ready-made suit, and time was running out, as always, we decided to sew it ourselves. The costume itself is easy to sew (for which thanks to my colleague Natalya Kiryaksovna Grigorieva), but the upper part - the head - made my brain work. And this is what came of it.
Foam rubber 2 cm thick – 1.5*1m
Foam rubber 1cm thick – 20*20 cm
Glue gun sticks – approx. 10 pieces
Sharp large and small scissors
Yellow acrylic paint, diluted with water - approximately 100 ml
Spray gun or spray gun
Acrylic paint a little white for the eyes and red for tinting
Black felt for eyelashes 0.3 cm thick – 10*10 cm
Blue mesh (tulle) – 20*20 cm (for the eyes to see)
Elastic band 2cm wide - approx. 1 m
And patience, a lot of patience)))
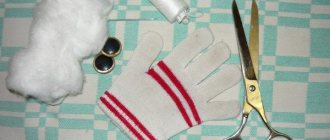
To begin, we cut out the blanks: two circles approximately (the second, back, larger to make darts like a hat, thereby creating space for the head. I cut out the circles by eye, focusing on my head), a nose, cheeks, rays of arbitrary length.
Let's start assembling. Carefully glue the foam along the edge on both sides. I forgot the most important thing. YOU MUST CUT THE FOAM CLEARLY ACCORDING TO THE CONTOUR SO THAT NO TRACES FROM THE PENCIL OR PEN ARE LEFT, OTHERWISE EVEN WHEN PAINTING, BLACK TRACES WILL APPEAR. (experienced the hard way).
On the back circle we make darts, I did it intuitively, constantly trying it on myself. I think anyone who sews well can immediately imagine in which places to cut the foam rubber))) I had to tinker with this.
I apologize for the bitten foam rubber, it’s just that my cat Timofey could not remain indifferent and contributed his share to the master class))) (of course, it all had to be cut off). And we continue. We glue the circles by 2/3, leaving the rest for dressing. On the front circle we make markings for the eyes, nose and cheeks, and draw lips. Glue all the details and move on to the lips. We cut out the lips from thin foam rubber, slightly larger than those drawn on the circle. We cut them into two parts and start gluing them. Apply glue along the contour, slightly bending it inward, and for volume, place circles of foam rubber inside the lips.
Sun made of cardboard or disposable plate
This is also a simple sun craft, suitable for kindergarten, which will cheer up both children and adults. To work you need:
- yellow-orange paper;
- yellow-orange cardboard or 1-time plate;
- paints;
- a simple pencil;
- glue and scissors.
Step-by-step making of a cardboard sun
For the circle of the sun, you need to take yellow cardboard, place the saucer on top and trace it with a pencil, getting a circle. If you have a disposable small plate, you can take it as a basis and paint it with bright yellow paints.
Take yellow-orange sheets of paper and trace the child’s palm on them. They will become the original rays of our sun. If you circle the palms of the whole family, you get a “family sun.” Each “palm” needs to be cut out of paper with scissors with small allowances for gluing.
One “palm” (rays) needs to be glued to the inside of the 1-time plate. You can adjust the length of the rays and density yourself.
The face of the sun turns out to be convex. Using a felt-tip pen (pencil) we draw eyes and a big mouth. You can cut it out of colored paper and stick it on a plate in a circle or cardboard. Waiting for it to dry. The craft is ready. Instead of palms, you can take yellowish napkins, roll them up, and glue the pieces around the plate.
Templates
Before creating any crafts, you should think about templates. These blanks will make the job easier and also allow young children to make more complex crafts. This will inspire them to creativity and future success.
Options for templates or pictures:
- Circles for the face of the sun;
- Sun with direct rays;
- A figure in the form of a semicircle with straight rays;
- Sun with triangular rays;
- Sunflower with petals;
- Sun with stripes of different lengths;
- The sun with rays in the form of flames. This is a complex figure that is best cut out in advance and the children will decorate it.
Pre-prepared blanks in the form of circles can diversify any craft and simplify the work.
How to make a sun out of paper and cardboard
By combining several different techniques in one work: modular origami, appliqué and drawing, they create varied and very interesting crafts.
A large sun assembled from whatman paper will be useful for theatrical productions or for Maslenitsa. They are held quite often in kindergartens, telling children about Russian folk traditions.
An applique and a small handmade item will decorate a child’s room and is perfect as a gift. You can make a sun craft in craft classes and, of course, at home. There are several different options for making the sun for children of different ages.
Origami sun for children 5-7 years old. (Option No. 1)
The rays of such a sun consist of three-color modules. The face is made of a cardboard circle covered with colored paper, with drawn eyes and a smile. When you hang it on a string and untwist it, you create the illusion that the sun is having fun and blinking.
Materials for work
- Colored paper.
- Markers.
- Sheet of cardboard.
- Scissors.
- Markers + colored pencils.
- Glue stick.
- Compass.
- Lace.
Crafts for a country house
An image of the sun made from plastic bottles, wheels from an old children's bicycle, or a picture of the sun cut out of plywood can be used to decorate your home area. A sun craft for a dacha looks original, woven from wicker and installed in the middle of a flower bed or decorating the wall of a veranda.
You can knit an original rug in the shape of a smiling sun to decorate your home or bathhouse. In the kitchen you can place a panel in the form of a stylized celestial body made from salted dough or pasta of various shapes.
In this case, the spaghetti will perfectly represent the rays, and the middle will be round pasta. Natural products are treated with a primer and coated with paint. You can finally seal the work with water-based varnish.
Step by step assembly
Modules are made from colored paper. Each element is made of a square, with sides 10x10 cm.
Prepare 6 pieces of modules of red, yellow and orange.
Alternating elements of different shades, they assemble a chain of individual “rays” and close it into a circle. More details:
Origami paper sun Watch this video on YouTube
Using a compass, draw a circle on cardboard of such a size that it fits inside the hole. Cut out 2 more identical circles from yellow paper, 2 cm larger in diameter than the previous one - this will be the “face” of the sun. On the first emoticon, open eyes and a smile are drawn, on the second, closed eyelids. To ensure that the image on both mugs matches perfectly, the design is copied by applying the details to the window glass.
A string is threaded into the beam blank, forming a loop of the required length. Place a cardboard circle inside. Emoticons with a pattern are glued to it on both sides. Since they are larger in diameter, they will connect the cardboard circle and the chain of rays well. Allow the structure to dry thoroughly and begin painting.
We recommend reading: DIY flowers from scrap materials: cotton pads and buds, egg trays, disposable spoons, burlap, thread and wire
The eyes are drawn with felt-tip pens or fragments are cut out from colored paper and pasted on the “face”. As already mentioned, on the one hand they are open. To make the expression of the eyes seem expressive, they are decorated with voluminous eyelashes cut out of black paper. To do this, the ends are screwed onto a pencil, and only a thin strip is attached to the “eyelid”. On the other hand, the eyelashes are placed on the closed eyelid. They draw a smile, add blush and freckles to the sun.
A paper sun will decorate a child's room. When it rotates, the sun appears to be playing. It can be hung on a chandelier or on the wall. If it’s time for the children to get ready for bed, they turn it over and the sun also “falls asleep.”
If you need to increase the size of the craft, increase the size of the square from which the modules are added and their number.
Option No. 2
The second option is easier to implement and is suitable for children 4-5 years old. Collect the sun from 2 sheets of yellow paper and 2 pink sheets.
Each sheet is folded like an accordion, the edges are cut at an angle of 45 degrees. Connected together. A cardboard circle with a smiley face and a skewer are attached to the middle. This model of the sun can be placed in a flower pot.
Option No. 3
Children who know the origami technique can easily fold a star-sun out of paper according to the diagram:
Volumetric sun-ball made of paper
A spherical origami sun is assembled from fragments of “Kusudama-clover”, “Kusudama-star”, “Kusudama-snowflake”, etc. The ball is folded in two colors or one color.
How to make a sun out of cardboard
To make a large fake sun for the stage, it is better to use cardboard or whatman paper. The circle and each ray are cut out separately.
If corrugated cardboard from boxes is used, each part is first covered with wallpaper or paper, after which the elements are attached to the circle and an image is applied. Painted with gouache. A cardboard sun is perfect for Maslenitsa. On festivities, it will decorate the yard and add a festive mood to passers-by.
Sun made from quilling elements
Works made from quilling elements look delicate and delicate. Strips 3-5 mm wide are cut from double-sided paper. Prepare 7 pieces of S-shaped curls of open shapes, 12 pieces of teardrop-shaped elements. S-shaped blanks are attached to the base.
A sun with 12 rays is drawn on the sheet. The width of each beam should be equal to the width of the strips from which the previous elements were twisted. They are bent at an angle of 45 degrees and given the desired shape. Glue on top of the S-shaped curls, drops cling to the rays. The result is a voluminous lace composition that can be framed.
Krasa - braided braid
Sun rays in the shape of braids look quite funny. This method of making a “sun” craft will allow children to gain skills in working with threads and develop finger motor skills. Materials you should have available:
- disposable paper plate;
- decorative multi-colored paper and threads;
- scissors with rounded ends, stapler, hole punch, ribbons.
The circumference of each plate should be marked into ten equal parts and marked with a simple pencil. Using a hole punch, make holes in the marked places at an equal distance from the outline of the disk.
Now yarn of different colors is cut into pieces of a certain length and threaded through the holes. With bated breath, children repeat all the movements after the teacher and slowly braid their hair along the entire circumference of the sun's disk.
Each child chooses the color of the braids independently, and at the end weaves a ribbon of an arbitrary shade. Therefore, the same crafts will not work out in a group. To decorate the sunny face, you need to glue on the eyes and draw a mouth with a felt-tip pen.
Variety of products
There are many different types of handicrafts. Sunlight can be created using your own efforts in a variety of ways. You can try to make one from cardboard, plasticine, yarn, food, textile materials. In any case, the result is gorgeous and will delight the people around you.
First, you need to figure out what exactly you would like to see in the end. Maybe a simple drawing, appliqué.
Some people love to make the luminary in the form of plush faces. The items are made differently, but each one reflects its uniqueness.
Why is sunshine produced?
We all strive to decorate our house or apartment. And children are very drawn to all sorts of cool things. Then parents and children develop objects for play in the form of a luminous miracle.
Paper sun patterns can enhance any room. Little children often play with them and wear them as flutes on their clothes. It happens that you need to attach a sun even to a school jacket, backpack, or bag.
Tasty and tasteless creation
To create a masterpiece, you can take products. Pasta such as spaghetti or spirals will help create voluminous and unusual rays.
Wheat or rice breads are suitable as a base.
Another option is salt dough. It is easy to prepare at home, and working with it is as simple as with plasticine. You should not taste these products, despite the fact that they are made from natural ingredients.
You can make a delicious sunshine from caramel or shortcrust pastry.
What is needed for a masterpiece?
After you have decided on the star, you can select the tools. If you have a mania for creating ordinary things, you need to get tools, paper clips, scissors. All you have to do is depict a ball, lines, facial expressions. Then you need to separate it, color it, make changes. There is nothing difficult in the chosen task.
If you want an amazing toy, you definitely need cutting tools, a needle, stuffing, and buttons. It depends on the person’s imagination.
If the desire is for the unknown, it is proposed to make heavenly happiness from pasta.
The sun made from tires looks aesthetically and unusually. This system is quite simple. You will need screws, a car tire, linoleum or plastic, paint, bottles with corks.
We dig the car part into the ground so that it holds and does not fall. Then, using nails, we attach the lids from the flasks. Then we put in the cans. This is already light with stripes emanating from it.
Then we bring the middle part of the required size. It is attached with nails. It is important to prepare it in advance. And then it’s a matter of taste. There is an opportunity to add a cute face, you can leave it as it turned out.
Tools and materials for work
The choice of tools depends on the source material. To make paper crafts you will need a pencil, office glue, paper clips, markers, scissors and a compass.
If you don’t have a compass, then it doesn’t matter - any round object, for example, a disk, a plate, or a lid, will serve as a template.
If you want to create a decoration for your personal plot, you will hardly need office supplies; you will have to look for tools and fasteners in a container with accessories for construction and repair.
Stages of work
The masterpiece of the radiant luminary is presented in different ways. But in any case, first everything necessary for the work is prepared, a sketch is made, then everything is put together.
If you make the sun with rays on cardboard, you will need an image and color. You can insert some rhinestones, threads, ropes, stones.
If the sun is made of fabric, then you need to take a sheet on which a circle is drawn. You can give it arms and stripes. Then you have to fold it in half to form a shape.
On the second one, you need to draw another circle, cut it out, having previously installed a hole. Then everything is connected with glue or threads.
Everything is sheathed, there is empty space inside. Add cotton through the hole created and sew it up. Our creativity is ready! But if you wish, you can add eyes, a smile, a tongue, a nose, or write something on the rays.
Option 1: applique
Making your daughter look like the bright summer sun is easy and simple. It's worth digging through your clothes and finding the right bright yellow dress. If you don’t have one, you can buy cute clothes in the store. Sew a sun applique onto the bodice of the dress. You can buy it in special stores with sewing accessories or make it yourself. It looks like this:
- We find a suitable image and try to draw a sun, as shown in the figure.
- Carefully cut out.
- We sew yellow threads onto the bodice of the dress.
- You can place plastic film between the sun and the bodice fabric, cover it with linen cloth and support it under the pressure of a hot iron.
The applique dress is ready for the event. We decorate the girl's head with a yellow ribbon.
Possible subtleties
In order to get irresistible beauty, you have to think carefully. After all, to do this you need to somehow embellish your product in an original way. A photo of the sun craft will help in this process.
There is a huge amount of product design available on the Internet. You can give preference to any of them that you like the most. There are many people who come up with their own options for the design and decoration of their trinket.
Society is always chasing something, trying to do things, satisfy personal needs. Favorite activities appear in the role of an assistant. The most important thing is attention, patience, free time. It is important to be able to manage talent. Individuals must remember this.
Sun suit for the matinee
Carnival costumes are very important when organizing various celebrations and New Year's holidays. On spring days, a number of events dedicated to March 8, Easter and other special dates are held in schools or other children's institutions. The “Sunshine” costume can be useful at any time of the year.
There are several ways to make a Sunshine costume for a girl with your own hands. Let's consider both simple and more complex options.
Sun made of cardboard and disposable plate
An easy craft that can be made by preschool children. Helps develop your child's creativity and motor skills. Helps create a good mood for family members.
Required materials and tools:
- disposable plate;
- cardboard (preferably yellow);
- watercolor paints;
- scissors, glue;
- pencils, felt-tip pens;
- compass;
- colored yellow paper.
If colored cardboard or paper is missing, there is no need to despair. The main thing is to have colored pencils or paint. In this case, the process may be delayed while painting paper or cardboard.
Stages of creation
Using a compass or plate of the selected diameter, a solar circle is drawn. The solar disk is drawn on cardboard and then cut out. If you have a medium-sized disposable plate, it is painted and used as the basis for the craft.
The palms of the household members are circled on yellow paper. The palms are cut out, leaving small pockets on the base for gluing. Glued to the inside of cardboard and plates. The sunny face is glued to both sides of the craft. Eyes and a smiling mouth are applied with paints, felt-tip pens, and pencils. These elements can also be cut out of paper and glued on. After drying, the craft is ready for display.
Option 1: applique
Making your daughter look like the bright summer sun is easy and simple. It's worth digging through your clothes and finding the right bright yellow dress. If you don’t have one, you can buy cute clothes in the store. Sew a sun applique onto the bodice of the dress. You can buy it in special stores with sewing accessories or make it yourself. It looks like this:
- We find a suitable image and try to draw a sun, as shown in the figure.
- Carefully cut out.
- We sew yellow threads onto the bodice of the dress.
- You can place plastic film between the sun and the bodice fabric, cover it with linen cloth and support it under the pressure of a hot iron.
The applique dress is ready for the event. We decorate the girl's head with a yellow ribbon.
Sun made of colorful paper
This is not a difficult manufacturing option. Available for preschool children. It's quite simple to do. Will help the child learn to use the simplest measuring instruments, office supplies, and devices.
The required materials and accessories do not differ from the previously defined list.
Manufacturing procedure
To make a sun, draw two circles of equal diameter on the inside of a yellow sheet of paper. Carefully cut along the outlined line. All elements are made from different paper. Black is used to make four eyes. Brown serves as the basis for creating a forelock. Red is used to make a smiling mouth. Yellow and orange are used to make sun rays. They are made in different lengths to make the sun look attractive. They are made in the form of strips up to 1 centimeter wide. The lengths of the rays of yellow and orange paper are measured in a ratio of 1:2. To hang the product, prepare a thread up to 30 centimeters long.
We recommend reading: Decoupage on wood: step-by-step instructions, materials and DIY methods
When the elements of the craft are cut out, gluing is done. Initially, the elements of the face of the front part of the sun are applied. Next, the product is given the opportunity to dry.
At the second stage, the rays folded in half are glued to the inner side of one solar circle. Orange ones are glued between each yellow ray. The end of a thread folded in half is glued into the middle of the structure. The drying time is determined.
In the final part, a similar second one is glued to the inside of the first solar circle.
A little theory
How to make a sun craft?
- First, you should understand what basic elements it consists of.
- The main component of the sun, undoubtedly, is the circle.
- During the work process, rays made of any suitable material are attached to it, on which, in turn, their length and shape depend.
- The resulting sun can be flat or three-dimensional, suspended on a string or attached to a stick - it all depends on the chosen option for making the craft.
- Drawn eyes, a nose, freckles and a playful smile, as well as long, expressive eyelashes or bangs with braids can give him expressiveness.
The complexity of manufacturing the parts added to the craft and their attachment to it, first of all, depends on the age of its creator and his capabilities.
This means that the younger the child working on the creation of the sun is, the simpler and clearer the process of making it should be.
To begin with, you can try to make one of the simplest crafts - a paper sun.
It will require:
- Yellow paper;
- Scissors;
- Glue.
When starting work, mark two circles of equal diameter on paper and cut them out. One of the circles will act as the basis for attaching the rays.
They can be made:
- From colored strips, by bending each of them in half (without pressing hard at the bend) - this way they will turn out to be more voluminous.
- By winding multi-colored strips of paper onto a pencil or knitting needle.
- From wavy strips cut from paper of different colors.
- From strips of paper decorated with fabric, braid, beads, rhinestones or beads. Folding cut paper like an accordion, etc.
On the second circle, draw eyes, a mouth, a nose and glue it onto the circle - the base, on top of the glued rays. The craft is ready.
Making a sun from computer disks
This manufacturing option is suitable for children of preschool age and primary school. Materials and office supplies correspond to the previous list. The special feature is the glue. Stationery will not work; you need glue capable of gluing the paper to the surface of the disk.
Manufacturing
First, fans are made from four sheets of colored paper. For this, it is better to use light-colored paper. Each sheet is folded like an accordion. The width of the strip should not exceed one centimeter. Then the accordion is folded in half, the inner parts are glued together. The ends are rounded to form a fan. Fans are also made from the remaining three sheets of paper. It turns out four lush fans of different colors.
Circles are cut out of yellow paper along the diameter of the inner circle of the disk. On the circles, with paint and felt-tip pens, we draw the smiling face of the sun. To create a face, its elements can be cut out of paper and glued. Solar faces are glued to the centers of the disks on the outer sides.
Fans in the shape of sun rays are glued to the inner sides of the discs. After drying, the product is put on public display.
A fan made of woolen threads is complex. Making such a fan is accessible to elementary school students with developed motor skills. In this version, the disc is carefully “sheathed” with wool or silk thread. The threads are applied tightly to each other, attached with loops to the disk.
Rays are knitted from individual threads. It is permissible to make them in the shape of braids; they are crocheted to the threads of the disc. Wool fabric is used to make the base of the sun face. Eyes and a mouth are embroidered on it with threads. The fabric is carefully sewn into the center of the disc. Faces can be made in the form of pillows. Then the sun will become more voluminous. Suspended from pieces of furniture by the beams.
On the Internet you can find many simple examples of making this item. The main thing is the joint creativity of family members. More complex elements of crafts are made from durable materials.
Application made from natural materials
On a sheet of sky-colored office paper you can make an applique from ready-made elements collected during an autumn walk in the park.
Beautiful, bright dried yellow leaves from maples, birches or reddish ones from park shrubs and fruit trees can be successfully used for an applique in the form of a sun, where the center is made of rounded crimson leaves, and the rays are made of yellow and even greenish leaves with carved edges.
The sun as a decorative element of a summer cottage
At all times, the sun was perceived as an attribute of good. The presence of such an item will decorate the summer cottage, add joy and light. It can be made as an independent decorative element, or be built into the design of objects. The production of such crafts is available to the head of the family and school-age children.
When setting up you will need:
- welding machine;
- drill with a set of drills, jigsaw;
- hacksaw for wood, metal;
- chalk, pencil, measuring tool;
- 6-8mm wire or 14-16mm metal rod;
- chipboard;
- car tires;
- plastic bottles;
- bolts with a diameter of 6-8 mm, washers, nuts;
- paints for exterior work on metal and wood;
- solvent, paint brushes;
- shovels;
- cement, concrete.
Sunshine on the playground
- Metal sun. The simplest version of the sun is made using metal wire with a diameter of 6-8 mm. The solar disk is arched in a circle of the required diameter. The ends of the wire are welded together. To prepare the sun's rays, pieces of wire are cut to the required length. Some rays are made wavy. Everything is welded to the solar disk. The eyes and mouth are made from the same wire, which are welded to special stands and installed in their places. Two nuts are welded to the outer rim. These are the attachment points for the craft. The product is painted with bright colored paints and attached to the walls of buildings or playground structures.
- Volumetric solar circles. They are made using the welding method, but using wire with a diameter of 14-16 mm. The solar disk element with rays is welded into 2 circles of larger diameter. The circles are connected to each other by crossbars, symmetrically welded from the beam of one circle to the beams of the other. The result is a three-dimensional rotating ladder. Can act as a slide ladder . Several circles of different diameters form a cascade of play ladders. The stairs are painted in rainbow colors. The bases are concreted.
- The sun in a car tire.
A car tire or several tires are dug into the ground. The digging depth should ensure the stability of the structure. At the ends of the tire, located above ground level, and on the caps of plastic bottles, holes are drilled according to the diameter of the existing bolts. Bottle caps, inside out, are screwed to the tires. Plastic bottles are screwed onto them. The design is painted in rainbow colors.
A solar disk made of chipboard is inserted into the tire. On a painted surface, the elements of the face are applied with paints. Attached inside the tire.
The work is finished. There is joy and fun on the playground. There is a place to play and relax.
In folk signs, the sun has always symbolized insight, prosperity, truth, and abundance. A self-made solar amulet will bring the family the joy of mutual communication, well-being, and comfort. Take care of yourself and your loved ones. Give your family the joy of communication, mutual care, and understanding.
Sun suit for the matinee
Carnival costumes are very important when organizing various celebrations and New Year's holidays. On spring days, a number of events dedicated to March 8, Easter and other special dates are held in schools or other children's institutions. The “Sunshine” costume can be useful at any time of the year.
There are several ways to make a Sunshine costume for a girl with your own hands. Let's consider both simple and more complex options.