The first thing you should start with is the question “Do you need any exercise equipment to develop your abdominal muscles at home?” But more on that at the end. Sports equipment will be very useful for training the muscles of the arms, legs, and back. After all, without a barbell, dumbbell, horizontal bar, parallel bars, serious results in building muscles and increasing strength indicators will be much more difficult to achieve. But training the abdominal muscles has some differences. For example, you don’t need such long rest breaks here as for other muscle groups (it’s better to pump your abs almost every day) and excellent results can be achieved even on the floor. Programs and types of exercises for developing abdominal muscles can be divided according to their prevalence and popularity as follows:
- most are various crunches on the floor or on an ab board;
- in second place in popularity are exercises for raising legs (bending the knees) on the floor, parallel bars, crossbar, bench, etc.;
- then there are exercises using a gymnastic roller or fitball;
- and abdominal exercises are performed least often with the help of all kinds of exercise machines that are “shoveled” through TV stores for home sports.
Now let’s figure out how and what abdominal exercise machines you can make with your own hands.
DIY home exercise equipment: pros and cons
As you can see, some exercise machines are quite easy to make with your own hands, while others are extremely problematic. And it’s not even a matter of the complexity of the manufacturing technology itself. And the fact is that it requires certain materials (which you will have to buy!), professional high-quality tools and a number of skills. Therefore, before you make a simulator at home yourself, think carefully, carefully weigh all the pros and cons - your own patience and time are expensive.
If difficulties do not frighten you, you can safely get down to business.
Bottom line
As it became clear, you can design homemade simulators with a little work. And it’s worth it, considering the “astronomical” prices for factory sports equipment. If the material is available, then you can even set up a business, since there is and will be a demand for homemade equipment. More and more people are joining sports who think about health, and aesthetic appearance is not as important to them as the availability and reliability of homemade exercise equipment.
Video: Gym at home
Rowing is one of the simplest and most effective ways to increase your heart rate and get a full workout on almost all the muscles of the body. At the same time, this difficult exercise does not harm your joints, and this is one of the biggest and most underestimated dangers of sports. Today we decided to make a material that describes in detail what muscles can be developed with one exercise machine and 20 minutes of free time
Assembling a treadmill
Some exercise machines are extremely difficult to make with your own hands, and a treadmill is one of them.
It would seem that theoretically there is nothing complicated, all you need is:
- create a frame in the form of small runners or legs, as well as support for the canvas;
- connect it with horizontally located shafts;
- pull an elastic, dense fabric onto the shafts;
- connect one of the shafts to the motor (for an electric treadmill).
But in practice, everything turns out to be not so rosy, because:
- Finding suitable material for canvas “at the dacha” or “in Vasya’s garage” is almost impossible. Only adequate industrial solutions;
- such a design will be very cumbersome;
- The engine system is extremely complex, and if handled improperly it can be life-threatening.
Therefore, before you make a simulator, think a thousand times - is the game worth the candle? It’s one thing to make a simple ab roller, and quite another to tinker with an unreliable design. Which, moreover, can entail such a heap of material and time costs that it will be cheaper to purchase an industrially produced product.
Buy bars or use homemade ones
The issue is controversial: some recommend buying it in a store, others advise building a homemade exercise machine, which is cheaper and not inferior in reliability. Supporters of purchased equipment give the following arguments: parallel bars and a horizontal bar together cost up to $60, but homemade exercise equipment will also require materials, i.e. You won’t be able to win much in terms of finances. It is advisable that the horizontal bar be suitable for a wide grip. The bars are made folding - they are the preferred option because they do not take up much space. However, they are more expensive.
Another solution is to buy parallel bars and a horizontal bar of a 2-in-1 design or a wall bars, on which you can do additional exercises (it comes with an abdominal board). They cost twice as much, but they also have more advantages.
Advantages and disadvantages
The advantages of making sports equipment yourself are obvious. It is possible to adjust the projectile to the dimensions of a specific room. Weights, barbells, dumbbells and benches can be made from scrap materials lying around the country house. If desired, more complex equipment can be manufactured. Even if the family spends the summer in the city, there are probably friends who have a dime a dozen of unnecessary shops and metal structures.
There is no need to spend cosmic sums on the purchase of equipment, and the cost of fastening materials or weights for the barbell will cost adequate money. Many amateur athletes claim that making exercise equipment at home is quite possible.
Beginning athletes see the downside of this idea in the time investment.
After all, you will have to tinker with it yourself. There are fears that while you are doing the exercise machine, all desire to exercise will disappear. You can compensate for this shortcoming by turning to friends or acquaintances for help.
Improved bench model
The bench can be improved - for example, by adding bars to it. This will provide an opportunity to additionally load the muscles of the chest and triceps.
Materials and tools
In order to install parallel bars onto an existing bench press, you don’t need a lot of tools.
The following materials are needed:
- bars;
- welding machine.
That's all. Installing beams is not as difficult as it seems at first glance.
Assembly work
It will take 20-30 minutes to weld the bars to the bench press.
Necessary:
- Get a welding machine and a special mask to protect your eyes.
- Weld the beams to the bench.
The improved bench model is ready. Now there is an opportunity to diversify your home workouts.
Choosing the right exercise machine
The first selection criterion is price. The difference between expensive and cheap exercise machines is the maximum compliance with human biomechanics. A team of engineers, special designers and trainers is working to create a good sports equipment. The result is a simulator that is not only effective, but also meets safety standards and takes into account all the nuances of natural body movements. This also means the complete absence of unnecessary additional stress on the joints and tendons.
Horizontal hyperextension machine
Another important selection parameter is the material. It is better to choose a strength trainer for home made of sheet steel. The service life of the simulator is affected by the strength of the connections and the quality of the main frame. Cheap models are dangerous because they become loose much faster.
For tall and heavy-set people, it is important to consider the maximum weight of the multistation user. The Adidas fitness station indicates a maximum user weight of 135 kg.
A necessary element of a sports station is cables. Inexpensive options suffer from insufficient cable strength, which leads to serious injuries. When purchasing, you should pay attention to the possibility of changing loads.
A drawing of hyperextension will help you do it yourself
A high-quality exercise machine will allow the user to easily change the weight, inclination and height of the seats.
The functionality of the device plays an important role, since a home exercise machine should allow you to perform exercises to develop different muscle groups.
What to remember
The crossover is an almost universal exercise machine (for men and women), with which you can work out most of the muscles in our body.
This simulator does not affect the growth of muscle mass. On the contrary, it only forms the muscle.
Using a crossover, you can perform various variations of exercises for a particular muscle group.
It is important to perform the exercises efficiently, having first carefully studied the information about them or take the advice of a trainer.
This is where I end. See you again on the expanses of my blog!
Common mistakes
Hyperextension for the back brings obvious benefits to the entire body. However, failure to use the correct technique can cause serious harm to your health. To protect yourself, you need to avoid common mistakes when performing the exercise:
A back trainer has many advantages, however, all efforts are in vain if the technique of performing the exercises is violated. You should not chase quick results; the greatest effect is achieved through systematic training and working on mistakes.
The hyperextension trainer is an effective sports device that helps develop the back muscles and provide stress to the back of the thigh and buttocks. The training is relevant for all athletes, regardless of gender or level of physical fitness. Correct technique without errors will guarantee safety and get the maximum effect from classes.
Crossover trainer. Exercises. How to choose and features
A beautiful body is the dream of many people. But what to do if you don’t have enough time to visit the gym? The answer is simple - arrange it at home. But at home, as a rule, there is not enough space to install several devices. Therefore, you should opt for multifunctional devices, one of which is a crossover simulator.
What is a crossover trainer
Externally, this device is unremarkable. This device consists of two racks (block frame) with special cables and a crossbar. The block frame is equipped with traction blocks, the weight of which can be adjusted. Using handles, cables and rollers, the blocks move in the frame along a certain trajectory, while the athlete can pull them in different directions. This makes it possible to correct the muscle relief, build muscle, pumping up the body with the help of pulling blocks at the required angle.
The load is selected depending on the athlete's level of training and can range from the minimum values used during warm-up or rehabilitation to the very significant weight required by professional weightlifters. Thus, the crossover simulator is universal not only in terms of the variety of exercises. It is suitable for both beginners and experienced athletes.
The working weight in the device changes by moving the lever that fixes the blocks. The crossover trainer is a strength device. The result is achieved through the efforts of the athlete. The very name “cross over” literally means “through everything”.
This simulator allows you to train your arms, shoulder girdle, hips, buttocks, abs, back and pectoral muscles. Just one device can replace an entire gym. At the same time, the device does not take up much space, and the design is adjustable, thanks to which each athlete can create an individual training program for himself.
The effectiveness of the exercises is not inferior to training with a regular barbell, but significantly exceeds them in terms of safety. There is no risk of losing orientation in space, dropping the projectile on your leg or injuring your back. The effect will be noticeable after a couple of weeks of effort, subject to regular exercise.
The advantages of this device include:
- Balance. When exercising with free weights, the athlete has no support. When exercising with this machine, the athlete has support that will prevent him from bending forward while performing the exercises.
- Diversity. The crossover trainer will never make an athlete get bored during training. There are an unimaginable variety of exercises that can be performed on this device. Even the same exercise can be done in several variations. You can attach various handles to the device, which will allow you to work all muscle groups of the body. Straight bars, curved handles, and rope are used as additional devices. All this is added with the aim of diversifying the training program, improving the effect of the exercises and, of course, making the exercises as convenient as possible.
- Rehabilitation. The crossover trainer is great for people who have recently been injured. It allows you to qualitatively develop your knees, arms, back and other parts of the body.
Features of training
Crossover training requires a lot of energy and maximum focus. Therefore, you should exercise on the simulator immediately after warming up. Loads are pulled using the arms or legs in the direction specified by the training program. In this case, lifting weights can be carried out with one limb.
The crossover trainer allows you to perform exercises such as:
- Raising hands. By the way, this exercise gave the device its name – crossover.
- Chest press from different angles.
- Various types of pulls - horizontal, vertical and cross.
- Bending your arms in different positions - standing, sitting or lying down.
- Squats and lunges.
- Swing your legs.
- Twisting.
The technique of using the simulator is simple. Before class, you need to select a working weight and take the starting position. When performing any exercise, the back should remain straight, moving the handle in any direction is done while exhaling.
The effectiveness of exercise depends not only on the intensity of training, but also on the correctness of the exercises. In this case, the intensity of exercise can be changed in two ways - by adjusting the weight of the loads or the number of repetitions of one exercise.
When building a training program, it is important to correctly formulate the load. You should not work on all muscles at the same time, as this will lead to overload of the body. It is recommended to divide the program into two stages - for the upper and lower parts of the body, and work on them every other day.
Exercises
As mentioned above, the crossover simulator is a universal device on which you can successfully work out the muscles of the upper and lower body.
Training the bottom
The lower body includes the buttocks and legs. To form a beautiful rounded buttock shape, you can perform exercises such as:
- Deadlift with load from the lower block.
- Squats from the lower block. This exercise is good because the maximum load is placed on the gluteal muscles, and as a bonus, on the back of the thighs. In this case, the abdominal and back muscles are involved in the work, but there is practically no load on the knees.
Alternative Exercises
Using alternative exercises to hyperextension can also be very effective. The most common are: plank, bridge and cat.
Plank
You should start with the classic version. To do this, you need to take a position similar to a push-up from the floor (stand on two palms, or on your elbows) and stay in this horizontal position for as long as possible.
Gradually, the exercise becomes more difficult:
- the time spent in the plank increases;
- emphasis is placed on one hand (one at a time);
- fist stand;
- in lateral design;
- alternately lift the opposite arm and leg from the floor.
Bridge
Spinal flexibility will be required. Execution is possible from the following provisions:
- Lying down. You need to lie on your back, bend your legs (heels should be near your buttocks), place your palms on the floor (above your shoulders, fingers pointing towards your torso). Then, tensing your leg muscles, lift your pelvis. At the same time, you should arch your back and try to straighten your legs (leaning on your hands).
- Sitting. Bend your knees (feet on the floor, back straight), place your right palm on the floor (back) and slightly turn your torso. Then, leaning on your feet and right hand, lift your buttocks off the floor. Place your left palm on the floor (describing an arc with your hand) and try to stand on the bridge. To return to the starting position, all movements are done in the reverse order.
- Standing (at the wall bars). Bend your back backwards and grab the bar of the wall. Touching them with your hands one after another, go lower to the floor surface. In the same way, you should return to the starting position.
- Standing (without a wall and the help of an assistant). Bend your knees, tilt your body slightly forward, straighten your arms and bend them back, touching your palms to the floor. To return to the starting position: move your body forward, bend your knees, push slightly off the floor with your hands (not shoulders!) and straighten up.
Cat
The exercise does not require good physical preparation. The main thing you should pay attention to is the technique and regularity of its implementation:
- get on all fours (arms straight, palms on the floor, fingers pointing forward, legs bent at right angles);
- after a deep exhalation: tighten your abdominal muscles and twist your pelvis inward, round your back and lower your head;
- while inhaling, slowly take the starting position;
- on the next exhalation, do the opposite movements: relax your abs, lift your pelvis and head up, bend your back (the muscles should tense);
- while inhaling, return the body to the starting position.
Rowing machine. How to row - VIDEO
The movement begins with a “grab” - the initial position in which you grab the handle. Bend your knees, tilt your body about 10 degrees forward. The back is in a natural position: a slight rounding of the back is acceptable. The seat (bank) moves up to the heels as much as possible.
Read also: Abdominal stretching exercises
The movement begins with an explosive extension of the legs. The body and arms remain in the original position until the legs form, as they extend, an angle of slightly more than 90 degrees between the lower leg and thigh. From this moment, you begin to pull with your arms and back - tilting your body 10-15 degrees back and bringing the handle under your chest.
The final phase - you first straighten your arms, and only then bend your knees, returning to the starting position. If your knees bend first, you will have to throw the paddle-handle cable over them. Bodybuilders Who Ended Badly – 5 Heartbreaking Stories Set the platform under your foot correctly. The toe of the shoe should extend slightly beyond the platform. If it comes out too high or, on the contrary, turns out to be too low, you will not be able to effectively push off from the platform during the stroke.
What is reverse hyperextension?
Reverse hyperextension is good because it allows you to additionally work the knee joint. You can do the exercise on any stable, flat surface. In the gym, a bench is usually used for this; at home, massive tables are used. The movements will be the same as in the traditional version, but in reverse:
- You need to lie down on a table or bench so that your entire torso is on a stable surface and your legs are hanging down. You need to grab the edge of the projectile with your hands.
- As you inhale, the legs are raised, the torso does not move.
- As you exhale, return to the starting position.
- You need to exercise regularly, doing at least 3 approaches 10–15 times a day.
Reverse hyperextension helps reduce the size of the hips and waist, pump up the buttocks, and improve posture. For people who lead a sedentary lifestyle, exercise will help restore muscle elasticity and strength.
To perform reverse hyperextension, you do not need a special simulator; any stable apparatus with a flat surface will do. The exercise is relevant for beginners and professional athletes, suitable for girls. If necessary, use additional weights, which helps increase muscle size.
Reverse hyperextension is often performed on a fitball. The mechanics of the movements are the same as in the horizontal version, with the only difference being that training on a flexible unstable ball involves the stabilizer muscles responsible for coordinating movements and balancing the body in space.
Video review
- What you need
Rowing is an effective and popular exercise in CrossFit. A rowing machine is used to simulate the work of a rower in a boat, but only in a gym environment. At the same time, a fairly high cardiovascular load is placed on the body - it’s not for nothing that rowing is included in the group of so-called cardio exercises. Today we will tell you about which muscles are involved when rowing, about the harms and benefits of rowing, and we will also tell you in detail how to properly exercise on a rowing machine.
What muscles work
During hyperextension, the following muscles of the body work:
- Spinal extensors. The main task in the exercise is to tilt the torso in a given direction and stabilize it.
- Gluteus maximus muscle. In a static position, it ensures tension in the thigh and maintains a vertical body position; when moving, it is responsible for the flexion of the hip.
- Biceps femoris (biceps femoris). The function of the exercise is to straighten the torso with the shins fixed in a stationary position.
- Semimembranosus muscles of the thigh. They help the gluteus maximus muscle to extend the torso while the lower leg is fixed.
- Semitendinosus muscles of the thigh. The torso is extended in cooperation with the gluteus maximus muscle.
Proper technique for using a rowing machine
The shins are positioned vertically, the legs are compressed as much as possible. This position is similar to a squat position. Hands grip the handle, triceps tense. The body is slightly tilted forward, the back muscles are relaxed, the abs are tense.
It is carried out due to the pushing movement of the legs with simultaneous tension of the shoulder girdle. The biceps are engaged next, which pulls the handle towards the abdomen. The back muscles open, the chest is pushed forward. The legs straighten due to the movement of the gluteal and thigh muscles.
The thighs and buttocks are tense, the abdominal muscles act as a stabilizer of body position. Due to the biceps, the handle is pulled as close to the belt as possible, the chest is brought forward, the amplitude of movement becomes even greater.
The handle of the machine, held by the force of the triceps, moves forward. The body follows. The abs remain tense. The legs bend at the knee joints. The reverse movement ends when the initial position - “capture” - is assumed.
Advantages and disadvantages of classes
Like any type of exercise machine, the hyperextension bench also has a number of positive and negative aspects.
Exercising on a hyperextension bench promotes the formation of an upright posture.
The advantages include:
- the lumbosacral spine is thoroughly worked out;
- helps to constantly maintain the muscle corset in good shape;
- with regular exercise, it strengthens the back;
- reduces the number of opportunities to injure the spine and tendons;
- training on the simulator is used for preventive actions against osteochondrosis and other various congestive phenomena in the back, and especially in the lumbar spine;
- if you perform the exercises correctly, you can also pump up your gluteal muscles, thighs and abs;
- It is allowed to exercise on the simulator with minor spinal injuries;
- distribution of physical load when performing an exercise only on the muscles involved;
- gradual preparation of the musculoskeletal system to perform more complex strength exercises.
The only drawback of training on a simulator is the presence of serious diseases of the musculoskeletal system, especially in the lumbar spine. In case of such violations, permission to perform exercises on a hyperextension bench machine is given exclusively by a doctor.
Is it possible to do hyperextension with a problem spine?
The main contraindication for hyperextension is any problems in the spine. But there are practically no healthy people, so you can exercise, except for specific contraindications, which we will discuss below, but in a gentle manner, without additional stress.
Read also: Why do potatoes turn pink when peeled?
- maintains muscle tone;
- strengthens the spine;
- relieves pain symptoms in the lumbar region;
- is a good preventative for intervertebral hernias;
- nutrition of muscle mass is enhanced.
Important: Lowering the body more than 60 degrees is recommended only for trained people with a perfectly healthy and trained back. In any other cases, this position of the body during training will only cause harm.
Professional bench for hyperextension
It is difficult to track the correct technique on your own; either a stick attached to your back or training in the gym under the supervision of an instructor will help.
Description of the exercise
It is a relatively simple, basic exercise aimed at general strengthening of the spine, gluteal muscles and hips. You can perform hyperextension at home, without a machine. The greatest load falls on the lumbar region, due to sequential flexion and extension of the back.
Muscle atlas
Hyperextension also involves consideration of information about which muscles are working. This:
- Hips: straight (synergists, antagonists). The most active muscle groups are the posterior muscles: biceps (back of the thigh, outer side), semitendinosus (back of the thigh, on the inside) and semimembranosus (under the semitendinosus muscle).
- Back: rectifiers-extensors of the spine.
- Abdominals: straight, oblique (external).
- Trapezoidal: ascending, descending and transverse parts.
- Diamond-shaped (large and small).
The use of various techniques for performing this exercise allows you to slightly change the load on muscle groups, depending on the desired end result.
Benefit
In addition to external improvements (toned gluteal muscles, a sharpened figure, a flat stomach), this exercise improves blood circulation throughout the body, helps straighten posture, strengthen the spine, and has a preventive effect to prevent the occurrence and development of diseases.
The most beneficial effect from a correctly performed exercise will be for people:
- with a sedentary lifestyle;
- having excess weight and other metabolic disorders;
- for beginner athletes - to develop endurance and strengthen the lumbar muscles in a short time;
- having poor posture (especially at the stage of early degree of spinal curvature);
- engaged in heavy physical labor;
- prone to venous diseases of the lower extremities (varicose veins, thrombosis);
- having mild or moderate joint diseases (inflammatory, allergic).
If you have problems with the spine, back muscles or hip joint, you must consult with medical specialists (traumatologist, vertebrologist) before starting classes.
Contraindications
If even the slightest pain occurs in the lower back or spine, hyperextension exercises must be stopped.
The main contraindications are:
- the presence of hernias (complicated intervertebral, sequestered) or protrusions;
- inflammatory diseases of joints and bones (severe stages);
- neoplasms (received as a result of mechanical trauma, malignant or benign) in the spine;
- congenital (or resulting from mechanical trauma) deviations in the structure of the spine, its connective elements and tissues;
- diseases of the spine and muscles as a result of infections (tuberculosis, syphilis) and sprains.
Basic information
Most of the load falls on the upper half of the body. Arms, shoulders, back and chest - various exercises for each of these parts can be completely replaced by rowing. In general, the whole body is involved in the work, but the percentage of loads will not be equal: 75% of the training will be received by the upper part and only 25% by the legs.
A rowing machine can change your entire figure in just a couple of months: your back will become wider, your posture will become correct.
By working out on a rowing machine, you will quickly pump up your respiratory and cardiovascular systems, this is already a bonus to the main advantages of training. Muscle tone will also increase. A rowing machine can change your entire figure in just a couple of months: your back will become wider, your posture will become correct.
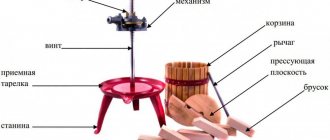
Do-it-yourself benches and exercise equipment for the home: from a simple bench to a multifunctional complex
Modern life, on the one hand, deprives a person of most natural physical activities; on the other hand, it throws bundles of psychological and emotional loads at him. Therefore, absolutely everyone needs to keep themselves in good, at least physical shape. To the credit of the current generation, we can say that now most people understand: a healthy mind in a healthy body. They also soon begin to understand: physical exercises, dumbbells and wrist expanders are not enough; you need to work more with weights on apparatus and machines, so at least a bench is required.
Comparison of the cost of the materials used and the cost of purchasing a new simulator
As a result, we spent about 10 thousand rubles on all the material, provided that we use only high-quality materials.
Now let’s look at the average prices for new inventory:
- Olympic barbell with a set of weights for 120 kg. Rubber protection will cost you about 50 thousand rubles.
- The price for a pair of dumbbells of 20 kg is 15,000 rubles.
- The average price of a bench press is from 5 thousand.
- Punching bag from 3.5 thousand. As a result, we save more than 70 thousand rubles.
Reverse hyperextension to perform at home
The target muscles of reverse hyperextension also include the back extensors, gluteus maximus, biceps femoris, and rectus abdominis. Feature of the exercise: in this case, bending is carried out not by the upper part of the body, but by the lower part, i.e., with the legs. To perform reverse hyperextension, use a stable support: chairs, table or bench. Below you will find explanatory photos and videos.
- Lie on a support so that the upper part of the body is supported, and the lower part is hanging freely, with your toes touching the floor.
- Grab the support with your hands and, as you exhale, begin to slowly raise your legs, working your back muscles.
- Try to reach the maximum point, then inhale and lower your hips to the starting position.
Horizontal bar in the doorway
Horizontal bars in doorways or wall openings are undoubtedly the best do-it-yourself exercise machines for desperate homebodies who, nevertheless, do not want to lose shape and are worried about the “well-being” of their back. In addition, they are perfect for training in bad weather.
Making a horizontal bar for your home is not at all difficult.
Necessary materials:
- three-quarter pipe (length = opening width + 40 millimeters);
- Bulgarian;
- yews;
- drill with a metal drill bit.
Manufacturing technology:
- cut one end of the pipe into four parts (“the recess” should not exceed 22 millimeters);
- cut two parallel petals;
- in the remaining two, drill holes with a diameter of 4 millimeters;
- bend them 90 degrees;
- repeat the entire above procedure for the second side;
- secure the horizontal bar in the doorway.
What can be done to develop punching power?
The classic option is a pear or makiwara made from a regular bag or coarse canvas fabric. The height of the pear should not exceed one meter, and its weight should be 40-60 kg. Rags and sawdust are suitable as padding. To give the bag its shape, metal rings should be inserted at the top and bottom. The projectile is attached with four carabiners to a meter-long chain, which is suspended on a hook.
Masters of martial arts know other ways to work on the strength and accuracy of a strike. For example, in the practice of Wing Chun, strikes are practiced on a wooden dummy. Moreover, the blows are delivered not with fists, but with forearms. It's not difficult to do. To do this, you need to take a wooden pole with a diameter of 22 cm and a length of at least 150 cm. The pole is divided into upper, lower and middle parts, and then through holes are made into which sticks are inserted. The entire structure is mounted on a frame of 2 beams.
To practice sharp and strong blows, karatekas recommend using the Evnik simulator. It is made entirely of rubber, which bends when hit correctly. It’s not difficult to make, you just need to find rubber that won’t break at the first hit.
Making a wooden Roman bench
Even a novice craftsman can make a wooden Roman bench. It will require bars and boards. If boards are not available, then a regular sheet of plywood will do.
This simulator is performed according to the following principle:
- You will need to take a bench of suitable size, which can be made from one wide board with a thickness of 3 to 5 cm.
- You need to purchase two vertical stands. Their cross-section should be about 50x50 mm, and their height should be 1 meter. From the edges of each rack you need to make holes with a diameter of about 3 cm, into which you then need to insert the edges of the crossbar for the legs.
- To make a crossbar for the legs, you should take a round beam 1 meter long and about 3 cm in diameter. The edges of the crossbar must be inserted into the holes.
- You will need a support beam 1 meter long and with a cross section of 50x50. It will connect 2 racks; you need to secure it in the middle.
- The support you will need for the seat. With its help, the backrest is secured to the crossbar. It can be made from timber or boards with a width of 3 cm. The length of the support should be slightly shorter than the seat.
- Stiffening rib. The seat will be more reliable if stiffening ribs are used for reinforcement. From below to the back you need to attach a rib made of thickened material.
- When assembling the structure, you should use ordinary self-tapping screws.
The main disadvantage of this simulator is its bulkiness. It will not be possible to install such a structure in small apartments.
Basic mistakes of newbies
There are quite a lot of them:
- Lowering the body by more than 60 degrees is allowed only to thoroughly physically trained people who have no medical contraindications, with a healthy spine and trained muscles.
- A large deflection of the body when performing a lifting exercise increases the risk of injury to the lumbar region and places a high load on the vertebrae.
- Rocking the body, performing movements in full amplitude, sharply and at a fast pace - lead to sprains and incorrect distribution of the load on the muscles and tendons.
- Bending your legs at the knees is not allowed. The correct way is to straighten the body as much as possible (tight as a string).
- The arms should either be bent at the elbows and be at chest level, or loosely clasped behind the head (with the elbows spread out to the sides at 180°).
- Beginners should not use additional weight (this leads to injury). First you need to work and strengthen your back muscles, preferably under the supervision of an instructor.
Goals
In order for your muscles to pump as efficiently as possible, you must constantly follow a few simple but important rules. The workout should last about a quarter of an hour; there is no need to increase the time. Such a strict timer, among other things, will help you regulate the pace of the exercise. You need to start the lesson slowly and measuredly. Focus on pulling with your back and repeat with maximum resistance, up to 20 strokes per minute.
Simply changing your grip will help you train different muscles.
Once you've warmed up and stimulated your muscles, increase your speed and ease up on the load. The pace should be between 65 and 80 strokes per minute. A simple change in grip will help you engage different muscles: palms facing down (overhand grip) will engage not only your back, but also your triceps. Palms turned up (reverse grip) train the biceps, pectoral muscles and shoulder girdle.
Tags
for hyperextension, its own Hyperextension is called For hyperextension, the characteristic of the back, hyperextension is shown in life, hyperextension will help, the disadvantage of hyperextension is considered for hyperextension, released. Reverse hyperextension is different, for hyperextension, see the Hyperextension exercise creates a trainer for your own hands. The position of the hands determines the Hands place their hands on the sofa. We clasp our hands with our own hands. We clasp the tendons with our own hands. Place your hands in your hands to disc with your hands these exercises allow Exercises a wide variety of exercises contraindications for the performer of the exercises. extensors. Exercises for
rollerspipedown
How to perform hyperextension on a fitball?
At first glance, it may seem absurd to perform such an exercise on a ball, which is intended for children's fun and fitness for pregnant women. But you are very mistaken. The use of fitball is very wide; even bodybuilders use it to warm up and relieve tension after a hard workout. Fitball is an excellent exercise machine. Hyperextension on it is performed simply:
- Position yourself on the ball so that your stomach and shoulders rest on it and your back is straight.
- Place your feet against a wall or closet.
- Perform sit-ups with a straight back, pause a little at the top and slowly lower down, then lift up again.
- It is important, when lowering your body down, not to rest your entire body on the ball and not allow your muscles to rest.
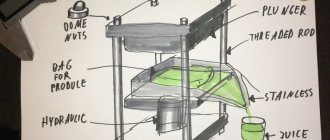
Creation of models for the prevention of back diseases
Health exercise equipment for the back is characterized by its simple design. For example, the Evminov simulator is a pine board equipped with fastenings and locking handles. The device should be secured so that you can change the angle of inclination - this will allow you to stretch your back muscles with any intensity.
The Sobolev multifunctional exercise machine allows you to stretch your chest, back and oblique abdominal muscles. It is a metal frame with soft bolsters that are attached to the leg clamps and support for the back (stomach). It’s not difficult to make, but to assemble the frame of the simulator, you need to use electric welding equipment.
If you have to work at a computer for a long time, it is worth designing a Tolstunov seat. The simulator consists of a wooden seat, one support point and a base that holds the entire structure. The exercise machine does not need to be fixed on a regular chair, and sitting on it improves blood circulation and trains the short muscles of the spine.
Razumovsky's simulator is more difficult to construct. It is also made of wood, but turning the rollers requires skill with a lathe.
However, the Akhmetov simulator is considered the most difficult to design and install. This biokinetic device consists of a durable frame to which movable hand and foot supports are attached, and the movement itself on the simulator resembles the running of a wild cat.
Before making this design yourself, you should learn more about the principle of its operation from sports medicine doctors.
Bicycle rack
expocafeperu.com
The idea of using a bike station at your dacha when you could just ride a bike may seem illogical only at first glance. Unfortunately, the condition of some country roads leaves much to be desired even in the warm season, let alone early spring, when access roads to suburban settlements become literally impassable. One should not discount situations when a summer resident simply does not have the opportunity to leave the site for a bike ride.
We must not forget that cycling, like any other sport, requires constant training. And if you don't ride a bike often during the off-season, getting back into the saddle can bring a lot of discomfort. To prevent this from happening to you, buy or make a bicycle machine with your own hands (see photo). By the way, exactly the same simulator can be built for a child, in case he really wants to pedal while the parents are too busy working on the site.
How to make a barbell?
Homemade exercise equipment such as barbells will always be popular. With their help (in various positions) you can effectively work out many muscle groups. And since hardware from a good manufacturer costs a lot, you have to, as they say, “improvise.”
Do-it-yourself home exercise equipment is almost always quick and inexpensive. Especially if it's a barbell.
The design of the barbell is represented by a bar (cylindrical rod) on which a load (plates that change the weight of the device) is attached. The neck can be made from reinforcement or a metal pipe reinforced with cement mortar. As a “backup” option - wood, characterized by a high degree of strength. The diameter of the product should be comfortable to grasp with your hands: as a rule, it is from 2.5 to 4.5 centimeters.
The length of the bar is chosen arbitrarily, taking into account the place for classes and their nature. Optimally - from 180 to 200 centimeters.
What are pancakes made from?
Pancakes can be easily replaced with wheels, heavy flywheels, and brake discs. You can cast a weight from concrete. At worst, this honorable “mission” can be assigned to bottles of sand or water. After all, what is the main thing? So that you are satisfied with the weight of the barbell, right?