I made a compact rocket stove from a fire extinguisher: a detailed description of production with step-by-step photos and dimensions.
Good day! I want to show you a very useful homemade product for lovers of outdoor recreation. I suggest you take note of the option for making a rocket stove, which I will describe in the article below.
To make this stove, the author used a fire extinguisher; finding it is not difficult, especially if you set a goal. The design that the author came up with is not complicated, but at the same time effective, it is also not large, which means there should be no problems with transportation, even if you do not have a personal car. In general, if the idea interests you, please read the article below, watch the video below it and take note.
What can you make from a fire extinguisher with your own hands?
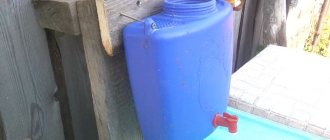
A receiver is a very useful thing when traveling in nature or just to pump up a tire on the road.
It is made from an empty fire extinguisher cylinder; for this you need to purchase a tap with a suitable thread, several adapter fittings, a hose and a nozzle for a car wheel nipple. For assembly you will need several wrenches, a couple of clamps, a screwdriver and 30 minutes of free time. Having reached the nearest tire repair shop, you can fill the cylinder with compressed air up to 6 kilograms of pressure or using a home compressor - if you have one. So the receiver is ready for all occasions.
Compressor - can be built from a car electric pump and a cylinder based on the principle of a receiver, but this invention will be more mobile and easier to use.
Unlike a simple receiver, the compressor can be pumped from the car network, but with slightly less pressure, usually up to 4 kilograms, but it all depends on the electric pump used, some more professional ones maintain pressure up to 6 kilograms.
It can also be argued that a pressure of 6 kilograms for an old fire extinguisher is not dangerous, since most cylinders can withstand pressures above 30.
A device for carbonating water - it can be made from the same fire extinguisher cylinder, filling it with carbon dioxide. To do this, you need to put a tap on it, a reducer, adjust the pressure by 5 kilograms, install a reinforced rubber hose (an 8mm car hose will do) and a nozzle for the nipple.
For a container with soda, you can use a plastic bottle of mineral water, preferably 1 liter in volume. You need to insert a nipple from a tubeless car wheel into a plastic bottle cap.
Having poured water or prepared lemonade into the bottle, close the stopper, connect the hose, open the tap on the bottle, wait 3 minutes and the lemonade or mineral water is ready. Also, if you do a little magic and buy an electric valve, you can make a design with a button control for more convenient use.
Potbelly stove - in the hands of a skilled welder, the cylinder can be converted into a small heater for camping conditions; of course, it will be very difficult to heat a garage with it, but it will be very useful for hunting or fishing.
By cutting off the neck of the cylinder for an adapter for a 50 mm pipe and making two doors for the stove and ash pan, you can easily install a mini potbelly stove in a tent, heating it with small firewood in the form of branches.
Brazier - a small camping grill is made from a fire extinguisher cylinder cut lengthwise, thanks to the thick walls of the cylinder and good metal, such a grill will last for many years.
A gardening sprayer is one of the useful uses of old fire extinguishers. The operation of the device is similar to a receiver, only instead of air, the container is filled with liquid fertilizers and pumped up for spraying with air.
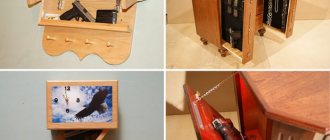
Products made from fire extinguishers are used not only for practical purposes, but also as part of the interior, for example, as a themed bar for alcohol, all kinds of ashtrays, trash cans, hiding places and even chandeliers - there are no limits to fantasies.
With the right approach, an old fire extinguisher will be useful in the house for implementing various ideas, and it will last for more than one year, and the shelf life of the product will depend only on you!
Four options for using homemade products
The foundation is half the battle, or how to choose wallpaper for painting.
The device is ready, and you can use it in four options.
PHOTO: YouTube.com The cylinder is filled with the appropriate liquid through the central tap. Do not fill the container to the top, you still need to pump in air with a compressor, you should leave room for it PHOTO: YouTube.com The first option for using the unit is pressure washing. You can easily wash your walls or car. You can also use a foam nozzle PHOTO: YouTube.com For the second option, you only need to pump air into the balloon. A stream of air will blow any dust and dirt out of any gaps. Also suitable for cleaning tools PHOTO: YouTube.com If you pump oil into such a cylinder, you can easily lubricate the engine or prime the car PHOTO: YouTube.com Finally, this unit will be useful to you for working in the garden as a compressor for pollinating plants. The pressure will be enough to reach the branches on the highest crowns
This homemade product, useful for everyday use, can be made from an old small fire extinguisher. A little fuss with assembling the adapters, but there are so many application options! Agree, all the work is worth it.
In addition, here is another idea from the same fire extinguisher for motorists:
Watch this video on YouTube
Previous #Betterathome#Betterathome Forced vacation: how to make a simple swing for a summer house Next #Betterathome#Betterathome Everything according to Feng Shui: making an unusual tabletop waterfall in one evening
Improvement of the gun with nozzle
For all uses of this device, you will need a compressor gun. You can buy one in any store, its cost varies between 200-500 rubles.
PHOTO: YouTube.com The gun will need a long tube attachment. Its only drawback is the shape of the tip. It's easy to fix
PHOTO: YouTube.com You need to heat the tip and flatten it with pliers, leaving only a narrow gap for the supply of liquid under pressure
Compressor
#betterathome plush blanket without hook or knitting needles: modern materials
Another ideal way to make good use of your old fire extinguisher is to turn it into an air compressor with a receiver. This will be an excellent solution for those who do not intend to use the compressor often, but at the same time it is very necessary for some type of work. Such homemade equipment will help you save a lot of money.
You will need the following tools and parts:
- body from an old fire extinguisher;
- power unit;
- compressor;
- hose;
- tee;
- self-tapping screws;
- drill;
- soldering iron;
- screwdriver.
It is best to choose a large volume fire extinguisher. All you need from the device itself is the housing. Everything else needs to be pulled out and dismantled, and the insides must be thoroughly washed. It is recommended to check the receiver separately so that later it works properly together with the compressor.
Next, install the safety valve and pressure gauge. Then a ball valve is installed to supply compressed air
The main thing is to pay attention to all places where parts are fastened: they must be airtight. Tightness will be ensured by a special fumlente
The last step will be installing the compressor. It must be tightly screwed to the structure and work properly. After checking the equipment, you can consider the device ready for use.
Foam generator
This equipment is useful for washing your car. Cleaning a car at home is a rather complex and time-consuming process. That is why it needs to be made better and simpler in every possible way. A homemade foam generator from an old fire extinguisher will spray foam better.
To work you will need:
- body of an old fire extinguisher;
- hose;
- faucet;
- rubber from the chamber for the seal;
- fumlenta.
All these materials can be easily found at a hardware or hardware store if any are missing. Next, we proceed to the installation process itself. The first step is to weld a small pipe into the body of the old fire extinguisher, from which the foam will come out. To do this, first make a small hole in the upper part of the body.
Next, we attach the faucet and the garden hose itself, through which the foam will flow. You also need to weld another pipe at the bottom for the hose connecting to the compressor. Then we pour water into the housing so that it fills half of the fire extinguisher. Add car shampoo and connect to the compressor. The device is assembled and ready to use!
The process of assembling a compressor with a receiver from a fire extinguisher with your own hands
#betterathome. how to make a chuck for an angle grinder without a lathe
First, you need to choose the right one from a variety of fire extinguishers. We need one with an M 24 thread. This parameter usually corresponds to fire extinguishers with a welded threaded ring, as in the photo on the right.
Having found the right fire extinguisher, the first step is to release the air from it, turning it upside down. It's better to do it outside. Then, making sure that there is no pressure left in the fire extinguisher, turn off the valve and pour out the powder from the fire extinguisher, after which we rinse it thoroughly.
We check that the threads of the fire extinguisher and the adapter match.
We prepare all the parts for assembling our future receiver and, having previously applied sealant, begin assembly.
We screw a ½-inch adapter to M24 into the bottom of the tee. We screw a fitting with a brush to one of the side holes; it is needed to connect the compressor through a hose. We screw an adapter from ½ inch to ¼ inch into the opposite hole of the tee.
Next, we screw in the gearbox with a pressure gauge and a quick-release limit switch for connecting pneumatic tools.
To provide the receiver with an air blower, you will need a small compressor. A car piston is suitable for inflating wheels.
Preference is given to a piston compressor due to its higher performance and the ability to pump pressure up to 10 atmospheres.
We connect the compressor with a hose for pneumatic tools and a fire extinguisher through a fitting with a brush. If the hose does not fit, you will have to unscrew the fitting and use a drill and file to reduce the diameter of the brush. You can also shorten the brush tube a little.
Screw the brush back in, not forgetting to lubricate it with sealant. We put a hose on it and secure it with a nylon tie.
In the instructions for the compressor, we find the value of its power and select a power supply with a voltage rating of 12/220V. A computer power supply, which can be bought at a computer disassembly site, is ideal.
In order for the unit to start working, you need to connect the contacts (photo).
You can connect the compressor to a car battery, which will make it autonomous.
A small brass corner from metal-plastic pipes will help reduce the dimensions of the assembly structure.
Turn on the compressor and pump pressure into the receiver. We check for air leaks with soap foam.
Now you can pump up the air and try connecting the pneumatic tool.
Works!
However, carrying all the elements of the compressor with the receiver and its power supply is still not very convenient.
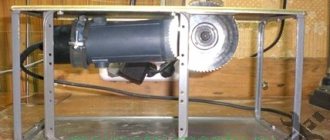
For ease of transportation, we will secure all the elements of the compressor with the receiver on a sheet of plywood.
The receiver fire extinguisher can be secured with a sewer pipe clamp by drilling holes in the plywood and securing the clamp with bolts.
The compressor itself can be screwed to a sheet of plywood with self-tapping screws, directly to its rubber supports, and the power supply is secured with perforated metal tape.
Everything is secured, but the unpleasant vibration of the plywood platform remains. We select shock absorbers from ordinary rubber bottle caps.
For reliability, we solder the connection of the wires of the compressor and the power supply with a soldering iron.
The entire design of the compressor with the receiver turned out to be quite compact and lightweight. All that remains is to make a comfortable handle for it from PP pipes.
To solder PP fittings, use a special soldering iron. If you don’t have it, you can get by with a gas burner.
We cut the pipe to size and connect it as shown in the photo.
The handle turned out to be as comfortable and reliable as possible. We paint it black and screw it to the plywood platform with self-tapping screws.
We check the operation of the resulting compressor using a fire extinguisher. In about a minute and a half, a pressure of 10 atmospheres is built up.
Using the reducer we regulate the outlet pressure we need. You can check the operation, for example, by cleaning your computer keyboard.
A homemade compressor with a receiver made from a fire extinguisher is ready for use. Of course, it won't be as powerful as the factory specs. However, it will easily pull a small load of one or more pneumatic tools.
Homemade flamethrower for burning garbage and thickets (18 photos)
The author assembled a flamethrower for a school competition, where he won first place. Then it was immediately taken to the museum, so the device was never finalized. The flamethrower is capable of creating a continuous stream of flame 3 meters long. It is convenient for them to burn garbage or thickets.
The only drawback of the device can be considered high fuel consumption. But the flamethrower works with almost any liquid fuel, you can even try to fill it with liquid gas, then it will come out in a liquid state, evaporate and burn.
The homemade product turned out to be quite ergonomic, it is as convenient to use as a chainsaw.
Materials and tools for homemade work: - handle (suitable for a bicycle, trimmer, or you can simply bend a metal pipe); - working fire extinguisher; - a metal clamp (large size, or something similar); — a brake lever from a bicycle with a cable (a clutch handle from a motorcycle will do); - a metal tube (you need to cut it exactly the same thread as the fire extinguisher nozzle); — autogenous lighter (refillable); - plug with nipple for the pump; - wires and tubes from the IV; — spring (needed to return the handle to its original position); - metal mesh (needed to strengthen the structure, as well as a beautiful appearance).
The tools you need to prepare are: hacksaw, black paint, drill, welding, wires, fastening tools and pliers.
Let's start making a flamethrower:
Step one. Preparing the handle The author makes the handle from a gasoline trimmer. However, a bicycle handlebar or another tube bent in approximately the same way is also suitable for these purposes. The excess was cut off from the trimmer handle. Next, a larger diameter tube is put on the handle tube, then both of them are drilled and secured with a bolt and nut.
Step two. Disassembling the fire extinguisher The fire extinguisher needs to be disassembled. In the photo you can also see other necessary details. This includes the clamp that will secure the fire extinguisher to the handle, as well as the copper pipe.
Subsequently, the handle is attached with a clamp to the fire extinguisher.
Step three. Handle for controlling the flamethrower To control the flamethrower, you need to screw the clutch or brake handle with a cable to the handle. Next, the cable needs to be connected to the trigger of the fire extinguisher. The cable is attached to the top of the trigger, and the cable jacket acts as a support; it rests against the bottom of the fire extinguisher trigger. As a result, if you press the handle, the fire extinguisher trigger will begin to open.
In order for the handle to return to its original position, you will need to attach a spring to it. How exactly to do this can be seen in the photo.
Step four. The final stage of assembling the flamethrower You need to take a thin metal tube and screw it into the fire extinguisher nozzle. You need to cut a thread on it first.
A hole needs to be drilled on top of the fire extinguisher, then a tube with a nipple is inserted here so that air can be pumped into the fire extinguisher with a pump. The tube is soldered.
To further secure the tube, you need to make a bracket from a strip of metal, which will be tightened with a bolt and nuts. Thus, the tube is fixed to the main tube of the flamethrower.
As a triggering device you will need a lighter with a piezo element. The piezoelectric element from the lighter must be secured to the main pipe, and the lighter itself must also be secured. In the photo you can see how the ignition system works.
That's all, now the flamethrower is almost ready
To make the flamethrower more original, the front part was covered with a metal mesh. It was also painted black.
To start a flamethrower, you need to pour liquid fuel into it, it can be kerosene, gasoline, etc. Next, you need to take a pump and pump air into the fire extinguisher. The flamethrower is ignited with the installed lighter.
For lovers of more powerful technology, below you can watch the video of the operation of the Shmel-M jet flamethrower. Such a flamethrower will be a hundred times more powerful than a homemade fire extinguisher. This flamethrower destroys small buildings like houses of cards.
Source
What is a fire extinguisher
A fire extinguisher or extinguisher is a special device whose task is to extinguish a fire. The extinguishing process is carried out using a special substance located inside the fire extinguisher. It extinguishes the source of fire. The device can be mobile or portable. The first type is used to extinguish large areas of fire, and a portable fire extinguisher is mainly used at the early stage of fire spread.
A fire extinguisher is the primary equipment that is used in case of detection of a fire and allows it. Design and use of a fire extinguisher. The regulation of the number of fire extinguishers and their volume in organizations depends on the type of premises.
Autonomous gas fire extinguishing modules
Gas fire extinguishing is effectively used to eliminate fires in rooms with electronic equipment, antiques or libraries where the use of water-based fire extinguishing agents will cause no less damage to material assets than fire.
Gas autonomous module model XQQCW 201b
There are two fundamentally different designs of gas fire extinguishing modules. The first of them is a simple cylinder into which a fire extinguishing agent is pumped under pressure. The main disadvantages of this design are: guaranteed leakage of fire extinguishing gas and the need for periodic maintenance and replacement/refilling of gas. The second type has a more complex design and, as a result, is more expensive. Inside the cylinder there is a solid chemical and a catalyst. Once triggered, a self-sustaining chemical reaction begins, releasing fire extinguishing gas.
Gas module testing video:
Composition of an autonomous gas module
Regardless of the method of placement or production of the fire extinguishing agent, gas modules consist of the following elements:
In most cases, gas modules are equipped with additional electrical devices for forced activation and can be combined into a common network and activated remotely
Such devices are of little use for use in smart home systems, as they pose a certain danger when used. The gas, displacing oxygen from the room, can lead to asphyxia for the people there. For more effective fire extinguishing, the room should be equipped with practically airtight doors and windows. The use of gas autonomous modules is advisable if the premises contain material assets consisting of easily damaged and flammable materials, and the entrance to the room itself is limited. It is recommended to use specialized gas autonomous self-triggering fire extinguishers in the central control unit of the smart home system. For example, the model PPKOPIU "Tungus"
PPKOPIU "Tungus" and its placement in a communication cabinet
DIY fire extinguisher from a plastic bottle
To make a fire extinguisher at home, you can take different items, but most often plastic bottles are used for this. Below is the simplest version of a fire extinguisher that even a child can handle.
DIY fire extinguisher from a plastic bottle
Tools and materials
To work you need to prepare the following:
- baking soda;
- vinegar;
- syringe;
- scissors;
- dropper;
- plastic bottle (a liter is enough for the first time).
Once everything you need is at hand, you can begin making a homemade fire extinguisher.
Instructions
Step 1: Place all materials on your workbench. If you don’t have scissors at hand, you can replace them with a stationery knife.
What is needed to make a fire extinguisher?
Step 2. Carefully cut off the cylinder with the middle hose from the dropper - they are needed for making the structure.
The cylinder with the middle hose from the dropper is cut off
Step 3. Make a small hole in the bottle cap using an awl. Do not overdo it, because the diameters of the hole and the syringe must match. Then insert the syringe into the hole and remove the holders.
Removing Syringe Holders
Step 4. Using heat-resistant glue, fix the syringe in the stopper, thereby ensuring reliable insulation.
The syringe is fixed in the cap
Step 5. Connect the IV tube and the end of the syringe. The design process at this stage can be considered complete. Now to prepare the mixture, pour vinegar into the bottle.
Vinegar is poured into a bottle
Step 6: Place a few tablespoons of baking soda on a paper towel and wrap it to prevent a premature chemical reaction.
Soda is poured onto a paper napkin
Step 7: Place the baking soda wrapped in a napkin into the bottle and quickly twist. If the bottle becomes hard, then the reaction has begun. As a result of this reaction, carbon dioxide begins to be released, which does not burn and extinguishes the flame.
Soda wrapped in a napkin is placed in a bottle
Aerosol modules
The fire extinguishing composition of the aerosol module is a flammable substance, which during the combustion process releases a large volume of gas saturated with fine solid particles. In fact, aerosol fire extinguishing is a symbiosis of gas and powder methods of extinguishing fire.
How does it work
After ignition, an aerosol is released that fills the entire room. Chain exothermic combustion reactions are interrupted due to the influence of inhibitors contained in the solid particles of the aerosol. The gas gradually displaces the air from the room, giving time for the safe evacuation of residents. A film forms on the hot surface of burning objects, preventing oxygen from entering the combustion area. Despite the fact that the consistency of the aerosol in the room in most cases allows a person to breathe, an effective amount of the fire extinguishing agent is stored in a conditionally closed room for at least 20-30 minutes, preventing re-ignition.
Module design
How to assemble the main unit: materials and technology
So, the main operating principle of all four future homemade products is the use of high pressure. And to control it, you need to modify the cylinder, and this will require additional parts.
PHOTO: YouTube.com The main problem in finding parts is the M22 metric thread with a pitch of one and a half, which is located in the neck of the cylinder. Finding an adapter for such a thread is not easy, but you should look for it in plumbing stores
PHOTO: YouTube.com For such an adapter you need to prepare a suitable crosspiece, an adapter with a tap, an adapter with a tap and fitting, and a pressure gauge to control the pressure in the cylinder
PHOTO: YouTube.com You can see the assembly sequence in the photo: an adapter for a cylinder is attached to the crosspiece, at the opposite end there is a valve for releasing pressure, on the sides there is a pressure gauge through an adapter and a valve with a fitting for connecting a compressor and hose
PHOTO: YouTube.com For a sealed assembly, the author used plumbing thread. In order for it to hold well, the threads of the adapters must have notches, this will prevent it from slipping. If they are not there, notches can be made using attached pliers. You need to wind the thread along the thread and the end - several skeins crosswise. It would be a good idea to apply sealing grease over the thread.
PHOTO: YouTube.com The assembled structure looks like this. Be sure to check it for leaks: fill the container with air, then close it and apply foam to the joints. Such a cylinder can easily withstand pressure up to 8-10 atmospheres, and you won’t need more
Step-by-step description of the manufacturing process
A smokehouse with a smoke generator from a fire extinguisher can be constructed quickly. The step-by-step algorithm of actions looks like this:
- Clean the fire extinguisher thoroughly. Remove any remaining powder and wash the outer and inner surfaces.
- Using a vice, unscrew the fire extinguisher cap.
- Remove the carbon dioxide cylinder and cut the tube into two unequal parts. One should be twice the size of the other.
- Make holes in a long pipe through which the air necessary to maintain combustion will enter the container. Their number depends on the length of the pipe, which will be located directly in the smoke generator body.
- At the bottom of the fire extinguisher, make a hole with a diameter of 18 mm, where the prepared tube is placed.
- A smaller part of the pipe is filed on one side to connect it to the smokehouse, and on the other, a recess is cut, located opposite the hole in the bottom of the lid. This will allow smoke to enter the smoking chamber without obstruction.
- A hole is drilled in the upper part with a grinder into which the nipple is attached. A water tee is screwed onto it.
- Opposite the outlet tube, a hole is prepared for the injection tube.
Do you need a compressor for a smoke generator?
There is no need to separately purchase a compressor for such a smoke generator. You can build a device with your own hands and connect it to the device. A regular cooler or computer fan is used as a supercharger. In addition, it is possible to make a unit that functions without a compressor. Smoking will occur by heating the bottom of the fire extinguisher with a blowtorch or fire. The nuance of this option is considered to be the heating of the smoke entering the smokehouse, which can affect the quality of cold smoking.
DIY compressor
DIY air blower from a cooler
Store-bought compressors are expensive, but they are much more convenient and easier to use. In the absence of a special device, you can build a supercharger from cardboard, tape and a computer cooler. This device has low power, but it is enough for cold smoking. In addition, to get started you will need a regular PowerBank or a mobile phone charger.
The principle of operation of a smoke generator in a fire extinguisher body
This is facilitated by holes made in the pipe. Due to natural draft or a compressor, the generated smoke flows through the chimney into the smoking chamber, where cold smoking occurs.
Air receiver from a fire extinguisher cylinder
Such a container cannot be used for industrial purposes, but in everyday life it is quite possible. Metal vessels that can withstand significant pressure are not a cheap pleasure. You can make a receiver from a fire extinguisher for a household compressor, which is always in demand in the garage and is almost as good as its factory counterparts. A carbon dioxide fire extinguisher cylinder with a capacity of at least ten liters is suitable for this purpose; this is the only way to ensure uniform air pressure at the outlet.
The fact is that carbon dioxide fire extinguishers are equipped with cast cylinders, which allows them to withstand pressures of up to 1000 atmospheres. Before use, you should make sure that the container is truly seamless, the shut-off and release device is equipped with a ¾-inch thread, and the fire extinguisher itself is empty, then disconnect the shut-off device from the cylinder. The inner surface of the container must be carefully inspected for traces of corrosion and, if necessary, cleaned.
- Instead of an inverted seal, it is necessary to screw a plumbing cross into the neck of the cylinder; to seal the threaded connections here and below, you should use FUM sealing tape, and apply an oil- and petrol-resistant sealant on top of it.
- A pressure switch should be connected to the upper outlet of the cross, and a check valve with a fitting for an oil- and petrol-resistant hose should be connected to one of the side outlets.
- An oxygen reducer with a shut-off valve is connected to the remaining output. The reducer allows you to smooth out pressure surges and obtain a dense stream of air.
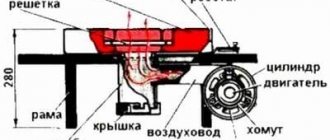
- When the receiver is assembled, a metal frame is welded onto it, into which the electric motor and supercharger are attached.
Poster “Matches are not toys!”
Fire-fighting crafts are aimed at strengthening safe life skills. Very often, parents and children follow the path of least resistance and use matches in crafts.
Inspectors from the Ministry of Emergency Situations and the All-Russian Fire Department categorically do not recommend doing this! Because now the child has glued a match to give “vitality” to the drawing, and then he decides to set fire to the piece of paper in order to stick it, burnt, also for vitality. Therefore, no matter how much you want to save time and effort in this way, it is better not to take risks.
Steam generator
The steam generator is made in almost the same way as previous devices. The list of tools and equipment is also almost the same. You will need to get rid of the old fire extinguisher's internal parts and thoroughly clean the inside of the housing. A liquid squeegee is installed in the neck, which will then be converted into steam.
It is necessary to weld an additional pipe for the hose through which steam will be supplied. For reliability, check the tightness of all connection points and eliminate problems using fume tape. Using a home steam generator you can iron things perfectly.
An old fire extinguisher can be transformed into a useful household appliance. Some equipment is very expensive, but it is easy to do it yourself, giving life to unnecessary and old things. It all depends on your imagination and desire, so you shouldn’t limit yourself to just this list in order to make good and free things that will be useful in the household.
Three-dimensional crafts on the theme of fire safety: photos
Such works can be made from various materials:
- colored cardboard
- plasticine
- cardboard
- unnecessary boxes
- wood, natural materials
- test
- fabrics
There is a wide variety of subjects for creativity. Look at the images below. You can make a small copy of a house, a fire truck, a small model of an apartment, or just a fire extinguisher, etc.
Three-dimensional craft - Firefighters are going to put out a fire in a house Craft on the theme - Matches are not a toy for children Craft for a competition - Fire safety
IMPORTANT
: Thanks to such joint crafts, your kids will successfully learn the material about fire safety.
How to make a first aid kit from a fire extinguisher, step-by-step instructions:
Step 1
We unscrew the hose, and then the entire upper part of the fire extinguisher with the lever, pressure gauge, etc., pour the powder out of the cylinder.
Fire extinguisher first aid kit
Fire extinguisher first aid kit
Step 2
We draw the future medicine cabinet door on the fire extinguisher cylinder. We attach the loops and mark with a marker the holes for attaching these loops.
Fire extinguisher first aid kit
We clamp the cylinder in a vice, wrapping a rag around the places where the jaws of the vice are clamped, so as not to damage the surface of the fire extinguisher, and drill holes for the hinges.
Fire extinguisher first aid kit
Step 3
Using a grinder, we cut out the door in the cylinder; we do it as carefully as possible so as not to end up with an ugly, clumsy medicine cabinet door.
Now all the edges of the cylinder and the door need to be sanded to remove burrs using sandpaper.
Fire extinguisher first aid kit
Step 4
We cut off the siphon tube from the assembly with the locking and starting device lever.
Fire extinguisher first aid kit
We cut out a circle from thick sheet metal along the inner diameter of the fire extinguisher cylinder, it will serve as a shelf, I cut it out using a grinder.
Fire extinguisher first aid kit
Sand the edges of the disc.
Fire extinguisher first aid kit
Step 5
I decided to paint the fire extinguisher again; to do this, I first sanded the cylinder and the door of the future first aid kit.
Fire extinguisher first aid kit
I degreased the surface inside the cylinder with white spirit, and I also did this with the inner surface of the door and shelf.
Fire extinguisher first aid kit
I sealed the outside of the can with masking tape and spray painted the inside with white. I also painted the inside of the door and the round shelf on both sides white.
Fire extinguisher first aid kit
Fire extinguisher first aid kit
Now, on the contrary, I sealed the door opening in the can from the inside with masking tape and painted the outside with red paint from the can. I also painted the door and fire extinguisher holder this color.
Fire extinguisher first aid kit
Fire extinguisher first aid kit
Step 6
I used a lathe to turn a small handle for the medicine cabinet door and thread the inside of it.
Fire extinguisher first aid kit
I used a plotter to cut out the words “First Aid Kit” and a medical cross (+) from self-adhesive paper. They are inverted, that is, the letters themselves and the cross have been removed, and only the background remains, since they will serve as stencils.
Fire extinguisher first aid kit
Fire extinguisher first aid kit
We paint through these stencils with white spray paint. After the paint has hardened, the stencils themselves can be removed.
Step 7
Next you need to screw the handle. And use rivets to attach the hinges to the medicine cabinet and doors.
Fire extinguisher first aid kit
Fire extinguisher first aid kit
We install the shelf in its place.
Fire extinguisher first aid kit
We screw the head of the fire extinguisher with the lever to the place where it stood from the very beginning, and then the hose. The fire extinguisher first aid kit is ready!
Fire extinguisher first aid kit
Fire extinguisher first aid kit
We screw the fire extinguisher holder to the wall, attach the fire extinguisher-first aid kit to it, fill it with cotton wool, iodine, bandage, peroxide and other necessary medications.
Fire extinguisher first aid kit
Fire extinguisher first aid kit
Fire extinguisher first aid kit
Pick up:
Classification
There are manual and automatic fire extinguishers - this is a classification based on the principle of operation. Manual devices are started by a person immediately after detecting a fire. Automatic fire extinguishers do not require human presence to operate. Such devices are installed in rooms with a high level of fire hazard. As soon as the temperature exceeds preset values, the fire extinguishing system is automatically activated.
Types of fire extinguishers
Fire extinguishers are also classified according to their operating principle. There are such designs:
- carbon dioxide;
- air-foam;
- powder;
- aquatic.
In domestic conditions, powder and carbon dioxide fire extinguishers are most often used - they are more practical. Now we will consider each of the listed types of devices separately.
Comparison of different types of fire extinguishers
Carbon dioxide
Carbon dioxide fire extinguishers use carbon dioxide as an extinguishing agent. Such products have a cooling effect; they also do not cause any damage to furniture and do not leave marks.
Carbon dioxide fire extinguishers
Air foam
They are used to extinguish certain types of materials, for example, air-foam fire extinguishers are effective when extinguishing oil or other flammable substances.
Foam fire extinguishers
Powder
A separate type of fire extinguisher, which is primarily used to extinguish live objects or devices.
Powder fire extinguishers
Water
Water fire extinguishers work well on solids and flammable liquids. As a rule, fire trucks are equipped with water-type fire extinguishers. To quickly understand the principle of operation of a fire extinguisher and understand what kind of device is in your hands, you need to familiarize yourself with the pictograms or pictures printed on the body of the device.
Water fire extinguisher
Marking
All necessary information about the fire extinguisher can be found on its body. The text must be written in Russian. The body contains information about the type of fire extinguisher, manufacturer's address and trademark. The owner of a fire extinguisher will be able to read what types of fires can be extinguished by this product, what it is filled with, etc.
Marking of fire extinguisher cylinder
A set of pictograms allows you to find out how to activate the device and what classes of fire cannot be extinguished with its help. The body must also indicate the total weight of the fire extinguisher and the weight of the substance with which it is filled.
Classification by trigger method
How to make a stove from a fire extinguisher
What can be made from a fire extinguisher while spending minimal money on consumables? The remaining old cylinders can be used to make a potbelly stove. This fairly simple device is ideal for heating an unheated garage, tent, and other similar cases.
Before manufacturing, it is necessary to unscrew the seal, and then cut off the tapering neck with a grinder or acetylene cutter so that only an even cylinder remains. A plate corresponding to the diameter of the cylinder is cut out of a sheet of metal and welded to the place where the cone is cut. The result is a flat heating surface used to heat food.
https://www.youtube.com/watch?v=tlLBoUsl1Jc
A rectangular hole for the door is cut just below the middle of the cylinder and a slightly smaller hole for the blower is cut near the very bottom. You can use cut out pieces of the cylinder as doors; you just need to weld the canopies and handles. Supports are welded to the bottom of the cylinder, and a round hole is cut out for the chimney on the side opposite the doors. You can make a chimney adapter yourself or purchase a ready-made one and weld it around the hole.
The chimney is purchased in the form of separate segments made of sheet steel, so if the stove is planned to be moved, it can always be assembled in a new location. If the stove is installed permanently, then it is advisable to install a corrugated pipe.
From decommissioned fire extinguishers, you can make a lot of other useful household items, since the steel used for casting cylinders has high-quality strength characteristics.
Applications
One of the most common trends in fire themes is applications. A simple craft in the shape of a fire truck is made from colored paper. The photo shows a cutting diagram. The outline of the parts is drawn on paper and cut out. On a thick sheet of paper on which the desired color background is created, the largest parts are first glued, and then the small ones are attached to them.
It is more difficult to make a composition. The photo shows a firefighter fighting a fire. His figurine can be cut out from a magazine or printed on a color printer, assembled from a certain number of parts cut out of colored paper. Lines and very small details are drawn with a felt-tip pen.
Recommendations for cooking smoked meats
Depending on the duration of cold smoking and the selected ingredients, the taste of the finished dishes will differ. It will take a lot of time before you can find the perfect one out of 100 recipes, so you should not be afraid, but experiment. To improve taste and aroma, use these tips:
- Carry out cold smoking in dry weather.
- Observe the cooking time. An undercooked product can not only be tasteless, but also dangerous to health.
- Choose the right wood chips and sawdust. Conifers are not suitable for cold smoking. But cherries or grapes, fruit trees will add exquisite taste and aroma to meat and fish.
Manufacturing instructions
Now let's move on to consider the direct process of creating a sandblasting machine from a fire extinguisher. It is carried out as follows:
- Preparing the camera. To prepare the chamber for further work, release the gas or pour out the powder from the fire extinguisher. If the cylinder was under pressure, then all contents will need to be removed from it.
- You will need to make holes in the container of the cylinder. In the upper part, the holes will serve to fill abrasives. They should be the same size as the diameter of the selected tube. And from below, holes are made for subsequent fastening of the crane by welding.
- Now a tap is welded into the cylinder, which will be responsible for regulating the supply of abrasive materials. In this case, you can use an alternative option - mount an adapter into which the regulator will be screwed.
- After the tap, you should install a tee, as well as a mixing unit. To secure them well, you will need to use fum tape.
- At the last stage, a tap should be installed on the balloon valve, and after it a tee should be mounted.
Now you need to complete the assembly of the main structure by welding handles for transporting equipment or installing wheels.
After this, connections, supply and removal paths for the finished mixture are created:
- fittings are installed on the balloon valve and the tee located below;
- a hose, which has a diameter of 1.4 centimeters and is intended for air supply, is placed between the valve tee and the corresponding mixing unit, which is located at the bottom of the container;
- a compressor will need to be connected to the supply of the valve tee equipped with a fitting that remains free;
- the remaining outlet of the tee is connected from below to the hose through which the abrasive will be supplied.
At this point, the formation of the sandblast can be considered complete.
Now you will also need to create a gun and a nozzle. The first element can be easily created using a ball valve attachment, which is mounted at the end of the air-abrasive composition supply hose. This outlet-type device is, in fact, a clamping nut, with which the nozzle is fixed to output the mixture.
But the nozzle can be made metal by turning it on a lathe. A more convenient solution would be to create this element from a car spark plug. To do this, you will need to cut the mentioned element using a grinder in such a way that you can separate the durable pillar made of ceramic from the metal parts of the structure and give it the required length.
It should be said that the process of separating the required part of the candle is very dusty and is accompanied by an unpleasant odor. So it should not be carried out without the use of personal protective equipment.
Now you should check the device. To do this, you need to unscrew the plug in the crosspiece and pour sand into the sandblasting body. It would be better to use a watering can so as not to spill it. It must first be well sifted and finely divided.
We activate the compressor, find the appropriate pressure, and also adjust the amount of sand that comes in using the tap at the bottom of the device. If everything is in order, then the resulting design will work correctly.
In general, it should be noted that homemade sandblasts made from a fire extinguisher show greater efficiency than industrial designs that can be found on sale. Therefore, it would be better to spend your own time creating a homemade analogue. Moreover, this does not require any large financial investments or resources.
How to make a sandblast from a fire extinguisher with your own hands, see the video below.
Tags
how to make crafts Make an inscription Make 2 cars make it white Make a helmet You can make it and Make it and forget to make ears. Crafts with your own Crafts for Crafts for Crafts from Crafts from Crafts from Crafts from Crafts from Crafts from New Year's crafts with your own hands with your own hands with your own hands with your own hands Make sleeves out of a fireman's hand. with your own hands with your own hands with your own hands
need soda toys instructions vinegar necessary idea and follows reaction solution traces read topic syringe cereals table of contents
Steam generator from fire extinguisher
Making a steam generator from a fire extinguisher with your own hands is also not difficult, since the main component - a reliable container - is already available. It is used to produce steam necessary for cleaning parts.
It is necessary to get rid of the seal, clean the internal surface of corrosion, and then screw the squeegee into the neck. Liquid will be poured through it and steam will come out from here. To seal threaded connections, high temperature-resistant paronite gaskets and FUM tape are used.
To supply steam, a special hose is used, onto the end of which it is necessary to attach a constricting nozzle, which will increase the outlet flow rate and its pressure.
Crafts on the theme of fire safety from salt dough: photo
What child doesn’t love making all sorts of dough figures? Any child will love this activity. But before you start working, you will need to prepare the dough itself and the necessary tools.
Dough recipe
:
Components
:
- Fine salt - 220 g
- Flour - 220 g
- Sunflower oil – 130 ml
- Water - 1-2 tbsp.
- Colored gouache, or vegetable juice for coloring dough
Preparation
:
- In a separate bowl, mix salt, flour
- Then add oil, water, gouache or juice there
- Knead the dough until the color is even.
To make a craft from salt dough, prepare tools and auxiliary materials, without which you will not be able to make figures. You will need boards, a knife, brushes, paints, rags, water, etc.
DIY salt dough crafts. Firemen
IMPORTANT
: After you make crafts on a given theme, you will need to dry them. There are several ways to dry products. If there is nowhere to rush, then you can simply place the products in the room, but not on a hot radiator. Otherwise, the craft will crack. If the figures are needed by tomorrow, you should use the oven. It is enough to put the product in a cold oven and then dry it at a low temperature.