When empty glass bottles have accumulated, you should not immediately take them to a glass container collection point, or even throw them away.
You can make a real work of art and a useful thing .
For example, it’s easy to use bottles to create a beautiful glass, chandelier or flower vase.
Summer residents and owners of private houses can use them to build fences and flower beds.
There are so many options for where you can put your empty glass bottles. Most of them are quite simple and do not require much effort or special skills .
In this article we will talk about what you can make from glass bottles with your own hands.
Vase and flower pot
A wine and champagne bottle can be turned into an excellent flower vase.
How to make it? Let's proceed as follows:
- Cover with acrylic or regular white paint in several layers.
- If desired, glue some beautiful thin fabric or lace to the glass container.
That's all, nothing complicated. The beautiful vase is ready.
You can also create something like a flower pot .
For this:
- Using a glass cutter, we divide our glass containers in two.
- We seal the upper part with a cork, turn it over and insert it into the lower part of the bottle.
- We pour the soil onto the mesh and we can plant our plant.
Animal drinking bowl
We made a special automatic drinking bowl for rabbits from a wine bottle. You can do this too. In the cork, just make a hole with a drill and insert a tube made of soft food-grade plastic with a nipple at the end. Build a mount from the wire so that you can hang it on the cage. A very convenient device. Pets can always get drunk, especially on a hot day.
Researchers note that due to the pandemic, UFO activity has decreased
Franziska the robot helps with cleaning and chats with patients at a Munich clinic
Fuel will be made from methane and water, competing with electricity
Chandelier and lamp
It’s easy to create an “antique” handmade chandelier from glass wine bottles. Here you will have to tinker a bit.
We can’t do without a cutter, a glass cutter, a lamp with a long wire and several light bulbs:
- We take three bottles and dry them.
- We put on protective gloves and a mask, fix our container in the cutter and begin to operate the glass cutter. During cutting, be sure to rotate the glass container so that the cut is as straight as possible.
- Alternately pour cold and hot water onto the container. This will help to detach the bottom part.
- Place the top part on the sandpaper and scroll for a couple of minutes to even out the edges.
- We begin to tinker with the lamp - we unscrew it with a screwdriver in order to “get” the wires with individual light bulbs.
- Then we insert the wires into the neck and assemble the lamp.
The chandelier is almost ready. To make it even more unusual, you can wind it with wire .
It’s easy to make lampshades from a beer bottle.
Just like with a chandelier, you need to cut off the bottom and then screw the neck into the lamp socket.
To make the lampshades look stylish, they can be painted with acrylic .
Candlestick
A candlestick is romance and comfort.
Making it from glass containers
is not difficult :
- We cut the container evenly.
- Take a piece of paraffin and melt it in a water bath.
- We put a piece of wick in the neck, fix it there with dry paraffin, and then fill it with melted paraffin.
- We leave it untouched for a couple of hours until it dries, then we attach it to the wall, and we can light candles and immerse ourselves in the romance of a bottle.
Candles
Champagne and wine bottles make excellent scented candles:
- Pour several bags of decorative balls into the container.
- We pour fuel for the burner into it. It should be liquid and alcohol based.
- Pour in a little essential oil (maximum 10-15 drops).
- We attach something to the neck to fix the wick. A regular ring of the right size will do just fine for this.
Now all that remains is to insert the candle, light the wick and enjoy the view and aroma.
For the garden plot
Crafts made from glass bottles very often decorate garden areas. Many people want to decorate their plot beautifully, but at the same time it is also practical, inexpensive and uncomplicated. Glass container is just the right material for this.
Multi-level flower beds
Creating flower beds in several levels requires a lot of time and material, but the end result is worth it. After preparing a large amount of glass containers, you can begin work.
Master Class:
- Using a hoe, dig a trench 15 cm deep around the flower bed.
- Insert bottles turned upside down into the trench.
- Pour sand or earth into the voids and compact. Half the height of each bottle should be above the ground.
- Pour another layer of soil onto the flower bed and thus protect it with bottles. The diameter of each subsequent level should be smaller than the previous one. You can make an unlimited number of levels, and the lowest level should be quite large.
Path in the garden
Crafts made from bottles can be quite large in size. For example, you can create entire garden paths from glass containers. They do not harm garden flora and are safe for health. Paths made from glass containers of different colors look especially funny. You need to come up with and draw the desired ornament on paper in advance and collect containers of the desired colors.
It is important to note that, for example, the diameter of a champagne bottle is 8.5 cm. Considering 1-2 centimeter gaps per 1 sq.
m of path you will need approximately 100 units of glass containers. A half-liter beer bottle has a diameter of about 7 cm. Therefore, 150 pieces are needed for the same area.
Master Class:
- Mark the perimeter of the path using pegs and stretched twine. If you plan to have a winding path, you can lay out the rubber hose. Suitable track width is 50-70 cm.
- Dig a ditch along the marked perimeter. Its depth should be approximately the same as the height of the bottle.
- Pour some fine gravel onto the bottom of the trench, carefully compacting and leveling it.
- Fill up to 2/3 of the trench with a layer of sand or soil.
- Fill glass containers with sand or fine gravel. This will give them more strength.
- Insert the bottles, neck down, into the soil, tapping them lightly with a rubber mallet. The containers can be placed close to each other or leave centimeter gaps between them. Using a flat board, you need to trim the bottles on top so that they are in the same plane.
- Water the soil in the gaps. Then fill it with dry sand. Water again and add sand to the top. The upper gaps between the containers can also be filled with decorative pebbles or gravel, or they can even be covered with cement mortar. The bottles should protrude several centimeters above the horizon.
Christmas tree and toys
Using a champagne bottle, you can make a New Year tree that will decorate the interior of your apartment during the holidays.
To do this you will need:
- champagne bottle;
- green satin ribbon 2.5 cm wide, 9-10 m long;
- green satin ribbon 5 cm wide, 1 m long;
- red satin ribbon 5 cm and 1.5 cm wide;
- silver brocade linen 2.5 cm wide for decoration;
- scissors;
- 1 sheet of plain white A4 paper;
- scotch;
- candle;
- matches;
- heat gun.
Next we proceed in the following order :
- Wrap the bottle in paper. The height along the width of the sheet will be approximately up to the beginning of the narrowing of the bottle. Secure with tape.
- Make cuts on top until the bottle expands, lay them carefully, securing them together with tape.
- Cover the wide part of the bottle with five-centimeter tape (we also glue it to the paper base with hot glue), and then glue it in several rows until the narrow part of the bottle begins.
- We cut sections from a thin green ribbon: the first is about 18 cm, and the next ones with a slight increase, as necessary. First glue them to the paper into the bottles. We let the ends of the tape overlap at an angle.
- Now let's start creating Christmas tree branches. To do this, we cut 10 cm sections, there are a lot of them and the quantity depends on the size of the bottle (about 7 rows of 10 pieces each). To prevent the ribbon from fraying, the edges can be sealed on a candle.
- Glue the first row of branches, retreating 2 cm from the edge of the bottle. Attach the second and all subsequent rows in a checkerboard pattern, retreating up 2 cm each time.
- Cover the area where the top row is glued with a silver brocade ribbon and decorate.
If there are a lot of bottles collected for the New Year, you can use another way to make a New Year tree:
- We place the first glass container round tier on the floor.
- We place a thick round cardboard or thin plastic tray on the bottles. The diameter of such a stand should be slightly smaller than the diameter of the bottle tier.
- We put the second tier. And so on.
You see, it’s nothing complicated, but the Christmas tree looks grandiose.
to create interesting, funny figures from small glass bottles .
A light bulb or plasticine can serve as the “head” for such a figure. We attach it with superglue, and then paint or draw a face with a pencil or acrylic.
An airplane is another toy that can be easily made from glass containers.
But it is still better to use plastic for this, so that there is no danger that the child will get hurt.
Master class on making
A playground with sand for kids will look like an exotic island if an evergreen palm tree appears on it. A detailed master class with a description will help you create a southern tree.
The following tools and recyclable materials will be required: green and brown bottles, twine fittings, cement, drill, sharp scissors or a stationery knife, a solid base, stiff wire, wire cutters.
- Make a hole in the support element and insert the reinforcement.
- For the trunk, it is necessary to cut the bottles of the required shade so that teeth are formed.
- Drill the bottoms and string until the required height is reached.
- For leaves: cut the sides according to the herringbone principle, secure them to a rolled metal thread, and mount them on the top.
- Fill the prepared hole with a fixing solution, place the tree, and temporarily fix it with twine.
For greater safety of the structure body, the sawn parts can be filled with sand.
Decor
With the help of an ordinary glass bottle you can transform the interior of your home beyond recognition .
Containers of a non-standard shape, standing several in a row or assembled together, will decorate a dining or coffee table.
Bottles of different colors, displayed in a row on the kitchen windowsill, will add an unusual note to the ordinary design of the environment.
All this in itself complements the apartment interior. However, there is a great variety of DIY bottle decoration.
You can pour salt colored with crayons inside. It looks unusual and elegant.
Another way to decorate an empty bottle is to cover it with twine or burlap . If desired, you can also use beads and other decorative elements.
You can decorate a glass bottle using decoupage and acrylic paints. Here a limitless field opens up for the flight of your imagination.
In this way you can create beautiful vases, dishes for bulk products and candlesticks.
Feeders
If you are a real gardener and summer resident, there is definitely a feeder in your yard, and more than one. It can become a real decoration of the garden. Unusual and bright - you, your neighbors, and the birds will like it.
Terrarium
Almost any glass bottles are great for creating various original flower beds, including a home terrarium.
It can be made hanging. Then it will seem as if the bottle is part of a flower that grows with him.
Making a terrarium is not difficult. You just need to cut a little glass along the bottle, add soil and plant a plant in it.
Recommended by moms - the best books
If children are afraid of the dark, make a funny night light for them and with them.
Idea source: Fab
Or these “fireflies”.
You can also make bright and funny rattles from plastic for little ones.
Idea source: Pink Pistachio
And here are these “foam blowers” for older children - in the summer, outdoors they will be a big hit with kids.
Idea source: Spoonful
It turns out that you can make not only toys from plastic bottles, but even an entire game! For example, how do you like this bowling alley?
Idea source: Cool Craft Sites
And you can create jewelry for girls:
Idea source: Spoonful
And, of course, you can very simply make a traditional piggy bank! True, it will be difficult to break it.
Glass bottle house
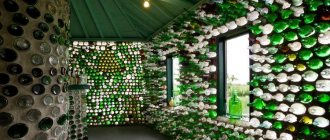
Another use for empty glass containers, which at first glance seems impossible, is the construction of bottles, including an entire house. After all, if you think about it, such a structure is not only environmentally friendly, but also cheap.
In addition, glass is a durable and strong material , and thanks to the cavities in the bottles, the house will have a favorable temperature regime.
Of course, such construction is possible if you have a very large number of bottles and time to build the walls yourself.
The bottles are laid out horizontally, similar to laying bricks. Considering that the bottles have a smooth surface, to increase the strength of their adhesion to the cement mortar, it is recommended to lay a polymer mesh every 2-3 rows.
The walls of the bottles should not touch each other. As the height of the wall increases, the thickness of the mortar is gradually reduced .
It is important to note that it is better to make the foundation in the traditional way - from concrete or brick, and starting from the first floor, use bottles. You can also try the tire foundation , which we talked about here.
A house made of such material will not collect dirt and dust on the walls, and inside it, thanks to the transparency of the walls, will be incredibly beautiful.
Fences and flower beds
A flowerbed made from glass containers looks very original. But you'll have to sweat a little.
We warn you - you need a lot of glass containers:
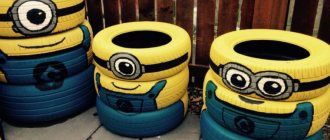
- The basis of our flower bed will be car tires. The lower part of this base is filled with cement mortar.
- Place the first row with the necks towards the center. We do the same with the rest of the rows, but gradually we shift the bottles so that they are laid diagonally vertically. All voids must be filled with cement.
- We fix the necks of the very last row from above with the same cement.
Now we add soil and create our unusual flower bed.
From glass containers it is easy to create a fence that separates the garden from narrow paths or one plant from another:
- We dig a ditch.
- We place the bottles next to each other.
- We compact the soil around them.
bottle fence
A fence made of glass containers - what could be more unusual?
We create this wonder like this:
- We dig longer wooden poles into the ground.
- We make holes in the bottle bottoms. They should be 1 cm wider than the pole.
- We put the bottles on the poles and secure them with a strap on top.
For the fence, it is better to use containers with different colors and shapes - this way everything will look even better and more interesting, as in the photo:
For apartment
Charming cups edged with braid and fabric, painted in the manner of funny monsters, animals and birds, will help organize your baby's pencils and other stationery.
Having cut the workpiece as shown in the photo, use the decoupage technique, and the result will be nice boxes for all sorts of things.
In everyday life, different container formats are often required. You can combine business with pleasure - assemble a laundry basket with your own hands. For this, there are two methods of weaving - from short strips and from spiral ones. The second option is preferable for large-sized products.
To get short rectangles, cut off the bottom and neck of the bottle with scissors, a paper knife or a special device. Cut the resulting cylinder along the seam, outline the outlines of future materials. Place the tapes as shown in the diagram.
This technique is applicable for a durable forest basket, a box for fruits and vegetables, and a sleeping place for a pet. To find out how to create a similar practical device, you should read the entry.
Lubok weaving, with the connection of long pieces using fishing line, is suitable for creating vases for sweets, all sorts of little things in the bathroom, and the like.
It also seems feasible to make nice organizers from solid PET walls. To do this, you will need additional tools - a hole punch or a special punch for belts, yarn, a needle or hook, a zipper, decorative elements - as desired.
It is necessary to determine the required size of the finished product and prepare suitable plates. All that remains is to assemble the intended design. As a result, you will get a basket to collect small children's toys, a handbag for a little fashionista to carry her favorite doll or a change of shoes, a storage box for medicines, cosmetics, bath accessories, hygiene products, and everything that requires systematization of storage.
Non-standard chandeliers and lamps will help transform the appearance of your home. To shape petals, flowers and geometric shapes, you will need a torch.
Charming and weightless floral arrangements, subjected to heat treatment, will not leave a hint of their origin, and will be good even as a present.
Creative young ladies came up with the idea of how to make jewelry from scrap materials. Earrings and rings of fancy shapes and various colors will suit delicate looks and satisfy fashion needs. Necklaces and headbands made in this style will not go unnoticed.
Hanging pots located at different window heights will receive the right amount of light without taking up an impressive area on the windowsill.
Furniture
Bottles are quite suitable for creating shelves . We make holes in the boards and connect them with bottles.
You can hang coats and hats on glass containers .
It will look great as a hanger:
- Take a container with a neck as long as possible.
- We cut at the desired angle.
- Glue the neck to the base nailed to the wall.
To make a table from glass containers, we drill holes in the board that will serve as a tabletop for necks of the required diameter. We insert our bottles into them.
Glass containers even make a good chaise lounge.
We glue the beer bottles to the metal frame with industrial glue and we can relax.
Winter New Year decoupage
Decoupage is the creation of a beautiful composition from glued paper with interesting images on the surface.
We will “decoupe” the bottles in the New Year’s style like this:
- Take a special napkin with your favorite image on the theme of the New Year holidays. We cut out the picture and glue it to the glass container with PVA. For bottles you need to use a three-layer napkin.
- Apply droplets of glue to the top of the glass container with a pistol.
- Take a sheet of paper and wrap it around where the napkin is glued. Secure the sheet with tape. We do this so that our New Year's plot does not get splashed with paint.
- Spray some spray paint on the top.
- Remove the sheet of paper.
All is ready.
How to cut a bottle at home?
You can trim the bottle yourself, cut off the neck or bottom in several ways:
- Use a special glass cutter or machine designed specifically for working with glass bottles.
- Use heating with boiling water or flame.
- Use a burning thread or nichrome wire.
To cut the bottle crosswise, you can use the most ordinary thread . Just soak it in alcohol.
You need to do everything like this:
- Wrap the cut area with a thick layer of thread.
- We put on gloves and safety glasses. We wet the resulting winding in alcohol and ignite.
- Let it burn for a minute, and at the same time twist the bottle 2-3 times around its axis. At the same time, hold the glass container horizontally.
- Simmer and place in cold water.
All. Due to the sudden change in temperature, one part of the bottle separated from the other. the cut with sandpaper .
Cutting a bottle lengthwise is a little more difficult, and it is advisable to use a special glass cutter for this purpose.
It may not work out right away. You need to be patient and the work will go like clockwork.
If you need to make a hole in a bottle, a drill and a diamond glass drill bit will help you. You can purchase it in specialized departments of stores. When drilling, be careful so that the smallest fragments do not injure you.
Safety precautions when working
When working with glass products, all safety requirements must be observed. In the room where glass products are cut, glass dust arises, which settles not only on objects, but also on the surface of the skin, gets into the eyes and respiratory tract. This can have a detrimental effect on health, as glass dust causes irritation, redness, and itching. To avoid health problems, when working with glass, use:
- protective glasses;
- fabric or thick rubber gloves;
- clothing that should fit snugly to the body.
After working with glass is finished, you need to wash your hands and face well under running water, and your clothes should be cleaned and washed. If you have to do cutting using fire or special equipment and tools, you must also follow safety rules. In the process of work, you can get burned, injured, or receive an electric shock. Measures must be taken to prevent burns and injuries.
Unusual stylish products for placement indoors, on the territory of a country house or on a summer cottage are easy to make
It is important to learn how to work with glass correctly, more precisely, to cut it and process the edges. Decorating is much easier, you just need to use your imagination, and the materials at hand can be found in any home
Products made with your own hands will become a wonderful decoration and will delight the owners; children will enjoy especially interesting things.


