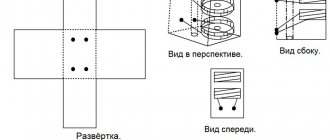
Exploitation
Tips for operating the lathe:
After installing the cutters, you need to check the reliability of their fastening. When processing metal workpieces, it is important to use a protective plastic shield. It will protect your eyes from metal shavings. It is necessary to regularly tighten the fasteners and lubricate the moving parts of the equipment. It is important to regularly check the tension of the belts in the gearbox. When lubricating moving parts, do not get oil on the belts.
This can lead to poor friction and poor tension.
A lathe is an important type of equipment used for processing and manufacturing metal parts. In order not to spend money on a factory machine, you can assemble it yourself. Homemade equipment will not cope with large volumes of work, but is suitable for carrying out household work with metal workpieces.
Lathe from a drill: assembly algorithm
To use the device in a city apartment, it is quite possible to create a homemade metal lathe from an ordinary drill in a few hours. It will serve both as an engine and a rotating mechanism. The design is not so powerful, but it is quite suitable for performing small tasks.
It is advisable to attach the drill to a metal structure - an old stand is ideal.
The manufacturing algorithm is as follows:
First, as always, the frame is made. Moreover, if you have a reliable workbench with a smooth surface, then it can serve as a support, and then the bed will not be needed. Then the wooden bases of the structure are created or a ready-made metal stand is selected
It is important to securely fasten the drill head to the base. This can be done using a regular clamp.
The emphasis on the other side can be made using bars of the appropriate size. They are fixed to the surface with self-tapping screws. All other assembly stages do not differ fundamentally from conventional devices.
Video: do-it-yourself lathe from a drill
The installation can also handle wooden products - with its help you can apply simple relief carvings to a wooden workpiece, as shown in the video.
Mini-machine: manufacturing video
Often, for household purposes, you need a small homemade metal lathe - here is a video with clear step-by-step instructions for making it.
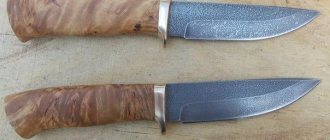
Unusual products made from wood
Wood is a unique material, and anything can be made from it. Those who believe that wood is needed only for construction or furniture production are greatly mistaken. Sometimes things made from wood are simply amazing. A table lamp, a case for a camera or laptop, a joystick for a game console or, for example, a coffee machine.
All these things look very elegant and give their entire surroundings a unique charm. And how stylish a wooden bathtub looks, and how pleasant it is to take it. But the fantasies of craftsmen are unlimited. What is the cost of a wooden bicycle or a car (!), the body of which is also made of wood. This model will look worthy among the most expensive cars in the world.
But these are all works of experienced masters who have devoted many years to this art. We will look at several products that anyone who has decided to seriously work with wood can do.
DIY wooden spoons
In Rus', wooden spoons have been made for centuries. And today, making wooden spoons is not only a useful activity. In addition to a beautiful decorative item, the master also receives great satisfaction from the process itself.
Choosing a tree, making a blank, turning it on a lathe, decorating it and as a result getting an exclusive item is a fascinating experience, especially for beginners.
Next you need to do the following:
- draw a picture of the future spoon, then transfer it to a wooden blank;
- using a lathe to perform rough turning;
- polish the workpiece;
- using flat chisels and a grinding wheel, shape the workpiece;
- using semicircular chisels, cut out the inner cup-shaped part;
- cut off all excess;
- sand with sandpaper;
- make a drawing on the handle of the spoon;
- use a special knife to carve the handle;
- soak with wax or any varnish, but if the spoon is intended to be used for food, then with hot linseed oil.
Making spoons with your own hands allows you to acquire skills in working with a machine and other tools, as well as feel how wood behaves.
Sharpening a wooden ring
Wooden rings can be used for various purposes, both as part of furniture decor, round mirrors or cornices, and as an independent decoration.
To turn a wooden ring, you will need a special chisel, which has two cutting edges, one straight and the second (side) semicircular. Turning should start from the end of the workpiece:
- fix the workpiece in the machine and grind along the entire length, leaving an allowance of 2-3 mm;
- point the chisel inside the cylinder with the side edge facing you, the depth of insertion of the cutter should slightly overlap the cross-sectional diameter of the ring itself;
- deepen into the workpiece and sharpen until a semicircular profile is formed inside the cylinder;
- Bring the chisel to the outside of the workpiece and, using gentle pressure from yourself, cut out the outer profile of the ring.
What does a lathe consist of: main components
For the most part, industrial and household lathes are similar. The difference lies in functionality, power and weight. The figure below shows the structure of a typical screw-cutting lathe. The main nodes are:
- bed;
- caliper;
- headstock (placement of the gearbox to adjust the rotation speed and change the amount of torque);
- tailstock (for more stable and reliable support of the workpiece or part clamped in the chuck (spindle), as well as for installing drills, taps and other tools);
- tool holder
The device of a screw-cutting lathe
bed
One of the main elements is the frame - a massive metal base on which all the main components and parts of the equipment are mounted. It must be strong enough, and the mass must be such as to prevent the machine from tipping over during operation. For the floor version, massive supports (pedestals) are added.
Lathe bed
Lathe support
The lathe support is designed to move along, across and at an angle to the spindle axis of the cutters fixed in the tool holder. The device has a cross design, consisting of three main elements: a carriage, a transverse and a cutting slide.
Metal lathe support for home
Making your own lathe headstock
The headstock is one of the most difficult components of a lathe, especially for DIY production. It houses a gearbox with a spindle and a control unit. Under the headstock casing there is an electric motor, which is connected by a belt drive to the gear pulley.
Homemade headstock assembly with chuck
This unit contains a block consisting of replaceable gears designed to transmit and change the spindle rotation speed and torque from the feedbox shaft. You can buy a lathe headstock or make one yourself.
Guitar lathe
Lathe tailstock
The tailstock of a metal lathe is movable and is designed to press the workpiece to the center of the spindle. One of the elements of this unit is a quill, on which a stationary or rotating center is installed, the tip of which rests on the workpiece. The workpiece is installed in a chuck on the spindle and supported by the tailstock. This ensures reliable fastening of the part for high-quality processing.
Metal lathe tailstock
Drills, taps, countersinks, etc. can be installed in the tailstock. When installing and moving on the skids of the frame, it is necessary to avoid sharp and strong impacts on the body of the unit in order to prevent displacement of the centers.
Tailstock detailing
Making your own tool holder for a lathe
The tool holder is designed to attach a metal processing tool to the support of a lathe and moves both in the longitudinal and parallel directions relative to the workpiece. There are two types of tool holders: two- and four-position. In the first case, you can simultaneously install two cutters using screws, and in the second - four, which allows you to quickly change cutters if necessary without stopping the lathe. A special handle is provided for quickly changing cutters.
Tool holder for metal lathe
Wood turning: the subtleties of turning products yourself on a machine - Machine
18.12.2019
In the old days, only craftsmen could make beautiful things from wood using hand tools, but when the modern lathe was invented and adapted for carpentry, the situation changed. Now any person who has learned the basics of working on a machine is able to create almost works of art using wood turning.
In recent years, woodworking has become not only the production of any wooden products at enterprises, but also a hobby for many thousands of people who like to turn wood crafts on their personal woodworking lathe.
If you make any part from wood with a hand tool, then such an activity will take a lot of time, but the same craft on a machine can be done much faster, and even better.
Only a master of his craft can make beautiful things from wood by hand, but anyone can master the basics of such a craft as wood turning, and he will produce very beautiful crafts.
Let's try to tell you a little about this craft.
Design and principle of operation of a wood lathe
The main difference between a wood lathe and its counterpart, which processes metal workpieces, is that instead of a mechanical device for bringing the cutter to the workpiece, it has a tool rest - a device for holding chisels.
A lathe for woodworking is simple. The headstock and tailstock are located on the device frame.
There is a spindle in the headstock; various devices are inserted into it, with the help of which the left end of the wooden workpiece is attached. The tailstock serves to support the right end of a long workpiece.
A tool rest is installed between the left and right headstock, which serves to support the tool with which the workpiece will be processed.
The spindle is driven by an electric motor. The rotation speed can be adjusted. By the way, some turning work can be performed on milling machines, but this should be discussed in a separate article.
The workpiece is secured in a chuck mounted on a spindle. Then she presses up with the tailstock. If the tailstock support device is stationary, then it is lubricated with machine oil before installing the workpiece.
Before you begin to install the workpiece, you need to accurately calculate and mark the center in it. The easiest way to find it is to use a corner finder.
If the workpiece is not fixed in the center, then when the spindle rotates, this will cause it to “beat”, and it will not be possible to turn the part well.
Material selection and preparation
Wood is a malleable material for making a wide variety of crafts. However, it must be borne in mind that not all types of wood are equally easy to turn.
The easiest parts to process on a lathe are walnut, hornbeam, beech, linden, birch and pear. Conifers, as well as oak and ash, are much more difficult to turn.
When selecting material for a workpiece, you should choose blanks that are free of cracks, falling knots, tar and other defects.
It should be noted that different types of wood have their own unique beautiful texture.
Knowing the internal texture of each type of tree, it is easier to select the necessary blank for making a particular craft.
From walnut wood you can carve a beautiful powder compact, a round box, and from acacia wood you can make a magnificent salt shaker. The texture of the wood must be taken into account when turning a particular product.
Before putting the blank on the lathe, you need to adjust its size to the future product as much as possible using a hand tool, for example, an ax.
There is no need to install a thick log in the centers if you have to carve a thin part. It should be trimmed.
If the workpiece has a square cross-section, then the corners can also be cut off with a hand tool, giving the blank a more rounded shape.
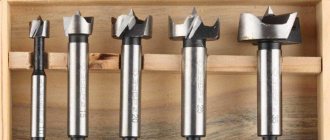
Devices for fastening wooden workpieces
The most commonly used device for fastening blanks is a driving chuck. Most often, two types of such devices are used for wood turning.
The first version of such a device is a cartridge with teeth. The workpiece is secured in such a device as follows: you should drill a small hole in the marked center of the blank, insert the central tooth of the chuck into it, of course, having first removed it (the chuck) from the spindle, after which you should lightly hit the shank of the device, thereby driving the remaining teeth into wood.
In this way, the location for installing the blank in the cartridge is marked. We install it on the spindle, after which we install the workpiece according to the markings, press the tailstock quill - you can start turning the wood.
The second option for driving a wooden block is to use a faceplate. This device is a metal round disk. In the middle there is a hole for putting on and attaching to the lathe spindle.
Through holes are located in the correct order over the entire area of the disk. Through these holes, the workpiece is attached to the faceplate with bolts or screws (self-tapping screws). First you need to mark the center of the workpiece, and then install it. You can’t do without using a faceplate when you need to turn the wood of the end of a workpiece, and you can’t use the tailstock for stop.
Wood turning tool
Most often, turning chisels are used for processing wood on machines. Compared to conventional chisels, turning chisels have longer handles, and their cutters are made only from high-quality tool steel. That is, the chisel consists of two parts - a handle and a metal blade mounted on it with a blade sharpened at a certain angle or a double-edged blade.
There are different types of chisels for different tasks. For a beginner in turning, in order to start working with wood, it is enough to learn how to use these two chisels:
- Reyer - this chisel has a semicircular blade, which is made of a thick plate, it is intended for rough turning of a workpiece,
- meisel - this type of chisel is intended for finishing the part; the blade is sharpened obliquely, on both sides.
Most of the other types of turning chisels are classified as shaped tools. They give the final appearance of a turned part. For example, decorative grooves can be cut out on a turned salt shaker. Here are some types of such chisels:
- chisel-hook - with such a cutter you can carve a recess at the end of the workpiece,
- chisel-comb - with its help you can cut internal and external threads or apply many decorative grooves,
- ring chisel - you can do the same thing with it as with a hook.
There are a great many types of shaped cutters. Experienced turners come up with their own cutters for a specific task and make them themselves.
Lathe technology
It is advisable that the workplace in front of the lathe be equipped for a specific worker - for his height. The workpiece should be at elbow level. Before starting to work, the turner must take a stable and comfortable stance in front of the machine.
Now you can start the engine. The more finishing work is done, the higher the spindle rotation speed should be. We rest the body of the chisel blade against the tool rest, and slowly bring the cutter closer to the rotating workpiece.
The chips must be removed in a thin layer; the cutter must not be allowed to penetrate deeply into the body of the blank - this is unsafe. Hold the blade of the chisel with one hand, and its handle with the other.
It is advisable to press the elbow tightly against the body; in this manner, a stronger and more immovable emphasis is created.
Compliance with safety rules when working on a lathe is a prerequisite
Without mastering the safety rules for working on a machine, you should not even approach it, otherwise the worker may lose his health and not get pleasure from a well-made part. The basic safety requirements when carrying out wood turning are outlined below:
- the turner must be dressed in overalls, which must be tightly fastened with all buttons,
- hair must be covered with a headdress,
- Be sure to wear safety glasses and lower the protective screen,
- the handles of chisels should not have cracks,
- the workpiece must be securely secured in the chuck,
- the workpiece must not be damaged,
- the machine must be grounded,
- all adjustment manipulations (measuring the size, moving the tool rest towards the part, etc.) must be performed with the machine turned off.
There are other points of safety requirements that can be set out either in the production instructions or in the documentation of the lathe manufacturer.
on topic: Turning wood products on a lathe
Application areas of lathe
A lathe is an ancient device; it is an early device for processing a wide variety of parts from a wide variety of materials - from metal to wood, etc.
Processing is, first of all, turning surfaces both inside and outside, drilling and boring holes of different diameters, cutting threads, and forming surface relief using knurling.
If we talk about turning metal parts, then industrial turning devices produced by different factories are expensive and massive units, which are very difficult to operate.
They in no way relate to desktop devices; these are serious industrial units that, in principle, are not suitable for handicraft work. Therefore, a DIY lathe is a great idea for all reasons.
Drawing of a lathe.
You can, for example, make it in the form of a mini version, which will be quite enough for processing both metal parts and workpieces made of any other materials.
There are certain limitations when using homemade mini-machines: they are designed mainly for working with round parts, with sections such as axles, handles for tools, wheels, etc.
In mini-machines, parts need to be fixed only in a horizontal position for their rotational movements. Excess material during turning is removed by cutters, which are fixed in the support of the lathe.
Vase
How can you make a vase on a lathe?
To make it, you may need a certain tool. In addition to the lathe, you need to take cutters, a plane, a hacksaw, a ruler, a compass, an ax and a saw, sanding paper and a chisel. The process of turning a vase is extremely simple. True, it should be noted that vases can be complex in configuration and simple. Let's look at how you can carve a simple option.
- First, a block of wood 10-20 cm long is cut out with a saw.
- It must be trimmed with a plane, both from the ends and along the length.
- The workpiece is installed in the machine chuck.
- The machine is turned on and checked for runout of the part.
- If it is present, alignment must be carried out.
- The top layer of wood is removed to a depth of 1 cm.
- A chamfer is removed at an angle of 45° from the outer end.
- A drill is inserted into the tailstock.
- A hole is drilled with a depth less than the length of the workpiece by 3-5 cm. That is, the bottom of the vase is determined.
- Now, using a cutting tool called a jamb, the cavity of the product is cut out.
Since the vase can have different shapes: straight, oval, and so on, the boring of the upper surface is accordingly maintained in the exact shape. After which the product is polished outside and inside. What is sandpaper used for? The wooden product is removed from the machine, the bottom is finished by hand using a plane and sandpaper. After which the souvenir is varnished.
This is interesting: Foundation for a lathe - we present it in detail
Finishing the workpiece
This method is used to process cylindrical elements of varying lengths, fixed between the centers of the tailstock and headstock. Accordingly, you have the opportunity to make any parts: from railing posts and table legs to tiny chess pieces. In particular, skilled craftsmen are skilled at making and sharpening billiard cues.
The first step of the job is to determine the location of the axle of the piece of wood to clamp it between the center of the tailstock and the driving center.
The second stage is to make a blank (from a trimmed log or square block of wood). This can be done in the 1000−1500 rpm mode. In this case, the chips should be removed from right to left using a grooved concave wide chisel to pre-process the reyer. If the workpiece is long, then roughing is carried out in several steps; the tool rest moves closer to the part as it is finished, without changing its height position.
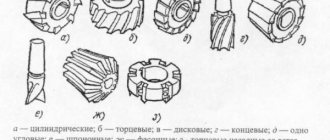
When turning parts, there are tools of various shapes for processing shaped surfaces:
- hook,
- semicircular cutter,
- flat chisel,
- beveled chisel (or popularly - jamb),
- grooved chisel, etc.
Depending on the type of tool used and the stage of the work process, it is necessary to bring the tool rest closer to the workpiece from time to time. At the end of the process, when the part is ready, the final finishing is carried out:
- polishing,
- toning,
- grinding,
- waxing, etc.
The finishing touches occur when the support has already been removed.
Wood turning
Most crafts require processing by turning. To make a craft on a lathe in the shape of a vase, plate or glass - objects that have the transverse shape of a circle, the workpiece must be secured in a special chuck of the machine. To fasten long parts, a trident is used, which presses them in with the center of the tailstock.
By moving the chisel along the axis of rotation, the part will be sharpened. This type of turning is called longitudinal. If the homemade product is small, it can be secured with screws to a faceplate or flat disk.
First, you need to mark the workpiece for screws, and then drill a blind hole, the depth of which is equal to the screw-in length of the screw. You can also poke a hole with an awl. To determine the location of the screws, the workpiece must be attached to the plank washer and through the holes that are located on the reverse side, outline the places for the screws.
When processing a flat part on a faceplate, it is necessary to prepare a chisel and, by moving it perpendicularly, grind the workpiece in a frontal or end-to-face manner.
The cutting part of lathes, called the blade, is wedge-shaped. The front and back surfaces form a cutting edge at the intersection. Turning wooden products may involve cutting off part of the workpiece, marking the centers of rotation, inspecting the condition of the workpiece and giving it the desired cylindrical shape.
Using all the possibilities provided by a lathe, you can achieve the ideal barrel-shaped shape of the desired product with your own hands. You can’t do without turning when making furniture handles and legs.
What tasks can a home machine perform?
Before making a mini metal lathe with your own hands, you need to carefully understand the functions of the future unit.
Can he do what a person needs in the first place? After all, not everyone can work with metal, which cannot be said, for example, about such a material as wood.
In general, the list of available works is as follows:
- Processing parts with a round cross-section (for example, wheels, round furniture parts, handles for construction tools, etc.);
- Precision processing of ends and grooves;
- Using the countersinking process, that is, enlarging existing holes (for example, in order to screw in a screw of a larger configuration, etc.);
- Trimming parts to required sizes;
- Creating a relief surface (using the rolling technique);
- Creating internal and external threads on parts.
Read here - Do-it-yourself stand for an angle grinder: drawings, projects and nuances of making the simplest models (95 photos and videos)
Making a wooden box
The recommended wood for making the box is acacia, which, when sanded, gives a beautiful light green color. To make crafts with your own hands, you will need various turning tools made of good steel.
- First of all, the workpiece must be rounded and the edges removed from it. First, you can use a semicircular cutter, then a smoother jamb cutter, which is used to make indentations, a kind of decorative grooves.
- Then both sides of these indentations are cut off, which creates bulges on the box.
- Then we round off the resulting edges.
- Now you can move on to creating the internal cavity. We move the support bar to the end of the workpiece and start making a recess from the center to the edge with a straight narrow cutter.
- Then you need to smoothly expand the cavity to the very bottom. To do this, we use the tip of a triangular cutter.
- Using a wide cutter, we level the bottom, give it the required thickness and make a groove for the lid.
- Let's move on to sanding. We clean the bottom and walls with sandpaper.
- When everything is ready, use a hacksaw to separate the part from the machine.
The lid of the box should be dome-shaped, the size matching the dimensions of the box itself. For this we need a semicircular cutter.
Safety precautions
Compliance with certain rules when working on a machine is mandatory, especially if we are talking about a product made by hand.
Preparatory stage
Immediately after assembly, you should run the machine at idle speed for a few minutes and listen to the sounds of the engine: they should be uniform, without extraneous noise. Preparation for work consists of the following steps:
Appropriate clothing is worn, all buttons are fastened and protruding parts are removed. Before starting work, the workplace should be in complete order so that only the necessary tools are on it - then you can consistently implement the entire plan without unnecessary fuss and waste of energy. Before each session, the homemade machine must be checked for the integrity of all parts and the reliability of their connections
It is also important to take care of sufficient lighting of the working surface and the correct location of the source so that your own shadow does not interfere with your work.
Safe work rules
During work, you must adhere to the following rules:
- Removal of parts, as well as cleaning and lubrication of the working mechanism is not carried out during operation.
- When processing a part, you need to be on the correct side and at a safe distance from the installation itself.
- Do not pass any objects or place your hands over the operating mechanism.
- If you are working on cutting a part, then the part being cut cannot be supported by hand - it is unknown in which direction it will move at any given time.
- It is unacceptable to lean even on stationary parts of the machine or lean on the working surface.
- All chips from parts are carefully removed after each working session.
A visual illustration is presented in the diagram.
A visual technology for working on a lathe for hand-made metal is presented in the video.
Studying the machine
Before you start creating a wooden masterpiece, it is worth studying the structure of the machine. It consists of four main parts.
Firstly, this is the frame, the frame on which all components and assemblies are mounted.
The next important part of the lathe is the headstock. Rotation from an electric motor is transmitted to it through a pulley system or gear transmission. At its output there is a spindle with a rotating center or faceplate for fixing the workpiece. In an industrial machine made for the right hand, it is on the left.
The tailstock is a passive part, which is a free-rotating pointed shaft. Its purpose is to fix a long workpiece. The headstock can be moved to work with parts of different lengths and be securely fixed in any position.
A tool rest or chisel holder is most often a metal table on which a chisel or wood chisel rests. Its design allows you to move freely for ease of use.
Before turning on the lathe, it is worth understanding the controls, understanding the operating principle and task of each part, this will allow you to avoid mistakes and, possibly, an accident.
The fillet is sharpened with a “spindle” chisel
Having turned several cylinders 200 mm long, mark lines on them in increments of 12 mm and begin to practice turning fillets.
The cone for the baluster can be turned with a roughing chisel and a “spindle”.
At the same time, the tool is slightly tilted in the direction of processing.
You can turn a fillet with only one tool - a “spindle”. First, a series of lines are drawn on the cylinder with a pencil in increments of 12 mm. The processing is carried out only with the tip of the chisel and the cutting edge is kept parallel to the surface being turned. You need to imagine how they cut the grass in the ditch. If you move along it, the mower goes horizontally, but when you need to mow the slopes, the tilt of the mower increases. The chisel should move similarly, but you need to watch the cutting edge, not the shank. Compared to working with a peeling chisel, the position of the hands on the “spindle” is the same, but the grip is weaker.
Place the chisel so that the heel of the cutting lump slides along the workpiece, and the chisel itself should be at a right angle to its axis. Lifting the handle, lower the cutting edge and grind a very small groove exactly in the middle of one of the 12mm sections.
To sharpen the right side of the fillet, turn the blade of the chisel counterclockwise and, touching the workpiece at the marking line with the tip of the chisel, rotate the blade in the opposite direction (clockwise), turning the fillet to its bottom. The rotation should be controlled and even, and the handle should move freely, so you don't have to rest it on your hip.
Now the left side of the fillet is machined in the same way. At the bottom of the fillet, the chisel should slide on the tool rest very easily. Then they alternate processing from the right to the left to obtain the desired fillet depth, but always finish the pass exactly in the middle.
It is impossible to sharpen a fillet with a chisel. For narrow fillets you also need appropriate chisels.
The roller for the baluster is the reverse of the fillet. And I think it's the hardest thing to learn how to sharpen. I sharpen them only with a “spindle”, although there are supporters of performing this operation with an oblique chisel. But sharpening the small rollers usually found in balusters with an oblique chisel is a risky business.
When making balusters, an elliptical roller looks good, and not in the form of a half circle. Therefore, it is not as tall as it is wide. To practice on a cylindrical workpiece, use a V-shaped cutting chisel to make grooves 3 mm deep in increments of 10 mm. You will get a row of rings 10 mm wide.
Like the fillet, the roller is sharpened in two stages - half at a time and always down the slope. To carve the right side of the roller, tilt the chisel slightly to the right and start processing from the middle of the ring. The processing is carried out to the right, while simultaneously moving the chisel handle to the left and turning the blade clockwise. To turn an elliptical roller, when processing to the right, the handle of the chisel must be moved to the right.
Then on the left they mirror what was just done on the right. At first, a beginner usually ends up with asymmetrical rollers due to the fact that a right-handed person is pulled a little to the right, and a left-handed person - to the left. As you gain experience, the problem goes away on its own.
On large rollers, processing should begin closer to the edge of the ring and the first pass should only round the corners. Subsequent passes increase the curvature. You should not try to remove a thick layer of wood in one pass.
The effect of the roller is greatly enhanced by emphasizing the corners with the toe of an oblique chisel.
Safety precautions when working with the unit
It is important to remember that before you start working, you must study the rules and safety measures very carefully. Important!
Important!
Improper handling of the lathe can cause injury!
Basic Rules:
- before turning on the machine, you need to check its grounding and serviceability at idle speed;
- you only need to work in special clothing;
- eyes must be protected with goggles or a mask, and if necessary, wear a respirator;
- firmly fix the workpiece exactly in the center;
- when working, do not put pressure on the part, movements should be smooth;
- do not measure a rotating part;
- do not leave the machine during operation;
- do not use defective workpieces (with cracks);
- do not pass or take any objects through a working machine;
- do not stop the workpiece by braking with your hand;
- do not start work when tired;
- Do not approach the machine while intoxicated.
This is the main thing, but not everything you need to know before starting work. If you are not confident in carrying out any operation, then under no circumstances should you start it. It is necessary to consult with a specialist, and only then begin work. This will help avoid accidents and injuries.
Making a Chiseled Mallet
- home
- Master Classes from “Master Class Direction” by tag: turning
Today we will make a turned mallet from 2 different types of wood based on Wood-Master magazine No. 5, 2009. This type of carpentry tool is often used when working with chisels and is quite easy to make with your own hands.
The hammer will be according to the drawing of the mallet from the magazine, the handle is arbitrary, so to speak, “under the arm.”
Mallet drawing
The maximum diameter of the mallet is 78mm, the length of the striker is 120mm, the length is 255mm
First of all, let's select the material. And let's do it literally - beech is a waste from our production of workbenches, and a sapele die is a waste from the production of our friends.
Material for making a mallet
The beech block must have a cross-section of 40mm x 40mm and a length of at least 350mm. This can be done either with a jointer and a planer, or with a hand plane (for the sake of sport) We process all 4 sides
IMPORTANT! All edges must be strictly perpendicular to each other and the same size!
Sawing sapele into planks
We cut a 20mm thick sapele die on a band saw into 4 strips: at least 70mm wide and 160mm long.
Gluing the workpiece
We fume one face and one edge. We glue each layer one by one to the beech block.
Glued mallet blank
This is how it turns out.
Mark the center and prick with an awl.
IMPORTANT. Accurately find the center for symmetry of the pattern in the finished product when transitioning from one wood to another. We install the workpiece in the lathe, securing it in the centers
We place the workpiece in the lathe, securing it in the centers.
We create a round one from a square blank. To do this, we will use a semicircular cutter - a reyer. Rotation speed 1000 rpm.
We mark the main diameters - the handles.
To turn the main surface of the handle we use a semicircular cutter.
To turn thin cylindrical belts and trim, we will use a cutting tool. Rotation speed 1500 rpm.
The main template for turning the handle is HAND. By periodically taking the workpiece (naturally motionless) in your hand, we achieve the greatest comfort.
We work with meisel
We level the surface of the striker to a diameter of 78mm and a length of 120mm with meisel. Rotation speed 1000 rpm.
Mark the lines of the main transitions with a pencil.
We smoothly draw out the surface of the striker according to the drawing, also with meisel. Rotation speed 1000 rpm.
We cut with a cutting cutter, leaving a thin isthmus. This will allow us to finish the mallet on the machine. We grind. Consistently reducing the abrasive grain: first 120, then 180, 240, 360
To do this, we use worn-out, but still fully functional, eccentric sander wheels.
We remove dust. It is better to use a blow gun and a vacuum cleaner. Apply the first layer of shellac varnish (primer). Let it dry completely.
We sand with steel wool and apply a second layer of shellac varnish... In this way we apply up to 5 layers.
We cut off the excess with a saw, grind the ends, also consistently reducing the grain size of the abrasive. And coat it with shellac varnish. Also preferably 5-6 times. Now you can work with such a wonderful wooden mallet.
I hope we have answered all possible questions on how to make a mallet yourself.
You can look for industrially made mallets in our store.
Making the Steering Wheel as an interior item with a secret, part 1
- home
- Master Classes from “Master Class Direction” by tag: turning
A new project on Rubankov TV from the Moscow Rubankov Carpentry School. Uncle Vanya, the head of the workshop, started an interesting design project for the interior with a real steering wheel, see the details for yourself) In the video we will do a lot of planing, sawing, gluing, turning on lathes and much more. Enjoy watching and see you at our craft school courses.
Making the Steering Wheel as an interior item with a secret, part 1
7:53 Glue brush - https://goo.gl/yRqPg6 10:35 Japanese drills - https://goo.gl/yr7JR2 13:21 Rubankov turning school - https://goo.gl/iShd6R 19:50 Hegner jigsaw https://goo.gl/5mwLWx 20:50 Self-centering drills https://goo.gl/J4ohWr
What can be done?
A lathe is a tool not only for making construction workpieces. It is often used to create various souvenirs and decorative items: boxes, vases, chess, candlesticks, wooden toys and much more.
Vase
In addition to the machine, you will need other tools: chisel, ruler, compass, hacksaw, axe, plane. Considering the variety of forms that vases can take, these products can be quite simple or complex.
Let's look at a simple example:
- the workpiece, finished along the length and at the ends, is installed on the machine;
- the top layer of wood is removed and given the intended shape: oval, straight, etc.
- using a drill, a hole is made in the center of the free end with a depth less than the length of the vase;
- the cavity of the product is cut out with a “jamb” cutter;
- the product is polished, the bottom is finished manually;
- varnish coating.
Turned chess
Small wooden blanks with a cross-sectional diameter of 50–60 mm are suitable for making chess.
On one side of the workpiece, a smaller cross-section is needed - this end will fix the workpiece on the machine.
- the free end of the workpiece is trimmed with a cutter and pressed against the tailstock;
- a layer of wood is removed to give it a round shape;
- at the discretion of the master, the shape of the figure itself is turned;
- grinding, the figure is cut off from the fixed part;
- coated with varnish/paint.
Important!
The fixed part must be machined to a rounded shape, since installing a tetrahedral workpiece in the chuck will create additional load on the cutter!
Making a box
The box is a fairly simple product to make. As a base, you can use a cylinder-shaped workpiece.
The main difficulty here is the lid, which must be flush with the edges of the box body and fit into the grooves of the walls in order to close tightly.
- we fix the workpiece on the machine and use a semicircular cutter to give it a clearer shape;
- using a straight narrow cutter we form the inner cavity of the box;
- Using a triangular cutter, we bring the resulting niche to the walls of the body;
- Using a straight wide cutter, we form the bottom of the product and the groove for the lid;
- sand, apply varnish and wax.
The lid is made from a similar blank, only thinner. It goes through the same steps as the body, and the formation of the outer and inner sides, which can be straight or convex, is carried out with a straight wide cutter.
DIY wooden products from different types of wood
Even more amazing things made of wood are made entirely by hand, without a lathe. Thus, it has become popular to create a wooden case for everyday things: a flash drive, a computer mouse.
There is even a concept model of a phone made entirely of wood and with touch-sensitive buttons.
Animal figurines
Such art depends entirely only on the level of skill of the manufacturer and his imagination. Linden is better suited for such products.
This rock does not form cracks and is easy to process. But they also work with other breeds. For production you will need:
- a chisel with a rounded and triangular end to create appropriate shapes;
- a blunt knife and a knife with a beveled blade.
Before you immediately start working with wood, it is better to sketch on paper what the future product will look like. Often the drawing is transferred with tracing paper to the workpiece, and in order to avoid mistakes, before working with metal tools, an outline is drawn on the figure with a pencil.
Crafts-souvenirs
Various handmade wood products look great as small gifts and souvenirs. These can be kitchen utensils: spoons, spatulas. Various keychains, badges, entire paintings and much more.
Selecting wood for turning
Before you start turning your planned product, you need to do some preparatory work: select a suitable material and dry it.
Dense, fine-grained wood species are best suited for turning work. It is desirable that the material does not have defects: cracks, falling knots, tar and sprouts. But curling and cross-layering, usually considered defects, are not problems when turning. On the contrary, due to the fact that twisted wood is difficult to split, it is often used to make mallets and handles.
Almost all types of wood are suitable for turning, but birch, alder, beech, maple, walnut, pear, linden and hornbeam behave best when processed, but pine, oak, spruce and ash are a little worse. Pear and apple trees are ideal for turning, especially wild species. The wood of these trees is easy to process and polishes well. The paint adheres well to it.
Beautiful toys and souvenirs come from aspen, linden, Karelian birch and elm. You can turn them into utensils and decorative items. Walnut wood makes good small items: powder compacts, boxes, frames. And to create interior decor, it is best to use species that have a beautiful texture - walnut, oak, juniper, cedar, mahogany, pine.
Beech, hornbeam, alder, maple, boxwood and Karelian birch are widely used in furniture production.
Read also: Palladium in radio components of the USSR
Woodworking Machine
The woodworking equipment market offers an extensive line of wood lathes. Each consumer makes his choice taking into account his interests, but the main criterion is the drive power. For a home workshop where turning work is performed sporadically, a simple tabletop machine with an electric motor power of 1 kilowatt and a spindle speed of 3500 rpm is suitable.
https://youtube.com/watch?v=xs8KOp1HoFI
The main components and mechanisms of a wood lathe correspond to the classic structure of a lathe, which processes workpieces by rotation. Three main mechanisms:
- drive - electric motor, single-phase or three-phase;
- transmission - a set of devices that transmit the rotation of the motor shaft to the spindle head;
- the executive is the support.
Four main nodes:
- bed - the body on which the mechanisms are fixed;
- front spindle headstock - for attaching a faceplate or lathe chuck;
- rear fixing headstock - for installing a rotating center or drill chuck.
Popular articles Bouquet of clothes for newborns
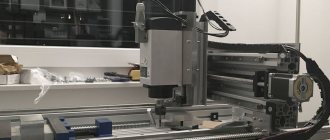
Design feature
You can assemble a wood lathe with your own hands from available materials. The design is simple and does not require much time to manufacture. The main part of the machine is a bed made of a channel, in which a groove is cut along the central center line with a grinder for fixing the tool rest and tailstock. The fixation principle is an eccentric mechanism.
The tailstock design is standard. The quill has a hole for Morse taper No. 2 to set the center of rotation. The drill chuck shank matches the quill hole. It is recommended to use a factory made tailstock.
Under the quill, machine a hollow cylinder with a blank end wall, in which a thread is cut for the flywheel screw. The moving part of the quill is a cylinder with a conical hole and a keyway along its entire length. The moving part moves with the help of a flywheel screw along a key welded in the headstock body.
The tool rest is classic, has an adjustment function with fixation to the diameter of the workpiece being processed, the base of the tool rest moves across and along the bed. It is fixed with an eccentric with a handle. The upper part is a regular corner.
The headstock has two angular contact bearings. The spindle shaft has an M14 thread, step two. This is a thread that is used on grinders and grinders. Thanks to this, all the attachments used by the grinder can be attached to the spindle.
DIY spindle head
The quality of the entire structure depends on the accuracy of the headstock manufacturing
Therefore, special attention must be paid to this node. Craftsmen recommend making the headstock of a lathe with your own hands
To do this, you need to machine a cylindrical body with a wall thickness of 10 mm
To attach it to the frame, you need to make a special stand. A section of channel is suitable for this. The channel end is welded to a corner made of sheet steel 10 mm thick. The headstock body is attached to the resulting stand
To do this, you need to machine a cylindrical body with a wall thickness of 10 mm. To attach it to the frame, you need to make a special stand. A section of channel is suitable for this. The channel end is welded to a corner made of sheet steel 10 mm thick. The headstock body is attached to the resulting stand.
To make a wood lathe with your own hands, drawings and dimensions do not matter, since everyone makes the design individually, taking into account their capabilities. Sectional view of a cylindrical body:
- outer diameter 56 millimeters;
- wall thickness 10 millimeters;
- length 180 millimeters;
- mounting sockets for bearings with a diameter of 24 millimeters;
- shaft with a diameter of 30 millimeters.
Simple accessories make the machine universal and increase the list of operations. For example, by installing a sanding drum with sandpaper in the chuck, you can sharpen the tool. The device for turning on a copy machine looks like this:
- copier;
- a pipe installed along the frame, acting as a slide;
- circular electric saw that acts as a wood cutter.
The milling attachment will replace the milling machine. Arbor with disc cutter
is clamped into the chuck. Instead of a tool rest, a work table with a stop ruler is installed. You can mill platbands, baseboards, and blanks for frames.
Enthusiasts and lovers of making homemade items are constantly coming up with mechanisms that make manual labor easier. Such people always have an answer to the question of how to make a woodworking machine.
Purpose and characteristics of a lathe
Modern manufacturers offer turning equipment capable of performing many machining operations. Depending on their list, the purpose of the unit is determined. The main characteristics of wood processing machines include:
- installed engine power;
- weight of the entire machine;
- dimensions;
- list of acceptable cutting tools;
- number of possible processing operations;
- maximum size of the workpiece;
- Availability of automation and software control tools.
Each type of machine provides a specific industry. If it is necessary to produce a large number of similar parts from wood, their production is entrusted to specialized automatic lathes and machines with numerical control.
Varieties
There are many types of lathes
Before purchasing, it is important to familiarize yourself with the features of each type in order to make the right choice.
Find out why the LT-10M universal lathe is so good
Tabletop for home workshop
A small machine is fixed on a special table. It is lightweight and small in size, but allows you to perform a large number of operations. In addition to external processing, drilling and boring can be performed. Its advantages are low cost and energy consumption. There is almost no noise during operation.
Household, miniature (mini), small-sized
The weight of such machines often does not exceed 50 kg, but the technical characteristics of many models are not inferior to large-sized analogues. The bed is made mainly of cast iron - this reduces vibration during operation. The working diameter of the chuck is 50–100 mm, the spindle speed is 100–3800 rpm, and the motor power varies from 0.55 to 2.25 kW.
Automatic with cross feed
They are used in mass production for various operations with small parts, including processing of shaped surfaces. They are also used for turning products made of copper, brass, and alloy steel.
Universal
A common group of machines that are found in serial and mass production. This includes a screw-cutting lathe. Such equipment is distinguished by a wide range of modes (spindle speed, tool feed speed), as well as the ability to perform work of various profiles.
Classification of universal machines:
- Heavy - they can process large parts with a diameter of 1600–4000 mm.
- Up to 15 tons - designed for processing parts with a diameter of 600–1250 mm.
- Up to 4 tons - the maximum permissible workpiece diameter is 500 mm.
- Lightweight - for working with small products with a diameter of 100–200 mm.
Universal units also include turret lathes. They are intended for mass and serial production of parts from rods. The main thing that distinguishes it from a screw-cutting lathe is the presence of a turret head, to which several tools can be attached at once in the sequence necessary for work.
Mobile
Portable machines are compact in size and have a powerful design with hydraulic or pneumatic drive. Depending on the modification, it is possible to process external and internal cylindrical surfaces, pipes, flanges, and grooves. The machine is attached to the edge of the workpiece.
Features and Benefits:
- Easy installation and fixation of the part.
- Performing operations in hard-to-reach places.
- Possibility to use additional devices.
- High precision and processing quality.
Unusual
There are unusual types of lathes found in industry. This is expensive, narrow-profile equipment, which is serviced by highly qualified workers.
These include:
- Multi-spindle - allows you to process several parts at the same time. Used in mass production conditions.
- Semi-automatic copy machines - perform complex operations using several tools.
- Lathes - designed for parts whose diameter is many times greater than their height (pulleys, flanges, wheels).
- Carousel - industrial machines for precision processing of large parts.
- Backing - designed for sharpening cutting tools (mills, taps, reamers, countersinks).
Manual
The group combines types of manually controlled lathes (not CNC). They are not equipped with automation; the turner performs all actions manually. The tailstock is moved and the quill is fed by the worker without the help of additional mechanisms.
Only the feeding of the cutting tool is automated. Manual machines are gradually being replaced by analogues with CNC, automatic and semi-automatic machines.
Micro
Equipment is limited to a weight of 30–35 kg. The machines are used for small-scale work in the home workshop. They are powered mainly from a 220 V outlet. Low power consumption and lack of noise allow you to work without disturbing your neighbors.