Homemade wood cutter with your own hands
Working with various materials requires the use of high-quality cutting tools.
Most of the required types have standard parameters and are freely sold in stores, but some samples have specific sizes or shapes. They are not produced or are extremely rare. To a greater extent, the question concerns cutters that have many profile options, varieties or types of design. Finding the right type can take too much time, so sometimes there are no other options other than making a cutter at home.
How to make a cutter
Milling cutter is a general name for a wide group of cutting tools. There are two main types:
There are many types of cutter designs used to perform different technological operations:
- Whole.
- Composite (prefabricated).
- End.
- End face.
- Shaped.
- With replaceable plates and others.
The production of cutting tools is a high-tech process that is demanding on the quality of the material. For example, the production of end mills consists of several stages:
- Turning of a workpiece (shaping).
- Milling teeth.
- Processing of cutting edges (sharpening and backfilling).
- Heat treatment of the material (hardening, tempering, other operations resulting in a high-quality metal structure).
To manufacture other varieties, similar or other operations are performed, determined by the type and design of the tool. Homemade cutters are only modifications of ready-made samples.
The need to use one type or another, to obtain a certain profile or size of the cutting organ, forces you to decide the issue yourself. Let's look at how to make a cutter with your own hands at home.
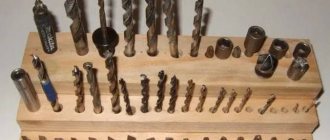
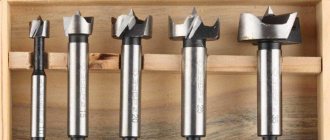
Homemade wood cutters
Making a wood cutter with your own hands is possible if you have the appropriate workpiece and a machine where it will be installed. At home, an electric drill or a hand-held milling machine is usually used. The most affordable option is to change the shape of a regular metal drill, but other methods can also be used.
Let's look at how to make a wood cutter from a drill. Depending on the purpose of the tool, you will need a workpiece (metal drill) of a certain size. If you plan to manufacture a shaped cutter, then the diameter of the workpiece must be equal to the maximum diameter of the final product. Manufacturing consists of two stages:
- Giving a profile.
- Creating a shank.
Both operations require the use of industrial equipment. In any case, a lathe will be required to make the shank. The hand router collet is designed for a diameter of 8 mm (there are options for 6 and 7 mm). Therefore, for large drill diameters, the shank should be prepared before creating the profile. This will eliminate beating, which is dangerous when processing wood. The easiest way to create a profile is by grinding. First you need to make a template, according to which you need to constantly check the status of the profile. To work, you will need a grinding machine (emery), a grinder or a cutting wheel mounted in the chuck of an electric drill.
To create replacement plates for the milling head, either ready-made samples are used, which are given the desired shape, or blanks made of high-quality metal. The profile is created by grinding on a machine at hand.
The final operation is backing. This is the process of setting a specific cutting edge angle to ensure that the back of the edge does not contact the workpiece.
Important! Backing is a rather labor-intensive process, but necessary; it is the only thing that gives the cutter the ability to work normally.
DIY metal cutter
Making cutters for metal at home is limited to regrinding existing tools, changing the profile or diameter of the cutting part. More active intervention will require the use of industrial equipment, as it will be necessary to perform complex procedures:
- Tempering of metal (a procedure reverse to hardening).
- Machining, including shaping, sharpening, backing).
- Hardening the cutter.
It is almost impossible to carry out these actions efficiently at home. In addition, work of this kind requires considerable professional training and experience, which not everyone has. Therefore, they are limited to only available procedures that involve minor intervention in the original state of the workpiece.
Making cutting tools at home requires the necessary equipment and suitable workpieces. In addition, you must have skills and experience, otherwise you can end up with a very dangerous product that can ruin the surface being processed and harm the craftsman himself. It is not recommended for an untrained person to carry out such work; it is better to seek help from a specialist.
Source: https://pro-instrument.com/ruchnoj/freza-svoimi-rukami.html
Homemade attachments / cutters / consumables for engravers, drills and drills
The article will touch upon the topic of how to make consumables with your own hands. It's no secret that Chinese nozzles are of very low quality, while branded ones are overpriced. So in some cases it will be more profitable to do it yourself. Under the cut you will see my homemade attachments and also interesting solutions from the Internet .
Abrasive attachments
Petal circle for engraver
Original sandpaper on a rubber drum does not last long, so you need to find an alternative solution. Cut out a circle of small diameter from plywood:
Let's give it a more even shape:
Making cuts with a hacksaw for metal:
We glue sandpaper into the resulting slots using epoxy resin:
Flap wheel for drill
The nozzle has a larger diameter. To prevent a “spread” as in the previous version, when gluing, the sandpaper must be tightened with an elastic band. This occurs because the base of the fabric absorbs the resin from the cut and becomes rough.
The advantage of flap wheels is that they last an order of magnitude longer than regular sandpaper on a drum of the same diameter.
Emery for a drill from rollers from a tape recorder
Older reel-to-reel tape recorders have large rubber rollers with a metal sleeve. We place a bolt on the bushing and glue sandpaper onto the rubber:
Cutting wheels for engraver
The topic is quite common, but I’ll still tell you for the sake of completeness.
We take a thin cutting disc for an angle grinder, a compass with two needles, an awl, and unnecessary scissors:
1) We draw circles with a compass (you shouldn’t make too large circles, it’s inconvenient to work with them. The optimal size is slightly smaller than a standard circle) Make sure that the center of the circle is in the middle of one of the squares of the reinforcing mesh.
2) Use scissors to cut the disk into sectors, and then cut out the circles themselves located in the sectors. Metal scissors are suitable for this work, but ordinary stationery scissors can also be used, but this makes them more dull, so we take those scissors that we don’t mind.
3) Using light rotational movements of the awl, we begin to make a hole alternately on both sides. The diameter of the hole must be equal to the diameter of the screw. If the hole is any larger, it will break.
4) Grind the circle at low speed on an unnecessary sharpening stone:
And we get reinforced cutting wheels:
Making such circles is much cheaper than buying them. They also last longer than purchased non-reinforced circles.
Decorative sanding attachment
A self-tapping screw without a head is screwed into the cork, and a washer is glued to the base. The chuck's jaws will rest against the washer and prevent the screw from being screwed in deeper.
It is most convenient to use this attachment on a drilling machine. Instead of a self-tapping screw, you can screw a felt attachment into the cork:
Drill polishing attachment
Another fairly common topic. The felt from the felt boot is clamped with a bolt with wide washers. Polishing paste, such as GOI paste, is applied to the felt.
The following are a few examples of abrasive attachments taken from the Internet.
Grinding drum for a drill
Grinding drum for an engraver
A metal drum with a slot is turned on a lathe, into which the edge of the jig is tucked, and it is wrapped around the drum. Fixation occurs with an elastic band. The same structure can be made from plywood, as shown in the previous version.
Grinding cylinders for engraver
Comrade Marshall suggests making cylinders this way, I quote:
In order to make this type of consumable, we will need: a durable, but as thin as possible fabric (preferably cotton), sandpaper of the required grain size, and most importantly, a tube of suitable diameter, on which the cylinders will be placed during gluing.
DIY drill cutter
This video tutorial shows how to make a cutter from a drill, analyzes the differences between the two tools, and the advantages and disadvantages of each of them. The repeatability result of this DIY method is very good, but don’t expect any supernatural abilities from the resulting product; a carbide spiral cutter is still much better. Although, on the other hand, a drill costs 20 rubles. Eight milling cutter about one and a half thousand. So it's up to you. It’s up to the master to show how to do it easier.
You need to start with a marker. First of all, we will sharpen two identical spirals, and in order not to make a mistake, you need to mark one spiral with a marker. You need to understand what actions need to be performed and what result is needed. Let's consider what section is in the cut. They are made from a cylinder, they have identical recesses, which are provided by the presence of a cutting edge. The drill has a shelf next to it. This is the cylindrical part that is present in any such tool. Next comes the step and the cylindrical part.
By the way, watch the video about this master’s milling table.
What is the backing for?
The air currents that pass through cool the cutter better. If we take a cylindrical hole in which rotation occurs, then air movement occurs here, the working surface is better cooled. Secondly, the cutting edge. Here nothing prevents cutting; we have only one point of contact. Vortex flows promote chip removal.
If we take a drill and grind along a spiral, in one pass we remove layers until we reach the desired profile. We remove in small strips and do the backing. It must necessarily be on one side and on the other.
Let's look at the machine. It is a household tool, but is very suitable for sharpening cutters. Here the drill has to be held at a certain angle and in this case nothing interferes with it. In other machines, this cheek is further away from the stone; there it is not possible to position it completely flat to the stone.
How spiral grooves are cut for backing
If we apply a drill, we will place it so that it touches this edge with two points. We can see at what point in the cut the stone touches. If we change the angle to a flatter one, the point of contact moves towards the cutting edge. You shouldn't approach her right away. You need to set the position of the drill as gently as possible. Also depending on the inclination. When positioned horizontally, the rear part is backed up.
We will sharpen it as follows. We will press the drill with our finger and drag, press and drag. But as the edge is sharpened and pressed with a finger, it cuts the finger. Apply adhesive tape or duct tape to protect your fingers.
Why is one groove black and one white? First we make a white groove, then a black one at the same angle. This will ensure that the edges are removed evenly. Then we set the angle and grind the white groove again. Next - black.
When rotating the drill as far as the length of your fingers is sufficient, you should not strive to sharpen the entire cutting edge. You still won’t be able to work at the working length. In addition, it will weaken and the resulting cutter will be very soft, it will sing and vibrate. At the same time, due to rattling, it begins to snatch the material. Continued on the video channel from 8 minutes.
Source: https://izobreteniya.net/freza-iz-sverla-svoimi-rukami/
DIY cutter: making homemade wood cutters
The question of how a wood cutter can be made with your own hands worries not only home craftsmen who do their own carpentry and modeling, but also professional finishers. And the main thing here is not only the desire to save money, but the fact that serial tools for woodworking, which today are easy to purchase in specialized stores or on construction markets, often do not have the required configuration of the working part. That is why specialists and home craftsmen who use such a tool have to modify its serial models or make it from scratch, using cylindrical steel blanks.
Homemade wood cutters
Cone cutters
Wood cutters, the working part of which has a conical configuration, are used for processing surfaces of complex terrain. In particular, with the help of such cutters, finishing of grooves in elements of furniture structures is performed. To manufacture such wood cutters in production conditions, complex-shaped workpieces are used, which are problematic to process at home. Such a cutter can be made with your own hands from a drill, the working part of which is given the required configuration.
Due to the fact that a homemade wood cutter is used to process fairly soft material in several passes, there is no need to further strengthen the structure of the material from which such a tool is made.
Manufacturing options for cone cutters
Required materials and tools
If you need a wood cutter, but you can’t go and buy it in a store, but you have a metal drill at home, you can easily and simply sharpen it into a tool of the desired diameter. A steel drill is intended for metalworking, which means it will withstand drilling wood just fine.
To make a cutter, in addition to the metal drill itself, you will need the following materials and tools:
- Bulgarian;
- file;
- drilling machine (preferably vertical);
- router or drill.
In some cases, additional tools and materials may be required to make work more convenient.
Types of homemade cutters for wood processing
Cone cutters, processed at medium and high speeds, are used to remove excess wood from the end elements of the workpiece. The best option for making a tool of this type on your own is a cutter from a drill. This cutter from a drill is made at home as follows: the tool is cut closer to its shank (from half to a quarter of its length), then each cutting edge of the cut drill is ground down by 1/2 – 1/3 of its diameter. If the cutting edges are ground down to a large amount, then not only will its body be exposed, but it will also lose its cutting properties. It is difficult to restore the cutting edges of homemade wood cutters, which have a spiral shape, with your own hands.
From a drill you can make cutters with different working heads
An end-type wood cutter can also be made from a thin-walled tube. How to make a cutter from such a blank? The following recommendations should be followed.
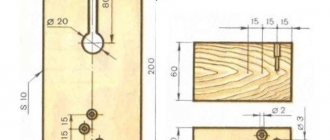
- A piece of pipe is taken as a workpiece, the length of which is 15–20 cm.
- From the side of the future cutting edge (at a distance of 2–3 cm from it), oval-shaped grooves are made on both sides of the pipe.
- The future cutting part of the wood cutter is given a conical shape, and it is ground at an angle of 2–3°.
- Having clamped the workpiece in a vice, a cross-shaped cut is made on its end part, for which an angle grinder is used.
- From the side of the cutting part, grooves are cut on the workpiece - up to oval holes.
Homemade tubular cutters
Using a homemade end mill made from a thin-walled tube, you can create blind or through holes in wood products. In this case, the inner surface of the blind holes must be refined using a chisel.
Many home craftsmen are interested in the question of how to make a large-diameter cone cutter with their own hands. It should be borne in mind that it is not easy to make such a tool for woodworking; for this you need to use special blanks and complex metal-cutting equipment.
Source: https://met-all.org/oborudovanie/prochee/freza-po-derevu-svoimi-rukami-samodelnaya.html
Manufacturing technology and recommendations
A homemade cutter has limitations on the materials that can be processed with its help. Making cutters for your own needs, as a rule, involves working with soft grade steel. That is why such a homemade tool is capable of cutting wood quite effectively, but when processing harder materials it quickly becomes dull.
In order to make their own milling tools, craftsmen use scraps of steel rods or reinforcement. If reinforcement is used as a workpiece, its ribbed surface is leveled using a lathe.
Scheme of a homemade cutter
The technology for making a homemade wood cutter from such a blank is as follows:
- On the part of the cylindrical workpiece where the cutting part of the homemade tool will be formed, half the diameter is cut off.
- A smooth transition is formed between parts of the workpiece with different diameters.
- Another quarter of the diameter is removed from the treated section of the workpiece; such a section of the workpiece is also connected with a smooth transition to the untreated part of the rod.
- The processed part of the workpiece is given a rectangular shape, for which its lower part is cut off. The thickness of the part of the workpiece on which the working part of the woodworking tool will be formed should be 2–5 mm.
To trim the rod, you can use a grinder and a drill, and the formation of the working part can be done on a sharpening machine
A homemade cutter can be used to process wood, but its internal angle must coincide with the center of rotation.
In order for a home-made wood cutter to be used for effective processing, the following recommendations must be followed when making it.
- The cutting edge must be sharpened at an angle of 7–10°. If you make it sharper, it will hold an edge poorly and have low cutting properties.
- To give the cutting part of the tool the required configuration, diamond-coated needle files or angle grinders with discs specially designed for metal work are used.
- If a homemade wood cutter must have a complex configuration, then it can be bent or flattened.
The finishing of the cutting edge is done with a diamond disk, then the surface is polished with sanding paper.
With a small thickness of the cutting part, a hand-made milling tool has a fairly short working life. To slightly increase the service life of such a wood cutter, the corner on the bottom of the tool, located opposite its cutting edge, can be slightly rounded.
A homemade cutter cannot immediately cope with a large volume of wood removed from the surface of the workpiece, so processing is carried out in several passes.
How to make a milling cutter from a drill
In this article we will talk about how to make a cutter from a twist drill, and also look at the structure of these cutting tools.
Sharpening a cutter in this way is not at all difficult, but the product you receive will not have very good qualities and high abilities. Undoubtedly, a spiral cutter made of carbide is much superior to its homemade counterpart. But in terms of price, the drill is, of course, almost a hundred times cheaper than a figure-eight cutter. So, if you are not satisfied with the high quality of your products, experts have already figured out how to resharpen a drill simply and quickly.
First, we must understand what we will do and what we can get in the end. Therefore, we will study the section of the drill in a cut. The cutting part of the drill is a cylinder-shaped rod with two spiral grooves. During the drilling process, chips fall along them from the hole being machined. Each groove on the protrusion has a cutting edge. The cutting part of the drill consists of the front and back surfaces, two cutting edges, sharpened along two surfaces in the shape of a cone, with a jumper at an angle of 55 degrees between them. During operation, all cutting tools, including drills, behave depending on the material from which they are made, heat treatment and the angles at which the cutting edges are sharpened.
Twist drills are widely used in industry. These drills have a diameter ranging from one tenth to eighty millimeters. The main parts of the drill are the working part, a conical or cylindrical shank (with its help the drill is secured in the spindle or in the chuck) and the legs, which act as a stop for removing the drill from the spindle.
Drills have different spiral angles. The less the drill spiral is twisted, the better the cutter will be. And sharpening such a drill is much easier. Plus, such cutters vibrate much less.
When examining the cross-section of the cutter, you will notice that the largest diameter is only at one point through which the cutting edge passes. At any other point in the section, its diameter is less than the original one.
Air flows passing through the backing grooves prevent the cutter from heating up. Looking at the cylindrical hole being processed, in which milling takes place, we notice the movement of air, which cools the cutting tool well. The cutting edge of the cutter touches the surface being processed at only one point, nothing interferes with the process. Air currents also help remove cut chips.
To begin work, we will need a marker for marking. Since we will be processing two identical spirals, we will paint over one of these spirals with a marker so as not to miss when sharpening.
Take a drill and grind it along a spiral turn, passing once. We cut off part of the metal until we finally get the profile we need. We grind with small ribbons, making backing. This operation must be carried out without fail on both one spiral and the second. A cutter with a back that is too flat will not show good cutting properties.
We will carry out the work on a household machine, which is perfect for turning our drill into a milling cutter. In the process of sharpening the drill, we will need to hold it at a certain angle. On this machine we can do this very easily, unlike other machines in which the jaw is located far from the circle. It will not be possible to place the drill on them at the desired angle to the disk.
How to make it yourself
Having prepared everything necessary for work, you can proceed directly to the remodeling process:
- Use tape or a marker to mark the part of the drill bit that you want to keep. It is usually about half the size of the entire instrument. Don't forget to leave a small reserve for sharpening.
- Saw off the remaining part in a convenient way.
Using a machine, use a rough wheel to form an approximate drill profile. If you look closely at the cutter cut, you can see that the clearance angle is quite large, about 40 degrees. Shape the back surfaces.
Place a diamond wheel and gradually bring the cutter profile to the desired one. You also need to form a spout (centering). Then carefully process the shank.
If there is a thin circle, use it to trim the edges. This way you can achieve maximum resemblance to the factory tool.
- Check the alignment, making sure that the resulting spout is exactly in the center. To do this, draw 1 line on one side of a piece of wood, and then turn the drill 180 degrees and draw a second line. If they coincide, it means the alignment was done correctly.
After sharpening is completed, you can begin testing your homemade cutter. We place the resulting attachment on the router and make several holes in the wood. If everything was done correctly, the holes will be of high quality, perfectly rounded, even. The wood is perfectly milled, without any effort. To compare the result, do the same with a branded drill. As a result, you can see that there is almost no difference.
This homemade product will save a lot of money, since factory cutters are very expensive. It turns out to be of high quality and reliable. But for an excellent result, you will need to practice on old drills, comparing them with wood cutters, and turning out the desired shape. With a little practice, forming the correct angle and edge will be quick and easy.
Website about DIY inventions
Milling cutters from drills (I want to save money))))
The topic was generally discussed, but rather sparingly. I would like to save money on cutters like here
There, the master makes a groove and a tenon with a drill, without any problems, nothing breaks out anywhere, in some places he even works with one hand. Moreover, in the video he himself says that this is a drill sharpened for a milling cutter, wow, that’s a savings of about 10 times, I’m surprised why the forum users haven’t figured it out yet. And if you find Soviet drills at a flea market, you can make yourself expensive cutters; by the way, I also saw Soviet spiral cutters for metal there.
So, how do you sharpen them? Do you need to sharpen only the cutting part, or do the ribbons also need to be processed?
I found an organization in Voronezh that offers cutters from drills [na_63mm_chetjre_zuba_r6m5_gost_1702571.html](na_63mm_chetjre_zuba_r6m5_gost_1702571.html)
[ s_tsilindricheskim_hvostovikom_i_tsentrovjm_otvers tiem.html]( s_tsilindricheskim_hvostovikom_i_tsentrovjm_otvers tiem.html)
Well, and most importantly, how can these experiments harm my new 3612c? otherwise the savings may still be the same. Although the person in the video gave us arguments that would be extremely difficult to refute, that is, a connection made before our eyes
Pashumbl wrote: I would like to save money on cutters like here
It’s not about saving money, it’s about the need to cut vertically along the grain
Pashumbl wrote: he himself says that this is a drill sharpened for a milling cutter, well, wow, that’s a savings of about 10 times
Are you comparing rootless HSS with carbide SMT?
Pashumbl wrote: you can make yourself expensive cutters, by the way, I also saw Soviet spiral cutters for metal there.
Have you seen metal cutters? They are for completely different speeds. You can make a bunch of poop out of them and suffer until enlightenment. and then go and buy inexpensive Enkor cutters, as other thinking forum users do.
Pashumbl wrote: So, how do you sharpen them? Do you need to sharpen only the cutting part, or do the ribbons also need to be processed?
It will not be possible to resharpen on the knee, there will be a wild imbalance. The milling cutter is a precise tool with minimal axial deviations.
Pashumbl wrote: Well, and most importantly, how can these experiments damage my new 3612c?
if the cutters are crooked, then in addition to the risk of injury, you will break the front bearing of the new router.
sanya1965 wrote: it’s not a matter of saving, but the need to cut vertically along the fiber
He not only cuts vertically, he also makes a groove along the tenon.
sanya1965 wrote: Are you comparing rootless HSS with carbide SMT?
Compared to SMT, all 20 times will work out.
sanya1965 wrote: Have you seen the cutters for metal? They are for completely different speeds. You can make a bunch of poop out of them and suffer until enlightenment. and then go and buy inexpensive Enkor cutters, as other thinking forum members do
With cutters for metal it’s clear, but I bought a little Enkorov ones, they’re not pleasing, if Makita didn’t have speed stabilization, I think they wouldn’t be happy at all, it’s just Makitov cutters, but we have little choice and they’re expensive dogs
sanya1965 wrote: it will not be possible to sharpen the knee, there will be a wild imbalance. The milling cutter is a precise tool with minimal axial deviations.
Ok, it’s clear, so what did the craftsman do with the drill in the video? The topic was generally created to discuss this drill - a cutter that, as we can see, cuts perfectly.
I wouldn’t like to talk about sad things, much less scribble, but: 1) as sanya1965 said above, the requirements for balancing a cutter are much higher than those of a drill, due to the difference in speed between the drill and the router 2) you have to be very risky by a person, in order to give a lateral load to such a “cutter” under conditions of many times higher speeds
Homemade drill made from stainless steel and a metal pin
There are two ways to make a feather drill. For the first option, you need stainless steel (about 2 mm thick), a metal pin - 8-10 mm in diameter and an M6 bolt.
List of necessary actions to obtain the tool:
- Draw a diagram of the future drill on a small piece of sheet metal.
- Use an angle grinder to cut the workpiece.
- Cut off a piece of the required size from the metal pin.
- Place the workpiece against the rod and determine the approximate depth of the slot.
- Check whether the future pen fits into the pin hole.
- On the surface of the metal workpiece, in the middle, use a felt-tip pen to draw the width of the rod. Make holes along these marks.
- Attach the feather to the tip of the rod using an M6 bolt (you can use a thinner one). To do this, use a drill to make a recess in the pin, which will be located at right angles to the slot. Drill the top of the rod to the beginning of the hole. I made a bolt thread in the lower half. Insert the feather into the pin and measure the middle, then remove it from the rod, and at this point use a drill to cut a hole 6 mm in diameter.
- Sharpen the resulting drill with sandpaper or a grinder. Use what you have on hand.
Making the tool will take no more than 30 minutes.
Feather drill from a key
You can make such a drill from an old key. To work you will need:
- an unnecessary key from an old lock;
- emery for sharpening tools;
- grinding machine with a wheel for metal.
First, use a grinder to sharpen the upper half of the key, making it sharp. At this stage, special precision is not needed; we carry out the work “by eye”, since in the future we will still have to sharpen the workpiece.
Then, in a vertical position, excess millimeters are removed from the surface of the key. It is necessary to remove the same thickness. You will have to grind about 5-6 mm. Next, the same work is done with the sides of the future drill. This is how the master adjusts the size of the rod to the required hole size. The workpiece can be turned to any size. The main thing is not to forget to measure the correspondence of the drill to the diameter of the slot.
The next step is sharpening the joints of the upper part of the key. This is done at a slight angle, for more convenient work with wood and plastic in the future. Then remove the head of the workpiece with a grinding machine and remove any irregularities with sandpaper. The feather drill is ready. You can safely insert it into the drill chuck and make the desired hole. This manufacturing option is quite fast, it will take 20-25 minutes. Such a tool drills no worse than a factory one.
Making a feather drill yourself is not difficult. As they say, the master's work is feared. It is worth doing everything according to the step-by-step instructions and observing caution and safety precautions when working with an angle grinder. And the necessary material can always be found in every home.
In the first method, if desired, the stainless steel is replaced with any sheet metal and a blank is made depending on the diameter of the desired hole. In the second case, any key that is not useful on the farm will do. You can drill wood, plastic, ceramics and glass with this homemade tool.
Source: https://tehnopanorama.ru/diy/2-sposoba-sdelat-perevoe-sverlo-svoimi-rukami.html
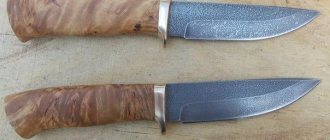
Sharp knife made from quick cutter R6M5
This homemade product is posted for informational purposes only. The creation and use as a bladed weapon is prohibited; according to Article 223.4 of the Criminal Code of the Russian Federation, it is punishable by imprisonment for up to two years!
Materials and tools used by the author:
List of materials:
— R6M5 steel (hacksaw blade); - a piece of wood for the handle; - epoxy adhesive; - a piece of brass for the handle; - oil or varnish to impregnate the handle.
List of tools:
- Bulgarian; - vice; - grinder; — orbital sander or machine; - drill; — a clamp (the author’s homemade one is made from wood); - marker; - sandpaper; - jigsaw.
Knife making process:
Step one. Cutting out the main profile
First we need to figure out what our knife will look like. Draw the profile of the knife on the workpiece using a marker. Well, then you can start cutting. We cut the workpiece using a grinder, but when cutting P6M5 there is one nuance. This steel is quite brittle and breaks when subjected to strong bending. All we need to do is make small cuts with a grinder in the areas that we need to remove. Well, then we break them off with pliers, like glass.
The final processing is carried out manually using fine sandpaper dipped in water. Well, at the very end, the blade can be polished on a machine using GOI paste or another paste.
Step four. Brass insert
There is a brass insert at the front of the handle. We select the desired piece of brass and drill a series of holes in it. Then these holes are bored out with a flat file so that the shank of the blade can fit in. At the same step, you can immediately give the workpiece an oval shape on the sharpener. The author immediately polished the part on the machine, since this would be much more difficult to do later.
Step six. Final modification of the knife
When the glue dries, we take out our knife and draw the desired handle profile with a pencil. Next, we cut off the excess with a jigsaw; the fastest way to do this is with a jigsaw. We grind the handle to obtain the desired profile, rough processing can be done on a sharpening machine or grinder. Well, we carry out finer processing manually using sandpaper. Making the handle absolutely smooth.
I hope you liked the project and found useful information for yourself. Good luck and creative inspiration if you want to repeat the homemade product. Don't forget to share your ideas and developments with us.
This homemade product is posted for informational purposes only. The creation and use as a bladed weapon is prohibited; according to Article 223.4 of the Criminal Code of the Russian Federation, it is punishable by imprisonment for up to two years!
Source
Become the author of the site, publish your own articles, descriptions of homemade products and pay for the text. Read more here.