A plumbing tee is a very versatile fixture. We recently wrote how to make a mallet out of it, and now we’ll tell you how to make an oil lamp. This thing is suitable for decorating a room, for example, if its design is in a loft style or you love steampunk.
What do we need
Necessary materials:
- Paraffin oil
- Glue
- Brass tees, angles, bends, plugs, tap
- Steel adapters from 1/2 inch to thin hose
- Liquid fluoroplastic sealant for threaded connections
- Cotton ropes
Adapter
Rope
Seal
Tools required:
Manufacturing process
Let's look at the manufacturing process:
- Coat the threads of the tee with liquid sealant. Next, this must be done with all threaded connections.
- We connect two tees by means of a drive.
- Two corners are screwed into the side holes of the second tee. Use the key to set them in a stable position.
- An angle is installed into one hole of the first tee using a long bend.
- A tap is screwed into the other hole through a short bend in the closed position, secured with glue.
- A tee is screwed to the tap.
- Two adapters with 1/2 inch to inch are installed in the tee holes. The top one is used for refueling.
- A distribution comb with a plug with a rubber seal is installed in another adapter. This entire structure is strengthened with a key.
- We make three wicks from the rope.
- The wick is inserted into steel adapters on the hose.
- The adapters with the wick are screwed into the holes of the distribution comb.
- The resulting lamp is filled with paraffin oil, and then the wick is set on fire.
- After working out, the neck from the adapter can be closed with an inch plug
This lamp is non-explosive and looks stylish. It can serve as a decorative element of the interior, and also help if your lights go out.
Source: https://remboo.ru/design/maslyanyj-svetilnik.html
Classic version
Today, olive oils for lamps are very popular. In some cases, the main component can be replaced with sunflower or corn oil. Of course, this is not the worst option, but it also has its drawbacks. Lamps filled with such oil will go out, clog the wick, and also form carbon deposits. This effect occurs as a result of the fact that after interaction with oxygen, fatty substances undergo oxidative polymerization. Films form on the surface of the solution. If you need to understand what lamp oil is made from, you should understand that flaxseed, corn, sunflower, hemp, and rapeseed oil can be used in production, but this is not the best option.
DIY lamps and lamps made from pipes: four simple instructions
For a true jack of all trades, leftover building material is a real treasure. From piles of rubbish he is able to create masterpieces suitable for interior decoration and useful for everyday use.
There are enough leftover plastic, plumbing fittings, plugs, and metal fasteners to create a beautiful and functional pipe lamp that can be hung on the wall or used in place of a table lamp.
If the finished product seems simple to you, you can complicate its design by adding metal parts - pipes, bolts, nuts, legs from fittings
Self-assembly of lamps from pipes
Even people who do not know the basics of plumbing can build a product from sections of pipeline, metal and plastic parts, and it will not be difficult for specialists involved in laying communications every day to come up with their own, unique, interesting options. The suggested instructions are just examples of how quickly and easily unnecessary materials can be turned into useful things.
A plumber's dream - a lamp made from a water pipe
For the installation of household communications, polypropylene is increasingly being used - a durable, flexible, reliable material that is resistant to rust and performs its functions for decades.
The systems are installed instead of outdated metal pipelines, which are dismantled and thrown into a landfill.
Let's take a few used iron parts and make a simple, convenient lighting device from them.
We will need:
- 1 pipe of arbitrary length;
- 2 flanges for stands;
- cross as a connecting element;
- 2 knees;
- electrical cord with switch;
- lamp (energy saving or LED);
- cartridge, coupling for fixation.
If the diameter of the base is 20 mm, then the remaining parts have the same cross-section.
Strictly technical, rugged lamps and cozy home floor lamps - all made from ordinary water pipes
The assembly process is simple. We connect the elbows and flanges with the cross - the stand is ready. We insert the pipe from above, then screw the coupling. We thread the wires, be sure to make insulation, since metal conducts current, screw in the light bulb. A few simple manipulations - and the original lamp made from water pipes is ready!
To give old parts an aesthetically attractive look, we clean all the elements with fine sandpaper and coat them with metal paint.
Video: Functional robot lamp made from pipes and fittings
Wall lamp made of flexible metal-plastic
For the wall-mounted version, we need a more dynamic tubular LED lamp that can be directed in different directions, and here metal-plastic products come in handy. Unlike plastic parts, they are durable, have elasticity, in other words, they bend.
The ability to bend and take different shapes will help make the lamp unique
For convenience, it is better to make the base, which is mounted on the wall, from a piece of wood - solid pine, birch blank, or a piece of thick plywood. We drill a hole in it for the flexible element. We grind out a body for the cartridge from a small block, taking into account that a movable fragment will be attached to the other side.
A ready-made wall lamp made from pipes is an excellent backlight for paintings or photographs.
All that remains is to complete the assembly. We insert an electric wire, previously threaded through the base, into a metal-plastic blank (20 to 50 cm long), fix the cartridge and make insulation.
We fix the base on the wall, screw in the LED element and enjoy the resulting effect.
It remains to add that the flexible tube for the lamp can be turned in any direction, and if desired, even tied in a knot if the length allows.
The cost of metal-plastic products of medium diameter is low - from 60 to 100 rubles per linear meter
Video: LED lamp made of plastic pipe
Three-arm horizontal illumination
A convenient lamp made from several movable copper tubes on a metal base can create full-fledged lighting for a small room or illumination for paintings, photographs, collages or shelves with souvenirs.
To work, you will need pieces of metal pipes of the same diameter, copper bendable tubes for making horns, several tees (according to the number of horns), a half-flange (for fixing the lamp on the wall or ceiling), plugs, electrical wire and fasteners. You will also need lamps - it is better to take LED lamps that do not heat the surrounding parts and the illuminated surface.
The tools necessary for assembly are found in every home:
- jigsaw or hacksaw for metal;
- pliers;
- screwdriver;
- drill and thin drills;
- insulating material;
- metal paint, brush.
First you need to prepare the copper tubes, then screw the base and finally assemble everything into a single structure. We make horns for lamps from copper blanks 30-40 cm long.
To do this, they need to be carefully bent so that they take the form of a smooth arc. Beware of creases, as the corners on the tubes will spoil the appearance of the structure and will prevent the passage of the electrical wire.
We screw compression fittings onto the ends, thread the wires, secure and insulate the cartridges.
We clean the metal pieces, paint them, and after drying, we twist them into a long pole.
We attach copper horns to it at regular intervals, not forgetting about the safe connection of electrical wires.
We fix the lamp we assembled with our own hands from pipes on the wall or ceiling so that the rays illuminate the desired area, screw in the light bulbs and check. The design in a trendy industrial style is ready.
LED night light made of plastic pipe
Plastic is easy to process, so there are a lot of possibilities for decorating lampshades and shades made from this pliable material. Openwork lamps made of plastic and polypropylene pipes are installed on the floor, on a table, and used as a table lamp or night light.
History of origin
The lava lamp was invented by English engineer Edward Craven Walker in the 1960s. Its production was established in Poole, UK. At the Brussels Fair in 1965, the glow of the device was seen by famous entrepreneurs Adolf Wertheimer and Hy Spektor. They bought the rights to sell the product in America, which they called Lava Lite. Wertheimer subsequently retired from this business. Edward Craven Walker's first lava lamp samples
Spector, on the contrary, began to actively develop production and sales of lamps at his own factory in Chicago. New colors, manufacturing technologies, and many design options have appeared. The 70-80s of the last century were marked by the fact that ownership of these devices became all the rage. Fans of lamps really liked the warm, original glow. They were called Lava Lamp. These devices are very popular among residents of America and Europe.
After the 90s, the production of original lamps was moved to China. Soon after, Walker, who owned the rights to his invention throughout Great Britain and Western Europe, sold them to Cressida Granger. Her company Mathmos has been successfully producing these products in Poole (UK) to this day. The production of lamps has returned to where it began. This device was recognized as the most spectacular home interior decoration.
Loft lamp made from pipes: master class
Not every connoisseur of the loft style can afford to live in a real former workshop, if only because there are not enough abandoned factories for everyone. But industrial-style decor is quite affordable. Moreover, you can do it yourself.
To write today’s article, we went to the Palleto loft picnic that took place recently in Moscow and, under the supervision of the craftsmen from The Sarai, we assembled our first lamp from pipes and sawn wood. We share with you the subtleties and secrets!
You will need:
- Fittings for cast iron or steel pipes: couplings, tees, bends, barrels, angles (including transitions), threaded flange.
- Cartridge with thread and wiring.
- Wire with plug and switch.
- Heat-shrink tubing.
- Drill with regular and feather drills.
- Self-tapping screws.
- Decorative incandescent light bulb.
- Wood cut.
Step 1
Gather everything you need for the rack. Make sure that the parts match the threads. Required elements: a flange to screw the structure to the saw cut, and a transition angle into the wide part of which you will insert the cartridge (we, however, used a coupling).
Step 2
When all the parts are found, go in search of a suitable socket with wiring. Ideally, the cartridge should have a thread that matches the angle/coupling, but you can take a smooth one if it fits tightly enough into the cavity.
Step 3
Prepare the base: drill holes in the cut for the wire (as in the photo): expand the vertical bottom with a feather drill and make a horizontal exit. Pull the wire through the holes.
Step 4
Start assembling the lamp stand. Pull the wire with the switch from the base side, and the wiring from the socket from the opposite side. Connect the wires and finally twist all the parts.
Important!
Since the lamp is metal, the wires must be connected and insulated as reliably as possible. Instead of using traditional electrical tape, use heat-shrink tubing to secure each of the two wires together first, then insulate them together again. The tube is shrinked with a hot air gun, but at home you can try using a lighter.
Step 5
Place the lamp stand on the saw cut and mark where it will be attached to the screws. Use a thin drill to make holes in these places. Using a screwdriver or screwdriver, screw the pipe structure to the cut.
Step 6
Insert the light bulb. Your lamp is ready!
Daria Myshlennikova, The Sarai
Source: https://kvartblog.ru/blog/loftovyy-svetilnik-iz-trub-master-klass/
Precautionary measures
A lava lamp, like any other device powered by electricity, requires precautions to be taken during its operation. To avoid harm to health and damage to the lamp, remember the following:
- It is unacceptable to transport the device in cold weather and store it at low temperatures (less than +5 C).
- The lamp should not be exposed to direct sunlight. Overheating the product can cause the wax to fade and damage the device.
- It is prohibited to shake the lamp connected to the network, move it, drop it, or perform any active manipulations with it. If you do not want the liquid in the flask to become cloudy, leak out or explode.
- Do not use additional light or heat sources to heat the device. An incandescent light bulb is sufficient to ensure normal operation of the device.
- According to the instructions, only incandescent light bulbs can be replaced. The rest of the design is not allowed to be changed.
- To maintain the integrity of the device and your own safety, it is recommended to act in accordance with the operating instructions for the lava lamp.
Often, neglect of safety rules and manufacturer's instructions leads to product failure. Warranty obligations do not apply to damage caused by the consumer.
Homemade lamp from a water pipe
One of the tools that helps create a comfortable environment in the home is a beautiful lamp. The stores offer a wide variety of models. The better and more beautiful the device, the more expensive it is.
Therefore, many craftsmen decide to make lamps from pipes with their own hands. There is nothing complicated in such a process: having simple parts available, you can make a unique design.
Plumbers can make such devices with particular ease.
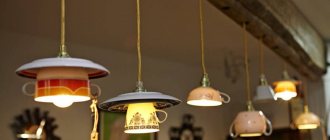
Assembling a chandelier from pipes
Conventional chandeliers are chosen as the main source of light in living rooms, kitchens and bedrooms. A device made from scrap materials will help you diversify the design of your room and stand out from your friends and acquaintances.
To assemble a lamp from polypropylene pipes and fittings, you will need the following components:
- a lampshade with a grille from an industrial lamp;
- two pieces of plastic pipes;
- the wire;
- plumbing tee and angle;
- two flanges, the same size as the cartridge;
- wooden block or other base;
- spray paint;
- paper;
- screwdriver and screws.
Assembling a lamp from PVC pipes
First, disassemble the lampshade by removing the grille and socket; if a lamp with a grille looks good in your interior, then leave it. Screw the metal flange onto the outside of the cartridge. Be careful not to damage the wires.
Screw the plastic pipe to the metal flange, then attach an angle in series, then another piece of pipe, a tee, and finally end with a flange again. With each new part, do not forget to stretch the wire.
Make several of these structures, and after everything is ready, they can be screwed to a wooden base. Don't forget to bring out and connect the cables to the central system.
The finished product can be painted in any color so that it matches the interior of the room. Don't forget to lay down paper before doing this so as not to stain the floor.
Screw in the lamp and, by flicking the switch, check the functionality of the PVC pipe lamp.
By excluding the corners from the design and lengthening the plastic pipe, you can make a floor lamp. The main thing is to prepare a stable foundation.
Wall lamp made of flexible metal-plastic
You can independently assemble wall lamps from water pipes with rotating lamps. To change the angle of incidence of light, it will be enough to turn the lighting fixture in the desired direction. During work you will need:
- flexible plastic pipes 20-50 cm long;
- solid birch, pine or thick plywood for the base;
- electrical wire;
- socket and lamps;
- jigsaw;
- screwdriver and screws;
- spray paint and paper;
- sealant.
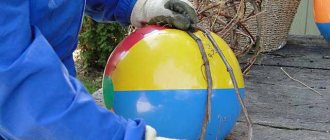
Operating principle
Let's consider the design of the device. The sealed container is filled with two dissimilar substances - paraffin, which has a semi-liquid state, and glycerin. Under natural conditions and normal room temperature, paraffin sinks in glycerin. An incandescent lamp located on the lower flange of the base of the device heats the layers of the substance to the desired temperature.
When the lamp is turned on, the paraffin softens due to heat. It becomes lighter, as a result of which it slowly moves up the cylinder of the device body. The process of changing the temperature regime is carried out unevenly. As the temperature fluctuates, the paraffin floats up chaotically. Moving towards the surface of the liquid, it moves away from light and heat. Schematic diagram of the functioning of a lava lamp
Having reached the surface, the paraffin hardens, stops moving, and then slowly sinks. Being near the bottom, the light bulb heats it up again. The whole process is repeated again. Air bubbles throughout the thickness of the multi-colored illuminated liquid are formed at different speeds, mix, and take on bizarre shapes and sizes.
The lava lamp has gained immense popularity among aesthetes all over the world. It is now sold in every gift shop on the planet. Instead of paraffin, natural wax is often used. Lava lamp color options
This product is an indispensable attribute of every children's bedroom. The illuminated layers move slowly, smoothly and beautifully along the transparent cylinder of the flask, reminiscent of multi-colored volcanic lava. Contemplating the spectacle of the lava working, a person plunges into a state of relaxation. At the same time, his body cells relax as much as possible, and the body gets the opportunity to fully relax, charging with positive energy for the future.
The light bulb that illuminates the moving masses of paraffin along with glycerin can be of different power. The main requirement is to calculate its characteristics so as to prevent the ignition of nearby objects. When lava functions, the entire interior space of the room comes to life. All surrounding objects become fabulous, shimmering with various exotic colors. Large table lava lamp
Oil lamp
Kerosene and oil lamps were widely used at a time when electricity did not exist.
But even today, in the event of a power outage, as well as during a hike or stay at the dacha, you can use an oil lamp.
A rarity that was popular in ancient times will be difficult to find and purchase today, but you can learn how to make an oil lamp with your own hands.
How to make an oil lamp: features
Oil lamps from jars
For oil lamp lighting to be effective, certain conditions must be met:
- Not any oil is suitable for ensuring that the wick burns evenly and for a long time, and, moreover, brightly. In this case, you need to choose an oil intended for aroma lamps and candles, or sewing machines; it is also good to use lamp oil. In camping conditions, in the absence of anything else, you can use vegetable matter.
- The wick should have a large diameter. You can even use rolled cotton wool.
- A container that is too wide, such as a saucer, is more fire hazardous than a small one, especially when lighting an oil lamp inside a tent.
DIY oil lamp
Homemade oil lamp from an incandescent light bulb
A DIY oil lamp can be very useful in camping conditions to illuminate the area inside the tent. However, you need to know how to make it correctly.
The basis of such a lamp is oil and wick. To make a miniature oil lamp, you will need the following materials:
- Match
- Copper wire
- Wool thread, preferably thick
- Oil
- Tin stopper
A thick woolen thread will act as a wick, and the thicker it is, the better. It absorbs any substance well, be it liquid or oil, lifting this substance upward. The basis for the thread should be a support, which is used as a match, on which copper wire is wound in tight rings.
When the match is completely wrapped in wire, it is removed from the loop. You should end up with a copper spiral, the end of which needs to be bent slightly to ensure stability. After this, you need to wind the thread tightly onto the resulting spiral from bottom to top, threading it between the rings.
The end of the thread should remain free at the top; it needs to be fluffed up a little.
Next, you need to take a tin stopper and pour in a small amount of oil, enough for the thread wick to be saturated to the top. In addition to the cork, you can use any metal container in which you need to place the manufactured wick.
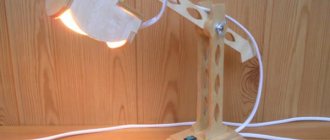
Another option for making an oil lamp is to use a regular light bulb. For this you will need:
- Old or new light bulb
- Cotton fabric wick
- Syringe
- Steel or copper wire
- Oil
- Set of tools
The light bulb will serve as a container for oil with a wick. To prepare it, you need to make a hole in the base: hook the protruding contact of the lamp with pliers and pull it. After this, you need to remove the black polymer around the contact and everything else that was there from the glass bulb of the light bulb.
Next, you need to check the wick for suitability: set it on fire and look at the result. If it produces loose ash, then the wick will burn well. If the fibers begin to turn into something resembling plastic, the wick is not suitable for an oil lamp. You need to measure the required length of the wick so that it is completely immersed in the bulb from the lamp, protruding about 1 cm from it.
To fill the glass flask with oil, you can use a 10 ml syringe. When the oil in the flask runs out, you can always add it.
You need to make a wick holder from the wire. To do this, use pliers to bend the wire into a spiral with a wide base. You need to make a slight curve on top of the wire so that it holds onto the top of the bulb from the light bulb.
After making the base, the wick is soaked in oil and lowered inside the flask, secured with wire. If the cotton wick on the wire does not stick out about 1 cm from the bulb, it will create a lot of soot.
The oil lamp is ready, you just need to light the wick and make sure to change the oil on time and tighten the wick as it burns. By the way, such a lamp will be an excellent interior decoration. But for this it is necessary that it be located on a stand.
What type of oil and wick should I use?
Lamps that use kerosene or lamp oil have specially made wicks. Long cotton wicks are not suitable for vegetable oil lamps because vegetable oils are highly viscous.
Long wicks simply do not take up enough oil and go out. Floating wicks work great with all vegetable oils!
How to make an oil lamp
This craft is interesting for those who live in regions with frequent power outages. It will be useful for travelers and those who like to go out into nature with an overnight stay. In the latter case, an oil lamp will help save battery power, which is usually used to illuminate the stopping place in the dark.
For the lamp, they find a centimeter-wide strip of tin and, bending it, form a thin tube of approximately 7 mm in diameter. A wick made from a medical bandage is inserted inside, twisting it into a flagellum.
They tie a tin tube with soft copper wire, leaving lengths on the sides, with hooks at the ends. Using the latter, the wick is suspended in the jar (the hooks lie on the edges of the neck) at approximately half its height.
The container is filled with sunflower oil - level to the middle of the tin tube. It is better if you use purified, light oil. If you use an unrefined one, the wick quickly becomes clogged with combustion products, which affects the quality of combustion and, naturally, the lighting.
The wick, which is moistened with vegetable oil, burns evenly inside the container. The brightness of the lamp is approximately the same as that provided by a stearin candle.
Thanks to the placement of the wick inside the jar, the lamp works well in the wind and does not blow out. You need to monitor the length of the wick - if it protrudes from the tube strongly, it burns brightly and with a high flame, which leads to the glass quickly becoming covered with soot.
When the lamp burns, the amount of oil in the jar decreases. It needs to be topped up; You can do this... with water. The latter, having a large specific gravity, sinks down and displaces the oil upward, to the wick.
After use, the lamp is extinguished, the tube with the wick is lowered to the bottom, and the jar is closed with a lid on top. So you can carry it with you when moving to another place. If necessary, remove the lid, hang the wick as described above, light it and use the lighting. At the same time, do not forget to add oil when it is almost empty.
To improve lighting, the lamp can be supplemented with a reflector. It is cut out from the body of a beer can in the form of a complex figure. It is based on a rectangle, at the bottom of which there is a protrusion 1 cm wide and approximately 1.5 cm long. It is bent to form a tube into which the wick is inserted. It is placed at a distance of 1...1.5 cm from the reflector plane.
In the upper part of the rectangular plate, side projections are left, with which it rests on the edges of the neck when placed inside the jar. The reflector is given a concave shape in diameter.
A further improvement of the oil lamp is the installation of two wicks in it.
Source: https://izdoski.com/kak-sdelat-maslyanyj-svetilnik.html
Step-by-step instruction:
Step 1: Collect glass bottles and jars and fill them with flowers or other decorative items. Fill with water.
Step 2: Pour some vegetable oil on top until the oil forms a layer about half a centimeter thick.