For beds, slats can be made exclusively from wood. The most commonly used are birch and poplar. This material was chosen for its flexibility and resilience. Wood also contributes to excellent ventilation of the mattress.
A double bed with slats is an ideal orthopedic sleeping option.
Experts believe that 30 slats are enough for a double bed, and several times less for a single bed. Manufacturers do not adhere to this opinion and place 20-22 pieces. But if you decide to make slats and a bed with your own hands, you can independently calculate their number.
Double bed option with a standard set of slats.
The benefits of making furniture yourself
Among the advantages of making your own bed and slats, the following factors are noted.
- Environmentally friendly. Natural material, that is, wood, cannot adversely affect human health.
- Durability. A product made with your own hands will last for many years. The bed can withstand heavy loads, which confirms its strength.
- Custom size and design. The bed will be made with your own hands according to your drawings. You can adjust its size and shape to the desired parameters. You don't have to look for a place to place a large bed.
- Saving. This applies not only to indoor space, but also to funds. You independently calculate the amount of material needed and purchase them. This will cost several times less than buying a ready-made product in a store.
Option for self-installation of lamellas
Bed design and construction
The designs of single or double beds made of wood are quite similar and quite simple. Both types of furniture consist of the following parts.
Durable lamellas with metal fastenings, installed by yourself.
- The mattress on which a person will sleep is located on a flat base or slats. For the first option, use a thick sheet of plywood. The lamellas are transverse strips. This design is preferable. The mattress will not deform on it; the slats themselves are quite elastic. This design is more comfortable for sleeping.
- Planks or plywood are placed on a frame made of high strength beams.
- Side panels or legs can be used as a support to which the frame is attached.
Slats are a durable orthopedic base for beds.
When choosing the size of your future bed, it is recommended to rely on the parameters of the mattress. It is also worth considering the location and location of the product. The standard size of a single bed is 200-210 cm long and 90-100 cm wide. For a double bed, the length remains the same, but the width is 180-200 cm, that is, it doubles.
Standard slats for bed bases.
The height of the product is a rather subjective parameter. It all depends on your preferences.
Important point
When cutting the tread, make sure that the cuts are clean. This means that the rubber being cut should under no circumstances melt or burn. A tread cut under such conditions will not last very long. The cuts should look as if they were made with a regular cold knife. And if the rubber burns, it means the regulator has overheated and should be turned off for a while.
So, we found out that making a regrower with your own hands is not at all difficult and even a novice car enthusiast can complete this task. But you should remember: it’s not enough to have a homemade regulator, you also need to be able to use it correctly. And if you don’t monitor the heating of the blade on such a homemade machine, you can hopelessly ruin even a high-quality tire.
Purpose of the cross bar
It has already been noted that instead of a crossbar, a thick sheet of plywood can be used. It is worth noting the advantages and purposes of the lattice in order to understand that it is preferable.
Selecting the type of fastening for the slats at the base of the bed.
- Reducing the load on the sleeping place. Thanks to this, the quality of the product is enhanced and the service life is increased.
- Has spring quality. The bar is elastic and therefore all the load that acts on it is distributed evenly.
- During sleep, your spine will take the correct position.
- The grille is attached using special holders. This makes the structure reliable and subsequently avoids squeaks and noise.
- The bar is positioned in such a way that natural ventilation of the sleeping area can be carried out from all sides.
The process of creating a bed base and frame from slats
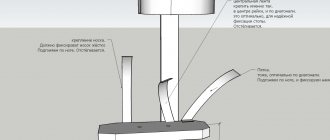
How to bend a blade without breaking it?
Blade for regrouver
When making a homemade device for cutting tread, an important role is played by a knife or blade with which the rubber will be cut. The knife for these purposes must be very sharp and thin. When making a regroover from a soldering iron, you can take a stationery knife designed for cutting paper. In the case of a burner, it is better to use a razor; it has a smaller blade cross-section than a knife, so it will heat up faster. Please note: if you try to bend a knife or razor into a U shape, the brittle metal will most likely break. You can get rid of this problem if you first burn the material from which the knife or razor is made. This heat treatment increases the ductility of the metal and reduces brittleness.
For firing you will need:
- pliers;
- burner;
- razor or knife blade.
Firing is performed in the following sequence:
- The blade is heated over the fire to a temperature of 400 0C. You can tell that the material is sufficiently heated by the reddish tint that the metal takes on. It is easier to distinguish this shade in a dark room.
- After heating, the material should be allowed to cool in the open air for about 6 minutes.
This procedure will increase the plasticity of the blade and allow it to be bent at the required angle. The specified angle depends on the desired shape of the tread grooves; it can have a different shape, in most cases it is the English letter U.
After giving the blade the desired shape, a wooden block is placed inside its outer parts, then this structure is clamped with a vice. Next, a hole is drilled in the blade for the mounting bolt.
Necessary materials
Before you buy everything you need and make the bed with your own hands, as well as slats, you should complete a detailed drawing. For a standard double bed you will need the following materials.
The process of distributing slats along the base of a single bed.
- 3 boards with dimensions 200x30x3 cm. They will become the walls and headboard of the product.
- 2 boards measuring 250x30x2 cm. They will become the sides of the bed.
- 5 bars, each length 200 cm, section 4x4. Needed for the manufacture of supporting structures, supports and legs.
- The rail measures 150x4x2 cm. It will become a crossbar at the base of the bed. The rail is needed to secure the headboard boards.
- Stain.
- Wood glue.
- Varnish;
- Self-tapping screws.
The lamellas can be attached either using fasteners or using self-tapping screws.
It is worth clarifying once again that the amount of material is indicated for a standard double bed. You should select everything in accordance with the parameters of the future product and drawings.
How to correctly insert slats into the mount.
Repairing bed slats
If the bed slat (slat) is broken and cannot be sealed, you will need to purchase a new piece. Bed slats can be found in furniture stores or ordered online. Sheets are made in a single copy in carpentry workshops. Measure the element and contact the specialist. In just a few minutes, a new slat for your bed will be made for you. In workshops and stores you can order and buy not only foil, but also holders for cans. Although these elements are made of durable plastic, they can also break under constant stress.
Required Tools
To assemble the bed yourself and make the crossbar, you will need a drill, cutter, and sandpaper. Also prepare a hacksaw and pencil. For measurement and accuracy, rulers, tape measures, and a square are useful. Among the tools needed to make a bed yourself should be a plane, a screwdriver and a jigsaw.
Installation of slats in the base of the bed can be done independently; this does not require any expensive equipment.
Equipment for tire retreading
The tread can be restored using a special device – a regroover. Its operating principle is based on deepening grooves using a hot blade.
Heating of a working tool can be direct, when a current passes through the blade, heating it, and indirect - the knife is heated by a soldering iron or the tip of a burner. On sale you can find regrovers only with direct heating. This is a rubber cut44 tire tread cutting machine. It is difficult to make an analogue of such a device on your own. You must have a welding converter.
Any motorist can make a tire tread cutting machine with indirect heating of the cutting element.
You need to have the following tools on hand:
- vice;
- pliers;
- gas or gasoline burner;
- drill or screwdriver with a drill with a diameter of 4 mm;
- hacksaw for metal;
- file;
- screwdriver.
To assemble the device you will need:
- medium power soldering iron – 300-350 W;
- bolt with nut M6;
- an old kitchen knife, you can take a stationery knife for cutting paper with a thin and narrow blade.
The only difficulty is in the process of obtaining the cutting element. Not many people know how to bend a knife without breaking it. The technology is very simple. The blade metal is heated to a temperature of 450 degrees C and then cooled in air for 6 minutes. Bend it after this is not difficult.
The future cutter is shortened to the required size with a hacksaw, and then attached, using a bolt, to the soldering iron tip. The soldering iron itself is also pre-treated. Its tip is processed with a file on both sides, and then drilled with a drill (4 mm drill). When choosing a mounting location for the cutter, you should consider the possibility of changing the depth of cut.
Industrial regrovers come with instructions for the tire tread cutting machine. Naturally, homemade products do not have it.
Therefore, it is important to follow a few simple rules:
- changing the tire pattern is only allowed on SUVs and swamp vehicles;
- the maximum groove depth should not exceed 9 mm;
- It is allowed to cut the tread of solid tires without appropriate markings. Such tires are used in loaders and special equipment.
Manufacturing process
After purchasing the required materials and preparing the tools, you should begin marking and further cutting them. It is recommended to adhere to the following rules in this process.
The ideal method for attaching slats is with metal fasteners.
- Make a detailed drawing of the future bed, indicating all the exact parameters.
- Write a list of all the parts needed for the product. Indicate how much material is needed for each of them.
- It is recommended to make markings in places for future cuts using a cutter or pencil and always a ruler.
- When making parts with identical parameters in several copies, you should make one and leave it as a template. This will make the process easier and faster.
- The cut areas must be cleaned with sandpaper.
Ortho frame for baby crib
After making the marks, you can begin building the frame.
It is recommended to begin assembly by measuring the parameters of the mattress that will be used on this bed. It fits freely into the frame frame.
Slats are increasingly being used to provide an ideal and durable base for beds.
Using the taken parameters, saw off 2 end and long boards, which will become the sidewalls.
Reinforced block of slats for a high-quality bed base with a high degree of load.
Gather the resulting pieces into a rectangle. To fasten them together, you can use wooden spikes or eyes. Cut holes with a jigsaw. Can be hollowed out with a chisel.
Orthopedic base with adjustable positions
The resulting eyes are lubricated with glue and connected. Align everything at a 90 degree angle and, using clamps, secure until completely dry.
Choose the type of lamella fastening that will be the most durable and reliable.
The frame is ready. It is quite reliable and strong. To make assembling the base of a wooden bed an easy process, you should connect the parts using self-tapping screws that have additional fastenings and metal corners.
Orthopedic double bed frame made of slats.
After the frame, they begin to install the legs. Cut several bars of identical length. They are mounted in the corners of the product. They can be inserted into the frame or secured from the outside, from the inside.
Lifting bed base
To insert the legs directly into the base, use tenons to secure them. This is the most reliable option. If the width of the bed exceeds 220 cm, the 5th leg should be installed in the middle of the product. To do this, a longitudinal board is mounted, to which it is attached.
Bed base mounted on five legs
Which lamellas are better – narrow or wide?
All lamellas can be divided into:
- Wide planks (from 50 to 70 mm). They are optimal for mattresses equipped with spring blocks or latex springless products. They are mounted at a distance of 4 to 6 cm from each other. Wide lamellas are convenient to use on tape, since if the length of the frame changes, they can be moved closer or further away.
- Narrow crossbars (from 30 to 40 mm). They are used for mattresses that have independent springs with high density. A grid of frequent narrow slats is used for folding beds, cribs and transformable beds.
By moving or moving the cursors along the bar, you can decrease or increase the stiffness in a specific area.
Important! The distance between narrow slats should not exceed their width.
Final stage
Now you can proceed to assembling the slatted base. These are cross bars that support the mattress and prevent it from deforming.
Slats at the base of the sofa
- Tap the fastening locking strip along the base, side and end parts.
- Mark at a height of at least 100 mm of the edge from above.
- The rail is attached around the entire perimeter using a solid line and a dotted line. You can use a metal corner instead.
- You will need a block with a section of 30x30. Use it to make a frame for the crossbar. They fasten it according to the internal parameters of the base.
- Then a rail measuring 150x4x2 cm is placed on the frame. Fasten it across the length. The distance is at least 5 cm.
The lamellas must be attached to the metal frame using metal fasteners.
If you carry out all the steps strictly following the drawings, you will not have any problems with installation. At the final stage, the base should be treated with sandpaper and coated with varnish.
The chalk holder can be completely invisible, but at the same time as durable as possible.
You should carefully consider the choice of covering for the finished bed. After all, it must completely fit into the interior of the room. Before coating the product with varnish, it is recommended to first tone it. Stain is suitable for this.
Reinforced metal fastening for wooden slats
It should be applied evenly using a brush. The surface should be varnished only after the stain has dried. It is necessary to make 2 layers of varnish.
Do-it-yourself bed slats: what to make from, how to install
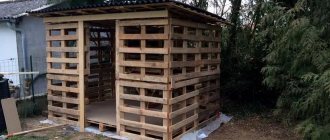
Good day to all! As part of our material today, I want to talk to you about do-it-yourself bed slats. I am one of those who consider this very basis to be the most correct and useful from the standpoint of human health. It is the lamellas that provide orthopedic properties, complementing the capabilities of the mattress.
Rest assured that a bed with a solid base, but with an orthopedic mattress, will be less beneficial and effective for your spine than a combination of slats and a similar mattress. We have already discussed choosing a bed base, so you can simply re-read the material at the link.
And we move on to our topic.
Materials used
Let's start with what to make homemade slats from. Sometimes you have to repair the base of a bed with an orthopedic base yourself when the factory slats are broken. And sometimes it makes sense to make them yourself, before replacing the old ones, without buying them on the construction market.
Before preparing drawings or thinking about how the installation is carried out, you should make a choice.
Lamellas made on professional equipment, also called latoflexes, are wooden planks with a certain level of elasticity. Moreover, they are made from not just plywood, but from bent-glued material. But when made independently, they are usually assembled from wood. The thickness of the factory slats is usually 8 mm. In this case, the width can vary from 30 to 68 mm. The curved shape provides additional useful properties and also helps to increase the strength of the entire structure.
Latoflexes are installed across the base of the bed, be it single or double. The distance between the slats is from 20 to 60 mm. However, it should not exceed the width of one lamella.
To assemble a good single bed, experts recommend using at least 15 slats. If you need a bed for 2 people, then the specified quantity is multiplied by 2.
The higher the weight of the users, the more slats with a smaller distance between them should be used.
For double berths, a middle support bar is used, which connects two parts of the base of the berth. This is about the question of how to insert the necessary latoflexes into a double bed.
In this case, the installation of the lamellas themselves is carried out in 2 rows. In fact, here we are talking about 2 identical orthopedic beds, but combined within one frame. The slats, like the frame, can be made from ash, birch, beech, maple, oak and other trees. Pine is considered the least durable. If you want to make latoflexes with your own hands, you can take boards of suitable sizes, cut them yourself, or order cutting from specialized specialists.
Now about what they can be and how to make and install them with your own hands.
Although we have already actually dealt with the manufacturing issue.
Varieties
Lamellas of good quality and with real orthopedic properties can have different configurations, shapes and designs.
Most often you see such options.
Straight wooden slats. The simplest designs used in inexpensive beds that do not have sliding, folding or lifting mechanisms, as well as an electric or hydraulic drive.
Transformers-latoflexes. The best option for those who want to achieve a comfortable and healthy sleep. The peculiarity is the ability to change the surface depending on the position of the human body. This gives the bed the correct shape. These are extremely popular solutions today. But it’s unlikely that you’ll be able to make them yourself. And in fact, nothing except the first option is intended for home production. Although a lot depends on the specific person and the available equipment.
Transformers are controlled using a manual drive or an electric drive.
Buying them is not a problem. They are universal. You just need to know the characteristics of your bed.
This will provide excellent sleep and orthopedic properties that are really important for many people. After all, they depend not only on the mattress, as some for some reason think. The base also plays a huge role.
On topic, I would like to give you a link to the material where we talked about a memory foam mattress.
And the third option for slats is slats, where you can adjust the rigidity of your sleeping place. They are equipped with attachments that are installed in areas that are subject to the highest load. This is largely the answer to the question of how the slats can be strengthened if the user’s weight is quite impressive. This is also a good choice for those who have problems with the spine. They are usually recommended when a single user's weight exceeds 130 kilograms.
All other cases allow the use of standard sets of lamellas.
Now let's talk about how to make them with your own hands and how to attach them to the base of the bed.
We make and install
I will say right away that it is extremely difficult to make full-fledged orthopedic curved lamellas at home. Almost impossible.
The bulk of the videos on this topic are devoted to ordinary straight slats. They are quite easy to make by cutting blanks from wooden boards or fairly thick plywood.
But we can talk about installation in more detail.
There are 3 main methods.
- Using self-tapping screws. You can screw it directly through the slats to the base of the bed, or use metal corners. There is no fundamental difference, although the option with corners is considered more reliable;
- Using edge tape. The idea is to create interconnected slats that will resemble a ladder with frequently repeated steps. To do this, the slats are connected at a controlled distance with this tape and a construction stapler. The advantage is that the slats are easy to remove and lay, rolling out like a roll on the base;
- Using special grooves. These are elements made of rubber, rubber or plastic. Easy to find on sale. They are attached to the base of the bed at a certain distance from each other, and the slats themselves are inserted into them. Simple and as reliable as possible. The rack may fly out, but it will not break.
I don’t see each method of fastening described in detail.
I can say that the optimal solution here would be to use ready-made factory slats if we are talking about the need to create a sleeping place with a really good orthopedic effect. What do you think about this?
Subscribe, leave comments, ask relevant questions on today's topic!
Master class No. 1: Pleated blinds from wallpaper
You can make these paper blinds in just a couple of hours, and if you still have wallpaper after renovation, you don’t even have to go to the store. Pleated blinds will last about a year, and then you can just make new ones, because it’s so simple, beautiful and economical. And paper blinds are great for decorating the windows of country houses and sharing creativity with children.
To make blinds from wallpaper like in the photo above you will need:
- A roll of paper wallpaper (only paper wallpaper will do, since vinyl and non-woven wallpaper will not be able to form an accordion);
- Auxiliary materials: scissors or stationery cutter, ruler, pencil;
- An awl or a hole punch (an awl is better);
- A rope longer than the height of the window and 5-7 mm thick or a thin satin ribbon;
- Latch with end cap of a suitable color;
- If desired, two more tapes of any width and a length 2.5 times the height of the window. These ribbons are for decoration only;
- Double-sided tape (or glue) and Velcro to match the wallpaper, if you want to make curtains with a “swag” around the edge.
- First you need to cut a piece of wallpaper to the required length based on the following calculation: window height + 30 cm. Then you need to assemble the canvas into an accordion. You can do this by eye, but the pleating will be more accurate if you first line the wallpaper from the reverse side into strips 2.5-3 cm wide. A ruler will help you bend the wallpaper evenly, and a pencil or pen will help you iron and fix the folds.
- Now the resulting accordion of wallpaper needs to be assembled, measured and marked in the middle on the first “lamella” and a through hole made in this place using an awl. You can also use a hole punch, but then the holes will have to be made in parts and the holes will not be in the middle of the “slats”, but a little closer to the edge, but they will be more accurate and wider. Next, take the rope and pass it through the entire accordion. If the rope is synthetic, then its tip can be burned a little to make it sharp, then it will be easier to thread the rope into the holes.
- The end of the rope on the first upper “slat” must be tied into a knot so that it does not slip out of the hole, and the tip itself can either be left to tie the curtains to the cornice, or cut off if you want to glue and attach the curtains directly to the window frame.
- At this stage, you can also glue some kind of solid base to the first slat, for example, cardboard, a plastic corner or a thin strip, so that you can use it to hang the blinds on the windows.
- We put a fastener on the lower end of the rope (at the bottom of the curtains) and assemble our curtains to the desired level. Now we glue Velcro on the right and left ends of the wallpaper using glue or double-sided tape, then we glue these Velcro and... voila! We get pleated blinds with “swag”.
- And finally, we attach our curtains to the window.
- Instead of a fastener, you can use a button of a suitable size with two or three holes, as shown in the photo below.
- Of course, each accordion blank can be cut to width. But, as a rule, wallpaper with a standard width of 53-55 cm is quite suitable for a standard window. But if you need larger blinds, then you can choose wallpaper with a width of 1 m.
Here is a selection of photos of different ideas for your inspiration.
The procedure for cutting the tread layer
Restoring the tread layer
Before cutting the tire tread, it is necessary to perform the following preparatory work:
- Removing the tire.
- Inspect the tires for appropriate markings and degree of wear. You can cut rubber that has no damage to the tread, beads or sidewalls. Plus, the degree of its wear is determined by the indicator present on the surface of the tire; if the residual depth is less than 3 mm, then repair work is not carried out, there is a possibility of damage to the cord layer of the product when cutting the tread.
- Cleaning the tire from dirt and stones.
- Repair minor tire damage, if any.
- Determination of cutting parameters: selection of groove width and depth. The blade depth is set according to the minimum permissible groove height.
You need to cut tires at a good speed; if you work slowly, the rubber will begin to melt. Cut the tread into strips of 15 cm in the direction of the grooves of the tread layer. The cut material is removed immediately. At the end of the restoration work, you need to clean the surface of the tire from any remaining stuck rubber.
Advantages of fabric blinds
Fabric blinds can be combined well with almost any other types of curtains. They are suitable for use in office premises, as well as in the living room, kitchen and bedrooms in a house or apartment. They will provide reliable protection against the penetration of ultraviolet rays into the room and help achieve the required level of illumination.
In order to make fabric blinds with the required characteristics, you need not only to measure the width and height of the window opening to calculate the dimensions of the finished product. It is also necessary to correctly decide on the type of fabric, its color and the location of the lamellas or replacing them with a single fabric. And following the step-by-step instructions, the process of self-production will be quite simple and quick.
Types of fabric blinds
Currently, there are three main types of fabric blinds for windows that you can make yourself, namely:
- vertical, the lamellas of which are fixed in the upper part with the ability to rotate around their axis. The amount of light in this case can be set by choosing the angle of rotation of the lamellas or by moving them in one or two opposite directions;
- horizontal, the slats of which are interconnected by a ladder, allowing them to be moved upward along the drum rotation means;
- rolled, which are a single sheet, which, when opening a window opening, is wound onto a shaft located at the top.