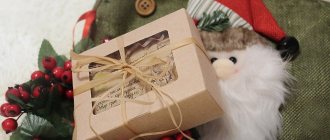
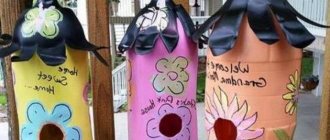
A box for tea bags is a way to preserve their integrity, protect them from damage, accidental wetness and exposure to foreign odors.
A beautiful and functional box can be a pleasant addition to the tea drinking ritual, and even decorate the table decoration.
An option for craftsmen is to make a box for tea bags yourself.
Schemes for tea houses
This kitchen accessory can be made according to your design.
You just need to think in advance about all the details of the future home, its size and appearance. Then you should draw a model of the product on paper and indicate its parameters. It is also possible to use ready-made diagrams, which will save time when making crafts.
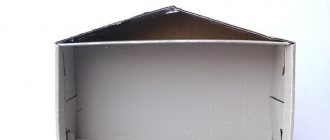
The following scheme is suitable for the manufacture of both one-story and two-story houses. The length of the base, roof and wall is the same for both options. The height depends on the number of storeys.
The presented sketches can be adjusted: to simplify or complicate the projects. The following photo shows a finished craft with a simple design.
More complex designs consist of several buildings and include windows, balconies, and fireplaces. It is convenient to store different types of tea in such houses.
You can place not only tea bags in the house, but also sweets. A fenced yard with a fence that is attached to the side of the house will serve as a bowl of candy.
In addition to choosing the design of the product, you need to decide on the material. The most suitable materials for crafts in the kitchen are cardboard and wood.
Advantages and disadvantages of use
There are advantages and disadvantages to separately purchased tea bag containers.
The advantages of this kitchen accessory include:
- Presentable appearance of the packaging.
- Protection of bags from external influences.
- Compact storage.
- Wide variety of models.
- Long service life for most types of boxes.
Minuses:
- Price.
- You can only use boxes that are intended for food products.
- Open-top containers do not protect bags from external influences.
Required materials and tools
A large tea room can be made from almost any available material. It can be cardboard, paper, newspaper tubes, plywood. However, the size and shape of the boat may vary. Many craftsmen recommend making a tea house with your own hands from cardboard, since this material is the easiest to work with. What you will need to create this craft:
- a simple pencil for drawing;
- manage;
- waste paper;
- vinyl glue;
- stationery knife.
- scissors;
- thick cardboard (you can take sheets from a regular box);
To glue the main elements of the craft, you will need waste paper or thin cardboard. When all the tools and materials are ready, you can start making a cardboard tea house.
Threads
Just like fabric, threads provide enormous scope for the use of imagination and the embodiment of the flight of creative thought.
A charming topiary will be a great gift for a woman. To make it, you only need to take a balloon, thread, glue, a cocktail stick, and a pot for home flowers. All this can easily be found in every home. But the admiration of the recipient of the unusual plant will know no bounds.
The remaining balls of yarn will be used to make pompoms. From fluffy lumps you can later make:
- decorations for keychains, handbags, clothes;
- hair accessory;
- soft toys for children;
- unusual rug;
- photo frame.
If you want to try yourself in the “real” business, you can knit a soft scarf or warm socks. Both do not require much skill or talent.
In the future, the set can be supplemented with mittens and slippers.
Master class on weaving a tea house from newspaper tubes
If you like weaving from newspaper tubes, then this master class is just for you. A wonderful gift can be made literally in one evening.
Look what masterpieces the craftswomen create!
Below we will offer a detailed master class on making an exclusive tea house.
What do you need for work?
Any work begins with quality preparation; in this type of creativity, the basis is straws. To do this, you will need to study the technology of their creation. Enter the search engine “how to roll newspaper tubes” and find a master class. The length of the pipes varies: 45 and 55 cm. In our case, we will cut strips 7 cm wide; if you need a larger texture, then 10cm.
For those who don’t have time to look for instructions, we offer a small master class in this video:
Manufacturing instructions
After the material is prepared, it is important to choose a base for weaving. Let's start from the bottom.
| Illustration | Description of the promotion |
We turn the tubes around the base
We glue the joints with PVA. Next, insert the tubes one at a time.
Don't forget to choose the correct shape of the tea house around which you will weave.
When you decide that the foundation for your house is enough, you need to raise the side posts.
You can not raise all the racks, but leave a part for weaving the base, for example, to create an additional platform.
Finishing can be done in a different color scheme
Let's move on to weaving the base. Please note that at this stage it is important to leave the windows to place the tea bags.
The closer to the neck, the denser our “top” becomes
Let's pay attention once again to weaving technology!
Decoration
Here, in fact, the stylish travel organizer for tea bags is ready and filled with contents. Regardless of what fabric you used - plain or patterned, the accessory will look quite stylish. But, if you wish, you can additionally decorate it with any decorative elements. For example, a cover can be embroidered with rhinestones or artificial stones, or a pattern can be embroidered on it. Various prints are also a good option, but you need special equipment to apply them, so it’s best to contact your local printing house. Printing is relatively inexpensive, so you won’t incur significant financial costs.
There are no restrictions when decorating the organizer. Don't be afraid to be creative and experiment. This is the only way you can make something truly stylish and original. And if you can’t come up with anything on your own, but you want the accessory to be the envy of others, then look at other people’s projects online. Perhaps one of them will inspire you to create your own masterpiece.
Cardboard house
This option is the simplest. For work, you can use both sheets of cardboard and a box of products or household appliances. The main thing is that the material has a density of at least 200 g, since the product must hold its shape well.
For work you will need materials and tools:
- manage;
- stationery knife;
- vinyl glue or “Moment”.
- thick cardboard;
- pencil;
Master Class:
- Using a pencil and ruler, draw all the details of the diagram on cardboard, strictly adhering to the given dimensions.
- Using a utility knife, cut out the parts along the drawn lines: base, front and back walls, 2 side walls and 2 roof parts. In the front wall of the future house it is necessary to make a round window and a semicircular door from which tea bags will be removed.
- Additionally, cut 4 strips of cardboard 3 cm wide, their length should be equal to the height of the walls, that is, 16.5 cm, make a cut along each strip so that they can be easily folded.
- Glue 4 walls of the house with folded strips. Each strip must be attached to the edges of two walls according to their height. This will strengthen the structure in the corners. Let the glue dry.
- Cut 3 more strips of cardboard 3 cm wide, but their length should be the same as the walls - 9 cm. Make cuts along the strips and fold them.
- Glue the walls connected to the base using folded strips. Cardboard strips must be attached to the base and bottom of the walls, excluding the facade.
- Make a removable roof. Glue 2 pieces at an angle so that the roof fits exactly into the box of the house. It is not necessary to glue the roof to the walls. It should be removable for easy placement of tea bags around the house.
What will be needed?
Sewing requires certain tools. The basic set that every housewife has at her disposal will be quite sufficient. It includes the following:
- sewing machine;
- iron;
- scissors;
- sewing clamps;
- pins;
- thick fabric;
- coordinating thread;
- Grosgrain ribbon.
If you love to sew, then most likely you have all this at your disposal. If something is missing, then you can purchase everything you need at any sewing store.
How to make a big house out of paper and cardboard
A non-standard tea house is one of the crafts with a low degree of manufacturing complexity. You will need to devote only 2 hours of your time to creating it.
Step by step assembly
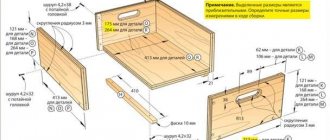
How to make large houses out of cardboard with your own hands - master class:
1. The first step is to find suitable options and templates for the template. You can choose them from our gallery.
2. When the pattern is chosen, you need to cut out the parts of the desired size from cardboard. A standard DIY kit consists of 4 side pieces, 2 roof pieces, 1 cardboard for the bottom of the house and 1 piece for the roof insert. In order not to get confused by the dimensions, it is better to focus on the indicators presented in the diagrams.
3. It is best to cut out the parts with a sharp stationery knife. If you use scissors, the cardboard may bend and the cut will be uneven.
4. Cut pieces of paper (or thin cardboard) 20 cm long and 3 cm wide to glue the walls of the tea house.
5. Connect the base of the boat with PVA glue. If the parts do not hold well, you can use Moment glue.
6. Now you can go down. To glue it, you will also need to cut strips of paper 9 cm long and 3 cm wide and use them to attach the lower part of the house to its walls.
7. To make a roof, you need to take a part with a length and width of 10 * 6.
8. It needs to be folded in half to form a triangle.
9. Using paper or thin cardboard, attach the roof pieces as shown. If the cardboard doesn't fold well, you can push it along the seams with the beveled side of a utility knife.
Interior
Start by folding three 18x12.7cm rectangles in half and iron them well to prevent them from unfurling. Next, stepping back a little more than half a centimeter from the top edge, go along it with a regular seam, and on the sides make a small stitch.
These rectangles need to be placed on top of the larger one, leaving one inch at the top and bottom, and secure them with pins. Fold the fabric under and sew Grosgrain ribbon across it. In this case, instead of the classic one, it is better to use a reverse stitch.
Smooth and fresh skin: dermaplaning, or why a woman needs to shave her face
A student at the Vietnam Police Academy shared how she takes care of her facial skin.
Lost weight: what Sofia Tarasova sacrificed for the sake of “VIA Gra” (new photos)
Fold the resulting product in half lengthwise, iron along the fold line, open it and make a central stitch in its place. Use topstitching on each end. After this, the inside of the organizer will be ready. If the seams don't turn out perfect, that's okay.
Wooden house
Working on a wooden house is a more labor-intensive process. Processing of structural parts takes longer. This can be done with either a manual or electric jigsaw, as well as a special computer-controlled tool.
As a material for the house, you can use a natural wooden board or a sheet of high-quality plywood. The second option is more common. The optimal thickness of the walls and roof is 6 mm, the base is 10 mm.
To make a wooden house you will need:
- manage;
- puzzle;
- fine-grained sandpaper;
- paper;
- vinyl glue or Moment joinery.
- pencil;
- file;
- pieces of plywood;
Master Class:
- Draw on paper drawings of the product parts according to the given dimensions. Transfer the image onto plywood. To do this, you can use a carbon copy.
- Cut out each part along the contour, but do not overlap it with canvas by 0.5-1 mm. Remaining material will be removed later with a file. The house consists of 7 parts: a basement, 4 walls and 2 roof parts.
- Sand the parts and sand the inside and outside surfaces with sandpaper.
- Assemble all parts of the product using vinyl glue. Apply glue to the ends of the parts to be joined. Then press all the parts together and secure for 3 hours with an elastic band or tape. Remove excess glue with a napkin. Without glue, you will have to leave the roof or base of the house so that the tea will pierce the hole.
- After complete drying, the house should be freed from rubber bands or tape. If there are glue residues or uneven surfaces on the product, it must be sanded thoroughly.
Making your own cardboard house
Making a tea house with your own hands from cardboard is the easiest way: you don’t need any special skills and it takes very little time
The main attention should be paid to decoration to make the item truly unique. What you need to prepare: cardboard, scissors, a ruler, PVA glue, colored paper and details for decoration (choose which ones yourself)
First, mark and cut out the parts for the house:
- The side parts are “walls”, size 20 x 9 cm, 4 pieces, in one of them at the bottom immediately cut a semicircular hole approximately 5 cm high, not reaching the edges of the “wall” by 1.5 cm on both sides.
- Parts of the “roof”: size 10 x 10 cm, 2 pieces; top insert 6 x 10 cm, 1 piece; bottom insert 10 x 13 cm, 1 piece; triangles 9 cm high and base width 6 cm, 2 pieces.
- “Base”, size 10 x 10 cm, 1 piece.
- Parts holding the walls together, size 20 x 3 cm, 4 pieces, folded in half lengthwise.
- Parts for attaching the base, size 10 x 3 cm, 3 pcs., bend in the same way.
Let's start assembling:
- We glue the “walls” together using cardboard pieces bent at right angles (20 x 3 cm), we get a box without a roof and bottom.
- We glue the base (10 x 10) to the walls using bent parts (10 x 3 cm), the semicircle hole should be at the bottom. The floor is ready, it's time to work on the roof.
- We form a volumetric insert from a 6 x 10 piece by first marking the short side into three 2 cm segments, and then bending it along the lines and gluing it.
- We attach two parts (10 x 10) of the roof “slopes” to the insert, resulting in a structure reinforced from above from the inside.
- We continue to work with the “roof”: bend the bottom insert (10 x 13 cm), marking 2 cm on both sides (it turns out 2 + 9 + 2 cm = 13), glue it to the bottom of the roof, stepping back a little from the edges - first try on the part so that it fits tightly enough into the corner formed by the slopes. The folds should be on the outside, strengthening the “slopes” and reaching their edges. If they turn out to be longer, just carefully trim off the excess cardboard.
- Triangles (height 9 x 6 cm base) complete the “high-rise” work, making the roof solid and strong.
We decorate the walls and top separately using patterned paper, lace, colored feathers or flowers cut out from postcards. Use your imagination, create beauty. If your ideas don’t seem enough, look at photos of DIY tea houses; you’ll definitely find something interesting.
How to make tiles?
In order for the teahouse to have a beautiful finished look, its roof needs to be landscaped. Houses with tiled roofs look original. There are several types of material for its manufacture, each of which has a specific effect.
From putty
To work you will need:
- toothpick;
- fine-grained sandpaper;
- soft brush;
- metal spatula;
- brown acrylic paint.
- construction putty or construction paste;
Manufacturing process:
- Using a spatula, apply a thin, even layer of putty to the roof surface.
- Using a toothpick, draw “flakes” of the tile onto the wet mixture.
- Let the solution dry completely.
- Sand the dry surface with fine sandpaper, carefully removing all irregularities. Use a brush to remove dust from the grooves.
- Paint the roof brown.
Made from corkboard
Required materials and tools:
- manage;
- table;
- brush;
- cutting board knife;
- black and red-terracotta colors.
- pencil;
- wood glue "moment";
- cork sheet;
Manufacturing process:
- Make marks on the roof of the rows where the shingles lie.
- Cut out the cork tiles using a utility knife, following the marks on the cork sheet. Before starting work, place a cork board under it. The size of the shingles can vary depending on the size of the roof, the installation method (cantilevered or flush with the roof) and your preferences. Approximate parameters: width - 1.5 cm, length - 2.5 cm.
- Round the edges of the cork rectangles using a pattern knife or pliers.
- Glue the tiles to the roof. Apply adhesive to the bottom edge of the roof and lay the first row of shingles. Continue the pose, overlapping, moving upward. Glue must be applied to the horizontal marking line and to the top edge of the main line. This way he attaches the shingles to the other side of the roof. Give it time to dry.
- Paint the roof. First, carefully paint the tiles black, not forgetting the ends and gaps. Once dry, lightly coat the tiles with red terracotta paint, allowing the black color to show in the pores. If desired, the roof can be aged a little and covered with moss. To do this, use a semi-dry brush to mark green spots on the tiles. Dry the product.
Shingles can also be made from ordinary cardboard, for example, from pieces left over from working in a tea house. But a cork roof is very similar to real shingles.
From eggshell
To make a roof you will need:
- vinyl glue;
- brush;
- acrylic paints.
- eggshell;
Manufacturing process:
- Break the shell into small pieces.
- Using vinyl glue, fill the entire roof space with egg fragments. Glue the shell with the concave side inward. The size of the fragments and the distance between them may vary.
- After the glue has completely dried, cover the roof with brown paint. It should be applied in a thin layer so as not to fill the gaps between the egg fragments. Once dry, apply another thin coat of varnish. You can add other shades to the roof: beige, orange, red, green.
Step-by-step instruction
When you have a rough idea of the type of finished product and the basic materials are prepared, you can begin.
If a wooden blank is used, it is necessary to carefully but carefully “sand” and sand it, eliminating all unevenness. On a smooth surface, all subsequent layers will lie smoothly and aesthetically. It is important to pay attention to all surfaces - external, internal, work all the corners, the roof. Carefully coat the house inside and out with a thin layer of primer. Usually it is easily washed off with running water, but you should not leave a dirty brush for a long time. It is convenient to apply the primer gradually, so as to lay the workpiece on different sides to dry. Experts recommend making broad strokes from top to bottom along the entire height of the wall. Peel off the top layer from the decoupage napkin, cutting out the required elements with nail scissors
It is important to remember that the paper is very thin and tears easily, so it is advisable to carry out all further actions carefully, without haste. According to the instructions, attach the drawing to the workpiece. Make a solution of PVA glue and water, the consistency should be close to cream or milk. Apply the adhesive mixture with a brush, gently smoothing it out. It is necessary to ensure that no bubbles, folds, or tears form. You can remove excess by blotting with a clean napkin. After drying, coat the acrylic product with clear varnish. Paint the remaining details with paints.
Ready-made tea boxes
Sometimes manufacturers immediately sell tea bags in elegant boxes. By the way, this is a great gift.
A fairly affordable option is a Greenfield wooden box, which contains 96 tea bags of 8 varieties. But you can’t buy Ceylon tea BASILUR for less than 7-10 thousand. But there are also many varieties, and there are many more than 100 bags.
Almost all well-known and well-known brands have different types of boxes: from Ahmad to Lipton, search and select online, in specialty tea and coffee shops and in large supermarkets.
It was in vain that we did not pay attention to such a gift from civilization as a tea bag. And don't think that tea bags aren't worthy of it. In such a box, the tea is protected from anything that spoils its properties. It is also convenient to take on the road in a durable packaging. On the Internet you can choose a ready-made box, with or without bags. And if you want to do it yourself.
Purpose
Tea bags in special packaging are better preserved; they will not get wet, will not be saturated with foreign odors, will not be damaged by direct sunlight, and will not be lying around in different corners of the kitchen. In addition, there are always delimiters in the box and you can sort the bags by variety so that they don’t get mixed up. And even, using their color and design, create a beautiful composition.
A simple tea ceremony requires not only an indispensable sugar bowl, porcelain cups and a bowl of cookies. You need a box! It will perfectly decorate the kitchen interior, believe me.
It is also worth taking the bags on the road not in soft factory packaging - you will then catch them all over your suitcase - but in a hard box that will not wrinkle.
Box from the store
These cute boxes are often sold in specialized souvenir and tea shops, and you can easily choose something that suits your taste and interior.
Tea boxes are made from wood, tin, plastic, cardboard and in general - all types.
- For example, Aliexpress offers you a bamboo box with six compartments and a small drawer at the bottom. It is suitable for both tea and jewelry, but not at the same time, but so that you decide how you will use it. And since we are talking about tea here, and not about beads, it means that everyone has figured it out. The price of this box is about 2600 rubles. Bamboo has a reputation as a valuable antimicrobial tree. But as someone who naively bought a Chinese bamboo bread basket in hopes of keeping the bread mold-free for as long as possible, I say this is nonsense. There's nothing antimicrobial in there. Plywood and plywood.
- Maybe a good quality bamboo box will have great properties, but I don't think you'll find it on Aliexpress at that price.
- Therefore, let's move on to more democratic versions. For example, the same bamboo box, but for 800 rubles. It is not only cheaper, but also smaller: only five branches.
- Even cheaper: the acrylic box has no compartments, but will protect your bags on the go. And it costs a little more than 600 rubles.
- And here is a very cheap tin box in the shape of an English telephone booth. Only 70 rubles!
- If you need something more artistic and cozy, let’s look at RuNet and find, for example, a box for tea bags in the shape of an old house - a little more than 500 rubles. This is still the same China, but now cheap porcelain - not bamboo or cardboard.
Have you stopped at nothing? So, make your own box. Now we will explain how to do this.
general information
The essence of the idea is to sew a small travel organizer designed for 12 tea bags. They can be stacked on top of each other or stored two in each compartment. You can also carry sugar, artificial sweetener and sweets in this case. With them you will make tea drinking even more enjoyable, especially if you combine it with reading your favorite book.
For sewing, two coordinating fabrics with high density will be needed. They can be either monotonous or patterned. There are no restrictions here, and everything depends solely on your wishes and preferences. But let’s not beat around the bush for a long time, but let’s get straight to the most interesting part, namely making an organizer.
Tea coasters for table setting
The tea bag holder is designed to serve tea bags beautifully and neatly. These are small containers similar to napkin rings, boxes or boxes. The width of the dish is equal to the width of an individually wrapped tea bag.
The tea is placed directly into the packaging or without it and placed on the table so that guests can choose the desired variety and prepare the drink in a cup. It is convenient to store tea in a drawer in a closet; you can make an assortment of different varieties and gradually add new tea bags from the bags. Convenient: you don’t need to open the box every time, the names and varieties are clearly visible.
Stands for serving tea bags are made of ceramics, clay, majolica, porcelain, glass, crystal, wood, and metals. Well-known brands produce tea “boxes” and “houses” in accordance with existing tableware collections. For example, the famous Geese porcelain from a Czech manufacturer. Or the recognizable Gzhel from an old Russian factory.
Craftsmen create original jewelry in the spirit of national traditions and places, turning useful little things into souvenirs worth taking with you from your trip. Economical, useful and pleasant!
When choosing an accessory for yourself or as a gift, allow yourself to be guided by the tea sets available in the house. To go with the ceramic group mugs, you can buy white porcelain vases with neutral or openwork decor. Baskets with an eloquent teapot look beautiful.
If you can't find a tea set template, a wooden tea bag stand will work. Raw wood pairs beautifully with ceramics, and fine carvings can also harmonize with delicate porcelain.
Wooden tea boxes are made of natural wood and plywood. For those who like to make designer things with their own hands, they sell blank organizers and houses in bags. The blanks can be painted, decorated using decoupage technique, and freshly decorated.
Metal coasters also easily match any utensils. This line features modern stainless steel organizers, gold-plated drawers for classics, or wrought iron storage drawers for country and antique styles. The most luxurious choice is silver. By the way, a great gift for a silver wedding.
Features of the tea box
The purpose of a tea box is to store exquisite raw materials for preparing your favorite drink. But she has one more important task. By choosing a box that matches the style of your kitchen, you can get an important element that complements and decorates your kitchen interior.
When tea drinking culture was just beginning to develop in England, similar things began to appear in every home. The box, which more often resembled a beautiful box, was a mandatory attribute of tea drinking. It was forgotten for a while, but now the tradition is returning.
A tea storage box can be made of any material. The most popular are:
Wooden. Wood is an excellent material, it is durable and does not allow foreign odors to pass through. The naturalness of the breed allows you to maintain a natural microclimate in the box. Such a box can be decorated to your liking, painted with any designs and patterns.
Tin. Most often, tea is already sold in such a box. When the tea runs out, you can fill the box with new tea bags. Metal does not allow foreign odors or moisture to pass through. It allows you to store tea bags for a long time. But it is better not to store loose tea in a metal box; it will change its taste after contact with metal.
Ceramic. These are the most exquisite, beautiful boxes. They are made to order by real craftsmen; you won’t be able to make them yourself. But this is the best option for storing any types of tea. Ceramics meet all the requirements for storing tea leaves.
Decoupage of the product
Decorating a tea house using the decoupage technique allows you to apply any image to the product without drawing skills. To decorate the product, you will need simple materials, the main one of which is a paper napkin with a pattern.
Decoupage of a product can be done in two ways.
Simple
This version of decoupage is considered simple. It does not require any special technical skills, so even beginners in this field can handle it.
Materials and tools needed for simple decoupage:
- primer;
- sponge;
- stationery file made of polyethylene;
- vinyl glue;
- brush;
- acrylic paints;
- water;
- paint for decoupage.
- home preparation;
- decoupage napkin or decoupage paper;
Performing decoupage:
- Remove any irregularities on the part with sandpaper. Cover the product with primer or white acrylic paint using a sponge. It is impossible to achieve such an even application of primer using a brush.
- Prepare a napkin with a photo. Do not cut, but carefully remove the necessary elements from it. A napkin with torn edges will “blend” better with the surface of the house; the transitions from paper to empty space will not be visible. Remove the lower white layers from the fragment, leaving only the top part of the paint.
- Apply the image to the product. Place the tissue face down on the file. Wet the image with water and gently smear it with your fingers or a damp brush. Then take a file and glue the front side of the picture to the wall of the house. Smooth the surface of the file with your hand and remove it, leaving the napkin evenly glued to the wall. Using a brush, coat the image with vinyl adhesive diluted with water and let it dry. Continue working with other elements.
- Cover the walls of the house with decoupage paint.
If desired, the design applied to the house can be supplemented with acrylic paints - make the image on a napkin brighter or add your own strokes to the walls. After drying, the product must be coated again with finishing varnish.
Other tips
There are no strict rules for making or decorating a house - everything is individual and depends only on inspiration. If you know how to work with dense materials, you can make a frame yourself by assembling it from sheets of plywood. In this case, you will need a drawing with calculations of all sides; usually the height of the house does not exceed 15-20 cm, taking into account the foundation site. The functions of the house can be performed by other pieces decorated using the decoupage technique - a stove, a kettle or even a sofa.
From polymer clay you can make flowers or a wheelbarrow with vegetables in a bowl courtyard, or a cat in the attic. Another option for “reviving” the composition is toys made from Kinder Surprises or simply miniature figures.
Creativity is always useful, especially if thanks to it masterpieces that make life easier and beautify are born. The main thing is to be confident in yourself and everything will definitely work out!
DIY tea box - gold, clever, designer
To make a tea bag box, use the decoupage technique.
You need:
- paint;
- stucco.
- acrylic paints;
Then take:
- napkin for decoupage;
- empty wooden or plywood box;
- PVA glue or even specifically for decoupage.
- stencil;
And I also need a tea bag. The box is easy to find in art stores.
First, sand the surface of the box with fine sandpaper and prime it with putty. We immediately prepared a tea bag to wet the inside of the box to give it a noble shade. But then it must dry well.
Treat all joints well on the outside. Once the primer is dry, sand it again to smooth out any rough edges. Then apply the stencil, then putty again. Then we remove the skin again - after everything has dried.
We glue a decoupage napkin on top and paint the walls any color. Use a sponge to give the threads and edges a good coat. And when everything is completely dry, cover the box with a layer of paint.
If all this bothers you too much, take an ordinary tin box from under cookies or sweets, place cardboard partitions inside - they can be glued for strength. This is all!
In this video we will teach you how to make an incredibly beautiful box for tea bags with your own hands so that you can admire it at home.
Technique on different materials
If almost any elements can be used as parts used to decorate a house, then what about the house itself? Does this require a special frame? As a rule, the work surface is usually wood, cardboard or ceramics.
Beautiful combination of lavender sprigs and pink lace ribbon along the contour
Spectacular tea house for two stacks of tea bags
Cardboard can certainly be called the most affordable material. If a wooden house is not found in every home, then no one will have any difficulties with cardboard. However, it is more capricious to work with, as it wrinkles easily, loses its shape when in contact with paint and is not as durable as wood. Therefore, it requires additional strengthening in the form of a layer of gypsum mixture. Otherwise, the technique for creating ornaments is similar to woodworking.
Cardboard tea house
Ceramics for decoupage are not used so often, especially when creating a tea house. In the case of this material, it will not be possible to use only the tools available in the house. If you do have a ceramic house, then its main feature is a very smooth surface. When applying cut-out designs, you need to make sure that the parts do not slip off.
Original DIY tea wheel for tea bags (photo, master class)
Do-it-yourself original tea wheel for tea bags (photo, master class)
by Elga 1. Everyone in our family has different tea preferences. I have long wanted to collect all the tea bags in one place, in the end it came to my mind and I got this “tea wheel”, it takes up little space, easily fits 100 tea bags, it is very convenient to use - the inner wheel rotates, the desired bag can be easily removed from window. Maybe my idea will interest someone else, so I want to share the main steps in creating this wheel.
Ambient technique
Three-dimensional images are in demand not only in cinema. Designers all over the world successfully apply the laws of perspective in interior decoration.
- Ambiente is a technique for “deceiving the eyes,” that is, creating a composition that has optical depth. This is a purely visual technique that provides the effect of a three-dimensional image in the painting. Of course, such images look more interesting because they look “alive.”
3D drawings will transform your product
The image created using the ambient technique looks amazing
Ambient decoupage is available to more experienced craftsmen, since creating a three-dimensional image is much more difficult and will require some effort and special materials.
On a note! In addition to the standard set required for regular decoupage of a wooden house, you will additionally need a 3D gel and a palette knife (can be replaced with a flat spatula from a manicure set).
The creation process follows the same pattern as in previous master classes. The main difference is the creation of a three-dimensional image, for which relief paste is applied using a palette knife under the edges of the picture. It turns out that one drawing is in different planes: the center is slightly removed, and the edges move forward, beyond the surface of the house.
Some details in the drawings, for example, a street lamp or flowers, are processed with 3D gel. Using the paste, you can not only make a tiled roof, but also draw brickwork on the house using a regular toothpick.
Accessories for other purposes
Stands for used envelopes can be used for other purposes. They are perfect as rosettes, gravy boats, and dishes for red and black caviar. Of course, a special caviar dish looks more respectable, but sometimes the established rules can be broken a little.
Miniature saucers can be used for:
- placement of capers, black olives, cherry tomatoes;
- for tasting purposes;
- serving chopped lemon or cheese;
- portion containers for raisins, nuts, seeds;
- serving delicacies;
- collecting seeds from berries;
- spices and salt.
Accessories for tea drinking
The action resembles a ritual where everything must be flawless. There are no trifles in this matter. To make tea drinking memorable for a long time, you need to correctly assemble and learn how to use a tea set, which includes the following elements:
| Kinds | Description |
| Tea storage jars | It is advisable to have several copies for different varieties. Suitable for everyday use. Can be used as a gift wrapping option. A paper envelope is not very presentable, but packaged in a beautiful metal box is just what you need. There are large and small containers. Which container is best to buy depends on the frequency and volume of the product consumed. It is advisable that they be equipped with windows for stickers. There you can specify the variety, brewing and serving rules. |
| Products for bagged tea | Despite the fact that the products are sold in boxes, they are, as a rule, not suitable for further storage. The design is ordinary thin cardboard. On the table it looks ordinary and nondescript, especially in combination with expensive service. For perfect table setting, especially for holidays, it is better to purchase a special device for envelopes. You can lay out envelopes of one type or make an assortment. What to look for when choosing? According to buyers, the best products are those that are made independently at home. These can be wooden accessories. Environmentally friendly material. Ideal for storing bags. It may be in the shape of a house, an interesting box with several tiers. There won't be a second design like this for anyone. |
| Saucers for used bags | The envelope should not remain in the cup for a long time. After brewing, you need to remove it from there. First of all, it interferes with tea drinking. It may inadvertently fall out of an overturned glass and stain clothes. Constantly going to the trash can is inconvenient; putting it on a clean tablecloth is dishonest. To show your good manners, you need to place the used envelope in a special saucer. There are a great many popular models of devices. On sale there are products made of glass, porcelain and wood, with or without a lid. Numerous reviews on the Internet show that porcelain sockets are the most practical. They differ in parameters and design. Some of them can be washed in a dishwasher. |
| Tray | An integral element when drinking tea. Allows you to beautifully bring cups and a teapot and display them on the table. There is also a sugar bowl, a milk jug, and a bowl of jam or honey. Products vary in shape, color, and material of manufacture. The product is available in oval or rectangular, large and small. It all depends on the number of participants in the process. The positive aspects include convenience, combination with any interior, and elegance of serving the drink. |
| Glass holder for strainer | After finishing brewing the drink, the strainer is removed. To do this, you need to provide a special glass on the table. Its diameter should match the diameter of the strainer. There is no need to walk around the house with it and stain the floor with drops. |
| Paper coasters | A regular stand for cups of tea or coffee. You can replace it with a saucer, but this is not always convenient. There are different types: in the form of a teapot, gnome, flower, car, regular round, square or oval with various images. They are in high demand due to their low cost. Often found in cafes, bars, offices. |