Sweet floristry is attractive for its versatility: it is difficult to find a person who does not love candies and other sweets. The most convenient and fastest way to make a bouquet is from “lollipops” - popular lollipops do not require additional fastening and easily form a composition. In addition, the logo of the iconic delicacy is shaped like a daisy. Well, how can you not collect a whole armful of such sweet and bright flowers?
Bouquet cake step by step
A base in the form of a cake is cut out of foam plastic. She is coloring. Flower lollipops are inserted into it on top. For better fixation they are glued. For such a craft, sweet flowers should be prepared in a slightly different way than for a bouquet.
Manufacturing procedure:
- the chupa leg - the chupsa is shortened a little to completely fit into the foam;
- The petals are made from different colors of corrugated paper. You can make some of the buds from ordinary rustling packaging film.
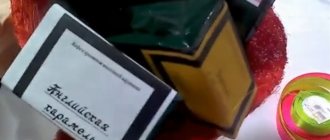
You can beautifully decorate a real cake with Chupa Chups flowers. To do this, they are glued to the box. It is better to place them either in the middle of the box or in the corner.
Chups in a box
A sweet bouquet in a box will look modern and stylish. To do this, you need to choose a beautiful box or make it yourself. The shape can be square, rectangular, trapezoidal. The box is made of thick cardboard.
The fastest option is to take a ready-made box and cover it with beautiful wrapping paper.
A foam base is inserted into the box. It should be the same size as the box and completely fill its entire lower part. Lollipops in the shape of flowers are inserted into the foam.
You don’t even have to make petals, but simply stylishly wrap each candy in corrugated paper and tie it with a ribbon.
A bouquet of lollipops can be made in other variations. The most important thing is not to stop there and keep experimenting. For beginners, it is recommended to make bouquets of sweets with your own hands for the first time from just chups, then gradually add a bit of decor to the craft.
For a wedding
Creative brides don’t have to worry that the traditional floral accessory looks too faded against the background of their original designer dresses, since you can even make a bouquet of the famous caramels for a wedding!
- white corrugated paper;
- wire;
- scotch;
- white satin ribbon;
- bow.
The sheets should be cut into small rectangles and wrapped around each candy. You need to place the base of the candy on the wire and additionally secure it with tape. The composition is wrapped in paper and tied with a wide satin ribbon.
A luxurious bow will add a festive touch to the product; it can be additionally decorated with beads or sparkles. And the greatest advantage of such an accessory is that the “flowers” will not wither in the heat, and the newlyweds will be able to admire their wedding gift for a long time.
Gift in a mug
This unusual composition will delight any child, because in addition to lollipops there are other types of sweets. For the craft you will need:
- beautiful heavy mug;
- popular chocolate jelly beans M&M's;
- 5-9 chups;
- several cockerels on sticks;
- colored paper;
- wooden barbecue sticks.
The length of the chups stick is increased by gluing wooden skewers to it. The resulting element is pasted over with colored paper or tape. A blank in the shape of butterfly wings is cut out of colored paper. You need to prepare 2 pairs of such blanks. They stick to a chups stick.
The result is a butterfly whose head is a round piece of candy. You can make several such butterflies. You need to make flowers from other lollipops.
M&M's jelly beans are poured into a mug. Lollipops in the shape of butterflies and flowers are inserted into it. The composition is decorated with cockerels.
Juicy mix
Homemade Chupa Chups can be as close as possible to their store-bought counterparts at home.
- Open a can of juice, a good housewife will always have homemade juice, if not, then you need store-bought juice, but as close to natural as possible. A couple of spoons will do. A few spoons of sugar, as well as sprinkles for Easter cakes or cakes. This will already be a multi-colored decor of the dish.
- Mix juice with sugar.
- Place on the stove and let the sugar melt into the juice. Afterwards, turn down the heat and simmer for a few minutes. Don’t blink, you can’t let the caramel burn, because homemade chupa chups with the taste of burnt sugar are definitely not included in your plans. Stir, because caramel is a capricious thing, you need an eye and an eye.
- When everything is ready, distribute it into beautiful molds. If you decide to make an exact copy of candy from the store, then wait until the mixture begins to cool, then feel free to roll the coveted balls with clean hands. The process of making them is entertaining, instruct your child to help you, let him make his own candy. Whether it comes out smooth or clumsy depends on your sleight of hand.
- Stick the sticks into the balls.
- Decorate with colorful sprinkles.
- Refrigerate until completely cooled.
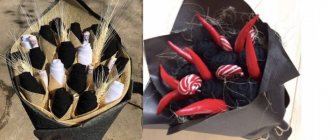
Bouquet-horn of Chupa Chups
A bouquet of Chupa Chups is a good idea for those who want to surprise loved ones with an unusual gift for little money. It can be given to both a child and an adult, because everyone loves sweets, regardless of age.
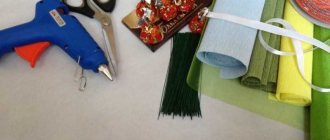
Tools
- Glue gun
- Scissors
- Ruler
- Lighter
- Secateurs
Materials
- Chupa chups lollipops – 11 pieces
- Kraft paper
- Corrugated paper
- Red satin ribbon
- Paper butterfly
- Nonwoven
- Food skewers
- Paper lace
- Colored stationery cardboard
We make a cone for the bouquet from colored cardboard measuring 20x20 centimeters.
- To prevent the cone from losing its shape, grease its edges with glue and press it well with your fingers.
- Next you need to cover the outside of the cone with craft paper, the size of which is 21x21 centimeters.
- The parts of the craft paper that extend above the cardboard cone should be trimmed off.
- We cut paper lace, which is sold in a confectionery store, into two halves. One should be slightly larger than the other.
- Glue the larger half of the lace to the cone as shown in the photo below. Its upper part should be a couple of centimeters above the edge of the cone.
- We make three cuts on the lace, grease it with glue and bend it inside the cone.
- Glue a satin ribbon bow on top of the lace. The ends of the bow need to be scorched with a lighter so that they do not fray.
- We decorate the bow on top with a butterfly, which we also attach with hot glue.
- The end of the Chupa Chups stick needs to be greased with glue and a food skewer inserted into it. This must be done with all candies.
- Next, cut square pieces of non-woven fabric measuring approximately 6x6 centimeters.
- They need to be folded diagonally, glued to the base of the candy and carefully wrapped around the candy.
- The candies are folded into a pyramid, the skewers in the middle are coated with glue and secured with a strip of corrugated paper.
- After skewering, it is necessary to trim so that the bouquet of Chupa Chups fits in the cone.
- Apply glue to the skewers and insert the bouquet of candies into the cone.
- We cut more squares from non-woven fabric, fold them diagonally several times and glue them into a bouquet, filling the voids.
- To make this delicious craft look even more beautiful, we decorate it with a satin ribbon at the end. We form double loops from it and glue it into the bouquet.
Let's get to know each other better
Before getting started with sweet floristry, it’s worth learning a little more about the main element of the future bouquet – the candy cane, which has won the hearts of both children and adults. The products of the Spanish company Chupa Chups can be found in every supermarket today. Once again, when reaching out for an inexpensive and tasty product, few people think about its history.
But it contains many interesting and impressive facts:
- The logo for the candy - a yellow 8-petal daisy with a red inscription - was created by the genius of surrealism Salvador Dali in 1961. In less than an hour, the artist sketched a sketch on a piece of newspaper. He also came up with the idea of placing a bright inscription not on the side, but on the top of the candy, thanks to which the name is readable without distortion.
- In 1995, the sweet on a stick went into outer space, becoming the first candy to conquer interstellar space. The inhabitants of the Mir station ordered this particular delicacy when they wanted to treat themselves to dessert.
- The creator of the Chupa Chups company, Catalan Enrique Bernat, came up with the idea of producing a candy on a stick in 1958, watching a mother scolding a baby who had gotten dirty with a sticky treat. The entrepreneur realized that ideal sweets should be convenient for children and not cause trouble for parents.
- The first batches of lollipops were produced on metal forks, then they were replaced by wooden holders, and subsequently by plastic.
- For the 50th anniversary, weighing 725 g. This is 60 times more than a standard candy.
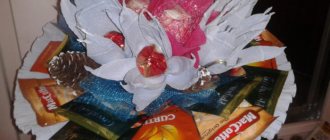
Flower pot made from lollipops
This option is even simpler and faster to implement.
For it you will need:
- a pot or a bright round cardboard box;
- lollipops;
- soft colored paper (it’s beautiful when it matches the color of the details on the pot/box);
- scissors;
- glue/glue gun;
- foam ball (its diameter should be slightly smaller than that of the selected pot/box);
- narrow ribbon for decoration;
- ruler;
- decor for the pot/box as desired.
The creation of this gift composition occurs in the following order:
- Cut out squares from colored paper (the length of one side is 10 cm), there should be as many of them as lollipops.
- Make a small hole in the center of each for a lollipop stick.
- Thread the lollipops through them, fold the two corners of the squares with their vertices, you get almost a triangle.
- Then bend the corners of the base of the newly formed figure clockwise around the candy so that they meet and partially lie on top of each other. Repeat with the rest of the preparations.
- Secure the resulting buds with a thin strip of tape, which is hidden under a decorative tape.
- Place the foam ball in a pot/box. If it moves there, then fix it by filling the empty corners with cotton wool or other filler.
- Place the “flowers” by lowering them into the foam half the length of the stick. It is better to start from the top of the hemisphere and move further in a checkerboard pattern.
- Release some of the ribbons out and curl them with scissors.
- If desired, decorate the pot/box with stickers, glitter, and decoupage.
Advantages
Such a gift has many advantages, for example:
- Originality. This is a bright and unusual gift; it will certainly please the person it is intended for.
- Uniqueness. Such a gift is one of a kind, because it is made with your own hands.
- Interesting idea for a gift. This special gift will surprise and delight anyone.
- Perfect for sweet lovers. After all, you don’t have to take Chupa Chups; you can take other candies, the ones you like best.
- Beautiful packaging. With the help of a bouquet you can beautifully give sweets.
- Ease of manufacture. Making a bouquet of sweets with your own hands for beginners is a very simple task.
- Suitable for children. Children will be delighted with such a surprise, especially if the bouquet, in addition to sweets, contains toys.
A bouquet of Chupa Chups is a wonderful gift idea for family, friends, and children. Such a gift will certainly bring positive emotions and surprise the person for whom it is intended.
Making a DIY candy bouquet for beginners with your own hands
To create a bouquet, you will first need to purchase five lollipop candies. To make packaging for this bouquet you need a variety of wrapping paper or simple cellophane. Plasticine will also be needed during the manufacturing process. And to decorate the bouquet you need to purchase a ribbon. You will need glue for gluing.
The first step in creating a bouquet is to cut out squares of opaque cellophane. You need to cut out five of these squares. Wrap one candy in each of the squares and tie a thin ribbon at the bottom (shown in the photo):
Chupa-chups, wrapped in cellophane, will act as the core of the future flower. To create the petals, you need to take wrapping paper and cut out rectangles from it. Next, they need to be folded in half lengthwise and assembled into a ring as shown in the photo:
The previously wrapped candy is placed in the ring, and the base is tied with a thin ribbon:
Do the same with the remaining candies to get five identical flowers:
The finished flowers are collected into a pre-prepared plasticine ball. It is needed so that the candy sticks stick together well:
To add greenery to your bouquet, you need to take green wrapping paper and cut out small rectangles from it. After this, carefully roll up the rectangles and distribute them between the colors. Thus, the petals of the bouquet will be obtained:
Finally, the finished bouquet must be packaged. To prevent the plasticine from being visible, use a small piece of opaque cellophane. The packaging cellophane needs to be rolled several times, and an opaque one should be placed on it. The entire finished composition can be placed in the middle of the prepared cellophane and tied at the bottom with a beautiful ribbon. Tighten the ends of the ribbons. Thus, this bouquet of delicious and sweet candies, created especially for beginners with their own hands, is ready:
Bouquet of chupas for a child
Materials and tools for making flowers:
- – office paper of different colors;
- – corrugated green paper;
- – glue stick, “Titan” glue;
- – pencil, scissors, ruler;
- - Chupa Chups candy.
For decoration we will need:
- - basket;
- – corrugated red and green paper;
- – red ribbon;
- – thick cardboard, polystyrene foam;
- – wooden skewer, pencil, scissors.
Materials
To make a craft using the sweet design technique, you will need various fabrics, lace and a variety of paper for decoration. As a rule, such compositions are decorated with beads, artificial inflorescences and ribbons.
For decoration you will also need a florist network. With its help, all the candies are formed into a single composition, fixing the grid with tapes, tape or a stapler. The product is wrapped over the mesh with wrapping paper, which can be purchased at craft stores.
Each candy must be wrapped in crepe or corrugated paper, a piece of thick fabric, or a candy wrapper that imitates a flower stem. If it is not possible to use the materials listed above, use ordinary colored cardboard.
Step-by-step execution of a bouquet using the sweet design technique.
Let's start by decorating the basket. Take green corrugated paper, cut it into strips 20cm long and 5cm wide. Fold each strip in half and randomly cut out leaves.
- Glue the prepared foam plastic to the bottom of the basket. Now we will insert the leaves along the edge of the basket, gluing them with glue.
- Cut the green corrugated paper into narrow strips and glue it onto the foam. You can glue a green circle. You can decorate the basket to your taste, using any available material.
- Let's move on to making sweet flowers. Let's take a sheet of office paper. We measure 21cm on the long side of the sheet, draw a line and cut it off. The result is a square.
- Fold the square in half, in half again and cut along the fold line. We ended up with four small squares that we will turn into flowers.
- We take a square, fold it in half, in half again, and now we make a triangle.
- Draw a cut line on the triangle to create flower petals.
- Cut it out. At the end of the triangle you need to cut off the paper a little to make a hole for the chups. We lay out our workpiece. The result was an eight-petalled flower.
- Cut out one petal.
- Using scissors, curl the petals.
- Lubricate one petal with glue and connect it to the other petal. Forming a flower.
- We use the same principle to make the rest of the flowers for our bouquet. We make them multi-colored to make the bouquet bright and elegant.
The flowers are ready. They really look bright.
- Take the chups, insert it into the hole and glue it to the flower. This is such a cute, big-eyed flower.
- Let's make the rest of the flowers. There are already three of them. And here is the whole bouquet!
- Let's start making sepals. Cut green corrugated paper into squares with a side of 5cm.
- Fold the square in half, in half again, make a triangle, round it and cut out the teeth. Let's make a hole by cutting off the tip of the triangle. We lay out our workpiece. It turns out like this.
- Let's make them according to the number of colors. We will have nine of them.
- Glue the sepals to the flowers.
- Cut a narrow green strip from the corrugated paper and wrap it around a chups stick.
- To make the flower stem longer, you can insert a wooden skewer into the tube and also wrap it with green paper.
- The flowers are ready.
- We decorate the basket with flowers. Along the edge we insert short-stemmed flowers into the foam.
- We place flowers with a long stem in the center. Here's what's happened so far.
- To complete the bouquet and its significance, we will make a red heart. After all, we give a gift to someone dear to us and with great love. To do this we will need red corrugated paper, red ribbon, thick cardboard, scissors, a pencil and a heart template.
- We trace the heart template, cut it out and wrap it in red corrugated paper.
- Take a wooden skewer and glue it to the heart.
- We tie a bow.
We insert our “loving heart” into a basket of flowers. You can go congratulate.
Animal crafts
bear
Print out a fairy-tale image of a bear, which can be found on the Internet (in the “Children’s Coloring Books” section). The image must be on the entire sheet.
Using this stencil, cut out 2 symmetrical parts from brown cardboard.
One - the back - remains unchanged, but the front part needs a little work. Draw the ears, muzzle and paws with a black marker, and simply cut out the nose. You will get a hole.
Insert the candy into this hole and glue both parts together. Glue a bow to the bear. The original cardboard toy is ready. And inside the baby a sweet surprise awaits.
Cute candy bunny
To make a candy bunny you will need napkins, PVA glue and a marker. Take 2 white paper napkins.
Cut one of them in half and wrap it around the lollipop so that the stick is on top. Twist a flagellum from the second half of the napkin and secure the edges of the paper around the stick with it.
Tear the second napkin into 4 parts and twist the balls - these will be the paws. Twist a tail from the remains of the flagellum.
Glue the paws to the candy and secure the tail. Draw a face with a black marker. The fluffy white bunny is ready!
Another option - animals made from lollipops
This idea is no less easy to implement. Draw any animals on white cardboard. For example, a bunny and a bear. Only the legs need to be drawn separately from the body.
Color the drawings with paints and felt-tip pens.
Cut out the toy and glue the legs so that each animal holds a candy in front.
Craft from candy deer
In the coloring section of the Internet, look for an image of a deer's head. Print it out on the entire page.
Using a stencil, cut out the head from orange cardboard and the horns from black.
Draw the animal's face with a black marker, glue on the horns and cut out a hole for the nose.
Insert the round candy on a stick into the hole and secure with tape. The deer on a stick is ready.