- October 31, 2019
- Country house
- Tatiana Antoshina
New gift ideas are always welcome. When you don’t have enough imagination or don’t want to give something trivial and familiar, our advice will come to the rescue.
A bouquet has always been considered an obligatory attribute of any congratulation, be it a birthday, a wedding, a victory in a contest or competition, or simply a meeting of lovers. By giving a bouquet, you express your feelings of tenderness, gratitude and love.
What if the bouquet consists not of flowers, but of your favorite berries? For example, from strawberries. How to make a bouquet of strawberries with your own hands? Our recommendations and step-by-step instructions will help with this.
Decorating dishes from fruits and vegetables was known back in the 12th century in Japan. Then restaurateurs began decorating their masterpieces. And presenting a beautiful and tasty bouquet for the holiday means giving your dear people unforgettable emotions, showing a little imagination and love.
Strawberries themselves are a wonderful, tasty and aromatic gift in winter and summer. What if you complement the berry flavor with chocolate or marshmallows, decorate it beautifully, and add some flowers? Place all this in a beautiful package - and here is the answer to the question of how to make a bouquet of strawberries!
How to make a bouquet of strawberries, step by step with photos
To ensure your strawberry bouquets look good in your bouquet, try to choose berries that are the same size and shape. In addition to the berries, you will also need bamboo skewers, tape, corrugated paper and satin ribbon for packaging.
In the presented master class, 63 strawberries were used with a total weight of 2 kg. Therefore, every 6 strawberry skewers made were connected to each other with tape.
- Using the sharp end of a bamboo skewer, pierce the berry. There is no need to remove the strawberry tails.
- After 6 berries have been strung, collect them into a small bouquet, and wrap the ends of the skewers generously with tape.
- As soon as all the berries are on the skewers, collect one large one from the mini bouquets, wrap the ends of the skewers with a large amount of tape.
- From corrugated paper, cut out a rectangle with a width equal to the circumference of the bouquet and a length 15 cm greater than the height of the bouquet. Bend 10 cm of corrugation across the width and stretch the edge. This will create a skirt for the bouquet.
- Pack the bouquet in corrugated paper and decorate with a satin ribbon.
Types of multi-level beds
There are several varieties of multi-tiered beds for strawberry beds. In most cases they have a simple design. But it won’t be superfluous to make a sketch of the drawing with dimensions. First you need to decide on the materials. There is complete scope for imagination here.
DIY pyramid bed: drawings and diagrams
One of the most famous methods. Allows you to make a multi-tiered bed for strawberries from both wood and car tires. The principle of assembling the structure is the same.
From tires
Tires of any size are suitable for creating a multi-tiered bed. The main thing is that they form a pyramid. To give an aesthetic appearance, rubber is painted.
Algorithm of actions:
- Choose a place for a multi-tiered bed.
- Cut the side of the tire down to the tread. Do the same with the rest of the tires.
- Paint the inside of the tires with any paint.
- Paint the outer parts of the tire in different colors.
- Place a reinforced mesh on the ground, its size should be slightly larger than the diameter of the lower wheel.
- Place a large tire on top.
- Cover with drainage and prepared soil.
- Next, lay a tire with a smaller diameter and fill it with soil.
- Carry out similar actions with subsequent levels.
If there are only two tires of different diameters, the third tier can be a plastic basin or a large flower pot.
Made from wood
Multi-level structures are made from wood much more often. Of course, the lifespan of a wooden pyramid is limited, because the material is susceptible to rotting. You can increase it by treating the boards with an antiseptic.
You can choose the dimensions of the multi-tiered strawberry bed to suit your needs. The general concept of its manufacture is shown in the drawing.
Construction algorithm:
- Choose a well-lit place.
- Place a reinforced fine-mesh mesh measuring 240 by 240 on the ground.
- Make boxes from boards with the following dimensions: 220 × 220 × 25 cm; 170 × 170 × 25 cm; 120 × 120 × 25 cm; 70 × 70 × 25 cm; 20 × 20 × 25 cm.
- Level the corners with a plane. Treat boxes with antiseptic.
- Install a large box. Pour peat to a height of 15 cm.
- Install a polyvinyl drainage tube with a plug at the end in the center of the first bed. First you need to drill holes in the pipe. It will be used to water the bushes. Add some soil in the area of the installed pipe.
- Install the remaining boxes and cover them with fertile soil or peat.
- The upper tier must be filled with earth carefully so that it does not fall into the pipe.
The shape of multi-tiered beds can be different: square, triangular. Sometimes they make structures in the form of steps.
Advice. To make multi-level beds, you should not take poplar boards. It is better to purchase more expensive pine or hardwood material. After treatment with an antiseptic, they will last for many years. The poplar will rot in 2–3 years.
Useful video: how to make a multi-tiered bed for strawberries from boards with your own hands
Made of metal
Multi-tiered metal beds are made according to the same principle as wooden ones. Structural elements are connected by welding or fastened with rivets, then painted.
From bricks, stones blocks
Multi-tiered beds made from bricks and blocks look good, but this is too expensive and complicated. True, they last a long time.
Vertical bed
Make a multi-story strawberry bed vertical. The simplest one, with three or four sides, is built from wood and mounted on supports. The tiers are attached to the triangular support using nails or self-tapping screws. You can make it using a drawing with dimensions.
A vertical multi-tiered bed for strawberries can be made from pipes.
You will need 2 pipes of different diameters.
- On a thin tube you need to put a plug at the lower end and make holes in the upper part.
- Wrap burlap around the bottom.
- Make holes in the pipe with a large diameter, maintaining an interval of 20-30 cm.
- Insert a thin tube into it.
- Fill a thick pipe with 10 cm of gravel.
- Fill with prepared peat or soil.
- Plant strawberry bushes in the holes.
One example with instructions is shown in the diagram.
A vertical bed made of thick plastic bags will look unusual. They are filled with soil and attached to the wall. Then slits (pockets) are made in the bags for planting strawberry bushes.
Similarly, you can root seedlings in plastic bottles, the top of which is cut off and filled with soil. If there is excess roofing felt, chain-link mesh, agrofibre, burlap, a vertical structure can be built from them. The main thing is to be able to fill the material with soil, tie it and put it in place.
Video: do-it-yourself multi-tiered pyramid bed for strawberries
Horizontal bed
A similar multi-tiered bed can be made from various materials. For example, from PVC pipes. To manufacture the structure, you don’t even need a preliminary drawing.
Algorithm of actions:
- Take the required number of pipes.
- Cut holes at a distance of 20-30 cm from each other.
- Place plugs on both sides of the pipe.
- Secure the beds to a wall or frame.
- Pour soil into the holes.
- Plant strawberry seedlings.
Video: how to make a multi-tiered strawberry bed from PVC pipe
Bouquet of strawberries and flowers, detail with photo
Prepare the berries by first washing and drying them, flowers, thin bamboo skewers, tape and paper for packaging.
- Pierce the berries with the sharp end of a bamboo skewer.
- Gather all the prepared strawberry skewers into a single bouquet. Carefully wrap the base of the bouquet with tape.
- Prepare the flowers by removing any unwanted leaves. Add one flower at a time to the bouquet. Due to the fact that the bouquet has gaps between the berries, flowers can be placed around the entire perimeter of the bouquet by inserting them between them
- Trim the flower stems so that they do not protrude beyond the tips of the bamboo skewers. Wrap the bouquet again with tape. Pack to your liking.
Bouquet of roses and strawberries, detail with photo
A composition of roses and flowers can be made using the method described above, having previously removed the needles, or you can use a floral oasis or foam plastic of a suitable shape to create it.
For roses, cut the stem, leaving 2-3 cm at the base. Do not throw away the stems and leaves.
Divide the base for the bouquet in half and fill one of its halves with roses, piercing it with the rest of the stem. You can divide the workpiece into several sectors and distribute roses and strawberries at your discretion.
Cut the leaves from the stems and use tailor's pins to pin them to the outer walls of the base, and also cover the places on the base where the strawberries will be located.
Prick the berries onto a toothpick and fill the remaining space of the workpiece with them.
Cut the stems of roses into sticks 5-6 cm long. Take several sticks, tie them with floral ribbon and attach them to the walls of the bouquet. A gorgeous bouquet is ready!
Saving berries from birds
Another problem with strawberries is birds. They are very attracted to the red color of the berries. And one fine morning you can find berries in the garden that have been thoroughly pecked by birds. To save the crop, you can cover it at night with the thinnest covering material.
This, of course, will require even additional effort, since you can’t just put covering material on the bushes. We'll have to make arcs for it. To do this, you can buy an insulated electrical wire with a diameter of 6 mm, cut sections of it longer than the width of the bed to form an arc, bend these sections into an arc and throw them over the beds at a distance of 50 cm.
And already throw a light covering material over these arches. It is important to secure it at the edges of the bed with pebbles or pieces of wood so that it does not fly away when there is a gust of wind.
Ready-made arcs are also sold in garden stores. This method of saving berries from birds will also provide the berries with warm nights: even under the lightest covering material it is warmer at night.
How to make a bouquet of chocolate-covered strawberries, step by step with photos
For this bouquet, prepare washed and dried strawberries with tails, bamboo skewers, chocolate or chocolate icing, sprinkles of your choice, a piece of polystyrene foam or a floral oasis, packaging film and wrapping paper, scissors and tape.
- Dip the tip of a bamboo stick into melted chocolate and pierce the strawberry through its tail. Let the chocolate set.
- Dip the strawberries on a skewer into chocolate and sprinkle with toppings, such as puffed rice. Place in the refrigerator to harden.
- To make the bouquet more interesting, dip the strawberries in chocolate, and then pour chocolate tinted with food coloring over it.
- Collect a bouquet. A square-shaped foam base is best suited for this purpose. Using the free tip of a bamboo skewer to pierce the foam, form a bouquet by combining chocolate-covered strawberries with non-chocolate-covered strawberries.
- Cut a square out of transparent film, and in its center make a hole the size of a foam piece. The film is needed not as a decorative element, but to prevent the berries from coming into contact with the packaging.
- Pack in wrapping paper of your choice.
Option for postcards
A simple origami strawberry model can be folded in just five minutes according to the following scheme. You will need a sheet of paper with two contrasting sides - ideally red and green. However, if you couldn’t find such a combination, don’t be upset. At the end of the assembly, the strawberry sepals can be painted or decorated with a stylized berry, matching the rest of the decor to it.
Step-by-step instruction:
We start working from the green side (or its color analogue).
- Fold the square sheet in half diagonally.
- We also bend the triangle in half.
- Open the left “pocket” to the right.
- Let's flatten it.
- Turn the workpiece over.
- Repeat steps 3 and 4 on the back.
- Turn the “Double Square” over with the open edge facing away from you.
- We bend the top of the first layer along the dotted line.
- For the second one, we move the ends apart.
- Fold the side edges along the dotted lines.
- Lower the top of the figure.
- You can draw characteristic points with a marker.
A slightly more complex version from Korean origamists:
Strawberries are often combined on postcards with other origami fruits.
Bouquet of strawberries and sweets, step by step with photos
To create this bouquet you need:
- strawberry;
- large chocolates;
- mint sprigs (optional);
- bamboo skewers;
- wrapping paper.
Place the candies on skewers. They will serve as the middle of the composition.
Do the same manipulation with strawberries.
Use chocolate candies to form a flower. Be sure to secure the ends of the sticks with tape.
Fill one row around the candies with strawberry skewers.
Secure the skewers together with tape.
Pack according to your taste and, if desired, place loose mint leaves around the bouquet.
DIY strawberry craft
DIY and crafts on SearchMasterclass 520 x 390 · 50 kB · jpeg
With my own hands. Master class for children 600 x 400 · 244 kB · jpeg
DIY and Crafts on SearchMasterclass 520 x 390 · 48 kB · jpeg
Do it yourself Sweet floristry 1024 x 768 · 112 kB · jpeg
DIY Strawberry Candy 2 520 x 390 · 78 kB · jpeg
DIY and Crafts on SearchMasterclass 520 x 390 · 61 kB · jpeg
DIY and Crafts on SearchMasterclass 520 x 390 · 111 kB · jpeg
DIY acorn crafts for 576 x 450 · 144 kB · jpeg
Cold porcelain strawberries | Country 520 x 390 · 45 kB · jpeg
- » ProstoDelkino.com - DIY crafts 520 x 390 · 50 kB · jpeg
Strawberry hairpin. It measures 700 x 525 · 71 kB · jpeg
Strawberries in daisies. Mother's DayDay 520 x 390 · 58 kB · jpeg
Strawberries from plastic bottles 2 640 x 480 · 60 kB · jpeg
Strawberries - Let's make them with our own hands. Master 525 x 350 · 34 kB · jpeg
- » ProstoDelkino.com - DIY crafts 520 x 429 · 67 kB · jpeg
Nothing found for %c3%90%c2%b2%c3%90%c2%be%c3%91%c2%80%c3%90%c2%be%c3 602 x 451 · 65 kB · jpeg
DIY Cake Mug Master 520 x 390 · 49 kB · jpeg
From a flower with your own hands | Podelkino 600 x 390 · 55 kB · jpeg
DIY Cake for School Competition 520 x 390 · 54 kB · jpeg
Strawberries - Let's make them with our own hands. Master 525 x 350 · 14 kB · jpeg
Strawberry Coloring Pages - Site for Moms 710 x 897 · 53 kB · jpeg
DIY cake Strawberry Master 520 x 390 · 64 kB · jpeg
Wooden strawberry. Remember summer. 600 x 493 · 44 kB · jpeg
Christmas tree made of fruits for yours 640 x 400 · 66 kB · jpeg
DIY Cake for School Competition 520 x 390 · 51 kB · jpeg
Strawberry - paper craft for children 567 x 719 · 27 kB · gif
It looks like a DIY strawberry 500 x 500 · 100 kB · jpeg
DIY for kindergarten school 550 x 414 · 69 kB · jpeg
With my own hands. Masters Club and 550 x 367 · 34 kB · jpeg
DIY Cake for School Competition 520 x 390 · 44 kB · jpeg
Empty-handed, and always saves us 500 x 500 · 49 kB · jpeg
DIY, children's crafts and 1120 x 1500 · 168 kB · jpeg
, DIY crafts “Miracle babies 520 x 519 · 167 kB · png
Strawberry crafts Strawberry crafts
Strawberry » ProstoDelkino.com - crafts 520 x 390 · 47 kB · jpeg Source ????? ??????? ??????? ?????? ????? 520 x 346 · 37 kB · jpeg Source Crafts from natural materials 600 x 554 · 57 kB · jpeg Source Crafts for the garden: delicious strawberries 520 x 321 · 22 kB · jpeg Source
Crafts strawberry photo Crafts strawberry photo
Strawberry » ProstoDelkino.com - crafts 520 x 390 · 47 kB · jpeg Source ????? ??????? ??????? ?????? ????? 520 x 346 · 37 kB · jpeg Source Crafts for the garden: delicious strawberries 520 x 321 · 22 kB · jpeg Source Strawberries that look like real berries 602 x 448 · 63 kB · jpeg Source
Making strawberry crafts Making strawberry crafts
Fascinating crafts from rubber bands 800 x 449 · 119 kB · jpeg Source DIY crafts from acorns for 576 x 450 · 144 kB · jpeg Source Strawberry “Sweet temptation” | Beads from 401 x 500 · 157 kB · jpeg Source Strawberry Garland | Podelkino 620 x 413 · 44 kB · jpeg Source
Making strawberry crafts Making strawberry crafts
Stem threads. Strawberries have 600 x 195 · 31 kB · jpeg Source How to make African beads - video 640 x 648 · 112 kB · jpeg Source Summer applique for children using the technique 628 x 353 · 28 kB · jpeg Source Make from green yarn 541 x 524 · 85 kB · jpeg Source Children's autumn
Strawberry craft for kids Strawberry craft for kids
Girls on March 8, clothes for babies 1600 x 1591 · 577 kB · jpeg Source Strawberry - Website for mothers of babies 710 x 897 · 53 kB · jpeg Source Strawberry - Website for mothers of babies 706 x 895 · 53 kB · jpeg Source Strawberry - Website for mothers of babies 899 x 706 · 44 kB · jpeg Source Strawberry - Website for
DIY strawberries DIY strawberries DIY crafts
Strawberries » ProstoDelkino.com - crafts with your own 520 x 390 · 47 kB · jpeg Source Strawberries from candies, crafts with your own 520 x 390 · 53 kB · jpeg Source From natural material with your own hands 624 x 382 · 47 kB · jpeg Source Finally, connect the two parts . For 580 x 580 · 59 kB · jpeg Source
Source: https://prostodelkino.com/podelki-k-novomu-godu/92765-klubnika-svoimi-rukami-podelka.html
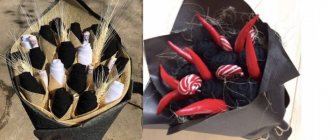
Bouquet of strawberries and marshmallows, detail with photo
The tandem of marshmallows and strawberries in one bouquet looks impressive and appetizing. You can also add sweets, cookies, waffles, greens and flowers to the bouquet. Detailed instructions for creating such a bouquet:
- Wrap each strawberry in cling film, leaving a small tail.
- Without piercing the berry, tape the tails of cling film to the skewer. This way, your bouquet can be stored for a long time, and the strawberries will not yield juice.
- Place each marshmallow in the same way in cling film, the tail of which is also tied to the skewer with tape.
- Do the same with the waffle rolls.
- Collect a bouquet. You can add sprigs of greenery or flowers to the composition. Secure the sticks with tape.
- Pack it.
How to fill the beds
The key to a good harvest is correctly selected and prepared soil. Strawberries love sandy loam and loam with an acidity level of no more than 5.5 PH.
Fill multi-tiered beds like this:
- The first layer is insulating – sawdust.
- The second layer is drainage - sand mixed with perlite.
- The third layer is a soil mixture of peat, garden soil and leaf compost.
If the soil mixture is heavy, you can add sand or perlite to it.
To protect strawberries from diseases and get rid of pests, the soil before filling is treated with boiling water, a strong solution of potassium permanganate or fungicides, for example, TMTD (40 g/1 m2).
Bouquet of strawberries in a box, photo with explanation
The important element in this bouquet will be the box. You can buy a ready-made box, or you can make it yourself. In the second case, any cardboard box of a suitable shape will do, which can be covered with scrapbooking paper or leftover wallpaper.
From a piece of foam plastic, cut a blank the size of the bottom of the selected box. Insert the cut piece of foam into the box.
Cover the sides of the box with leaves using tape.
Place strawberries and sweets on skewers and insert into foam.
The bouquet in the box is ready.