For centuries, the rainbow has amazed people with its beauty and unusualness. Many legends revolved around this phenomenon, since the mystery of the origin of the beautiful seven-color ray remained unsolved.
If you want to please yourself and your loved ones with a rainbow-shaped craft, pay attention to this article, it will tell you how to make a rainbow with your own hands.
Volume applique
A good reason to spend time with your child is to make a voluminous paper rainbow. Cut seven long strips of colored paper, the colors of the rainbow. On a blue sheet, draw two silhouettes of a cloud with a pencil, cut out along the contour.
Carefully glue the strips together so that the edges of one overlap evenly with the other. Don't go wrong with the right color transition. Allow the workpiece to dry a little.
Bend the edges – the bases of the rainbow – a centimeter inward. And stick them to the clouds. Bend the rainbow and fix it. For realism, you can attach a little cotton wool to the top of the clouds. Glue the finished application, clouds, onto a sheet of thick white paper.
The result is a beautiful decorative rainbow that can be used to decorate a child’s bedroom.
Original ideas for applique flower arrangements
Do-it-yourself fruit bouquet: photos of the best ideas, step-by-step master class for creating it yourself, simple diagrams
Let's make a composition with snowdrops from colored paper. This will require some effort and time. The result promises to be impressive.
To create an applique with realistic chrysanthemums, you need double-sided colored, plain white and decorative corrugated colored paper, yellow and green felt-tip pens, scissors, and glue.
Thanks to thick corrugated paper, flowers will better retain their shape:
- Strips are cut from decorative paper. The length of the petals depends on the width of the strip.
- The strips are folded several times.
- Using scissors, triangular cuts are made along the width of the strip. These will be the petals of the flower.
- An adhesive trace is left on the untouched length of the strip.
- The strip is rolled into a roll. A second strip is glued onto the finished roll.
- We straighten the paper petals. This creates a chrysanthemum flower.
- The core of the flower can be colored inside with a yellow felt-tip pen.
- A vase is cut out of decorative paper. From green - leaves. Using colored felt-tip pens, the veins on the petals are drawn.
- The vase is glued to the background of the applique. It can be made from paper with cut edges glued to cardboard.
- The flower bowls are turned over, the bases are cut, unfolded and coated with glue.
- Flowers are glued over the edges of the vase in three rows.
- The leaves are slightly bent and glued by their bases to different parts of the picture.
At this point, the original applique with chrysanthemums is considered ready. Artificial flowers can be used separately - for example, to decorate a room or create artificial bouquets.
Let's try to create three-dimensional carnations out of paper.
To make an applique, you should prepare corrugated paper, a regular sheet of colored paper, a sheet of cardboard for the background, scissors, glue, felt-tip pens, a water sprayer, a stapler:
- Four square pieces are cut out of decorative corrugated paper.
- The squares are overlapped and connected with a stapler.
- A circle is cut out of a multi-layer paper square. Slightly oblique cuts are made at the edges, going towards the core. These are the petals of the future flower.
- The petals rise starting from the top circle. It turns out a voluminous clove.
- Using a felt-tip pen, thin colored veins are depicted on the petals.
- The paper is sprayed with water.
- The flower is folded along the midline twice.
- Stems are rolled from green paper, leaves and sepals are cut out.
- Paper with curly edges is glued to the cardboard. This is the background for the application.
- The stems are glued to the base, two sepals and two flowers are glued to each stem.
The result is realistic carnations that delight the eye with their beauty. The picture can be decorated with additional details - for example, butterflies or ribbons.
Making appliqués is one of the easiest ways to show your creativity. The flower craft can be used as a gift for March 8th or hung on the wall.
Fruit rainbow
The easiest time to assemble a multi-colored fruit dish is, of course, in the summer. But, with a strong desire and a good supermarket nearby, the idea can be implemented even for the New Year.
For a berry-fruit rainbow you will need 300 grams of raspberries, strawberries, mango, pineapple, kiwi, blueberries, blueberries, mulberries. Cut large fruits into cubes. Place on a plain flat dish in the correct, rainbow order. The layers can be placed parallel and twisted into a spiral extending from the center.
The mix laid out in concentric circles looks beautiful. The middle can be decorated with a white flower made from whipped cream. Photos of how to make a rainbow of berries and fruits can be found on the Internet.
A couple of fruit mixes collected in this way will decorate any table. Especially for children.
Paper rainbow: three-dimensional craft step by step
A bright and beautiful paper rainbow is an excellent spring-summer craft for children. There are many ways to create it, two of which are presented in this master class.
To work you will need:
- Double-sided colored cardboard in red, orange, yellow, green, blue, indigo, violet;
- Ruler, pencil, scissors, glue;
- For the second method - also cotton wool.
Colored baked goods
Before preparing dishes, you should stock up on edible food coloring in the amount of 7 pieces, according to the colors of the rainbow and the necessary products. Mix the dough for pancakes or waffles according to your favorite recipe. Divide it into seven parts. Add the appropriate paint to each in such an amount that the dough acquires a pronounced, rich color. Bake in turns to avoid accidentally mixing colors in the pan.
Arrange the finished pancakes in a stack in the desired order. While the waffles are still hot, roll them into a wide tube or small bag and fill them with any cream colored in the same color. Arrange on a plate in a circle like a seven-flowered flower.
There are actually quite a few dishes from which you can make a rainbow. Colored jelly, multi-layer cake, cake.
How a rainbow is formed: the principle of refraction
Of course, your mini-rainbow is different from the one that appears in the sky after rain, but they have the same basic color characteristics. Why? Your demo version of the rainbow and the original work on the same principle: refraction and reflection.
Refraction is the bending of light as it passes through a different medium, such as glass or water. Refraction can even cause the clock hands to go backwards when viewed through a glass of water.
When you shine a light beam from a flashlight (or white light coming from the sun) into water, the light bends. But white light is not made up of just one color - it is a combination of all visible colors. Therefore, when white light is bent, all of its components (red, orange, yellow, green, blue and indigo) are also bent. Each of these colors does this at a different angle because each color moves at a different speed within the water or glass.
When you reflect light from water using a mirror, you are reflecting white light that is broken down (by refraction) into a full spectrum of colors. This is how a rainbow appears!
Painted eggs
The idea can be implemented at Easter, when it is customary to paint eggs. The algorithm is simple. Buy in advance the required number of white eggs and bags of dyes. Set aside a few free hours to color the eggs.
It is recommended to paint strictly according to the instructions. If the egg is not kept in the solution for the required amount of time, the egg may not be colored or may be slightly colored.
After the paint on the eggs is completely dry, place them in a basket or around an Easter cake. It will be beautiful.
Children's paper crafts. Rainbow and cloud.
Red, orange, yellow, green, blue, blue, purple! It is these colors that are present in the amazing natural phenomenon - the rainbow. Each of us always associates a rainbow with a good mood and weather.
And in this article we would like to offer you several simple master classes on making children's crafts on the theme of Rainbow. With their help, you can introduce your children to flowers and talk about how such a miracle in nature as a rainbow is created.
Panel
The craft requires the presence of a certain number of multi-colored stones. In craft stores you can buy artificial stones or large transparent buttons of different sizes. A rainbow of multi-colored glass pieces, turned into pebbles, looks good. It's better to look for this particular material.
Prepare a canvas and lay out a drawing on it. Next, without disturbing the design, carefully take one pebble at a time and glue it onto the canvas without moving the others.
After all the elements of the pattern have been glued, dry the workpiece. Place the panel in a frame and hang it on the wall. A wonderful decor item!
Drawing a rainbow with a sponge
To draw with this unusual material, prepare:
- sponge;
- Gouache;
- Paper (preferably large format).
Apply seven stripes of paint to the sponge in the correct sequence. The stripes should not be too thick. Next, hand the child a sponge so that he runs it over the paper in a certain sequence.
It is important to do this in one direction, avoiding layering paint on top of each other, otherwise all the colors will mix with each other and lose their aesthetic appearance.
Rainbow on glasses
Painting on transparent glass glasses is almost an art. How to make a rainbow with your own hands on dishes? Prepare several glasses from clear, smooth glass.
Degrease with acetone so that the paint does not accidentally spread. Prepare acrylic paints and several brushes of different sizes.
The rainbow can be painted in the form of spiral stripes encircling the entire glass, as a small design on the side, or as abstract spots.
Rainbow using a mirror
If you don't know what you can use to make a real rainbow, pay attention to the following method. It will allow you to create not a craft, but a real seven-color beauty at home. To do this, you only need a container of water and a mirror.
Prepare a container and fill it halfway with water. Place the mirror in the bowl at an angle.
Place the container so that the sun's rays hit the mirror directly. Hold a sheet of plain white paper over the mirror. Adjust it until you see a rainbow.
In the garden
Master class on how to make a rainbow on garden paths.
Purchase several cans of multi-colored rainbow paint from a hardware store. In order to guess the composition of the paint and not spoil the matter, be sure to consult with the seller before purchasing. You need paint that can be used to paint small crushed stone.
Prepare the required amount of crushed stone. Divide it into several parts. Take turns painting each pile in the desired color. It's easy to do.
Pour paint into a large basin, take a special construction sieve, put crushed stone on it in one layer, lower it into the paint, and mix a little. Pull it out, let it flow and send it to dry in a ventilated, shaded, dry place.
After making sure that the paint is completely dry, does not stick or get dirty, cover the path with colored crushed stone so that you get a rainbow.
If the paint remains, you can collect huge cobblestones, paint them in the same way as crushed stone, and line the flower beds with them.
Colored borders and paths will decorate the garden in summer and especially in winter, when nature lacks bright colors.
Experiment with water, paper, mirror and plasticine at home
To conduct the research you will need:
What to do: 1. Fill the container with water; 2. Attach the mirror to the container using plasticine. Half of the mirror must be under water, and the other half above water, otherwise the experiment will fail; 3. Place the container on a windowsill or other place that receives direct sunlight; 4. Take a piece of paper and hold it above the container, trying to catch the rainbow. The position of the sheet and mirror can be changed.
You can play with the shadow, take mirrors of different sizes, which will allow mother and child to explore different natural processes in a playful way. If you are lucky, you will be able to see a secondary rainbow - this is light reflected several times in a prism. The secondary rainbow surrounds the first, being paler.
Rainbow installation
One designer came up with an unusual decoration for the living room in his home. I stretched multi-colored silk threads from the ceiling to the floor, grouping them according to the colors of the rainbow. You can try to repeat the installation. The algorithm is quite simple. It is only important that the threads are located very close to each other. Then you will get the desired effect.
Step-by-step instruction
The container should be wiped dry, otherwise the salt will dissolve.
Further actions:
Pour salt onto the paper and rub the chalk on it until it turns colour. Carefully pour salt into the container to the marked level. You can use a homemade paper funnel. Take a clean sheet of paper and repeat the procedure with a different color chalk. The pattern will be more interesting if the container is tilted at an angle
This must be done carefully so that the layers do not mix. If necessary, level the surface with a stick. Cover all layers and remove traces of marker from the glass surface
A regular rubber eraser, soda or alcohol will help. Close the bottle. If desired, the lid can be painted, wrapped in colored paper, foil or film. It will be beautiful if you tie a bright bow at the neck of the vessel.
A rainbow in a glass container is an easy craft. You can make it together with your child, and in the future it will decorate the children's room.
DIY rainbow photo
Progress of the lesson
Educator: Guys, listen to the riddles. Try to guess.
Multi-colored rocker
It hung over the river.
(rainbow)
Seven colors - one arc,
This is a miracle
(rainbow)
Educator. Nature is a beautiful and mysterious world with a lot of interesting things.
Now guys, I’ll ask you to remember what natural phenomena you know?
Children's guesses (answers to the question)
Educator. Okay, great. Children, today we will talk about rainbows. We must learn what a rainbow is, how and when it appears.
Next comes the presentation of the “Rainbow”
.
Educator. The word "rainbow" is similar to the word "joy". And in fact, it is joyful
when suddenly a surprisingly beautiful arc appears in the sky. In the old days they called it “Paradise Arc” and believed that it brought happiness. Since then that’s what they call it – rainbow.
A rainbow only appears when it rains and the sun shines at the same time. Sometimes you can see not one, but two rainbows in the sky. When the rain stops, it's like someone is erasing the rainbow
from the sky.
Children, what world do you think the rainbow belongs to (natural or man-made)
why is it called a natural phenomenon?
Children's answers:
No one created it with their hands, it was created by nature itself, etc.
Guys, there are seven colors in the rainbow, and they are all always located in the same order, who can name them?
Right! Well done! And now we will play with you.
Ribbons of the same colors as in the rainbow and in the same order are hung on the easel.
Educator. I will remove the rainbow ribbons, and you will tell me what color the ribbon is gone.
Educator: Guys, now I suggest you make a rainbow.
I prepared colored paper in all the colors of the rainbow in advance. It is lined with stripes. We need to cut this paper into strips together. The children are given paper and they get to work, cutting their paper into strips.
Educator:
Well, we got each stripe with only one color, but we need each one to have a multi-colored rainbow. What do I need to do? .Children's answers.
That's right, each of you needs to share your strip of paper. Children exchange stripes. Glue their strips onto a paper roll, repeating the saying and comparing all the strips of paper with it. Then the pre-printed and cut out clouds are glued onto the sleeve.
Independent creative work of children.
Lesson summary:
Well, now you each have your own wonderful rainbow. Well done.
LiveInternetLiveInternet
nata_tursha
all posts by the author There is a phenomenon of two rainbows in nature, you and your child could observe it. And he probably bombarded you with questions. The creative process will help you tell your child why there is a double rainbow, because in an applique two rainbows are a phenomenon as natural as in nature.
For work we will need:
- colored cardboard or thick colored paper (white, lilac, blue, cyan, green, yellow, orange and red); - round saucer (wide cup or dish lid); - cotton wool; - glue and double-sided tape; - scissors and pencil.
We will assemble the first rainbow using the mosaic principle, for which we will cut semicircular strips of all colors. Place the dish on the back of the red cardboard so that half the circle is covered, and trace it with a pencil. On some dishes this half can be easily identified by the seams.
We lower the saucer just below the first contour and draw the second. From the center to the tips the thickness of the strip decreases. But this is not a mistake, but only the costs of using one vessel instead of several different in size.
We cut out our first (and largest) stripe of the rainbow along the contour. All subsequent ones will decrease proportionally.
Using the lower border of the red stripe, draw the upper border of the orange one. The saucer will help us with the bottom again.
We make all the other parts of the rainbow in the same way - the top of each next strip is drawn using the adjacent one, and the bottom is obtained by tracing the roundness of the dishes.
Starting with the smallest arc, lilac, we gradually glue all the parts onto the base sheet.
Cut out the resulting applique.
Glue white cardboard clouds to the ends of the rainbow. They will serve as the basis for a three-dimensional composition made of cotton wool. To ensure that the cotton balls that we rolled hold well, we attach pieces of double-sided tape to the cardboard base. Having removed its protective layer, we place the balls, lightly pressing them for better adhesion.
If we want to put the rainbow on its feet, we make triangles from strips of cardboard of equal length. With one side we glue them to the underside of the rainbow, namely to the cloud zone.
To give the craft a finished look, the cotton wool can be tousled with light movements.
We will use the remains of the first rainbow to create a second one, which differs in design.
Let's start working with red cardboard. We attach the semicircle with the colored “face” down on a blue cardboard platform. A strip of double-sided tape holds the weight of the cardboard perfectly and does not require drying time, like glue, for example. Then we raise the semicircle perpendicular to the platform. At the beginning of the work, it is worth assessing the size of the cardboard base so that six more colors can fit in front of the red one.
We place the orange part of the rainbow in the same way, but at a small distance from the red one. Due to the fact that the orange piece is double-sided cardboard, its “face” can be either side.
By gluing all the parts one by one, we get an amphitheater rainbow. But she lacks something, she is too strict, she is not decorated with anything.
We cut out this “something” from small pieces of colored paper, sketching silhouettes of butterflies on the reverse side with a pencil.
Three different ones are enough for us to make this multi-level composition “come to life”.
Source
Material (senior group): Broken applique “Rainbow-arc”
Dear parents!
I suggest you and your children do the work
“Rainbow-arc” in the style of broken applique.
This mosaic rainbow, assembled from small parts, has an original look. Its creation will require attention and accuracy from the child.
In the process of work, the child will continue to improve the ability to carefully tear small pieces from a sheet of paper and stick them on the base, work with glue, and consolidate knowledge of the colors of the rainbow. This activity promotes the development of fine motor skills and creative imagination in children.
Preliminary work: looking at the picture “Rainbow”, memorizing the saying “Every hunter wants to know where the Pheasant sits” to remember the colors.
Materials and equipment: white cardboard, pencil, colored paper (red, orange, yellow, green, blue, indigo, violet), glue.
First you need to draw a rainbow on a piece of paper. Then you need to carefully tear off small pieces of colored paper of the desired color and sequentially stick them on the base. It is advisable to leave a small space between the pieces of glued paper. Then the finished cut-out applique will look like a mosaic.
Good luck!
Do you want to play with your child easily and with pleasure?
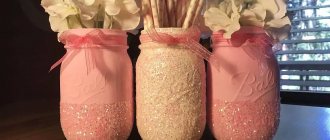
For the cores, we used the remains of rhinestones that I once used to embroider a picture, and a glue gun. The stems are made from cocktail tubes and complemented with leaves of colored paper. We decorated the jar with material from flower packaging and our little bouquet is ready.
Svetlana Radionova and son Mikhail, 7 years old. Saint Petersburg.
For this bouquet you will need double-sided colored paper, scissors and glue. Take a green sheet of paper, fold it in half and cut the “noodles” with scissors, leaving about 2 cm at the bottom edge. Then we roll up the sheet, glue it together and straighten the resulting “grass”.
Then we cut out flowers from multi-colored double-sided colored paper, draw hearts with them and glue them onto our grass in any order. That's all. The bouquet is ready, you can give it to your mother!
Jaromir 4.5 years old and mother Anastasia Kalinkova, St. Petersburg.
Carnations
We made a bouquet of carnations. To make flowers we needed:
- napkins (white and green);
- markers;
- wire.
We take several white napkins, fasten them with a clothespin so that they don’t move apart, draw a circle and cut them out. Next, use a felt-tip pen to carefully color the edges. We insert a wire into the center of the flower and secure it. For flowers, my husband gave us braided copper wire. You need to clean the tip so that it is sharper, pierce the napkins and bend it with pliers. It is enough to make a small hook. Since the napkins are folded in several layers, they seem to hold this hook themselves, and you don’t have to be particularly sophisticated.
We always want our little ones to be comfortable in their room, even in rainy autumn weather. Therefore, we try to decorate their comfortable corner as interesting as possible. Today we will make a rainbow and an umbrella out of paper together.
Step-by-step descriptions with photos will be clear even to children.
Material (senior group): Broken applique “Rainbow-arc”
Dear parents!
I suggest you and your children do the work
“Rainbow-arc” in the style of broken applique.
This mosaic rainbow, assembled from small parts, has an original look. Its creation will require attention and accuracy from the child.
In the process of work, the child will continue to improve the ability to carefully tear small pieces from a sheet of paper and stick them on the base, work with glue, and consolidate knowledge of the colors of the rainbow. This activity promotes the development of fine motor skills and creative imagination in children.
Preliminary work: looking at the picture “Rainbow”, memorizing the saying “Every hunter wants to know where the Pheasant sits” to remember the colors.
Materials and equipment: white cardboard, pencil, colored paper (red, orange, yellow, green, blue, indigo, violet), glue.
First you need to draw a rainbow on a piece of paper. Then you need to carefully tear off small pieces of colored paper of the desired color and sequentially stick them on the base. It is advisable to leave a small space between the pieces of glued paper. Then the finished cut-out applique will look like a mosaic.
Good luck!
Knitted panel in the form of a rainbow - master class
Take:
- wire or metal circle;
- yarn of the desired colors;
- light threads;
- scissors;
- white thick yarn;
- felt;
- filler.
If you don't have such a wheel, then roll the wire to get a similar blank. Now start winding white threads around it to form rays like this between the two circles.
The panel is ready. Then take the purple threads and start weaving the bottom edge of the rainbow. In this case, you need a small ball so that you can pass it between the inner wheel and the white threads wound here. After completing the first row, do the second. At the same time, fill only the upper area to create a semicircular rainbow.
In this way, design another sector of this celestial phenomenon. After this there is a blue stripe. Make it from yarn of the appropriate color.
Now use threads of other colors to fill in the rainbow. Close the bottom of the work. To do this, take this unspun white wool and begin to cover this area with it. Also weave, passing threads through the white rays. If you do not have such material, then use suitable threads after fluffing them. You can also take an unwanted white knitted T-shirt or other item of that color, cut it into strips and make clouds.
To make the rainbow panel further, you will need to tie or sew strong threads here, at the ends of which there are felt pompoms. They must first be made from circles and filled with filler.
The quilling technique will also help you make a rainbow. To do this, take strips of the desired colors, fold each in half and form a rainbow landscape. And from white stripes you will make elements of rain and clouds.
You can also make interesting work using voluminous paints of your own making. See how to make one.