Usually I like to do things around the house. As a rule, these are the simplest crafts, which at the same time look quite interesting and unusual. Recently I came up with a very interesting idea to create a shelf in the shape of a honeycomb, which could be supplemented with elements or, conversely, reduced in number.
My wife liked this idea so much that she now tells everyone how her husband made interesting hanging shelves. They are comfortable and fit perfectly into any interior design. I’m sharing how to make them yourself quickly and easily.
The first stage of creating shelves
Make sure you position the miter saw correctly to cut the 30 degree angle. Throughout the entire production of the shelves, you will never have to change this setting. The end of each of the prepared boards (the number is calculated from the number of proposed shelves) must be cut at an angle of 30 degrees. After you make the first cut, turn the board over to measure its long edge. Mark the required distances and make a second cut.
In fact, the template for all subsequent shelves is ready. Their size is determined independently depending on the dimensions. I made some pretty impressive shelves, but the smaller version looks just as stylish. I cut 15 of these boards in total. You need to make sure that all the pieces match each other in size.
How to paint a shelf: 3 tips from Belinka
Regardless of whether you paint the shelves with glaze, enamel or other decorative coating, choose reliable paints that are safe for health. These must be materials for interior work; you don’t want to breathe harmful substances, do you?
If the standard azure color does not suit you, you can mix several colors of the same brand yourself. True, you will have to do test paints on an unnecessary board and wait for it to dry.
Apply the first layer of glaze with a brush or roller, and after 3-4 hours the second. It is also recommended to apply enamel in 2 layers. Bookshelves, like other furniture, can be varnished if desired: for furniture in the room we recommend Belinka Interier Lak.
All that remains is to attach the corners that will hold the shelves on the wall. Prepare holes in the wall, drive in dowels, and then secure the shelves with screws.
The universal enamel we used is also suitable for metal - we also tinted the corners with it.
Popular posts
- How to make an infrared illuminator for a camera with your own hands. Do-it-yourself flower beds made of stones at the dacha, photos and how to make them. How to make a paper bunny with your own hands. How to make a folding shelf in a bathhouse on hinges with your own hands. How to make a flower pendant with your own hands. How to make paving slabs with your own hands. How to make a rotary cutter with your own hands using MTZ. How to make a model of a tank from cardboard with your own hands, step by step instructions.
How to make your interior fashionable
Unusual shapes and extraordinary ornaments can decorate any interior and give it unique features and personality. The regular hexagons of a honeycomb have long attracted designers and artists, because this is a truly amazing natural phenomenon that can become an excellent basis for creativity. Today's master class will tell you how to make original wall shelves in the shape of a honeycomb with your own hands.
To make wall shelves in the shape of a honeycomb, you will need the following materials and tools:
- boards 1-2 cm thick, 10 cm wide (it is better to calculate the length individually);
- packaging of screws - self-tapping screws for wood;
- corner brackets and screws with dowels - for attaching shelves to the wall;
- white paint on wood;
- colored wood glaze (translucent paint) or water-based decorative wax;
- paint trays, brushes or paint rollers;
- electric drill and drills of the required diameters;
- grinder or sandpaper;
- construction tape;
- ruler;
Step 1. To estimate how many shelves and what configuration you want, take a sheet of notebook and sketch out the desired design, taking into account the proportions of the wall and the free space on it. Let it be individual hexagons scattered across the wall, or collected in groups - it’s up to you to decide.
Any size can be made. For example, take the edge length as a basis - 20 cm. Now count how many edges you have drawn, and multiply the number by your edge length - this is the total footage of the board you need to buy.
Step 2. If you have a reliable circular saw on your farm, start cutting the boards. In fact, it’s easier to make preliminary calculations, then buy the required boards at a DIY hypermarket or specialized market and have them cut on site. The main thing you need to tell the cutting master is that the cuts of the boards should be at an angle of 30°!
Step 3. Fold the sawn parts. It is more convenient to do this on a flat floor. We fasten the honeycomb parts together by drilling holes to the diameter of our self-tapping screws, and only then screwing the self-tapping screws into them. If you do not first mark the holes and drill them, the boards may crack, because we screw the screws into the very edge of the boards. We assemble all the elements according to the intended design.
Step 4. Sand all surfaces well and proceed to painting. In our version, all shelves are painted with translucent glaze (water-based decorative wax), and the ends are painted with white wood paint.
For painting, choose reliable paints that are safe for health. These must be water-based materials for interior work. If the standard color of glaze or wax does not suit you, you can mix several colors of the same brand yourself. After mixing, make test paints on an unnecessary board and wait until it dries - this is the only way to evaluate the color that will turn out in the end. Carry out painting in accordance with the technology: apply the first layer of glaze with a brush or roller, and after 3-4 hours - the second.
It is also recommended to apply white paint or enamel on wood in 2 layers. Our bookshelves, like any other furniture, can be coated with a clear water-based wood varnish (glossy or matte) if desired.
Step 5. All that remains is to attach the metal corners to the resulting shelves, which will hold the shelves on the wall. Prepare holes in the wall, insert dowels into the holes, and then secure the shelves with screws. To prevent the metal corners from standing out against the background of the wall, paint them with the paint that was used to paint your wall, or just white paint to match the color of the ends of the shelves.
Ready! Our wonderful and very unusual shelves in the shape of a honeycomb will fit perfectly into the interior of a child's room or bedroom. Also, such shelves will be a wonderful decoration for the interior of a hallway, corridor or kitchen. All that remains is to fill the shelves with things and decorative items.
Progress
- Jigsaw, hammer drill, drill and screwdriver.
- Various screws and dowels.
- Beam 50 by 50 mm. for pole supports or a skein of strong and thick rope (what to buy depends on which assembly method you choose).
- Tape measure, pencil, plumb line and upholstery cord.
- Level rule.
- Hammer and drills of various diameters.
- Metal furniture corners that will “hold” the shelves.
How to treat the surface → Room decoration → How to choose the right paint → Surface treatment technologies → Leveling and finishing the walls → Selecting and applying a primer → Removal from the surface → Stretch ceilings and technologies → Reviews and testimonials
Purpose
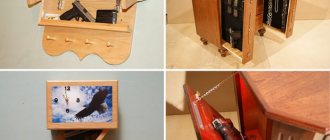
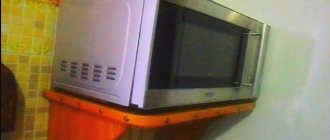
A completely logical solution is to supplement such a product with a small mirror.
In a children's room, shelves are often used to store cars and other small toys. Sometimes they are supplemented with glazed doors into which anti-reflective glass is inserted. But such doors must be made exactly according to the allotted dimensions in order to avoid mistakes. It is useful to have an easily removable, replaceable backdrop.
Such a solution is convenient both for using the collection and for admiring it; This approach, by the way, will also be approved by collectors of various decorative items.
If you need to make a shelf for flowers, for the kitchen or for books in small quantities, you should focus on other approaches. The front walls are definitely not needed here, and you can do without the rear ones.
The variety of possible options is almost limitless. Any experiments with colors and geometry of products are acceptable.
And also shelves for flowers can be made in:
Expert opinion
Strebizh Viktor Fedorovich, leading construction foreman
In accordance with the obtained numbers, horizontal lines are drawn on the wall; this will be a guideline for screwing, that same fixation of the plywood. If you want to clarify something, please contact me!
Fastening the structure
In order to fix the honeycombs, we need a regular drill, as well as a drill-chisel. We drill a hole of the required size in the elements to connect both parts together securely. You need to screw in the screws very slowly and carefully, as the wood can easily crack. Typically, two screws per side are sufficient. We repeat this procedure, moving around the entire hexagon. We get a very interesting and simple design in the form of a honeycomb.
After that, we prepare several hundred more according to the same scheme.
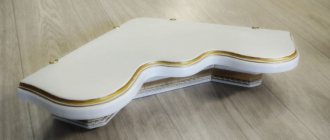
First cell
In order to make your first hexagon, you need to take 6 cut boards and first install them on edge on the floor. In fact, we are simply putting together a regular puzzle and determining which side is best to place the individual elements. After this, we connect the boards together using wood glue. After each application, it is necessary to press the sides tightly against each other for several seconds. At this stage, we only partially secure the boards so that they do not move apart during subsequent work.
A double harvest is guaranteed: carrots need to be sown in boxes and insulated with spunbond
She was born 8 years before her father’s death: how did life turn out for Ots’s youngest daughter
Not only carrots: nutritionist names foods that are good for eye health