- November 2, 2018
- Furniture
- Natali Michaelis
Shelves are the most important element of any closet. They are used for arranging books, clothes, bed linen or simply decorative items. However, not all closets contain a sufficient number of such elements, so people may have a question about how to make additional shelves for the closet with their own hands. This task should be approached with great responsibility so that the service life is as long as possible. We will talk about all the features of making shelves in our article.
Selection of material for manufacturing
In order to make a shelf in a closet with your own hands, you will need to choose the right material for construction. First of all, you should pay attention to what the wardrobe itself is made of. The most common material used in the manufacture of furniture is chipboard. However, this does not mean that using other materials would be wrong. You will have at your disposal:
- wood is a fairly durable and highly durable material;
- stacked solid wood, consisting of several pieces of wood;
- The blockboard is suitable for storing heavy items.
In addition, you can also use laminated chipboard and MDF with a dense structure. This material is not particularly strong or durable, but is significantly cheaper than any of the three previous options.
General rules
Making a wardrobe with your own hands provides many advantages. So, this is not only a significant saving on the family budget, but also an opportunity for imagination and experimentation. In order for the finished product to be comfortable and practical, at the design stage you should be guided by the following tips:
- The number of compartments inside the cabinet must match the number of doors. But this rule does not apply to wide doors, behind which you can install 2 compartments with shelves at once.
- It is convenient to store laundry in cells with a height of 35-40 cm, books - 20-35 cm.
- The optimal opening for long clothes is 150-160 cm, for short ones – up to 100 cm.
- Large items, suitcases, and travel bags are best placed on the top shelf. The height of the opening must be at least 45 cm.
- According to generally accepted standards, the depth of the wardrobe is 60 cm, which is exactly the size of the factory model. If the wardrobe is made independently, it is better to make it at least 65 cm. The fact is that the door mechanism “eats” 10 cm, so only 50 cm remains for clothes with hangers.
- If you plan to install a volumetric handle on the box, then it needs to be recessed a little so that the protruding part does not touch the doors. An excellent alternative to such handles would be the finger grooves on the front panel of the drawer.
- When making drawers with your own hands, it is better to use ball-bearing full extension guides. They are distinguished by their durability, strength and convenience.
- Large cells larger than 80 cm must be reinforced with a partition, otherwise they will bend under the weight of things.
- Rods for clothes longer than 100 cm are also recommended to be additionally reinforced with a vertical rod, the lower end of which rests on the floor, and the upper end on the top shelf. Thanks to this, you don’t have to worry about the heavy weight of your clothes.
- It is better to install the lighting in the cabinet in the remote roof canopy, and not inside the structure, otherwise the light will only fall on the top shelf.
When making a wardrobe with your own hands, we must not forget that the arrangement of things in it must have a certain sequence. For example, on top are placed the most unnecessary things that need to be taken out least often - hats, bags. In the middle are those that are used most often - outerwear. Below are boxes with shoes, bags, backpacks.
Which mount should I choose?
In addition to the material, when making shelves you will need to pay special attention to the holders, since they bear most of the load. There are two ways to arrange the fasteners: along different axes and along one axis. For the first time, it is best to give preference to the first option, since maintaining parallelism on two planes is much easier than looking for joints between two partitions. In addition, you will need to choose the optimal screed method, since the “load capacity” of the future shelf will depend on this. We will talk about all the features of each method in the following sections.
Corner screed
Special furniture corners can be made of wood and plastic. Installation of such parts does not require special knowledge and skills. It will be enough to use a screwdriver and several self-tapping screws to connect the shelf to the side wall of the cabinet. The only difficulty may be the correct location of the corner ties relative to one axis. If you create an uneven structure, then such a shelf will be of little use.
Decoration
Decorating shelves is an important element of furnishing an apartment. To ensure that the room is not cluttered, use some design tips:
- Leave some shelves empty. The absence of some details will help create an effect of order.
- Using boxes. In stores you can find boxes for every taste: wicker, wood, fabric, of any color and size. Use them to store small items. This way you will get rid of chaos on the shelves and definitely won’t lose your favorite things.
- Store books by color. This solution visually gives order to things and you will have the feeling that there is a real tree in your house!
- Use symmetry. It is not necessary to arrange all objects symmetrically. A few large objects are enough to create a form.
Screw tie
Another common type of screed, which is actively used when making shelves in a closet with your own hands. To fasten the shelf, a screw and a special barrel are used, which connect the shelf to the cabinet wall. It is worth noting that such a mechanism is highly complex to install, so if you are not confident in your abilities, it is better to ask a professional for help. The main problem is the difficulty of aligning the hole in the shelf with the barrel. However, the screw tie guarantees a reliable connection and a long service life.
Types of structures
There are several types of shelves:
- Classic - wooden or glass of symmetrical shapes.
- Corner - from the name it is easy to guess that they are distinguished by a special type of fastening - at the joints of surfaces, in the corners of walls.
- Suspended - attached to the ceiling or other surface using chains, cables or ropes.
- Floor-standing – are racks with a floor support.
Suspended structures are considered the most original and at the same time simplest to manufacture. Using the following instructions, you can easily make your own hanging shelf.
We take wooden boards as a basis: by assembling them into various modules, it will be possible to create a unique design.
Euroscrews
Increasingly, Euroscrews are being introduced into furniture production, which show good fastening efficiency. To create such a fastener, you need to screw the part into the end of the shelf into a pre-prepared hole. As a rule, products with a diameter of 7 millimeters and a length of 50 to 70 millimeters are used for this. The main disadvantage of the Euroscrew is that the furniture cannot be disassembled and reassembled frequently, since after three or four such procedures the fasteners may simply collapse. In all other respects, the Euroscrew is ideal for fixing shelves in a closet with your own hands.
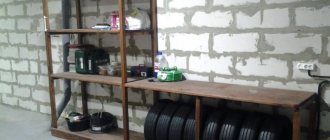
How to make a rack from pipes with your own hands
In this master class, the shelves are “strung” not on ropes, but on pipes. This rack is assembled like a construction set and can withstand heavy loads.
What do you need
- Four furniture panels - they will become shelves. Choose the size at your discretion;
- sandpaper grit 220 R (grit);
- drill;
- drill with a diameter of 24 mm;
- 12 pipes with a diameter of ½ inch, 30 cm long;
- eight flanges for ¹⁄₂ inch pipe;
- four ¹⁄₂ inch diameter extended spools;
- 12 x ¹⁄₂ inch pipe connectors;
- spray paint for pipes and wood varnish and brush (optional);
- 12 self-tapping screws 16 mm long.
How to do
Sand the surface of the furniture panels with sandpaper.
Shot: Around Home DIY / YouTube
Using a drill, drill holes in the corners of the furniture panels. Let us remind you that a vacuum cleaner will help you litter less.
Shot: Around Home DIY / YouTube
Paint shelves and pipes if desired.
Shot: Around Home DIY / YouTube
Assemble four rack legs from pipes, flanges and connectors.
Shot: Around Home DIY / YouTube
Assemble the rack: all shelves, except the top one, will rest on pipe connectors.
Shot: Around Home DIY / YouTube
The top one will be attached to self-tapping screws - screw it through the flanges. If you painted pipes, tint the fasteners with the same composition.
Shot: Around Home DIY / YouTube
Before using the shelving, allow paint, if any, to dry completely.
Shot: Around Home DIY / YouTube
What other options are there?
Industrial Style Open Shelving Wall Mounted:
Reliable wall-to-wall shelving:
Making a wooden shelf
Finally we get to the manufacturing process itself. To make a wooden shelf in a closet, you will need to collect all the necessary tools in one place in advance, so that during the process you will not need anything. Typically the list will be something like this:
- a regular iron for gluing furniture wool;
- drill with drills of suitable size;
- stationery knife and pencil;
- fasteners.
You will also need to get an electric jigsaw or circular saw if you decide to cut the boards yourself.
The workpiece must be cut only according to a pre-drawn diagram (drawing). It is best to do this with a saw, since the jigsaw may leave uneven surfaces that will have to be sanded down. You can also contact a carpentry workshop, where they will cut boards of the required size for you for a small amount.
The ends should be covered with furniture edges so that moisture cannot penetrate into the material. Edge tape is best applied using a hot iron. To cut off the excess, you need to use a utility knife or sandpaper. After that, all that remains is to install the shelf in the closet.
White mesh baskets for wardrobe
The most inexpensive option for mesh metal baskets are the white classic models on roller guides. The cells of the mesh structure can be large or small. Baskets are also distinguished by three sizes - the height of the container, its depth and the width of the base. You need to be especially careful with the last size. If a drawer can be made to fit any size section of a wardrobe, then the baskets are built into a “base” of a certain width.
However, baskets can be assembled into separate racks using additional fittings and placed separately.
This option is especially convenient for dressing rooms - you can always move the rack with baskets to the right place.
For convenience, they can be equipped with wheels. And the baskets themselves have partitions inside.
- The advantages of white mesh baskets include affordability and similarity to the design of mesh shelves. And also lightness and spaciousness.
- The disadvantage is insufficient load-bearing capacity. This type of basket is not designed for heavy loads; you can store light items and linen in them. And also monotony in design.
Installing a wooden shelf
This process is not particularly complicated, of course, if we are talking about an ordinary cabinet, and not some kind of pencil case. First of all, you should draw with a pencil the markings on which the shelves will be located. To draw lines between points, it is recommended to use a level so that the fasteners lie in the same horizontal plane. Otherwise, the shelf may collapse. It is also advisable to check with a level that the side walls of the cabinet are at right angles.
Sequence of work when installing shelves in a cabinet:
- Using a drill, we drill holes in the furniture according to the pre-made markings.
- We mount the selected fastening element (holders for shelves in the closet).
- We install the shelf on the mount.
To strengthen the structure, you can use wooden blocks. The parts are fixed to the front edge using screws or special wood glue.
Briefly about the main thing
Installing shelves is not difficult. It is important to prepare the shelves and cabinet themselves in advance, choose at what distance they will be located, and decide on the fasteners. If appearance does not play an important role, I advise you to stick to simple Euro screws. They are durable and simple and easy to work with.
When working, I recommend checking the markings several times before starting drilling. You need to lean the shelf against the markings and check whether it is positioned correctly and whether it is skewed. This will get the job done right the first time.
Question
Write in the comments which fasteners you prefer - easy to use or invisible? Have you ever worked with a conical or eccentric coupler?
Pull-out shelves
If you decide to make a pull-out shelf in your closet, then in addition to all of the above, you will need to use a special mechanism on which the shelf will move. You can purchase such a device at furniture stores, or you can remove it from an old chest of drawers, cabinet or computer desk, if the size is suitable. In order not to make mistakes with the calculations, be sure to draw up a drawing of the future shelf.
First, we make the shelf itself from wood or chipboard. If you decide to make a drawer instead of a sliding shelf, then you will have to add three more walls: two side and one front, as well as a handle. Be sure to take into account the dimensions of the mechanism itself when calculating, since it will be mounted on the end of the shelf and the inside of the cabinet. As a rule, its dimensions range from 4 to 6 centimeters in width. Fastening occurs using a large number of small screws.
As you can see, at home you can make almost any shelf of absolutely any size. To do this, you do not have to have special carpentry skills, but simply draw up a competent drawing and select good fasteners. After this, installation is reduced to minimal theoretical knowledge. However, this does not mean that this process should not be approached with great responsibility, because if the shelf is not secured securely, then it will simply not be possible to store objects with a large weight on it. Therefore, use only high-quality screws and a reliable screwdriver.
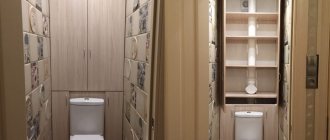
Arrangement of the hallway and bedroom
The internal design of the wardrobe directly depends on what exactly is planned to be stored in it. This means that when designing a piece of furniture for the hallway, bedroom or living room, you need to clearly know what things will be located there.
Most often, the dimensions of the hallway do not allow for a wardrobe with a depth of more than 40 cm.
Taking into account the fact that about 10 cm is spent on the sliding system, there is very little space left for placing outerwear - jackets, coats, raincoats. And standard hangers simply don’t fit in such a narrow closet. End rods, which are mounted instead of standard ones, will help make the internal structure more functional. They come in both retractable and stationary types. It is unlikely that they will be able to fit the entire outer wardrobe of the family into them, but the basic things can be done.
To store shoes, wire niches are installed where you can place 2-3 pairs of shoes or boots. The rest will have to be stored in boxes. Small pull-out elements will help make the closet convenient, where you can put brushes for shoes and clothes, creams, spare keys, and other small items.
The closet in the hallway is a place where umbrellas, packages, and bags are stored, so you need to take care of the required number of hooks where you can hang everything you need. Using a mirror on the door will not only visually expand the room, but also allow you to see yourself in full size before leaving the house.
A wardrobe for a bedroom is a place to store casual, work clothes, and bed linen. Therefore, before you start making furniture with your own hands, you need to carefully consider all the options for filling it. The most popular are:
- Baskets. They can be made of metal, plastic and are universal for storing things. They can hold both socks and shirts.
- Pantograph. This is a clothes rail equipped with a handle and a mechanism for lowering it down. This option is suitable for those who want to use the upper space as efficiently as possible.
- Iron holder and built-in ironing board.
- Hangers for ties, belts, trousers.
- Drawers for underwear.
- Mounts for storing shoes.
As for built-in wardrobes, many people prefer to make niches for TVs and computers in them. This allows you to unload the room and free up more space.