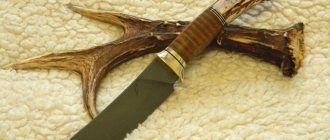
For any good knife, not only the technical characteristics of the blade are important, but also its handle, and if for the first element it is enough to choose high-quality steel, process and sharpen the blade, then the handle should be comfortable, practical, and beautiful. Moreover, it does not matter at all whether a new knife is being made or an old blade is being reanimated. Wooden or forged handles are considered classics. We must pay tribute, outwardly they look very decent, but making such a knife with your own hands is very difficult, and in some cases even impossible.
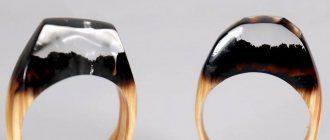
The building materials market is constantly expanding, and oligomers containing epoxy resins are gradually gaining popularity. You can make a handle of any shape from epoxy resin, and there are several options for decorating it. The strength of the hardened resin, as well as its other physical properties, make it possible to obtain reliable, practical and very beautiful products. This knife will serve for a long time in the kitchen or is suitable as a souvenir gift.
Resin mold
There is absolutely no need for the average user to classify the handles. When purchasing, he chooses a knife that is convenient for himself. But when making a handle yourself, you should understand that the process of its production will depend on the selected model type option.
You will need to make this form yourself. They are not sold in the store. But this will allow you to make a unique product. And if you add dye to epoxy resin, you will get beauty. There are several options for creating a fill mold.
Expert opinion
Konstantin
Since childhood, I have been interested in knives and everything connected with them. I bring the accumulated knowledge to the masses. I make knives myself. I take criticism positively, but I also like to argue.
By making the handle from epoxy resin, it will meet all the necessary safety and quality requirements. The use of resin is quite an original and interesting idea from a design point of view. You just need to know some of the nuances of production.
From sculptural plasticine
The mold for the handle of a knife made of epoxy resin will consist of two halves. The exception is the symmetrical handle. One form will be enough. For production you will need sculptural plasticine and plastic film.
Regular plasticine will not work. It will spread at the slightest increase in temperature. You will need to make a cast; it can be obtained using a working knife. You should lay a plastic film on the surface of the plasticine bar.
The best option would be food stretch. Make sure that the film fits tightly to the plasticine. If there are air bubbles, you should disperse them by hand. Then the handle of the knife is applied and pressed halfway into the plasticine. This will give us a cast of the handle.
Glued forms
A block of plasticine.
If in the previous version, filling with epoxy resin meant two halves separately, then in this case it means gluing plasticine bars together. Don't forget to leave a hole for pouring the solution.
And the result is a solid handle of the required shape.
The product obtained in this way does not need to be sharpened during finishing. It will be enough to sand and polish the finished handle. The complexity of the process is slightly higher than the previous option. Both methods are simple and accessible to beginners in this matter.
Solid wood handle
In this version, everything looks quite simple. The method involves casting a solid block from epoxy resin. It is then ground to the desired shape. This is the most time-consuming method. But you can get the result you need.
Cylinder shaped handle
Such handles are rather unattractive in appearance. But the manufacturing method is quite simple. Using acrylic sheets, finished tubes are obtained from them. Which will act as a handle. This production does not require much time and effort, and is suitable for completely green beginners.
Examples of epoxy resin handles.
Components of a knife handle
Depending on the purpose of the knife, the appropriate shape of the blade is selected, taking into account which the handle is formed and the method of its location is selected. The handle for the knife can be in a straight line with the butt of the blade or at a certain angle to it. It consists of the following parts:
- the shank is a small strip of metal, narrow in relation to the blade, which is its continuation and on which the handle is formed;
- the handle holds the blade for working with a knife;
- The limiter is located between the handle and the blade and is designed to support the fingers of the hand and protect them from cuts. It can be one or two-sided;
- head - a device located opposite to the tip of the blade that attaches the handle to the shank;
- holders - paired steel strips of metal that wrap around the handle, which protect it from damage in the form of cracks and splits;
- fitting - an analogue of a holder, which is attached near the limiter or together with it and performs the same functions;
- end - used when putting the handle on the shank using a riveted method, in which it is attached to the shank;
- The shield is placed on the side of the handle in the form of an insert, onto which the manufacturer’s data is applied (drawing, monogram, master’s initials).
The knife handle is attached to the shank in two ways: mounted and riveted.
The riveted method is used when there is a wide shank, the shape of which matches the contours of the handle. Two identical plates of the handle, which are also called “cheeks,” are screwed to it with rivets. The ease of operation and reliability of riveted handles allow them to be used for knives for any purpose. Only riveted handles are used to create folding knives.
For the mounted method, narrow shanks are suitable, onto which the handles are mounted. They can be of different shapes and sizes, which makes it possible to embody design and stylistic ideas for the appearance of the knife. The weight of a knife with a mounted handle is much less, which allows it to be used for long, energy-intensive work.
Twisted epoxy resin micarta
The best experience would be to make micarta from epoxy glue. Craftsmen have been using this production method for a long time. The method involves coating multiple layers of fabric with epoxy glue. Suitable for these purposes: old pants, T-shirts or jeans.
The result depends little on the quality of materials. The most important thing is to saturate them well. To get a unique product and an interesting color scheme, you should dream up your own imagination. In general the process looks like this:
- Have you tried making your own micarta?
Not really
First you need to make a special pencil case from wood. It will contain fabric impregnated with epoxy resin. The pencil case must be made with a lid; it will need to be clamped with clamps to compress the workpiece. You should also prepare cling film and cover the insides of the pencil case with it. This is required to prevent the workpiece from sticking to the walls of the box.
- Work should be carried out in a well-ventilated area or forced exhaust is required. Chemical poisoning has not been canceled; impregnation of the fabric will take some time. It is better to carry out all work in a respirator. Choose a suitable location and begin to saturate the layers of fabric with epoxy resin. To make the final product more attractive, it is recommended to alternate colors.
- We put on gloves, take the resulting fabric pie in our hands and twist it thoroughly as much as we can. This way, it will be possible to expel all small air bubbles from the workpiece. Place the folded fabric in a pre-prepared pencil case. We close the lid on top and press it all down with clamps.
After 24 hours, the product should be ready. The material should be removed from the pencil case. Next, work is done with it as with regular micarta. You can cut it in all available ways lengthwise and crosswise, drill holes and generally do whatever your heart desires. Of course, everything will depend on the intended handle.
Twisted micarta handles.
Manufacturing process
Before you start pouring you need to have:
- one of the described molds,
- blade (you can make a knife from any chosen metal - there will be no unwanted reactions),
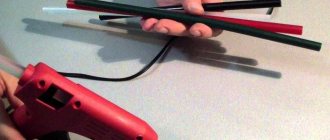
- epoxy with hardener and, optionally, dye,
The best option is epoxy resin for decorative products. It is easier to work with, the kit already includes the required hardener, the proportions are indicated, it will easily penetrate into the pores if you use wood blocks as a filler.
- containers and mixing sticks,
- polyethylene to cover the surface,
- optional – handle filler.
Progress:
- Place “reinforcement” in the mold - pieces of wood, fleece, jeans or metal mesh.
- Mix the resin according to the proportions with the coloring pigment and hardener (at least 10 minutes to allow the air to escape).
- Fill part of the mold, immerse the base of the blade.
- Secure the structure and leave it for a day until it hardens.
If you made two halves of the handle, glue them together with epoxy glue. Finally, you will need to carefully sand the handle.
Knife handle made of copper wire and epoxy resin
The method of making a handle from epoxy resin using copper wire is considered quite interesting. If you have already tried to make a handle from epoxy at least once, then it will not be difficult for you to perform this trick.
The materials used in manufacturing will give the product an unforgettable look. Next follow these instructions:
- We clean the shank to a mirror shine; it is not recommended to paint it, for better adhesion to the material.
- Next, we wind copper wire around it in a random order.
- Then you will need a piece of plastic or rubber pipe. We cut it lengthwise with a knife and wrap it with tape. The inside should be coated with oil or grease.
- Place the tube on a small surface and glue it with hot glue around the entire circumference.
- The next step is to lower the blade into the tube with the tang down. You should wrap the blade with wire a couple of times and then attach it to the pipe by the remaining tendrils, also with hot glue. The blade will be in a suspended state.
- Mix the epoxy resin with the hardener and carefully pour the solution into the tube. Watch the filling level; only the shank should be in the glue.
- After 24 hours, the entire structure should be freed from the tape and the tube should be opened along the cut. It makes an excellent handle. It must be processed with files or an angle grinder to the required shape.
During the sanding process, always fit the product to your hand. Finish with fine-grit sandpaper. It is better to perform final polishing using an angle grinder and a felt wheel.
Handles reinforced with wire.
Western brands of epoxy and other adhesives for knifemaking
Matthew, interesting.
This 1 to 15 is how viscous plasticine turns out, or like “rubber”. That is, if you press it with your fingernail, for example, will it straighten out - or will it remain dented?
I made the domestic Rostov one only in a standard way, as far as the accuracy of the standard bubbles allowed, in general it turns out to be something very hard, not exactly glass, but hard, I always thought that it would crack wherever it could at the first blow, when the Western plastic one would stretch and flatten and then she recovered. Due to its hardness, 10-minute Poxipol raises exactly the same concerns.
(Although, to be honest, these quick-drying epoxes, I think, are a match for knives in a cannon shot. Because with them, you have to prepare the joints very accurately in advance, and assemble them very quickly, and they will set even before the instructions, even stirring to the maximum is a problem. It is convenient to do only quick things. And the knife, if you further position something, so that the resin hugs all the insides, covers the niches, wets all the smallest surface irregularities with maximum adhesion, calmly releases bubbles, the whole structure is assembled without haste with your hands and covered with glue - here a long time is needed (it’s not a question of mixing it as efficiently as possible, and what’s not mixed will “diffuse” itself). And they are weaker (fast bauxite), I think, for approximately the same set of reasons as indicated on them according to the performance characteristics.)
(We haven’t discussed plasticizers yet; cement, sawdust, nahua are an eternal topic.)
Types of epoxy handle decoration
Decorating a handle made of epoxy resin is called reinforcement. There are quite a lot of such options, depending on your imagination. But such a decorative element also carries a useful load, so the handle becomes stronger. Here are some simple reinforcement methods:
Plastics and thermoplastics
The further progress goes, the more types of plastics appear on the market. We list the most commonly used compounds that are used to make knife handles.
Plastics are a common and inexpensive material for kitchen and folding urban knives.
- ABS plastic. One of the best options for making a kitchen knife handle, where functionality is required rather than the uniqueness of a natural pattern and other aesthetic qualities.
- Nylon thermoplastics have almost the same strength indicators, and in addition to this they also have low weight.
- Elastic thermoplastics are not the most popular materials. They are oil-resistant and do not slip in the hand, but they have very little mechanical strength and are not resistant to temperature changes.
- Electrical insulating laminates (fiberglass, carbon fiber) are among the most resistant to mechanical damage (including impact loads) materials. These include micarta. This paper or thread-based material was originally produced as a dielectric, but has also found widespread use in the manufacture of handles. Very durable, resistant to mechanical damage, easy to process, especially decorative. Micarta handles turn out to be quite massive and heavy, which, however, does not interfere with fast work with the proper skill.
Micarta is a thread- or paper-based material that imitates ivory.
Rules for using products
It should be remembered that epoxy resin is not a particularly durable material. It's more of a design raw material. It is necessary to take into account the loads that such a blade can withstand. Some operating rules must be followed. Here they are:
- do not leave the product dirty, rinse it with water after use;
- Direct sunlight is harmful to the material; do not leave the knife in such conditions;
- such a handle is afraid of falls and impacts, after which chips and cracks may form on the handle;
- It is not recommended to wash the product with cleaning agents; use only clean running water.
And so epoxy resin in everyday life does not cause any harm to humans and the environment. The material is considered environmentally friendly and harmless. But mainly such handles are used as souvenirs.
Wood
As with other wood products, the first advantage is the attractive appearance of such handles, and other characteristics common to all types are comfort for the hand, non-slip and low weight. True, there are quite a lot of differences between different types of wood.
- Boxwood, ironwood and ebony are the most used species - they are quite dense and wear-resistant, although they are not the best in terms of resistance to moisture. To increase moisture resistance, they are treated with oils, waxes or synthetic varnishes.
- Maple absorbs less moisture due to the fact that it has smaller pores; its strength is slightly lower than that of the rocks from the previous paragraph.
- Amboyn is one of the most expensive types of wood, durable and wear-resistant. When processing, it requires sealing minor defects in the form of shells.
- Bocote is a fine-pored, expensive wood native to Mexico. Very wear-resistant option.
- Wenge lends itself well to processing and has a famous beautiful natural cut pattern. Wenge, one of the most beautiful types of wood, is also easy to process
- Bubinga, a tree native to West Africa, is extremely resistant to frost and heat, as well as mechanical damage. It has an interesting natural pattern, which they try to emphasize with oils rather than painting over it with varnishes.
- Thuja is good for making knife handles that come into contact with moisture. By itself, it secretes a lot of resins, which fill its pores; because of this, it has a high resistance to moisture. One of the disadvantages of thuja is the ability to quickly dry out and dry out (the latter case concerns poorly made handles).
- Walnut is rarely used for making handles, as it is too soft and prone to deformation. Nevertheless, knives with similar handles can still be found.
Additional accessories
Such devices most often include a trench and a sharpener, as well as secret holes in the back of the knife and pockets on the sheath.
Trenchik
A special loop for attaching the sheath to a belt. When making a trench coat, various materials are used: rope, cord, strip of leather. Making a sheath with your own hands allows you to make a trench coat from any available material.
The trench coat can be glued, sewn, attached with a screw from the inside of the sheath, the main thing is to make a loop with a margin for any belt width. The length must be selected individually.
Sharpener
A small, fine-grained block of stone used for sharpening a knife. The sharpener is attached to the sheath and is necessary when using the blade for a long time.
Pockets
Making a knife and a sheath with your own hands allows you to fully equip it to your taste. But it is worth carefully considering the necessity, and most importantly, the practicality of this or that pocket.
When making handles for knives, some craftsmen leave a cavity in the back, into which small objects can also be placed.
Overhead riveted version
When making a riveted version of the handle, linings are used, located on the wide shank of the knife, which follows the shape of the handle. The plates are attached to the shank using rivets or screws. The latter are used quite rarely for these purposes.
Copper or steel rivets are widely used for fixing linings. Knives in this design can be found in any kitchen. Many people wonder how to make a knife handle at home. Advantages of the overhead fastening option: ease of manufacture and ease of fastening.
Among the disadvantages are:
- limited form;
- heavy weight;
- high thermal conductivity coefficient.
Blade forging
Tools
We've sorted out the material, now we should talk about the necessary tools and forging itself.
For forging you will need:
- hammer up to 1 kg and hammer 4-6 kg;
- blacksmith tongs, you can use pliers with the insulation removed;
- adjustable wrench;
- vice;
- an anvil or a homemade device for an anvil;
- grinder;
- welding machine;
- grinder;
- a forge furnace or hearth, pressurized using bellows or a fan.
Before starting work, experienced craftsmen advise drawing sketches of hunting knives, which can be made if one or another material is available. After choosing a suitable sketch, forging begins.
Forging stages
The forging process consists of several main stages, it is necessary:
- Light the furnace and heat the metal to a certain temperature (depending on the steel used).
- Design and forge the shank. The workpiece is subsequently held by it.
- Formation of the future knife nose. At this stage, the future shape of the hunting knife is acquired.
- Forging the blade using minimal allowances. At this stage, the metal should be gradually forged without changing the thickness of the workpiece.
Steel selection
Before you begin directly forging, you need to decide on the material from which the hunting knife will be made.
When choosing steel, one uses its five main properties:
- Hardness.
The ability of steel to resist deformation. Hardness is measured using the Rockwell scale, which ranges from 20 to 67 HRC. - Wear resistance.
Metal resistance to wear. Directly related to the hardness of the steel used. - Strength.
Preserving the integrity of the blade during impacts and other damaging factors. - Plastic.
Absorption and dissipation of kinetic energy during impacts, cuts and bends. - Red fastness.
An indicator of the resistance of steel when exposed to temperature. The temperature of forging and hardening of steel depends on this indicator. Hard steel grades are the most red-resistant (more than 900 °C).
All properties are closely interconnected. The predominance of one of the indicators leads to a decrease in the quality of the material as a whole. The severity of a particular property is caused by alloyed additives and elements present in the metal.
Depending on the presence of certain alloying elements, the steel receives the appropriate marking. For example, grade U9 - carbon 0.9%, grade X12MF - contains 1.2% molybdenum and vanadium.
Of the most suitable steels for the manufacture of a hunting blade, two grades of steel can be noted that are most widespread:
- ХВ5
– diamond, alloy carbon steel with high hardness (up to 70 HRC) and excellent cutting properties. The metal contains chromium and tungsten, which add strength. But with prolonged contact with water and dampness, corrosion spots may appear, so a knife made of this steel requires careful care. - Х12МВ
– stamped steel, tool steel, hardness up to 60 HRC. The composition includes: chromium – increases resistance to corrosion; molybdenum - makes steel more viscous; vanadium – increases heat resistance.
Recently, powder steel has become popular, for example, ELMAX (Sweden). The steel is quite wear-resistant and tough, and also has anti-corrosion protection. Products made from it hold an edge for a long time.
Damask steel – has exceptional hardness and elasticity, and is not subject to corrosion. Damask steel has a pronounced pattern, which is imparted by carbon steel. The damask steel blade easily copes with mechanical and thermal loads. The best hunting knives are made from damask steel.
Damascus steel is not inferior to damask steel in all respects, but requires protection from moisture and dampness. The Damascus blade has a unique pattern and holds an edge perfectly, but it must always be wiped after use and periodically lubricated with special oil.
How to care for a knife with a dial handle
A few care tips:
- wooden handles are impregnated with linseed oil or beeswax. It is possible to use combined impregnation;
- models made of wood, birch bark, leather are not resistant to moisture. They may swell and crack. Avoid contact with liquid;
- Do not dry in direct sunlight;
- do not place near radiators;
- Plexiglas handles are subject to mechanical damage.
Making a set handle is not an easy task. However, if desired, it is possible to make a device with a unique design from simple components.
Where will you do it?
The need to make a cutting tool can arise anywhere:
- Houses:
- in the country;
- on a hike.
At home, as a rule, they make knives for some special work, as well as for gifts or collections. If you don’t do this professionally, then you don’t have any special equipment yet. But there may be a lot of suitable ones in the tool cabinet.
There will probably be a lot of useful things at the dacha. Most likely, there is almost everything there - a broken hacksaw, an old file, etc. If you are left without a knife on a hike, you will have to think and carefully look around. Oddly enough, the answer to the question of how to forge and make a good knife or blade from start to finish with your own hands may be right in front of you.
Stainless steel
Stainless steel is a very common element for both blades and handles. Stainless steel is the "strongest" metal on this list in the sense that it won't dent or scratch as easily as titanium or aluminum. However, on the other hand, steel is heavier, which can be a hindrance if you are using the knife for EDC or survival purposes.
Most knives with stainless steel handles have smooth surfaces that make the knife very slippery when wet. Some manufacturers add all kinds of ribs or etching to improve the grip of the knife.
Advantages:
- Less susceptible to scratches.
- Durability and low cost.
- Corrosion resistance.
Flaws:
- Heaviness and bulkiness (especially for EDC).
- Slips when wet.
Aluminum is also a very popular material for handles. It is durable, lightweight and cheap. Like titanium, it is also a non-ferrous metal, which means it is resistant to corrosion. However, aluminum is quite soft, so the handle is susceptible to scratches and dents. There are quite a few aluminum alloys used in knife making, the most common of which is T6-6061. In addition to aluminum, the composition contains other elements such as magnesium, nickel and copper.
Advantages:
- Relative rigidity and lightness
- Not subject to corrosion
- Wide choice of colors thanks to anodizing
Flaws:
- Heaviness and bulkiness (especially for EDC).
- Slips when wet.
Let's move on to synthetics. Micarta is a very popular material for survival knives (usually fixed blades). It is extremely strong and durable, and has proven to be a safe choice for all types of conditions. Micarta itself is a phenolic laminate. The creation process involves soaking pieces of fabric, paper or canvas and pressing them together. Fun fact: Micarta was originally developed as an electrical insulator.
Micarta is smooth but often textured to improve grip.
Advantages:
- Tough, lightweight material.
- Incredible strength and water resistance.
Flaws:
- Relatively expensive option
- May break under high pressure
Kraton is a thermoplastic elastomer, also known as TPR (thermoplastic rubber). This means that it is mainly a synthetic rubber material. Kraton is flexible, has good grip and is waterproof. It also has increased resistance to heat and harsh conditions compared to natural rubber.
The main problem with Kraton is that while it is durable, it is also porous and can absorb a lot of liquid. This can cause the handle to feel a little damp and deteriorate over time.
Advantages:
- Ergonomic and comfortable handle
- Weather resistance
Flaws:
- Not the most aesthetic
- Quality may decline dramatically over time
Mr.Blade Fastbo
G-10 - Probably the most popular handle material is a "fiberglass composite laminate." G10 is made from pieces of fiberglass by soaking them in resin and then compressing them.
G10 is extremely durable, waterproof, lightweight. This material has all the characteristics that make it a good option for survival knives. G-10 handles are usually textured to give the hand a good grip. Fun fact: G-10 was developed for use in electronic circuit boards due to its excellent resistance to water, oil and acid.
Advantages:
- Maximum strength and water resistance
- Reliability of grip
Flaws:
Making a “note holder”
Hello everyone) Today I will show you how I made a decoration for my desktop, or rather a “note holder” in the form of a pot with cute cacti.
For this I needed: clay (mine is white), wire, paints (it could be acrylic or watercolor), an old toothbrush (to add texture), a blade, a toothpick and glue. I will sculpt with gloves to make the work as neat as possible.
I start with a pot: I take clay and paint it beige (I add dark brown and yellow acrylic). Stir until a uniform shade is obtained. Afterwards I form a cylinder, then roll a ribbon from the same clay to later make a rim for the pot.
I take a small piece of clay and add black and brown acrylic. Now, after mixing, I stick it on top of our pot. I use an old toothbrush to create the texture of the earth and voila) Half of the work is done.
Now I paint the clay green and roll balls of different sizes (about 3 pieces). I take a blade and make veins (as shown in the picture). I decorate the top with small pieces of yellow clay, imitating flowers on a cactus. Next, using white acrylic and a toothpick, I place the needles.
The cacti are ready, now I glue them to the pot.
The last step is to make the device itself, which will contain notes or photos. I cut a short length of wire and twist one end into a spiral. All that remains is to insert it into the pot and glue it (for this I use Crystal glue).
I decided to make the structure heavier; after drying, I glued a coin to the bottom with hot glue. But you can glue a magnet on the back so that you can decorate not only the table, but also, for example, the refrigerator)
Thank you for your attention)
Also visit my Zen channel, there is even more interesting stuff https://zen.yandex.ru/sinabona