On the eve of the celebration of someone dear to your heart, you want to give a gift that would impress and leave pleasant memories. We suggest making voluminous postcards with your own hands, they are also called pop-up postcards. What are these wonderful postcards?! At first glance, these are ordinary postcards, but when you open them, a three-dimensional figure or an entire composition suddenly appears in front of you! Such cards will not leave anyone indifferent! Especially if they are original and keep the warmth of your hands!
Interesting and original do-it-yourself folding postcard
Hello, dear readers of the blog about needlework and more! Recently, more and more people are turning their attention to handmade cards. there are a lot of emotions from just one original handmade postcard
Have you tried making cards with your own hands? If not, it doesn't matter. Today I will show you how to make such an unusual folding postcard. Believe me, it's easier than you think. We will definitely look at how to make a blank for a folding card, because knowing the basics, you can then make cards with your own hands for any holiday.
So, let's go! We collect materials:
- A4 cardstock (a sheet of paper for watercolors or thin colored cardboard);
- scrap paper;
- glue pencil and universal transparent;
- pencil, ruler, creasing;
- stationery knife;
- a mock-up mat or just a wooden board;
- silicone stamps;
- ink pad;
- double-sided bulk tape;
- curly scissors;
- small figured hole punch;
- decorative elements: flowers, cut-out butterflies, ribbons, etc.
Here is the list that came out. In fact, needlewomen have much more in their stash, but this does not mean at all that in order to make this original postcard with your own hands, you need to urgently buy everything written. The main thing is scrap paper. And the rest will be found. In this work I used Boho Chic (First Edition) paper.
Idea No. 2
If you have a beautiful napkin, use it for needlework and decorate it with sparkles for a greater effect.
Below are other ideas for DIY New Year cards.
A handmade postcard is a warm and sincere gift. The manufacturing process allows for creativity and is suitable for children and adults. They will be a wonderful souvenir for grandparents, educators and teachers.
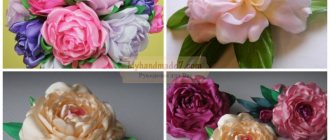
Volumetric postcards using scrapbooking technique
Scrapbooking is the art of decorating photo albums, but its techniques are also very popular when creating cards.
Using Kirigami elements, using the Scrapbooking technique, you can also make a three-dimensional postcard with your own hands. We cut out and fold “steps” from scrap paper for the “pop-up” candles on the second half of the card. Glue the candles and glue the resulting blank onto the base of the card.
You can make a simple but original greeting card from scrap or colored paper. We cut out the candle flame and decorate it with sparkles, then glue it to 2-sided tape. We glue the second part of the candle with glue. The congratulation itself can be tied or glued to an elegant satin ribbon. Simple and original!
A postcard made from paper of a different texture will look completely different)
By placing each element of the card on top of each other, again using double-sided tape, you can create such a voluminous, bright cake!
Let's take a look at Tatyana Sadomskaya's master class on how to easily make a voluminous, delicate postcard using the Scrapbooking technique using ready-made pictures.
To create such a postcard, Tatyana used:
- scrap set ScrapBerry's “Favorite Pet”
- scissors
- thick cardboard
- glue
It is better to use scrap paper with a large number of miniatures that can be cut from a single sheet, as well as colored stamp prints and chipboards.
Before creating a postcard, you need to decide on its plot in order to choose the color of the base of the postcard and its “characters”. In this case, the basis is paper with a calm beige print, and the components of the plot are cut out of it: kittens, a puppy, flowers, a crown on a pillow.
Next we work with the base. It is necessary to make markings for cuts on the front side.
Don’t forget to decide before starting this work what will be in the foreground and what will be behind it!
In our case, we put the larger kitten in the foreground, this will enhance the feeling that it is closer than kittens with a dog.
We make the necessary cuts. The result is a design with “steps”. We glue leaves of arbitrary size onto the resulting “steps”. These leaves imitate a wooden fence.
Next, we gradually glue our elements, starting from near to far. We start from the foreground and glue the kitten. We glue it onto beer cardboard, because it gives additional volume and casts a shadow. Using the same principle, you can glue several other elements, for example, balls and flowers. When the inside is ready, glue it to the base of the card.
We also decorate the outside of the card with an elegant floral print.
For greater elegance, decorate the elements of the card with sparkles (use glitter).
For inspiration, check out this masterpiece 3D cake card:
Progress:
We disassemble the cardboard box and cut out the base ( cardboard strip )
for
a folding folder . from the resulting wide cardboard strip. We cover the sections with plain paper. Let the glue dry well. Then we begin to cover the folding folder with self-adhesive wallpaper. First we glue the back side of the folder and bring the edges of the wallpaper to the opposite (front)
side
(see photo)
.
The wallpaper must be ironed well so that it lies evenly on the surface of the base. After the back side we begin to paste over the front side (see photo)
Now we place our files on a beautiful base using double-sided tape. The white stripe from the file can be cut off if desired.
Folder folder ready!
If necessary, you can remove the folder . It folds up easily and does not take up much space
You can also place files with other information on the other side of the folding folder This clamshell can be used to decorate modern laptops.
Thank you for your attention!
Folding folder for parents “Exotic cuisine of nomads - traditional Kalmyk cuisine” Kalmyk cuisine bears the imprint of the nomadic pastoral life of the Kalmyks and is not very diverse. Main ingredients. Master class “Folder for drawings of a kindergarten graduate” In May, our kindergarten, like others, will hold graduation parties. Very soon we will say goodbye to our students. They became us. Master class “Movable folder for the Nauryz holiday!” Dear teachers, I haven’t found a single folder on the Internet for the holiday of Nauryz! I tried my best and made something so interesting. Master class “Mobile folder for Flag Day” Every year on August 22, Russia celebrates the Day of the State Flag of the Russian Federation. Traditionally, this important holiday is timed. Master class: mobile folder “What should a child have in his locker?” Preparation of information folders that need to be conveyed to parents of children attending a preschool institution. That's it lately. Master class “Folding folder “Favorite Dumplings” Master class folding folder “Favorite Dumplings” Dear colleagues, at present we have to take an active part in our work.
Source
Accordion postcard (diagrams and templates)
Another type of voluminous postcard is the accordion postcard.
To create such a postcard you will need: thick scrap paper for the base frame, a die-cut scrap knife or stationery knife, transparent plastic for the internal parts, stamens, semi-pearls and other materials for decoration.
We take the template and make blanks for the postcard. We cut out 8 blanks for the base frame from thick scrap paper and 4 from transparent plastic.
Thick paper blank...
...and transparent plastic
We glue the plastic blanks to a paper base. To make the card fold, we make a double crease of about 2 mm on the outer folds. We connect the resulting 4 parts - glue them with glue or use 2-sided tape. Glue the remaining 4 frames on the opposite side.
Next, we connect the internal plastic parts. The easiest way to do this is to use transparent tape. We get this basis for an accordion postcard.
We connect the parts with tape
Basis for an accordion card
Now you can begin the most creative part of creating a card - decorating it! Glue fluttering butterflies and twisted greenery to the plastic. The postcard is ready!
Let's start decorating
See below for various templates for making the bases of such postcards:
Using your imagination, you can create all sorts of variants of such folding postcards. For example, with a predominance of children's themes. The number of components may vary.
Clock for the night owl
Asterisks for the astrologer
Birds, flowers, butterflies always look very light and airy on postcards!
Ah, France, Provence!
For the most beloved!
How do you like this original clock mechanism?!
Ceiling tile folder
Do not rush to throw away the foam tiles left after repairing the ceiling; they can be used as the frame of a mobile folder. Compared to the traditional cardboard version, this folder has several advantages:
The number of tiles matches the expected number of information sheets. Step-by-step manufacturing instructions look like this:
A sliding folder made of ceiling tiles will keep its shape, even without the usual folding, so it can be positioned in an effective semicircle.
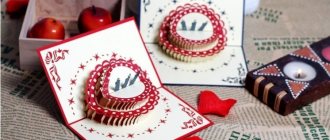
How to make birthday cards with flowers
How to do
1. Fold the crimson paper in half crosswise. Draw a smooth line in front, as shown in the photo, and cut along the contour.
YouTube channel Tonni art and craft
2. Use scissors to divide a sheet of pink paper in half crosswise. The half should be the same size as the folded card. Glue the paper to the back cover.
Draw semicircles on pink paper along the edge of the cover. For convenience, you can outline the lid or something else. Cut along the outline.
YouTube channel Tonni art and craft
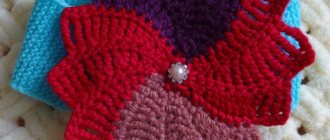
3. Form two small identical squares from paper of three different colors. You can use stickers without adhesive.
Fold one diagonally. Then bend the corners as shown in the photo or video below.
YouTube channel Tonni art and craft
4. From the corner side, draw something like a heart on the figure and cut it along the contour.
YouTube channel Tonni art and craft
5. Open the part and curl the petals with a pencil. In the same way, fold the second square of the same color, draw a heart on it and cut it out. Open, shade the beginning of the petals and twist them outward. Make a small cut in one place between the petals and glue one petal to the other.
The simplest
What could be easier than making the outline of a New Year's forest beauty using a satin ribbon or a strip of corrugated paper.
For this you will need:
- cardboard;
- ribbon;
- double-sided tape or plasticine;
- star for decoration.
1. On the wrong side of the tape, glue thin strips of double-sided tape.
2. Then, forming a Christmas tree, we attach the ribbon to white cardboard. We decorate the top of the head with a star.
To make it easier, you can use tailor's pins to make a Christmas tree shape in advance and secure the side ends with thread.
Postcard from February boat, poovo with photo
To work you will need:
- sheet of paper A 4;
- pencil;
- red colored paper;
- scissors;
- blue cardboard;
- glue.
Step 1 Cut out a boat, seagulls and clouds from a white sheet according to the template.
Step 2 The number 23 is made from red paper. Step 3 A sheet of cardboard will serve as the base of the card. It is bent in half. Step 4 The internal protrusions of the boat are also bent.
Step 5 Attach the boat to the middle of the base, coating only the top and sides with glue. Use a pencil to lift the middle part.
Step 6
The work is decorated with clouds and seagulls hovering over the water.
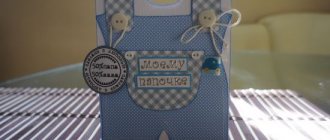
Idea #1
When there is no inspiration to come up with a congratulation, a creatively designed couple of warm words will solve the problem.
The elements of the postcard consist of 3 sheets (the first is the basis for the words, 2 Christmas trees).
For special intrigue, the craft is held together with thread or ribbon.
Clamshell postcard
Gray everyday life is brightened up by bright holidays; the brighter the card, the more fun the event. What birthday card? Of course, a postcard with a surprise.
The master class is devoted to how to make a folding card from colored cardboard, paper, ribbons and decorative elements.
– Colored cardboard, main-background and color double-sided;
– Regular and curly scissors;
– Colored gel pens;
First, cut out the main detail of the future postcard from plain cardboard (*color scheme can be any). Dimensions: The main square is 15x15 cm, and the collar is 7.3x10 cm.
Then we bend the collar inward. The base is ready.
Now we are making the folding part (the one that is a surprise (it is with the help of it, and also with the help of the gate, that the card can stand).
Cut out a rectangle 14x14.5 cm. And line it with stripes, width:
– two stripes of 4 cm,
– two stripes of 3 cm,
– two stripes of 2.5 cm,
We bend two strips of each width together to form an accordion.
I note that the width of the entire accordion should be half a centimeter less than the width of the main square of the postcard, so that the collar can close normally and not wrinkle the accordion.
On the part of the accordion that is wide and will be attached to the main part of the postcard, you need to make a small fold and this is what will be attached to the postcard itself.
Now let's make the accordion elegant. Let's make strips smaller in size than the width of each field of one fold and glue them to double-sided tape.
Now we will make holes in the hoops, into which we will subsequently attach a tape that will hold the hoops and prevent the accordion from jumping out ahead of time.
Then we will cut out additional elements - small fields where we will write congratulations, as well as the cherished words: HAPPY BIRTHDAY. For cutting, we use paper of different colors and with different patterns. We will also need curly scissors.
On one of the blanks we write a congratulation with a contrasting gel pen and set it aside for a while so that it hardens, while we ourselves proceed to the “header”, the inscription that will reign at the top of the card.
We write the necessary words on the blank with a pencil and then begin to circle and paint over them. It turns out very juicy.
We attach the decorative element to the workpiece in advance by making a hole with a hole punch and threading the tape.
Now you can start collecting all the parts of the future postcard.
And when folded the card looks like this.
You open it, and there is a good mood.
How else can you make a book?
If you don't like boring sticky paper, use paper, border tape, or pre-made scrapbooking kits. They include ready-made pictures, beautiful frames and adhesive tapes. Stickers, paper, labels, rubber and silicone stamps, special markers will allow you to expand your arsenal of expressive means.
Scrapbooking kit Scrapbooking
There are also a large number of electronic scrapbooking sites on the Internet that offer interesting backgrounds and designs to print. Go to any of them, download and print the image you like. Glue it onto the cardboard before you start pinning the pages together.
Scrapbooking sheets
FOR YOUR INFORMATION! Choose sets with a children's theme. Set simple tasks for your child and ask him to help you.
A folding book made by a child with his own hands or with your help will be his first work experience and will make his hands more dexterous. In the process of communication, he will acquire useful skills and learn many new words. You will learn to understand children and find a common language with them.
Book of Seasons Book with a winter fairy tale Book with funny pictures
Books are useful not only to read, but also to do
If a child is not inclined to active games and prefers quiet fiddling with toys, then the opportunity to do something interesting together with adults will be good entertainment for him. Such tasks are good for developing not obvious, but important qualities in children:
Volume book with fairy tales
- fine motor skills and manual dexterity;
- rapid formation of the speech apparatus - in the brain, the centers of motor skills and speech are located nearby and stimulate each other;
- acquisition of communication and collaboration skills;
- the ability to focus one's attention on an interesting task.
Fun folding book
IMPORTANT! When the child grows up and goes to school, these skills will help him learn better. He will be less distracted in class, think logically and make the right decisions, and will quickly learn to read aloud expressively and write in beautiful handwriting.
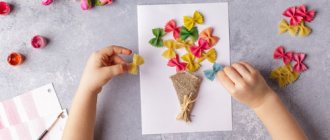
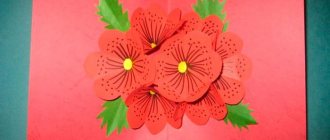
Postcard with a bouquet for grandmother
A voluminous postcard with a bag in which flowers are wrapped looks unusual. To make it, you can use ready-made artificial flowers or make them yourself.
- Glue a rectangle 2 cm smaller on each side onto a sheet of paper.
- From another sheet we form a bag - approximately the same as the ones they sell sunflower seeds in. We fasten it in the center of the rectangle. All that's left is to put in the flowers.
- It's very easy to make carnations from tissue paper. We fold the strip like an accordion and collect it in our hand like a fan. We secure the base with a piece of green paper, spread the fan in a circle - you get a flower. Attach a stem of thin wire, make several of these carnations and the festive bouquet is ready.
- We write congratulations and give it to the birthday boy.
Cards made from colored paper are an affordable and budget-friendly way to effectively congratulate a loved one on their occasion!
What is a mobile folder?
A mobile folder is a convenient, practical information stand for children, parents and educators. Its two-sided samples contain information about two current topics at the same time. The number of sections depends on the volume of the message.
The pages of travel folders most often contain rules of behavior, advice from pediatricians, child safety issues, methodological recommendations, information about seasonal changes in nature and holiday dates.
The product is usually placed on lockers in the children's locker room, where parents can study the information while they wait for their children to change clothes for home.