Buy
Home Tutorial How to make a 3D book with your own hands
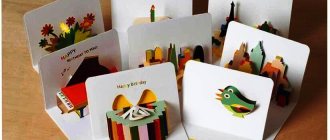
Remember books with three-dimensional pictures that, as if by magic, appeared on the spread? Panorama books continue to delight even now, when the 3D effect has ceased to be a novelty. The trick with the appearance of three-dimensional images can be successfully used in a slide show! It will fit into any video, from a children's album to a wedding greeting. Read the article and you will learn how to make 3D books with your own hands and achieve a similar result in PhotoSHOW PRO:
Master class on creating a panoramic book on the topic of fire safety
Love Mantula
Master class on creating a panoramic book on the topic of fire safety
Teaching preschool children fire safety is very important in our time. Everyone should develop the skills of careful handling of fire: both parents and teachers. This can be done in a variety of ways: holding conversations and briefings, attending excursions, holding exhibitions, playing games, related to the study of the basics of fire safety , read fiction devoted to this topic, and also inform children and parents about the causes and consequences of children's pranks, through booklets, memos, leaflets, folders and many other ways.
Today I will show you how to make a wonderful guide ( panoramic book )
for learning
fire safety . This book will be interesting even for the youngest kindergarten students.
For this craft you will need: A4 paper, scissors, glue or double-sided tape, and also if you draw pictures yourself, you will need paints or felt-tip pens , it all depends on your abilities. I made page layouts for our book in Photoshop using pictures and poems from the Internet.
After all the page layouts, as well as the pictures that will rise when opening the book, are printed, we cut out our pictures, making small “ears”
for gluing.
Then we fold the pages in half and glue them back to each other.
We also fold our pictures in half and glue them to the front side of the page at a slight angle.
Our panoramic book is ready !
For kindergarten students, it will help them understand the importance of proper handling of fire and be responsible for following fire safety . The book will enable children to equip themselves with the knowledge, skills and abilities necessary to operate in extreme conditions. Children will be able to appreciate the importance of fire in a person’s life and understand when fire is a friend and when it becomes an enemy.
“From a spark a flame will ignite.” Project on fire safety as part of the month of fire safety A flame will ignite from a spark” Project on fire safety as part of the month of fire safety Author of the project: teacher Bazaleeva. Summary of a lesson on fire safety “Dangerous matches” Summary of a lesson on fire safety in the second junior group “B” of a compensatory focus Topic: “Dangerous matches”.
Master class for teachers of preschool educational institutions “Formation of fire safety skills in children of senior preschool age” Equipment: set for the game “Assemble an object from geometric shapes”, raw potatoes, bandage, vegetable oil. Hello, dear colleagues.
Master class “Making a baby book” One of the stages of the regional competition of pedagogical skills of educators “Ladder of Success” was a master class. Because carry out. Master class on making a baby book on the theme “Winter” Good afternoon, dear colleagues! I would like to offer my master class on making baby books for preschool children. Daughters. Master class on making a flip book MASTER CLASS on making a flip book on the theme “AUTUMN” MK was prepared by the teacher of the MBDOU “Barkhatovsky kindergarten” Elena Nesterova. To you.
A project on fire safety in the senior group on the topic: “Fire is a friend, fire is an enemy” Today, one of the most interesting, developing and significant methods in domestic pedagogy, both for adults and for preschool children.
Entertainment on the topic of traffic rules and fire safety in the senior group Physical entertainment on the rules of the road and fire safety in the middle and senior groups “We are not afraid of fire and we are green.
Lesson on studying fire safety rules with children of senior preschool age “Fire safety rules” “Fire safety rules” Lesson on studying fire safety rules with children of senior preschool age Lyalenkova V.V.
Source
Double-sided model
To make the fairy tale more interesting for your child, we suggest you recreate its plot using three-dimensional pictures. You will need: colored paper; paper fairy tale characters (you can draw them yourself); paper blanks in the form of flowers, trees and houses (it all depends on the plot); glue; scotch. Procedure: You should fasten the sheets of the future book with glue or tape. We put the plot you need on each page. To make the drawing voluminous, apply glue not to the entire surface of the paper man, but to its middle. Thanks to this trick, you will get a 3D picture. Important! Flowers, houses, paper doll clothes can be made from colored scraps of fabric. If you have a plastic beetle or butterfly lying around somewhere, you can also glue them on. For example, the stems and leaves of a flower are drawn, and the bud is made of fabric. Place your beetle or butterfly on one of the petals.
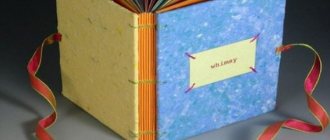
Making a fake book “Old Book”
I always have a book in my handbag, in case the real world stops being interesting.
So I decided to transfer my love of reading to puppeteering! A book angel was about to be born and he had to stand on old books! But I didn’t dare spoil them, even the ZIL engine repair manual. It was decided to make deceptions! Which, in fact, is what I want to share with you. Such “books” can be used for photo shoots, because not every home has second-hand, old copies. And if you cut out the middle, you get a secret storage for your secrets!
We will need very simple and accessible materials:
First, let's decide on the size. I will have 2 books at once, one 1/4 A4 sheet, the other a little smaller. I cut the sheets in half, take 3 pieces each, fold them and run them along the fold with scissors, so I get these mini blocks.
I buy used paper. We will help save + ecology. All this printed disgrace will not be visible.
We select the desired thickness of our book.
And put it under pressure, I left it overnight. This is a good, heavy press in the form of a pan of water, so that the blocks become even and do not bulge.
Now let's outline the approximate border along which we will glue. So, we will trim the edges so that the book becomes smooth and neat, about 0.5 cm will be cut off on each side. And the leaves on the cuts should not be glued so that everything looks natural! This means we retreat approximately 1-1.5 cm from each edge, draw (you can mentally) a border and begin.
This is my least favorite part! Each page needs to be coated with glue and glued together! It’s boring, monotonous... but, “The Party said, “We must!” The Komsomol answered - “Yes!”
It is more convenient to glue 5-7 mini blocks together, and then assemble them into a book of the required thickness. Don’t be overzealous with glue, PVA glues paper perfectly even in small amounts! Have you collected it? Great! Place under a press (remember a saucepan with water) to dry!
One more moment! If you are planning a bookmark, leave the place where you will place it unglued; I conveniently forgot about this and had to tear the block apart.
It should turn out so beautiful!
Now it's time for the dirty work! We take sandpaper and thoroughly sand it! We don't regret our block! This book has gone through a lot over the years! We pay special attention to the corners! They should be rounded, frayed and worn the most!
And again, don’t forget to take care of yourself! If you have breathing problems or allergies to dust, wear a medical mask! There will be a lot of fine paper dust!
Here's what I got.
OK it's all over Now! The boring part is over! While the family wasn't looking, we quickly cleaned up the pile of rubbish we had made, made some tea/coffee, and picked up our brushes and paints in a great mood!
I used watercolor, gouache, acrylic, charcoal and coffee.
Let's start painting using wet watercolor technique! We thoroughly moisten our cuts with strong coffee! You can use water, of course, but with coffee everything will look older and more natural.
Well, then - the flight of your imagination! Imagine everything that could happen to a book over decades! She could be burning, drowning, lying in the sun or in a damp basement! Turn yellow, mold and much, much more! Leave traces of all these twists and turns on its pages! During the painting process, you can additionally sand the wet paper, rubbing and fraying the sheets even more!
Bend and crumple the sheets while they are still wet! Make your book history! Done? Great! Let's send it out to dry!
In the meantime, let's take care of the capital!
Of course, the real thing won’t work, we’ll imitate it!
Everything is extremely simple! We take a piece of twine of the required length, a piece of cotton and a thread of a suitable color, I have floss, iris is also perfect! Fold a piece of fabric in half, insert a string and sew over the edge! All!
We send it to age in a cup of coffee!
When both the block and the captal have dried well, we glue one to the other. I used silicone glue, you can also use PVA and Moment Crystal, in general, whatever you have on hand and what’s convenient for you!
Has it dried out? Fine! Tuck the ends in and you're done! You can cut off the excess, but then don’t forget to glue the captal threads with PVA so they don’t unravel!
It's time to add a bookmark. It can be anything. The main thing is not to forget to give your bookmark a good beating!
It's cover time! From thick cardboard, cut out a rectangle of the required size (+0.5 cm, on each side, to the size of the block) and cover it with the paper of your choice! It can be anything! Scrap paper, colored children's paper, rice paper, packaging. Everything is at your discretion!
BUT! I have a little advice on this topic. I still have some colored paper left over from my kindergarten days! Perestroika times, dull, thin, terrible quality! + also turned yellow with age! Great! just what I need! It frays and crumbles on its own and looks very natural when aged!
Therefore, in the store, choose the cheapest colored paper, thin, dull in color, not coated and without any newfangled additives. This is rare these days, but you can find it.