DIY voluminous paper snowflakes
Snowflakes are a neutral theme that suits everyone. Volumetric paper snowflakes are wonderful craft ideas for children and adults. Elegant and beautiful voluminous paper snowflakes can be used to decorate windows, ceilings, walls and anything else to create a festive New Year's interior. Making a voluminous paper snowflake with your own hands is of course a little more difficult than a regular snowflake, but there are plenty of opportunities to add patterns and unusual details. The patterns can be covered in glitter, painted or left plain. In the real world, there are no two identical snowflakes and, although you have probably already seen thousands of photographs from hundreds of master classes, perhaps in this article you will find new voluminous paper snowflakes that are suitable for your New Year's decor. Here are voluminous paper snowflakes with cutting templates , step-by-step photos and master classes, giant paper snowflakes , quilling snowflakes with amazing patterns. Many paper quilling snowflake are great for winter holidays, special events and Christmas decorations - they always look great. Look through the entire selection of interesting projects and you will definitely find your inspiration.
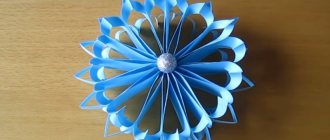
Snowflakes using quilling technique
Want to learn how to make giant snowflakes using the quilling technique ? Cut the colored paper into long strips 2.5 cm wide. Roll into a tight coil. Allow to unwind a bit and glue into a folded circle shape using Elmer's glue. Secure with a paperclip for a few minutes until the glue dries. Make a lot of reels. Shape several coils into a teardrop shape by pinching one side.
Make it in the shape of an eye (like an oval, but pointed at both ends), pinching the circle on opposite sides. These will be the basic shapes. There are other, more complex ways to shape paper for quilling, but these three basic ones will allow you to make many beautiful snowflakes. Make the blanks different using only these shapes. Just twist with different densities, then some will be larger, others smaller.
Cut the strips in half to create very small circles (especially towards the outer edges of the snowflake for a “soft” look). Once you've created a few spiral shapes, start experimenting with arranging them in different ways until you find a design you like. Glue the spools together with school glue. But don't apply too much or it will run off and stick the snowflake to your work surface! It doesn't take much to create a strong connection. Usually start with six pieces of the same shape, glued in a circle, this is the center of the snowflake, and then add the outer shapes. In principle, you could use hot glue for snowflakes of this scale, although this is uncommon for quilling projects (tiny snowflakes would use more hot glue than paper). But it definitely works in this case and can really speed up the process if you make quite a few of these big pieces.
One of the nicest things about these snowflakes is that the lacy shadows they create are just as beautiful as the snowflakes themselves.
Photo source: tomkatstudio.blogspot.com/2010/12/tutorial-giant-quilled-snowflakes-from.html
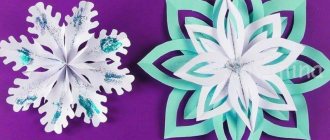
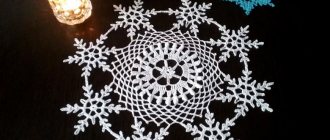
Do-it-yourself voluminous paper snowflake – photos and ideas
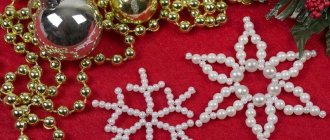
Look how beautiful and interesting voluminous paper snowflakes can look. We've put together a small photo selection for inspiration!
Photo: csgo-starshop.ru
Photo: evepla.com
Photo: vsesvoimirykami.ru Photo: archive.ysia.ru
Photo: info.sibnet.ru Photo: vestnikcel.nichost.ru
Photo: in.pinterest.com
Photo: podelunchik.ru
Photo: fotostrana.ru
Photo: vsesvoimirykami.ru
Photo: dkvitin.ru Photo: fotokartka.com
Photo: tvojdizajn.ru
Photo: vsesvoimirykami.ru
Photo: otprazdnuem.com Photo: da.crafts-fair.net
Photo: in.pinterest.com Photo: pinterest.cl Photo: viramaina.ru
Photo: idea-5.ru
Photo: vsesvoimirykami.ru
Did you like the post? Subscribe to our channel in Yandex.Zen, it really helps us in our development!
For window decoration
This instruction is suitable for those who want to decorate windows with snowflakes for the New Year.
1 way
To make a snowflake you will need:
- pencil or pen;
- scissors;
- napkins.
Take napkins of any color and scissors.
Cut four squares from napkins.
Fold the squares four times.
Fold the square in half. A triangle emerges.
Fold one of the corners as in the photo.
Cut all workpieces to a sharp corner; the cut can be straight or wavy - whatever you like.
Make patterns on all sides. The patterns are full of variety - choose which one you like.
Video about selecting patterns for snowflakes:
Unfold the resulting snowflake.
Cut out any number of snowflakes this way. They can be different in shape and size.
Method 2
Required for work:
- pencil or pen;
- scissors;
- foil (you can take from chocolate).
Cut out several squares from foil.
Fold as in the photo below so that you end up with six rays:
Use a pen or pencil to draw various patterns:
Cut out patterns with scissors.
Expand the snowflakes. The craft is ready! You can hang products on windows.
Photos of possible variations for making snowflakes from paper; they can also be used for cardboard with foil:
More folds, more edges - making the patterns on snowflakes more complex
Snowflakes cut from paper are not the only things that differ in their patterns. They can also be different in the number of faces. This is another vector for creative thought. If you fold the triangle twice, you get a tetrahedral snowflake. Its center is the obtuse angle of the triangle. This must be taken into account when drawing.
If you fold the triangle three times, you should get eight sides. But with the help of a pattern, the middle rays can be made shorter, and visually the snowflake will be tetrahedral.
A pattern with smooth, rounded lines will make the snowy beauty graceful and romantic. Geometric lines in the pattern will give the snowflake strict grace.
Beautiful craft “Snowflake-ballerina” with simple stencils for cutting
Have you ever seen such a miracle of nature? Yes, you walk along a path in winter, and every now and then the snowflakes seem to dance and dance like a waltz. So the masters came up with the idea of making and imitating something similar, but only from paper. The image is based on the image of a girl who dances. And she can wear any skirt you like.
Choose any beauty and cut it out of white cardboard or thick paper.
For a skirt, use these blanks. First, fold the sheet in the desired sequence:
And then choose any sample and carefully cut out the sketch. Dress up the ballerina, and then hang her on a ribbon or thread and on a Christmas tree, also hang her on a chandelier or door.
On a note. By the way, the skirt can also be made from fabric, such as mesh or organza. She also looks very gentle and charming. Is not it?