how to make a paper carnation Carnation
is the perfect flower for crafts. Most of us know how to make a paper carnation with our own hands since school. This is probably the most common paper flower that people make.
You can make carnation flowers from a variety of materials; crepe paper carnations , which look very natural and are most often used for paper bouquets. Carnations made from napkins and colored paper are also very beautiful and very easy to make with your own hands. Here are 12 examples, in most cases the craft requires only a few things, such as paper and floral wire, perhaps scissors and glue, all of which you most likely already have. So a paper carnation is not an expensive project, and the result will certainly be worth all the effort and time spent.
Do-it-yourself corrugated paper carnations - step-by-step master classes, photos
The tradition of placing carnations on a memorial plaque or giving to veterans has French roots. So, even the troops of Emperor Napoleon considered this flower to be their talisman, giving courage on the battlefield. In our country, the scarlet color of the carnation is associated with freedom, honor, loyalty, as well as blood shed for one’s Fatherland. You can make beautiful carnations from corrugated paper with your own hands according to our master class with step-by-step photos - the finished flowers will decorate a package with a gift, a touching sign of attention in honor of Victory Day on May 9.
List of materials and tools for the paper carnation master class:
- corrugated colored paper
- PVA glue
- scissors
- cotton swabs
- ruler
- simple pencil
Step-by-step master class on corrugated paper carnations for Victory Day on May 9, photo:
- Unroll the roll of red corrugated paper and measure 10 cm from the edge, cut it off.
- The strip must be cut into squares with a side of 10 cm.
- Fold the cut square in half - once and twice.
- We bend the resulting part diagonally to form a triangle.
- We connect the edges of the triangle in src=”https://strana-sovetov.com/wp-content/uploads/gvozdiki-iz-bumagi-svoimi-rukami-81.jpg” class=”aligncenter” width=”650″ height=” 650″[/img]
- Use scissors to cut off the sharp “tail”.
- Now we slightly unfold the part and make small cuts at the edge, imitating the “fringe” of a carnation.
- We unfold it again and carefully cut the “petal” in several places - no further than the middle.
- The result was a blank for the future carnation (in the photo in expanded form).
- In the same way, you can make several more parts.
- We make the center of the flower from a cotton swab - one tip needs to be cut off.
- Cut out a rectangle with sides 3 and 7 cm from red corrugated paper.
- On one side you need to make cuts - as in the photo.
- Using a cut cotton swab, apply glue to the rectangle.
- We apply the stick to the edge of the part and begin to twist the paper, trying to do it as carefully as possible.
- The result is the middle of a clove - it’s very convenient to hold by the stick.
- Take the previously prepared circle, punch a hole in the center and insert the middle.
- Lubricate the area around the stick with glue and collect the “petals” at the top.
- Add three more “petals” and get a paper carnation.
- Following similar instructions, we make several carnation flowers - from 10 to 15 pieces.
- Then cut a strip measuring 10 x 3 cm from a roll of green paper.
- Lubricate the strip with glue, wrap it around the bottom of the flower and a cotton swab (the tip can be cut off).
- A plastic stem from a store-bought flower is ideal as a stem. We attach the stem to a cotton swab - and our paper carnation is ready.
- These bright carnations can complement a wall panel, a painting or a composition in a vase. As you can see, it’s quite easy to make carnation flowers with your own hands, putting a minimum of effort into the work, but all the warmth of your hands and a piece of your soul. Happy Victory to you, Happy May 9th!
From foamiran
Modern foamiran material is ideal for creating large life-size compositions for decorating a stage, assembly hall or school corridors. Such decorations can be used to decorate a memorial plaque in a school or a monument.
Required materials:
- Foamiran sheets;
- Iron;
- Ironing board;
- Thick, durable wire;
- Glue;
- Pattern templates;
- Scissors;
- Foam balls with a diameter of 10 cm. The ball can also be cotton;
- Paints.
Step by step procedure:
- Cut and foamiran circles with a diameter of 20, 25, 30, 35 and 40 cm, 2 pieces of each type. Also, using the patterns, create other parts from green material.
- Trim the edges of the circles with scissors so that you get cloves.
- Cut the circles into slices, not reaching the middle.
- Iron the details. Using a knife or scissors, draw veins on warm foamiran and form them into petals and leaves. To form the green leaves of the flower cup, the parts must be attached to a foam ball.
- On the circles, paint picturesque veins with a darker paint than the color of the foamiran. Also tint the teeth.
- Round the tip of the wire and place foamiran circles on it one by one, starting with the smallest one. When assembling, secure the circles together with glue.
- After the last circle, you need to put a foam ball on the wire and secure it with glue. Glue green sepals to the ball.
- Heat a long strip of green foamiran with an iron and wrap it around the wire. Glue leaves on top.
To install a bouquet of such flowers, you will need a tall vase with weights at the bottom or a special floral base for large compositions.
In the same way, you can make growth studs by increasing the size of the parts:
A variety of carnation crafts will be useful for any patriotic or social holiday, and will become useful, educational entertainment for children.
DIY light paper carnations for children - step-by-step master class, photo
The red carnation is not only an amazingly beautiful flower, but also truly royal. So, from Greek the name “carnation” is translated as “flower of Zeus”, “divine flower”. A gift in the form of a bouquet of carnations is appropriate for any occasion - be it a date, a birthday or a colleague’s anniversary at work. In addition, children are happy to make paper carnations with their own hands to please their grandparents on Victory Day on May 9th. A step-by-step master class with photos can be easily repeated by every child - such paper flowers always turn out beautiful and touching. Alternatively, a bouquet of three to five carnations can be complemented with a greeting card.
What materials will you need to make paper carnations:
- red colored paper double sided
- half cardboard green
- glue
- pencil
- scissors
How to make a carnation from colored paper step by step with photos:
- Draw five circles on a sheet of red paper.
- We cut out each circle and bend it in half.
- We put the parts together in the form of a book.
- Using scissors, we cut the edges of the workpiece, making sharp “teeth”.
- Then open the circles and cut them into two equal halves.
- We bend each petal several times to form an accordion.
- We straighten the paper halves and begin to form a flower bud. We take one part, coat it with glue and place the second one on top, turning it slightly at an angle.
- We glue the third part in the same way, but making an angle on the other side.
- To make cups and flower stems, take a sheet of green half-cardboard. We cut out each part in triplicate.
- We glue the resulting elements together and get a carnation.
- We repeat all the steps we have gone through step by step and create two more paper flowers. Such a cute bouquet can be tied with a satin bow and given to a veteran you know on May 9, or sent to a children's work competition in a garden or school.
DIY colored paper carnations step by step – diagrams, templates, photos
The first days of May remind us that soon the whole country will celebrate a joyful and slightly sad holiday - Victory Day. The events of distant 1945, when they managed to defend peace in the face of enemies at such an incredible cost, will forever remain in the memory of many veterans. For children, we have prepared a simple master class on carnations from colored paper - you can make several bright flowers with your own hands, which are considered a symbol of victory and struggle. In addition, diagrams, templates and photos will help little creators of beauty better navigate the process of making a holiday card with carnations.
Materials and tools for the master class on carnations on a postcard:
- colored cardboard
- white office paper
- colored paper
- templates, diagrams
- glue
- scissors
- pencil
Master class step by step postcards with carnations made of colored paper with photos, templates:
- First you need to make individual parts using a template - you can download it and print it on a printer. We will need: a stem (3 pcs.), stripes of leaves of green paper (size 15 x 15 cm, 3 pcs.), red circles (15 pcs.), the inscription “May 9”.
- We attach the template for the leaves to a sheet of green paper, trace it and cut it out. The photo shows how to bend each sheet and glue it inside.
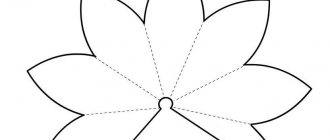
- We also make the carnation calyx from green paper using a base template.
- We use red paper to make flower petals. Each piece cut out according to the template must be folded in half and glued in the middle, as indicated in the photo. We cut the edges with a fine “fringe”.
- Take a sheet of cardboard in a bright contrasting color and glue a green stem in the center.
- We attach a red circle folded in half to the stem.
- Glue two more on top of the first semicircle - each subsequent one should be positioned slightly lower than the previous one. Apply glue only to the middle of the flower to make the petals voluminous.
- In the same way we attach the fourth folded circle.
- When all the petals are glued, you can cover the bottom of the flower with a green cup.
- We fix the wide leaf at the base of the stem.
- Now you need to slightly fluff the “fringe” of the petals, giving the flower a natural look.
- Following the step-by-step instructions, we make a couple more paper carnations - we got a whole bouquet.
- At the bottom of the postcard we place the congratulatory inscription “May 9”. As you can see, the presented master class is quite suitable for children, but if you wish, you can retreat a little, introducing the author’s notes into the composition.
Stencils for windows
It is very easy to create beautiful stained glass windows using carnations. Flowers on the windows will create a festive atmosphere. The child will be proud of his contribution to the preparation for the holiday. Even a child can make simple applications on windows.
Necessary materials:
- Colored or transparent tracing paper or thin colored paper;
- Corrugated paper;
- Stencils for flowers;
- Colour pencils;
- Scissors;
- Ruler;
- Colored or transparent rhinestones;
- Double transparent tape;
If you take transparent tracing paper, you will get beautiful stained glass windows that will change with the changing lighting on the street.
Operating procedure:
- Create flower patterns. For young children, it is better to prepare patterns in advance, and then decorate and cut them out along with them. Older artists will be able to draw or transfer patterns onto tracing paper themselves.
- Think through the concept of window design with your children.
- Color the carnation templates with colored pencils. It is better to leave some transparent elements in the center of the carnations. Thanks to this, the flowers will glow and shimmer on the windows.
- Cut the blanks along the contour.
- Glue small red rhinestones to the ends of the carnation petals. Transparent rhinestones can be placed at the base of the buds or on the leaves, then the sparkling elements will look like dew.
- Using double tape, place the applications on the windows.
In daylight, the flowers will look like chic stained glass windows, and when it gets dark, the rhinestones will sparkle, reflecting the radiation of the lamps. Thanks to this, the windows will change throughout the day, which will interest the child.
Such decorations can be placed not only on windows, but also on other pieces of furniture:
- On cabinet doors;
- On the mirror in the hallway;
- On the facades of kitchen units;
- On the refrigerator;
- On the blackboard at school or kindergarten.
To place it in the interior of the room, you need to take not transparent tracing paper, but bright, pearlescent paper. Parts of the flowers need to be glued onto a thick base. To place it on the refrigerator you need to use a small magnet.
How to make paper carnations with your own hands - step by step photos for beginners
Many from their “Soviet” childhood remember bright fluffy carnations made of crepe paper - in the hands of participants in a festive demonstration in honor of May 9th. However, modern children can also be interested by offering to make paper carnations with their own hands according to our master class with step-by-step photos. We have selected a simple lesson for beginners, but experienced crafters will also enjoy this exciting activity.
We stock up on materials for a master class on carnations made from colored crepe paper:
- colored crepe paper
- ruler
- scissors - regular and curly
- wooden skewer
- thread or transparent fishing line
We make a paper carnation step by step for May 9 using a master class for beginners:
- Take a roll of red corrugated paper and cut a strip measuring 40 x 7 cm.
- Then the strip needs to be slightly stretched and cut from one edge with curly scissors.
- Fold the piece into a square and finely cut one edge with a fringe.
- We wrap the prepared strip of crepe paper on a wooden stick, giving it the shape of a flower bud.
- When a lush bud is formed, we tie the base of the flower with fishing line or thread.
- For the stem you will need a strip of green paper (1 cm wide). Lubricate the strip with glue on one edge and wrap it around the stem.
- Having made several carnations, you can make a bouquet - for a composition in a tabletop vase, congratulations to a veteran. Happy May 9th!
Tank for Victory Day
At the thematic competition on May 9, the school will probably have a sufficient number of different tank crafts; you can try to compete with them. Even a 1st grade student can do such a simple craft.
What you will need:
- a set of green corrugated quilling paper;
- scissors;
- glue;
- red stars;
- colored cardboard for crafts - dark green.
Manufacturing:
- We roll 10 wheels for the tank from strips of corrugated paper and glue the ends.
- We glue 5 wheels together, and glue the outer wheels with their displacement upward.
- We cover the wheels with whole strips of the same corrugated paper, so we have the tracks of the tank.
- We cut out a small rectangle of any size from green cardboard and glue it to the tank tracks on top.
- We install a double turret on the tank's armor. We make a double tower from two blanks, one with a larger diameter, the other with a smaller one.
- We roll the blanks like wheels from strips of corrugated quilling paper.
- We glue the towers together and glue them onto rectangular green paper, which serves as the armor of the tank.
- From a rectangle cut out of the same cardboard as the armor, we twist the barrel. Glue it in place by gluing a small twisted piece at the end.
- We glue a small circle on top of the tower - a hatch, and glue a star on the side.
- We install the tank craft, made with our own hands for the competition, on any stand and glue a twisted St. George ribbon. On the pedestal you can make an inscription dedicated to the holiday of May 9.
How to make paper carnations for a postcard with your own hands - master class, video
Bright colored corrugated paper is an excellent material for creating the most beautiful artificial flowers. In connection with the approach of Victory Day on May 9, all kinds of carnations made of colored, corrugated paper, and fabric shreds are becoming especially relevant. How to make paper carnations with your own hands for May 9? In the video you will find a step-by-step master class with instructions for making a bouquet of carnations for a Victory Day greeting card.
Video with a step-by-step master class on handmade paper carnations:
Knitted flowers
Beautiful buds can not only be cut out of paper, napkins or embroidered from satin ribbon, but also knitted. This kind of work requires concentration so that all the hinges are in place. There are patterns and descriptions for crocheting, but not everyone can navigate them the first time. I suggest watching a video where the master talks in detail about each step, the rules for casting on loops and the step-by-step creation of a flower. If you are just starting your knitting journey, this lesson will be a real godsend for you.
How to make voluminous paper carnations with your own hands - step by step photo, video
Large flowers and bouquets of colored paper are often used as decoration for banquets, assembly halls, and other rooms for upcoming festive events. With the help of this video tutorial we will learn the intricacies of making a large voluminous carnation from corrugated paper. If you don’t know how to make paper carnations with your own hands, follow our master class step by step, and in the photo you can admire the finished version.
Step-by-step master class on video on creating a voluminous paper carnation:
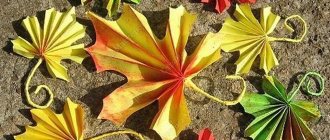
Ideas for photos of large paper carnations:
Craft templates
To simplify the process of creating carnations for the children, it is necessary to prepare templates in advance. Templates are like a short guide to creating patterns, which greatly simplifies the work. Template manufacturing options:
- Lightweight contour patterns made of stiff paper, whatman paper or cardboard. Using them, children will simply trace the details for later cutting.
- Stencils. These templates may have slots inside. They are suitable for complex details and compositions. For example, these could be designs of wreaths, baskets or bouquets of carnations for windows.
- On sheets of white paper with a black thick outline. The drawings can be printed many times and given to children new ones each time. Children will be able to transfer such patterns onto transparent paper.
For younger children, it is better to offer templates with the least amount of small details. For older people, on the contrary, it will be interesting to cut through every detail in detail.
Do-it-yourself origami paper carnations step by step - instructions, diagrams, photos
It is impossible to imagine Victory Day without an abundance of scarlet carnations, St. George ribbons and patriotic songs on a military theme. Looking at these bright red flowers in the hands of veterans, I want to add a touch of warmth to the holiday atmosphere. We suggest making your own paper carnations step by step using the origami technique - instructions, diagrams and photos are presented below.
Necessary materials for a master class on paper carnations in the origami style:
- double-sided colored paper in red and green colors
- ruler
- simple pencil
- scissors
Step-by-step instructions for a master class on carnations in the origami style with photos and diagrams:
- For the flower petals, you need to cut out 8 squares from red paper - 5 cm wide.
- Take one square and bend it in half (diagonally).
- Then fold it in the middle again to make a small triangle.
- We bend one side of the part as in the photo.
- We make several of these details, depending on how many flowers are planned.
- We begin to “assemble” the cloves. Insert another into the side hole of one triangle, and then a third. In total you need to connect five blanks.
- For the second part of the flower, we assemble three parts together.
- The second part, consisting of three blanks, must be glued to the first.
- On a sheet of green paper, draw two squares with a side of 6 cm (based on one flower), cut them out. We fold each part similarly to the red squares.
- Now you need to stick it on one side of the flower.
- We make the stem of the clove from a square with a side of 10 cm - cut it out and roll it into a tube. We attach it to the flower with glue.
- We also glue the second green blank at the base of the carnation.
- Our master class is over, and you can admire the wonderful carnation in the origami style. If you make a few more of these flowers, you will get a luxurious bouquet - very beautiful!
Origami
Take a square and fold it into a triangle. Then we bend it in half.
We bend one corner of the resulting triangle and fold it in half.
We need 5 such blanks.
Let's move on to the green base. Fold the square into a triangle. Fold the triangle in half again.
We bend one corner and fold it in half.
That is, fold the base the same way as the red petals. Now let's collect the flower.
Lubricate the petal and insert it into the pocket of the second petal - a triangle. So that the bent triangle is free and sticks out from the front side.
So we fold all the petals into each other and bend the protruding triangles in one direction, we get a flower.
Now we will make 3 more of the same red blanks and also form a flower from them. Glue the green blank to the smaller flower. We glue the green triangle itself so that the free corner is tightly fixed.
Glue a large flower to our blank.
You can stop here if the flower is needed for a card, but if you need a bouquet, then we make another flower of 3 petals with a green base. We twist a tube diagonally from a green leaf.
We turn the large flower over, coat it with glue and glue the tube, flattening it a little.
Glue a small flower on top of the tube - a blank. We get a flower on a stem. Now we make the leaves.
Popular articles Master class: Decoupage plates
We fold the green square in half, open it and fold the corners towards the middle, as in the photo.
We also bend the lower corners towards the middle. And fold the workpiece in half.
We open it, smoothly bend the upper corner and get a petal. We bend the lower edge of the petal to get a wider base of the leaf.
Lubricate the base with glue and glue it to the leg. You can make a couple more of these leaves.
The flower is ready.
Author https://www.youtube.com/watch?v=koCv0szj8hc
Application made of colored paper “Carnation for May 9” - with templates, photos
It is best to prepare a gift for Victory Day on May 9 in advance so that on a holiday morning you can give it to your grandmother, grandfather, or just a veteran you know who has taken part in hostilities. In kindergarten or elementary school, you can conduct a lesson on making your own paper carnations. We have put together a simple master class with photos and applique templates for beginners - try making a paper bouquet of carnations on a postcard.
List of materials and tools for the “Carnation on May 9” applique:
- colored paper and cardboard
- sample
- scissors
- simple pencil
- PVA glue
How to make a carnation applique from colored paper:
- First, we’ll make a St. George’s ribbon - cut out a strip of 28 x 3.5 cm from black paper. Then you need to cut out two orange thin strips 28 cm long and 0.5 cm wide.
- We glue thin orange ones on top of the black stripes - at the same distance from each other.
- To make a flower, cut out four squares of different widths (2, 4, 6 and 8 cm), fold them in half, then fold them again. We get a triangle.
- We cut the wide edge of each triangle in the form of a fringe.
- As a result, we have 12 parts - based on three flowers.
- The petal blanks need to be glued on top of each other, placed in descending order by size - from the largest.
- For the leaves you will need a rectangle of green paper with dimensions of 9 x 6 cm. It will be easier for children to cope with the task if they use a template - just attach and trace.
- We cut out each leaf.
- We make the stems from strips of paper (length 18 cm, width 0.5 cm).
- On a sheet of cardboard we glue a St. George's ribbon with a fold in the middle, stems, bright carnation flowers, and green leaves. Every child can easily make such an applique with carnations for Victory Day. Happy holiday!
Simple clove
For a three-dimensional postcard you will need the following materials:
- thick cardboard for the base
- colored paper (you can use regular table napkins)
- good PVA glue or in pencil form
- stapler
- scissors
- pencil and ruler
- various decorations (for example, St. George's ribbon)
We will use thick cardboard for the base and fold it in half.
You can choose any color for the base; I’ll take white so that all the details of the card look contrasting and harmonious. And put it aside until the last step.
Next, take colored paper or napkins, depending on what you will make the carnations from: red, pink or white. Although, you can experiment and make carnations from any other color.
We try on the size of the carnations for our base. Cut out a long strip, the width of which will be equal to the approximate size of the carnations on the card.
The width of my strip turned out to be 5 centimeters.
We fold this strip with an accordion so that it becomes a square and in the middle we fasten all its layers with a stapler. I got 6 layers, but you may get more. It should look like the picture below.
We cut off the corners of the square to get a circle and, without cutting to the middle, we make a fringe along the contour. Shown more clearly in the photo below.
We fluff the flower in one direction and try it on the card. I advise you to make 3-5 flowers. You can use different colors and sizes, for example, combine red flowers with white ones.
Now everything depends only on your creativity. It is necessary to fill the remaining space with stems, leaves, and maybe some other decorations.
Stems with leaves can also be made voluminous using skewers and colored paper, or you can simply stick them on or draw them.
I will make three-dimensional ones using skewers and tell you how it’s done. Everything is very simple here, you only need skewers, scissors, green paper and good glue. You can also use wire instead of skewers, then your stems will be more flexible.
First, take a skewer and adjust it to the size you need for the stem, trim off the excess.
Now cut out long green paper strips about 1 centimeter wide.
We begin to wrap the skewer with this strip, holding it diagonally, lubricating the beginning and end with glue. You can use any glue, as long as it sticks to the wood.
Then we cut out a couple of leaves and start gluing everything.
You can glue it with any glue that is more convenient and convenient for you. Also decorate the card with additional accessories, drawings, inscriptions and the like.
And here are some more examples of postcards.
Beautiful DIY paper carnation - video tutorial for beginners
A bouquet of bright paper carnations is an excellent gift, a sign of attention for any occasion. For beginners, we have prepared an interesting video tutorial on how to create beautiful carnations with your own hands from paper.
Video with a master class on colored paper carnations:
How to make paper carnations for May 9 with your own hands? Here you will find step-by-step master classes with photos, videos, diagrams, templates of paper carnations for beginners - from colored plain and corrugated paper, on a stick in a bouquet and on a postcard, in the origami style, in the form of an applique. Good luck with your work and good mood!
A bouquet of flowers in the form of carnations for dad on February 23
Of course, how could we not congratulate our men on this day? They are like children, they are also waiting for gifts, and we will definitely give them them. And we will surprise you with luxurious flowers that are beautiful, even if they are made from improvised materials. Watch the video and learn:
Well, in conclusion, I would also like to show the diagrams and work steps that I managed to find on the Internet, I hope they will become your helpers. Create for your health.