If you like to do handicrafts, namely knitting, then read the article on how you can knit mittens, mittens, and scratches of various designs for children.
In the cold winter season, children cannot do without warm mittens. Kids love outdoor games: throwing snowballs or making a snow woman. Sometimes it happens that a child doesn’t even have enough two pairs of mittens for one walk because they get wet to the thread.
Buying mittens is not a problem now, but it is much more pleasant if a caring mother-craftswoman knits warm, beautiful mittens for her beloved child herself. However, not all mothers know how to tie them. More on this below.
How to knit warm double mittens for boys and girls from 1 to 11 years old?
Double mittens will keep your little ones' hands warm even in severe frosts.
In order to link them, you will need:
- Knitting needles - 5 pieces
- Threads for the product
- Pins - 2 pieces
- Hook
Original double mittens with an ornament for a girl 11 years old
Progress:
- Decide on the size of your child's hand. To do this, measure the widest point on your hand (near the thumb).
- Cast on a certain number of loops . Distribute them evenly on the knitting needles for knitting socks, and use the heel to knit the elastic in the round.
- the method of knitting the elastic according to your taste: two loops - knit, two - purl, or one - purl, one - front, etc.
- You can also knit any height of the elastic band 3-6 cm . It all depends on how long the mitten you want to make.
- Next, proceed to the main drawing of the product. And where the thumb will be, leave the loops on the pin without knitting.
- Make a small hole for your finger. Then knit the mitten right to the tip of the little finger .
- Then begin removing the loops on both sides evenly to make the top in the form of an isosceles triangle.
- Knit with knitting needles and crochet the thumb .
- Using a crochet hook , make on the elastic band of the finished mitten for the inside of the product
. - Throw the loops over four knitting needles and knit the same twin mitten , which you will then tuck inside the mitten.
- Using the same description, knit second mitten .
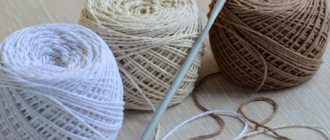
Yarn selection
The choice of yarn is primarily based on color, texture and price. But this is not enough. The label of the skein should contain information that is useful to read.
To select yarn, you should pay attention to the following parameters:
- skein weight;
- length in skein;
- thickness;
- compound;
- color uniformity/dye fastness;
- stretch/shrinkage ratio;
- tensile strength.
Important! When choosing yarn, you need to be guided not only by the weight of the skein, but also by the length of the thread, since with the same weight, yarn of different textures can have completely different lengths.
Types of yarn
Knitting yarn can vary in composition, texture, thickness, twist and color. These factors determine the purpose of hand knitting yarn.
The yarn is like this:
| Origin | Kinds | |
| Natural raw materials | Plant origin | Animal genesis |
| Viscose, cotton, linen | Cashmere, wool, silk, mohair | |
| Synthetics | Acrylic, polyester | |
| Mixed fibers | Various combinations | |
In addition, the yarn can be:
- twisted with several threads;
- homemade, self-spun;
- large and small boucle;
- polished.
Yarn for knitting needles and crochet
You can knit any yarn on knitting needles. But when choosing, special attention should be paid to the uniform thickness of the thread in the skein along the entire length. If there are thickenings or areas of thinning of the thread, then such yarn is not recommended for openwork and stocking stitches. Uneven yarn is used for knitting raised patterns or in combination with yarn that matches the color.
For crochet needlework, the choice of yarn and special threads is much wider. Any yarn is suitable for this knitting, as well as “iris”, “floss”, “krashe”, “garus” and thick bobbin threads.
Yarn for mittens
Mittens should be warm, soft, and not easily ventilated. Based on this, the spinning threads are selected mainly natural - wool, wool blend, mohair, angora. For mittens it is possible to use mixed yarn. For example, wool - acrylic, or mohair - cotton.
Self-spinning from goat fluff remains popular to this day - the same yarn that grandmothers and great-grandmothers used. From self-spun fiber, needlewomen like to use goat, camel and dog hair.
Among modern yarns for knitting mittens, we can recommend Kaun wool, YarnArt Jeans, Trinity “New Zealand” wool, and Laika.
How to knit owl mittens for girls: diagram with description
knit mittens with the Owl . The main thing is to master the technique of knitting the mittens themselves on circular knitting needles. And creating a pattern is not difficult if you follow the pattern.
Gray mittens for girls with a pattern - Owl
So, to get these mittens, do the following:
- Cast on a certain number of stitches and distribute them onto four needles .
- the fifth knitting needle , knit an elastic band (first row: two loops - knit , two - purl , second row and all subsequent ones: according to the drawing).
- Knit 25-30 rows . On the front of the mitten, start knitting a pattern as in the diagram below. Where: × - means cross the loops ; – front loop ; ǀ - purl loop .
- Make the owl's eyes from beads or buttons.
Knitting pattern - Owl
IMPORTANT : When knitting, try to keep the loops the same size.
How to knit mittens with braids for girls?
braid pattern will decorate a girl’s mittens and make them more voluminous. And if you line these mittens with beads, your little one will feel like a princess.
Delicate white mittens with braids
- For a simple braid, you should use twelve loops .
- Knit the first three with purl stitches , then six with knit stitches and three with purl stitches .
- Knit the next row according to the pattern; in total, six rows should be knitted .
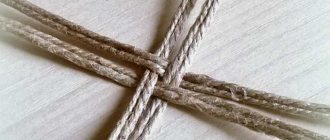
- The image below shows how to cross the loops to create a braid.
- To do this, move the three loops of the right harness onto a pin or an additional knitting needle . Then knit three loops of the left rope .
- Then knit three knit stitches from a pin and knit the remaining purl stitches .
How to knit braids yourself?
Finger.
We transfer the loops from the pin onto the knitting needles and cast on another 8 or 10 loops from the edge loops. We knit 16 or 18 loops in a circle. Let's try it on your hand. When the finger is almost hidden, decrease the loops in 3 places.
We also knit a second mitten.
Try to choose bright colors. Look what a difference it makes!
You can decorate ordinary mittens with embroidery. For example, like this.
How to knit mittens with an ornament for girls and boys: pattern diagram with description
For older children, mittens with bright patterns are good. Moreover, you can combine mittens with different tones of threads. Use two, three, four shades of yarn to create a fancy pattern. There are many patterns for knitting these patterns online. We will look at the Norwegian ornament .
Children's mittens with ornaments
- It is not at all difficult to connect such a star. It is enough to cross the threads on the back of the mittens and not confuse where to knit white and where to knit red.
- The base is knitted (in satin stitch) with white yarn . And the star is with red threads.
- To create an ornament, you need to calculate a repeat of 23 loops in the center of the front side of the mitten so that the pattern is beautifully located on the product.
- First tie an elastic band.
- And then knit according to the pattern, as in the image below.
Knitting pattern for mittens with a pattern for children
How to knit fingerless mittens with knitting needles for a girl and a boy: description
Mitts for a child are easier to knit than mittens. Such products are just perfect for mothers who are just starting to master the knitting process.
Mitts for children
How to knit mittens without fingers?
- Decide on the size of the product. To do this, measure three values : the circumference of the hand in the area of the thumb, the distance to the base of the finger and the distance to the base of the other four fingers.
- Cast on ten stitches and knit a row or two to find out how many stitches there are per 1 cm.
- Next, based on the data obtained, cast on a certain number of loops for the mitts on circular knitting needles, knit a regular elastic band (2 purl loops, 2 knit loops).
- Then choose the pattern you like, knit according to the pattern to the place where the thumb will be. Leave a few loops on the pin.
- Knit several rows and make a hole for it.
- Tie the upper part of the mitts and decorate the edge with an elastic band .
- At the end, tie the thumb only without the top.
Required measurements
Before you start knitting, you need to take the necessary measurements from your hand, namely:
- The circumference of the palm at its widest part.
- Wrist circumference.
- The length of the palm from the wrist to the top of the middle finger.
- The length of the palm from the wrist to the base of the thumb.
- The length of the thumb from its base to the top of the head.
All measurements are taken with a tailor's measuring tape without any allowance for a loose fit.
Transformable mittens with folding top knitting for girls and boys: diagram with description
The mitts are convenient because the fingers are free and nothing hinders their movement at all. However, in severe frosts, you also need to hide your fingers so that they do not freeze. For this, resourceful needlewomen came up with transformable mittens.
Mittens for boys and girls with convertible top
The sequence of knitting them is almost the same as for mitts. You just have to knit one more piece - the top.
How to knit the top part of the transformers mittens?
- Start with an elastic band . Knit two centimeters in the usual pattern: two knit stitches, two purl stitches.
- Tie the top part with any pattern you like to match the main one.
- Smoothly round the top , gradually reducing the number of loops in the row.
- Sew the top of the mittens to the elastic band of the mitts.
Knitted mittens for newborns: description
Mittens for newborns are knitted quickly, because the baby still has very small hands, and there is no need to knit the thumb. Because putting mittens knitted with thick threads on your finger will be problematic. The baby will not like the discomfort.
DIY mittens for newborn babies
How to knit mittens for babies?
- Cast on 28 stitches on circular needles. Knit three rows with knit stitches .
- Then knit six to seven rows with an elastic band .
- Then continue to knit row after row, without changing the number of loops, all the time with facial loops. Until you knit the product to the tip of the little finger of the crumb.
- After which you can gradually decrease the loops so that the mittens are round in shape.
- decorate the mittens with applique and embroidery . Insert tape at the bottom to prevent the mittens from falling off your tiny hands.
Bright, beautiful scratches for girls
We crochet warm mittens for the winter for a newborn baby
1). First, knit an elastic cuff. Cast on 7 loops and knit 25 rows in this way: single crochets behind the back thread of the base loop.
READ ALSO: Crochet booties, master class for beginners
2). Connect the resulting rectangle into a ring with half-columns. This is a cuff.
3). Knit in a circle so that every 2 rows of elastic give you 3 loops, as in the photo.
4). Knit 15 rows with single crochets using the back thread of the base. Actually, the mitten is almost ready, because we wrote above that it can be knitted without a finger.
5). You can reduce the loops sharply, but it is more beautiful when the mitten for a newborn is rounded smoothly, and not at a “house” corner. To do this, in the 16th row, decrease (that is, knitting 2 loops together) every 3 knitted stitches. In the 17th row, do this decrease every 2 columns, and in the 18th row – every other stitch. In the last, 19th row, knit every 2 loops together. And finally, gather all the loops together, crochet and tighten the thread.
6). For a cord, you need to cast on 70 chain stitches and knit one row of single crochets.
Thread the string into the mitten at the edge of the elastic band and tie it with a bow. The second mitten is knitted exactly like this.
Knitted mouse mittens made from grass for kids: diagram with description
These cute mittens should be knitted using two types of yarn. Use grass for the back of the hedgehog, and regular blue yarn for the main part.
Blue baby mouse mittens for babies
Progress:
- Knit regular mittens on knitting needles of the desired size
- Separately, knit a rectangle using knitting needles
- Sew it to the mitten
- Use black thread to embroider the mouse's eyes and nose
Knitting needle selection
The quality of the knitted fabric, its smoothness and uniformity depend on the type of knitting needles. The choice of knitting needles depends on the type and thickness of the yarn, so this issue must be approached responsibly.
Correct choice of knitting needles:
- the desired design (knitting needles with stops, Teflon or metal on fishing line, stocking or hooks);
- the required thickness and length (depending on the yarn, knitting density);
- from the preferred material (wood, bamboo, plastic, metal);
- of adequate quality (smooth, without jagged edges, with a comfortable end and stopper).
Approximate correspondence between knitting needle size and yarn thickness:
| Yarn thickness (thread length per 100 g weight) | Recommended spoke thickness |
| 50 m – 100 g | 7 – 15 mm |
| 100 m – 100 g | 6 – 9 mm |
| 150 m – 100 g | 5 – 7 mm |
| 200 m – 100 g | 4 – 6 mm |
| 300 m – 100 g | 3 – 4.5 mm |
| 400 m – 100 g | 2 – 3.5 mm |
| 800 m – 100 g | 1.5 – 3 mm |
The label of a standard skein of yarn usually indicates the recommended number of knitting needles.
However, everyone’s knitting style is different - some prefer tight knitting, while others prefer loose knitting. Beginner knitters, for the most part, knit very tightly, so larger knitting needles are recommended for them. Conversely, for weak and loose knitting, thinner knitting needles are needed. For knitting mittens, gloves, and mitts, stocking needles are most suitable. These are 5 shortened knitting needles without a ring or stopper. They are convenient for knitting even small fingers on mittens and gloves in a circle and learning how to knit.
To knit mittens from yarn with hard fibers, use smooth metal knitting needles, and for polished yarn, use plastic or wooden knitting needles.
Knitted hedgehog mittens made from grass for kids: description
For these children's mittens, choose threads in gray tones. For the base - regular yarn, for the spines - gray grass. Decorate the hedgehog's eyes in the form of buttons or beads, and instead of the nose, sew a black bead.
Cool mittens made of grass in the shape of hedgehogs
Progress:
- Knit mittens from dark threads on circular knitting needles
- Using a crochet hook , pick up on the back of the hedgehog and transfer them to the knitting needles
- Knit with a regular knitting needle until you have tied the entire back
- Close the loops and sew the edges .
Down mittens
Down mittens are knitted in the same way as mittens made from regular wool yarn on 2, 4 knitting needles and Teflon circular knitting needles with fishing line or a plastic tube. Their thickness should correspond to the thickness of the threads. For mohair mittens, knitting needles are taken in a larger size, since loose knitting is assumed.
To make down mittens, yarn with goat and rabbit down, mohair, angora, and home-spun twisted threads are used. Down yarn can contain 100% natural down or down with the addition of cotton thread.
Down mittens are very warm and soft. Some knitters make them double so that the fluff inside does not fall off. For this purpose you need very thin natural fabric or fleece.
How to knit children's mittens with cones for a girl aged 1 - 11 years: diagram, description
If you like voluminous patterns, you can knit these mittens with cones. To do this, take 100 grams of yarn, knitting needles, a hook and start the process.
How to knit mittens yourself with knitting needles with a pattern - cones
Progress:
- First, cast on the loops and knit a regular elastic band for mittens.
- Make the main drawing as below in the picture .
- Having reached the base of the thumb, leave the loops on the pin and continue knitting to the end.
- Then reduce the number of loops on both sides to create a triangle at the top of the mitten.
- Knit the finger using satin stitch.
Pattern diagram and description of the knitting sequence - Cones
Let's knit unusual mittens
Perhaps all children, without exception, love cartoons. And many cartoon characters become their favorites. You can knit mittens for a 5-year-old girl with the image of your favorite character. It is not necessary to use jacquard patterns. Knit simple plain mittens and then decorate them with embroidery.
Step-by-step description of the process:
- Every needlewoman can knit such original mittens. They are knitted in regular garter stitch.
- After taking measurements and determining the knitting density, we cast on the knitting needles in the classical way the required number of loops.
- We distribute them on four knitting needles and close the cast-on row into a circle.
- We knit a 1x1 elastic band 5 cm high, alternating one knit stitch and one purl stitch.
- On the first two knitting needles we will knit the front part of the mittens, and on the third and fourth knitting needles we will knit the lower part.
- We knit a fabric 5 cm high with a scarf pattern, and then add two loops per row.
- Having knitted to the base of the thumb, on the third knitting needle we make a hole for the finger. When knitting the left mitten, the hole for the finger is made on the fourth knitting needle.
- We remove the loops for knitting the thumb onto the pin and continue knitting the main part of the product. Having knitted the mittens to the desired height, we move on to knitting with yarn of a different color.
- We use the following scheme in our work.
- We tie the thumb and close all the loops.
- We crochet the parts of the bird using regular single crochets and then sew them to the mittens. The eyes can be embroidered or made from beads or seed beads.
- Double-sided knitting patterns: diagrams
- Knitting children's blouses for girls
Your child will always be warm in mittens. Mittens knitted with jacquard patterns look incredibly beautiful. If you are new to knitting, then knit mittens using garter stitch, and then decorate them with embroidery or decorative elements. Creative success!
How to knit Minions mittens with knitting needles for a boy aged 1 - 11 years?
For these fun Minion mittens, prepare bright yellow yarn and black and blue threads. Also, to knit large glasses, take white or gray yarn. Make the eyes from black buttons.
DIY mittens – Minions
All that remains is to knit the combined mittens with an elastic band and make glasses. Then sew them to the mittens.
How to decorate finished products
You can decorate the mittens:
- beads or beads;
- sequins;
- satin ribbons;
- stripes;
- buttons;
- cross stitch using floss threads;
- pom-poms;
- knitted decorations (bows, flowers, leaves);
- fleece appliqués;
- rhinestones;
- tied ears, tails, tassels (mittens in the form of animals, insects, with cartoon characters).
You can knit the decoration yourself:
- It is recommended to take yarn of three different colors (it is better to choose them in combination with the color scheme of future mittens), a hook, a needle and threads.
- Using simple posts, tie leaves of the same color - 6 pieces about 2-3 centimeters (two small braids connected together).
- Then you need to repeat the steps using the 2nd and 3rd colors.
- Sew the leaves to the mitten using thread and a needle (one color first, another on top, and then the last).
There are many similar schemes. The main advantage of knitted mittens is the ability to decorate them at will. This item can be an excellent gift for a loved one.
Two-color knitted mittens for girls and boys: diagram with description
If you have bright yarn of two colors, then you can knit beautiful mittens for your baby by combining them in the same way as in the picture below.
Knitted mittens for babies - two-color
Below in the image, see in detail how to knit such mittens.
Knitting pattern for mittens for girls and boys
How to knit baby kitten mittens with knitting needles: diagram, description
We invite you to knit cheerful, striped kittens in the form of mittens. For these mittens, prepare:
- Light gray threads, dark yarn
- Knitting needles
- Pin, scissors
Cute baby mittens - kittens
Progress:
- dark yarn to knit an elastic band for mittens.
- Next, knit two rows with light threads
- Knit two rows of dark yarn
- Leave the thumb loops on the pin
- Knit the mitten further along the pattern until you reach the kitten's head
- Make the head in light colors
- When you begin to close the loops, leave room for the eyes
- Make them from dark threads
- At the end, embroider eyes , antennae, nose with threads
How to knit baby chanterelle mittens with knitting needles: diagram, description
- These are the red foxes that can be made from 80 grams of orange yarn.
- For the nose you will need very little white thread. We knit the ears like we did the thumb (only in smaller sizes), after we finish with the main part of the mitten.
- Embroider the eyes and nose with black thread.
Mittens for children – Chanterelles
How to knit children's paw mittens with knitting needles: diagram, description
Older children like mittens with paws on their palms. You can knit them using the usual mitten knitting pattern. Sew the paws separately, after crocheting them with red threads.
Delicate, white mittens with paws for children
How to knit children's mittens with bullfinches: diagram, description
Any mother can knit very beautiful bright mittens with white bells for her child. It is enough to be patient and time and prepare the material for the mittens.
You will need:
- White yarn, and red, black, green, gray threads
- Knitting needles, scissors, hook
White mittens with patch – Bullfinches
Progress:
- Using white threads, start knitting with an elastic band
- Then move on to the main part of the mitten
- Tie a bullfinch on the outer half, as in the diagram below
- Knit a mitten and don’t forget to place a place for your thumb
- Then finish your work
Knitting pattern for bullfinch for mittens
Sew scratches
Before you start sewing, you need to prepare a pattern. To do this, take tracing paper (a sheet of paper) and draw a rectangle measuring 90x130 mm. We round the upper edges of the future mitten and cut out the blank. Let's prepare the elastic band right away: take the desired length and cut it in half. You should decide on the location of the seams, which can be internal, external or hidden (between layers of fabric).
We take the finished pattern, place it on the fabric and trace it. We cut out the parts, lean them against each other and sew them together, leaving a hole for the handles. We apply the elastic to the bottom edge of the product, turn it in 2 cm and stitch it. We decorate ready-made scratches for newborns with ribbons, bows, embroidery or lace. If desired, you can increase the length of the cuff - then the elastic will no longer be needed.
What mittens to knit for a teenage girl and boy with knitting needles
For young men, it is better to knit mittens with ornaments or without any patterns at all. For girls, you can choose many options for mittens: openwork knitted, with a voluminous pattern, bright patterns, appliqués, etc. You can see patterns and useful knitting tips here. Also find out how to calculate the correct size.
Mittens for teenagers