An alarm system will ensure the safety of your home when the owners are away. There are many types of it, with different capabilities, from a simple sound notification to calling the police. For budget home use, a self-assembled GSM alarm system is well suited.
Its incomparable advantage is the notification of the owner when strangers penetrate through the security perimeter of the premises. The design itself is incredibly cheap and simple. Any person capable of holding a soldering iron can make such a system.
The essence of the gsm alarm system
GSM alert systems allow you to send SMS messages or a call to the owner's cell phone. Their extended variants are capable of making already established logical choices depending on the situation and are controlled by feedback, command signals from the user.
For example, in the event of a false alarm, the owner can turn off the alarm using SMS. Or, when there is no response from the notified subscriber, the system automatically calls the police.
One of the alarm systems with many possibilities
Of course, in order to provide similar flexibility to a homemade GSM alarm system, you will have to spend additional money on a logical unit - a computer, a communication module attached to it and sensors with corresponding parameters.
All this together will make it possible to create a warning system no worse than those officially sold in stores. Moreover, the price of a self-assembled one will be much lower than the options available on the market.
Option one
The following components will be needed: a push-button telephone (the cheapest one possible, but functional and with a good battery), a magnet, wires, a reed switch and a simple switch.
The assembly process itself is quite simple and consists of several simple steps:
- 1. Set up a call to the required number (for example, your mobile) on one of the buttons.
- 2. Remove the front panel of the mobile phone. This is necessary to gain access to the contact group of the device and connect the wires.
But there may be several options:
- — the function of receiving and rejecting a call is on one key. In this case, one wire is soldered to it, and the second - to the number that you assigned to call the required subscriber;
- — if different keys are used for the call and hang up functions, then you need to solder a wire to each of the three keys and use a three-pin reed switch.
By the way, the advantage of this installation is that the phone will turn off along with the alarm, which can significantly save battery capacity.
- 3. The last step is to install the magnet on the door (garage or car), as well as setting up its operation.
The further principle is very simple: when the door is opened, the reed switch contacts open, and the car owner receives an alarm message about an intruder breaking into the car (garage).
A switch must be provided in the reed switch circuit, with the help of which the GSM alarm system will be turned on or off by the owner. In this case, you can choose the location of such a switch yourself. The main thing is that the toggle switch does not catch the eye of intruders.
As an example, you can use the following scheme.
The advantage of such a self-assembled system is absolute autonomy. The main thing that needs to be considered is the issue of constantly recharging the battery.
The ideal option is if the charger can be connected to the vehicle’s on-board network (in the case of installing protection in a garage, to a 220 V network via an adapter).
In this case, the phone will be constantly recharged over a long period of time.
The disadvantage of such a system is a slight delay in operation, because it must take some time to call a subscriber.
If suddenly the attackers quickly entered the garage (got into the car) and closed the door, then the circuit will be open and the signal may not reach.
But this problem can be easily solved - it is enough to equip the magnets with a special product that will prevent the circuit from opening again.
There are many options here to solve the problem. For example, one of the simplest is to install the magnet in such a way that when the door is quickly opened, it moves.
In this case, after closing the door, the circuit will not open immediately and the GSM alarm will do its job completely.
Where can it be applied?
The scope of GSM signaling is very wide. It can be used not only as security for apartments, private houses, country houses or shops. Even in the simplest version of its manufacture, its functions are sufficient to notify the owner of any physical event.
For example, it is possible to install it on a garden watering system so that signals are sent when the water has run out. Or it can be used as a fire department - when the smoke and fire sensor is triggered, a call is made to the owner. It all depends on the type of sensors.
Various sensors
A GSM alarm is also good for protecting your car from theft or theft. In the first case, a pleasant bonus will be the ability to find the loss using radio direction finding of the phone.
Functioning of a home-made alarm system
A homemade GSM alarm from a mobile phone works according to the following principle. If the sensor installed on the object is triggered, the contacts of one of the phone keys are closed, which is used as a shortcut button. As soon as the contact terminals are connected, the quick call function will be activated and the owner of the apartment or house will receive a call, which will warn that there is someone on the premises. Thanks to quick notification using such an alarm, the owner of the house will be able to call for help in a timely manner and independently arrive at the site, which will not allow an attacker to steal from the apartment or steal a car from the garage.
In addition to sending a call, you can also add elements of light and sound psychological influence to your homemade alarm system in the form of a siren and flashing lights, which will go off when the subscriber calls. At a protected object, you can install several sensors that will respond to one shortcut key or several.
How to make a GSM alarm from your phone with your own hands?
The most budget option of all possible for such an alarm will be considered. An alert is triggered when the amount of monitored space changes. It occurs if a large object, person or any movement appears in the sensor’s field of view.
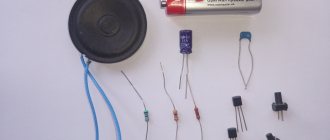
Components and materials
- The main part is any push-button mobile phone, as long as it allows you to remove the auto-lock of the keypad and is relatively easy to disassemble. In this case, old, black and white mobile phones are good. Their design and easy access to the elements are a great help in creating a warning system. But a smartphone won’t work; everything is too dependent on the built-in software.
Push-button mobile phone
- Volume and motion sensors. In the original scheme, Astra was used, but you can use any suitable parameters.
- Connecting wires - the required length is selected depending on the distance to the sensors.
- Chip K561LA7 or its foreign analogue – CD4011A.
- Optocoupler. You can pull it out of an old computer power supply.
- Stabilizer 7805. You can find it in the same place as the optocoupler.
- Two 100n (nanofarad) non-polar capacitors.
- Resistor 3.3 kOhm.
- Thin varnished wire. Useful when soldering in the phone itself; large wires are difficult to work with.
- Soldering iron, flux and tin.
- 12 volt battery or power supply.
Installation and connection instructions
A push-button cell phone is disassembled down to the printed circuit board. Some models allow you to remove the buttons themselves under the screen. To do this, just pry them off from the side with a knife or an iron ruler. The main thing is to get to the contacts of the keyboard group.
Push-button phone board
Contacts required for soldering
The call key is soldered to both contacts using varnished wire. Then the housing is reassembled, in which it is necessary to leave the new lines outside.
Assembling a telephone with a separately displayed call button contact
Next, on a breadboard or using conventional etching, a circuit substrate is made, onto which the necessary elements are soldered. You can design and make a layout on a computer using various specialized software, much of which is available for free.
Schematic diagram of the alarm unit
The finished board is connected to the already described contacts of the phone button and volume sensors. If several sensors are used, they are connected in parallel so that when any of them is triggered, a signal is sent to activate the system.
The circuit is connected to a power supply or 12V battery. Such current characteristics are necessary not only to provide energy to the soldered structure, but also to the sensors themselves.
That's it, the device is ready for use. The logic of its operation is quite simple: a pulse from a motion sensor triggers the generation of a rectangular signal on the K561LA7 microcircuit, with an amplitude frequency of approximately 1 Hz.
Through an optocoupler, with their help, the call button contacts are repeatedly connected, which on most phone models will first call up the history with the last number, and then dial it, informing the owner that the alarm system has been triggered. That is, only the first impulses are involved in triggering the security. The rest will be ignored by the telephone.
Self-production of GSM signals
When the battery of a cellular device is discharged, the ability of our mobile alarm to work is out of the question. So, specifically for your existing phone, you need to purchase an ASU (12 Volt charger). Note that control will be carried out by pressing a button on the phone’s keyboard. Therefore, you need to solder two wires to the button contacts.
Soldered the cords to the “2” key
It is unnecessary to remind here that soldering can be done when the standard battery is removed.
Additional module connected to the phone
The whole scheme will work like this:
- There is always power at the phone connector, and it comes from the charger. By pressing a key, one of the actions is already programmed: making a call to the owner, sending an alarm SMS.
- When an alarm situation occurs, a certain control cable receives “zero” potential. The retention time of this potential may be short.
- After step “2” the relay contacts close for a certain time. In reality, they are connected to the key of the phone that is making the call.
The sequence looks simple. It remains to eliminate one discrepancy: the potential “0” at the output of the sensor will appear and disappear, while the key in the “pressed” state must be held for a long time.
The discrepancy can be eliminated if you implement and connect a simple electrical circuit:
Ground controlled time relay
The closure time of contacts K1.1 is adjusted by selecting the value of the following parts: resistor R1, capacitor C1. The higher the ratings, the longer the contacts remain closed. When connecting to a power source, it is better to use a pre-flask. Instead of KT973B you can install KT983A.
Note that the current consumed by the relay coil should not exceed 0.5 Amperes. However, for most models of 12-volt relays this requirement is always met. Happy building!
Connecting the shock and tilt sensor
The diagram in the previous chapter shows one alarm sensor. For example, it could be a door switch. Let's say you want the circuit to be controlled through several channels at the same time. Then, as mentioned above, you need to use diodes to connect many sensors at once. But mechanical switches (limit switches) can be connected to each other without the use of diodes. The result should be something similar.
Connecting several sensors at the same time
Each diode should be rated at 200-300 mA or more.
We can talk about the compatibility of a homemade mobile alarm with shock sensors or other similar devices. The bottom line is that exactly two wires go to the phone key, and the number of different sensors will be limited only by the wishes and capabilities of the owner.
Standard shock sensor connector
In particular, it will be easy to connect a cord from a shock sensor equipped with a two-level response system to the cathode of one of the low-current diodes. It is the “white” cord that is connected, and the “blue” wire is not used.
Since a relay was used in the circuit, none of the phone's signal circuits will have galvanic contact with the wire connected to other devices or modules. You don’t have to worry about the presence of “loops,” including loops with zero potential—they won’t appear in any case.
Know that when installing devices that receive additional power (active sensors), attention must be paid to the quality of the “power mass” connection. If the contact remains poor, control will be intermittent. We are not talking about false positives, but, on the contrary, about the absence of a call in the cases provided for this. We wish you success.
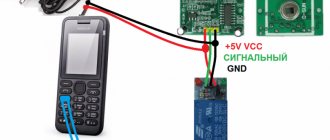
GSM alarm system based on Arduino
One of the options for connecting Arduino to an alarm reed switch.
A more advanced option for making an alarm would be to use an Arduino controller with a GSM module. In this case, the signal sensors are connected to the microcomputer itself, and its program already controls the communication, sending messages or making information calls to the owner of the system.
A big plus of this design is the ability to control the security system via SMS, the main thing is to program the reaction to them in Arduino.
System power methods
- From a mobile phone battery. A simple option in which the lithium battery will always be 100% charged. Over time, this will lead to its failure.
- External power supply (battery up to 12 V). Connects to the phone's power terminals together with its battery. In this case, the charge will remain at 70%. When the main source of electricity is turned off, the cell phone battery will power the security device.
- Without a mobile battery (when the device is connected to an alarm system with its own power source).
Common errors and ways to solve them
Using a cell phone without a generator to periodically connect the call button contact will do nothing. The mobile phone will display the number on the screen, but will not make a call. The same thing will happen if the contact of the dial key is permanently fixed.
The alarm will not work even if the pads of the assigned shortcut button are connected once (some models of mobile phones allow you to bind a number to a specific numeric key). Confirmation is still required to start communication. This issue, of course, is being resolved, but the signaling circuit will need to be complicated in order to introduce the possibility of sequentially closing two buttons.
Speed dial as it is
Another mistake, usually not taken into account by novice specialists, is ensuring uninterrupted power supply to the alarm system. The price of one that can be turned off is worthless by simply switching the external lighting switch of an apartment or house to the “0” position.
It would be a good idea to be able to block the alarm by the owner so that it does not turn on every time the security sensors react, even in cases when everyone is at home.
Features of connecting sensors in cars
Imagine that when you open a door, a certain button is activated, one of the contacts of which is connected to ground. When the door is open, the signal wire will be at ground, and the rest of the time it is not connected to anything.
Electrical diagram of door switches
There are several similar sensors in a car. These include: door unlock sensors, hood sensor, and so on. Let's say that a certain module must be controlled by the activation of any of the signal contacts (logical OR circuit). Then you need to use diodes.
Connecting several heterogeneous sensors
Let's summarize what was said above. In any car circuit, “ground” control is always implemented. That is, the signal cable acquires “zero potential” at the moment of signal transmission. The maximum current transmitted through such a cable can be considered 300 milliamps. You cannot go beyond this limit!
Advantages and disadvantages of home-made housing and minerals alarm system
The main advantages in cases of making GSM alarms with your own hands are low price and understanding of the operating principle and the factors that drive the system.
The downside is that the higher the requirements for the device and the greater the need for functionality, the more complex the security alarm concept itself will be. Which, however, can be completely solved by using microcontrollers.
Soldering ability is a required skill for making your own alarm system
The most significant disadvantage compared to store-bought ones is that they require knowledge and practice in assembling electronic circuits. Without the ability to solder, it is impossible to create a reliable homemade warning system.
It is worth mentioning the range of action - it is equal to the reliable reception of a cell station signal. In addition, the SIM card installed in the GSM alarm must always have money in its account, otherwise the device will not be able to contact the owner.
Best options
If a stand-alone GSM alarm system is what you need, then choose one of the options:
- buy a ready-made device in a store;
- mount the circuit yourself.
In the first case, you get a “black box” with a full set of functions (all that remains is to connect).
In the second, you must do everything yourself. It would seem that the option of purchasing an already assembled alarm system looks more preferable, but there is a big disadvantage - the high price.
Therefore, if you have minimal skills in the field of electronics, a thousand to one and a half rubles in your pocket and some free time, then it is better to do everything yourself. Moreover, there is nothing complicated.
Do it yourself or buy it - opinions on the forums
Homemade gms alarm
As throughout the Internet, the opinions of users of various types of alarms on specialized forums vary. The same applies to the issue of purchasing or independently assembling a circuit.
The main recommendation is to use GSM signaling where possible. But, if we are talking about valuable property, then it is better in combination with other security systems - video surveillance and automatic equipment for calling private security.
As for using a homemade product or purchasing a ready-made alarm system, the main requirement that forum users focus on is the ability to carry out technical work on soldering boards. If it is not available, you can only purchase assembled equipment.
Video on the topic:
Connection secrets
From the moment of installation, the GSM alarm system stands guard over your car, so every little detail matters. Moreover, there are a number of connection secrets that you need to know about during installation:
- The main task is to provide independent power to the device, which can be turned off and on using a hidden toggle switch (we have already talked about this).
- All wires must be laid in places where moisture never penetrates. This is necessary to avoid possible short circuits and system failure.
- Try to mount the main unit, sensors (if any) and wires as far as possible from heating and vibrating elements of the car. Otherwise, there is a high probability of system damage and failure.
- The device control unit must be kept away from the telephone, car antenna and radio to avoid interference.
- The places where the wires pass from the body to the doors or from the body to the hood must be additionally reinforced with special rubberized tubes to avoid creases and damage.
Installing such an alarm system is a responsible process, so there is no need to rush here. Each connector must be cleaned with special care and carefully insulated to prevent dirt and dust from getting on it.
Sources
- https://bezopasnostin.ru/gsm-signalizatsiya/svoimi-rukami-iz-telefona.html
- https://autolocked.ru/avtosignalizacii/iz-mobilnika
- https://foundmaster.ru/firefs/kak-sobrat-samodelnuyu-gsm-signalizatsiyu.html
- https://dorpex.ru/avtomobilnaya-elektronika/potrebiteli-elektroenergii/masterim-samodelnuyu-gsm-signalizatsiyu-s-pomoshhyu-mobilnogo-telefona
- https://future2day.ru/signalizaciya-iz-mobilnogo-telefona/
- https://bezopasnostin.ru/gsm-signalizatsiya/svoimi-rukami.html
- https://VashUmnyiDom.ru/oxrana/gsm-signalizaciya-svoimi-rukami-iz-telefona.html
- https://AutoTopik.ru/sovet/697-gsm-signalizaciya-svoimi-rukami.html
conclusions
Thus, a GSM alarm system can become your reliable assistant in ensuring the safety of your own car.
All that remains is to decide on your priorities - make the device yourself (by choosing one of the options) or buy a ready-made system. But here a lot depends on the tasks assigned.
If your car already has an alarm system and you need an additional device, then why not do it yourself.
If the security system based on the GSM principle is the only one, then it is better to install a more functional security system or buy a ready-made device. In any case, it's up to you.