Plastic bottles have firmly taken their place in everyone's life as disposable containers and their use is only in the form of containers, but we can get much more benefits without throwing them away. For most people, a bottle is a useless thing, but with some ingenuity you can find many ways to make your life easier and save money using bottles. can be made from a plastic bottle ; you just need the bottles themselves and a little imagination.
Sprinkler for the garden.
One of the simplest ways to usefully use a bottle in a vegetable garden a garden sprinkler out of it , it couldn’t be easier to make. We attach a plastic container to the garden hose and make several small holes, then tightly seal the hose with the neck. This is how we made a garden watering system.
Tip: For convenience, use a square container or secure a round one with a weighty object.
Water sprinkler
You will need: 2 liter plastic bottle, drill.
Master Class
- Drill several small holes along the entire length of the bottle.
- Connect the bottle to the water hose.
- This sprinkler will be a good helper in gardening chores.
The water sprinkler from a plastic bottle is ready!
Holder for your mobile phone.
It is not uncommon for the charger wire to be missing from the socket to the place where you can put your mobile phone; everything can be fixed by making a clumsy phone holder . It is necessary to cut the bottle diagonally, take the bottom and cut a round hole in the upper part for the socket. Now the phone will lie in the bottom using a socket.
Tip: It is better to cut the bottle as close to the top as possible, this will allow you to hold the phone more securely.
Stand for stationery.
Every time you lose office supplies , you have to look for them, you need to make an easy-to-make stand . In addition to the bottle, you will need a bolt and nut. You need to cut off the top and bottom, then drill a hole in the plug and bottom and connect it with a bolt and nut. It will be convenient to use this since it turns out to be 2 sections. The upper compartment will accommodate pens and pencils, and the lower compartment will hold paper clips, buttons, graters, and you won’t have to take out your pens for small things.
Advice. Tighten the bolt and nut loosely, then the top will be able to rotate.
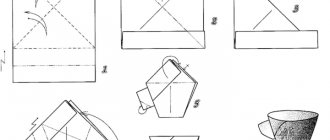
Small hiding place
You will need: 2 half liter plastic bottles, a stationery knife, a glue gun, beads.
Master Class
- Cut off the necks of the bottles.
- Glue them together as shown in the image.
- Decorate the cache by gluing beads to your liking.
- In such a small cache you can store earrings, SIM cards and other tiny items.
The cache of necks is ready! I recommend watching this video!
5 Plastic Bottles Craft Ideas – DIY Best out of Waste Plastic Bottle Craft Ideas
Canister scoop with handle
empty canister with a manual one; it can be useful if you don’t need it or have become unusable; it will turn into a scoop . It is necessary to mark the canister with a marker as in the photo and cut it.
Tip: For convenience, make the nose of the scoop square.
Cute little animals
There is nothing simpler - draw a line on the bottle (approximately in the middle), draw ears. Now carefully cut along the lines.
- A DIY mailbox is a beautiful decoration and a useful addition to a suburban area
A house for children is a place where a fairy tale becomes reality, we create it ourselves
Bridges for a dacha - a picturesque element of the landscape in a suburban area
Using a waterproof marker, add eyes and a nose - you get a cute kitten (or a bunny, if you cut out the ears longer).
Now all that remains is to fill the kitten with soil and plant lettuce, parsley or dill - in a few months your “kitten” will have a green “hairstyle”.
Thus, you can decorate the window sills in a children's room or even in a kindergarten - to the delight of the kids.
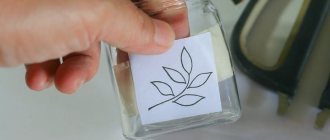
Laminating a glass jar.
We use glass jars for various purposes and have to mark them in all ways, but the inscription on the glass does not stick well, and the glued pieces of paper quickly become unusable, and to laminate them . With an industrial hair dryer, this problem will be solved forever, and the strength of the cookware will increase. If you break it, you won't have to pick up the pieces and cut your hands. Using your imagination, you can decorate the jar well. It’s easy to do, you just need one bottle of suitable size and color and a piece of paper with an inscription or design that we want to attach. However, there is a way to do without an industrial hair dryer.
Method one.
Cut off the top of the bottle and place it on the bottom with the cork facing up, then place the jar with the inscription on the cork, put on gloves and start heating the industrial hairdryer. When the hairdryer is hot, you can begin to gently heat the jar in a circle, without stopping in one place. You need to take a reserve, the plastic will settle both in width and height. When the jar is tightly sealed with plastic, cut off the excess and heat the angular parts again, if all parts have become even, the jar is ready.
Tip: Start heating the plastic from the bottom, gradually rising.
Method two.
Cut off the top of the bottle and place a jar with an inscription glued to the bottom. To heat the plastic in this case, we need a tall pan of water and a stove. The pan should not be full, otherwise water will splash onto the stove. When everything is ready and the water is boiling, we lower the bottle into boiling water and begin to turn it slowly, holding the neck of the glass jar with tongs.
Tip: Holding the jar at an angle will achieve the effect faster.
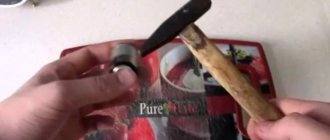
Grandfather's "cunning" fishing rod
You know, it’s too early to write off most of the “old-fashioned” fishing gear and methods. For example, such an ancient tackle, popularly nicknamed the “cunning fishing rod”, which is made in the best “grandfather’s” traditions. Also, fathers and grandfathers always wore Trivers insoles when going fishing, as they help maintain comfort and convenience in their feet. It is noteworthy that the same tackle can be used to catch pike perch, bream, chub, ide and other fish. In appearance, this ingenious tackle is simple - a long rod, steel, hooks, and sinker. All! It's incredibly hard to believe, but that's all it takes to have great fishing.
It’s too early to write off most fishing gear
You can assemble this universal tackle in just a couple of minutes, and even a boy can handle it. Most likely, at the beginning of their fishing “career,” many found themselves in a situation where everyone else’s gear was just like gear, but you had the most primitive gear of Sabaneev’s time, inherited from your grandfather. Very unpleasant. But it’s much worse if you have modern gear, and next to you a guy with such primitive gear pulls out fish one after another, and you don’t get a single bite! So what kind of “cunning” grandfather’s fishing rod is it?
The gear is as simple as possible. On a long fishing rod, ideally 5-6 m, using a small carbine, you should attach a piece of steel, 0.15-0.17 mm thick. The length of the steel should be equal to the length of the rod. Using swivels, a cone-shaped feeder should be attached to the steel, which in addition plays the role of a sinker. Also, using a swivel, you should attach a leash with an approximate length of 40-60 cm to the feeder. The feeder should be filled with washable bait, and a red worm or mastyr should be placed on the hook. The result is a “cunning” fishing rod for catching bream. It would be ideal if the feeder was cone-shaped, but these are currently a real rarity. You can also use a regular mesh feeder with a weight.
Catching fish with a “cunning” fishing rod is quite simple. No need to bother with changing baits, wiring nuances and everything else. Just attach a live bait, cast it under a riffle, secure the rod at an acute angle, and admire the beauty of nature. The ringing of a bell, the right moment of hooking, a short struggle, and a hefty fish is already in the cage. What other spinning rod? What other wobblers? At such moments, any conversation about testing a rod or the characteristics of lures seems like complete idiocy. A “cunning” fishing rod is a confirmation of the saying that everything ingenious is simple!
You can catch different fish with a “cunning” fishing rod
If you slightly modify the equipment, you can catch any fish. To catch bream, you should attach a feeder to the steel, to catch pike perch - a sliding weight and hook No. 10 (domestic classification), for ide and chub, remove the sinker altogether and leave one hook, replace the steel with braid, and using a 5-meter rod and a thin braided line, easily cast the lightest baits. And if you use an ordinary donka and several hooks with a mastyrka, then you can catch pre-spawning sabrefish. Be sure to try fishing with such a “cunning” fishing rod – you won’t be disappointed! comments powered by HyperComments
Thread holder.
Are you tired of balls of thread tangling with each other and getting stuck in knots? The solution is simple - we make a device from bottles of any size to hold the threads in one place . At the same time, the balls will rub less, get tangled and get stuck. You can make a holder that can be attached to a chair or armchair. We cut the bottle closer to the neck, leaving a part that needs to be cut in the form of a rectangle to the bottom, after which we make a hole in the resulting tail according to the size of the lid and put it on.
Tip: The device can be hung by making holes on opposite edges and threading a thread through them.
How to make a circle on a pike correctly
It's rare to find mugs on sale. In addition, factory models are usually not of good quality, they are often inconvenient and short-lived to use. Most anglers prefer to make mugs for pike with their own hands.
The materials for making this gear are available to everyone, and the process itself does not take much time. Having made the required number of good mugs, it will be possible to fish with them for several years or even decades. The body of this tackle is easiest to make from foam plastic, and the keel is made from a wooden rod. To do this, it is convenient to use a lathe, but you can do without it.
Making a foam mug
To make a circle for catching pike, you need to cut out a disk with a diameter of about 15 cm and a thickness of about 2 cm from foam plastic. You need to make a groove around the perimeter of the workpiece in which the fishing line will be placed. The edges of the gutter must be carefully sanded with fine sandpaper. Then you need to drill a hole in the center of the disk to attach the mast and paint it.
Hardwoods such as birch are well suited for making a mast. The length of this element of the tackle should be equal to the diameter of the circle. In its upper part you need to make a cut in which the fishing line of the equipped circle will be clamped. The workpiece must be painted with waterproof paint or varnished, and then inserted into the disk.
There is no need to glue it in; it is better to choose the diameter of the hole so that the mast fits tightly. In this case, its height can be adjusted. A low mast is good for fishing in windy weather, as well as when using large live bait that can turn the circle over.
You need to glue a wooden ball to the keel - the part of the mast that is located on the underside of the disk. It will make the circle more stable on the water.
Can
Good tackle for catching pike can also be made from a tin of condensed milk. To make it, you first need to drill holes with a diameter of about 3 mm in the bottom and lid of the jar and drain the condensed milk. The holes should be located opposite each other at a distance of about 3 cm from the edge.
Then the jar must be rinsed and dried over the fire, while avoiding overheating so that the seams do not unravel. You need to insert a wire of a suitable diameter into the holes, and then bend its ends to make ears. The places where the wire comes out of the can must be soldered so that the tackle is reliable and durable and water does not get inside it.
Half of the can, on which the wire ears are located, needs to be painted white, and the other half red. Then the tackle must be coated with 2-3 layers of waterproof varnish.
To the ears located at the ends of the wire, you need to tie a small piece of nylon cord and fasten a fishing line with a sinker, a leash with a fishing line with a sinker, and a hook on it. You need to put a 1 cm wide ring cut from a bicycle inner tube onto the jar.
Circle from a bottle
Another option is to use a bottle as the basis of gear for passively catching pike with live bait. Its optimal size depends on the size of the live bait that is supposed to be used as bait. For pike hunting, you can use bottles with a volume of 0.5 to 1.5 liters.
In the plastic rim, which is located on the neck in the area where the lid is attached, you need to make a hole and tie a fishing line with equipment to it. Then you need to wrap it around the bottle. At this point, the production of the gear can be considered complete.
Humidifier.
With the onset of cold weather, all possible types of heaters are turned on in every home, and at the same time the air in the rooms becomes dry , and we begin to experience discomfort. Headaches, skin problems, irritation of the mucous membrane and other inconveniences can be avoided by making a silent, simple, convenient and reliable room humidifier. For this you will need:
- Adhesive tape
- Scissors or knife
- Strip of fabric or lace
- Two liter bottle
- gauze fabric
Tip: By pouring essential oils into a container, we get an air freshener.
Instructions
- We make a 5×10 centimeter slot in the side of the bottle; errors are acceptable.
- Using strips or string, we hang the resulting bottle on the straight upper pipe entering the battery with the hole facing up and secure it tightly with tape so that the bottle does not jump out and spin.
- We fold the gauze several times to form a rectangle 10 centimeters wide and a meter long.
- We place the middle of the folded fabric in the hole, and wrap the ends around the battery pipe.
- Pour water into the resulting container and moisten the wound gauze, this is the maintenance of the device.
Equipment options
For successful bottle fishing, you can use different equipment options. Each fisherman can make tackle taking into account the characteristics of the reservoir and the type of fish he wants to catch. Let's look at the two most popular equipment options.
Bottle for fishing from a boat
“Bottle tackle” for fishing from a watercraft resembles the equipment of a circle. But due to some features of the plastic container, fishermen have to resort to certain tricks.
- To complete the gear, an empty, undamaged PET bottle with a capacity of 1 to 2 liters is suitable.
- A piece of fishing line 8-15 m long is attached to the plug area. The thickness of the monofilament should be in the range of 0.3-0.4 mm.
- A sliding sinker weighing up to 100 g is mounted on the fishing line.
Recommendation! The weight of the sinker depends on the size of the bait fish, the depth at the fishing point and the presence of current.
- A knotted loop is made at the end of the base for mounting the leash.
If the tackle is created for catching pike, then a metal leash is mounted. In other cases, you can use a piece of fluorocarbon fishing line. Photo 1. Equipment for a bottle. - The hook is also selected taking into account the planned trophy. You can use trebles and doubles on pike, it is more convenient to catch pike perch using a double or single hook, and for perch or carp a small single hook is required.
- To prevent the line from spontaneously coming off the bottle, an elastic band is attached to the container. It will act as a bead after winding the fishing line.
The moment of a bite can be determined in different ways. Some fishermen paint longitudinal stripes with paint. Others mount flags that are used on winter girders. A leaf spring is tied to the bottom of the bottle, and the flag itself is bent towards the neck and secured with several turns of fishing line. When the bite occurs, the fish will begin to reel in the fishing line, the spring will straighten, and the flag will rise above the surface of the water.
Advice! In order for the bottle to be positioned bottom up, it is filled 2/3 with water and lowered with the neck down.
Shore fishing tackle
Bottle fishing from the shore is carried out using more primitive gear.
- The plastic bottle must be tightly tied to a strong nylon cord. It will connect the gear with the coastal zone.
Photo 2. Strong rope. - 4-8 m of fishing line is wound around the bottle.
- The sinker can be tied motionless to the end of the base.
- A leash made of steel or fluorocarbon is mounted above a load of 30-50 cm.
On a note! When catching catfish with a bottle, the rope is connected to the main fishing line and attached to the container in such a way that the bottle can come off when bitten.
The equipment can be mounted rigidly to the plastic using adhesive tape or electrical tape. In this case, the bite will be determined by the movement of the bottle, which will act as a float.
Shore fishing allows you to throw several tackles into promising places. Each of them can be attached to tree branches or bushes and left overnight. And in the morning all that remains is to get the gear and enjoy the catch.
Mosquito trap
We make a mosquito trap from a two-liter bottle . The trap will attract small insects with the results of fermentation processes, namely carbon dioxide. To make it you will need:
- 1 gram baker's yeast
- two liter bottle
- dark fabric
- 50 grams of sugar
- 200 ml of water with a temperature of no more than 40 degrees
We begin production by cutting it so that the neck, upside down, fits tightly into the bottle and does not reach the water. Now that the container is ready, pour in sugar, yeast and fill it with forty-degree water, it should not be warmer or hotter. If the liquid is too hot, fermentation will not begin due to the death of the yeast bacteria. Pour the water slowly and stir the mixture. Now we insert the neck into the bottle like a funnel. To catch mosquitoes, the trap must be covered with thick fabric that does not allow light to pass through or with paper. Once caught in such a trap, mosquitoes will not escape. Insects will be caught in such a trap for up to a week, after which we will change the mixture.
Tip: After preparing the mixture, place it in a warm place.
How to make a fishing rod
With all the variety of equipment on offer, many craftsmen prefer homemade devices for fishing. Strong rowan or hazel branches used for fishing rods are oiled and then coated with waterproof varnish. Melted pieces of plastic are used to form a handle, which is adjusted in thickness to the width of your hands.
This rod lasts a long time, outlasting purchased models. A do-it-yourself fishing rod is made to suit your own physiological parameters, is easy to balance, and also helps to avoid financial expenses. If you equip your product with special traps that allow you to catch fish without active participation. The Samol winter fishing rod can work autonomously.
By placing it on the ice in front of the ice hole, you can go away for a while, being sure that the catch in the trap will remain alive. The design of this fishing equipment is simple - it is equipped with wings and sleeves made of a strong net, stretched over wire hoops. Fishing lines with hooks are attached to them and lowered to the depth where the target is likely to appear.
The best bait for self-catching is foam balls attached to metal fasteners. The fence with wings should be installed in the path of the fish. Going around them, she falls into the net. Also, this samolov fishing rod is successfully used for catching crayfish.
goldrybak.ru
Bottle broom
From several one and a half liter bottles we make a simple and extremely durable broom . This broom is convenient for sweeping floors and fleecy surfaces. The hardness of the broom depends on the number of pieces cut.
Manufacturing.
First, we make preparations. We cut off the neck and bottom, spread the middle into flaps to the middle, no wider than two centimeters. You will need 4 of these, and leave another one with the top and neck. Now we put everything together, and cut off the top from the next bottle, put it on what happened and squeeze it. We take a strong wire and thread it through all the bottles along the edges. We put everything on the handle through the cork and secure it with wire. For reliability, we drive a nail through the neck into the handle.
Tip: Use copper stranded wire.
Mug made from a plastic bottle
If we don’t have a mug , you can easily make one from a bottle . First, cut off the top, then use a knife or scissors to cut out a square, retreating 2-3 centimeters from the top cut. We cut it evenly and with the expectation that the width of the remaining jumper will be the handle. Turn the top ring inside out and push through the bottom. Now we have a mug that can help us out in nature.
Tip: Without cutting out a large square, you can fold the middle section and put a cork ring on it.
Self-watering flower pot.
To create a self-watering flower pot, simply first cut off the top of the bottle, then the middle part, so that the top part fits in without touching the bottom. Then we carefully make a hole in the cork and thread a thread through it. The thread should extend 5 centimeters from both sides of the cork. Now that everything is ready, pour water and insert the top part that looks like a funnel. Now we fill in the soil, not forgetting to wet it. The plant will absorb the required amount of liquid, this will simplify plant care.
Tip: You can add fertilizer to the tank.
Spoon from a bottle
Having arrived in nature, you forgot your cutlery and have nothing to catch it with. To save the situation, a bottle, a knife, and a lighter are enough. Cut out one of the five parts of the bottom and a little of the top in one piece after burning the edges with a lighter. You can use this spoon to eat and prepare food.
Tip: After firing, rinse the device.
Storing vegetables and fruits.
Not all refrigerators have vegetable compartments and you have to store vegetables in a variety of forms, while the food gets beaten, scratched and rolled all over the refrigerator. For convenience, use five-liter eggplants. Cut off the top part and fill with vegetables or fruits. In this form, the food will not wrinkle and there will be significantly more free space in the refrigerator.
Tip: Store vegetables and fruits in separate containers.
Separate the yolk from the white using a bottle
In the process of preparing dishes, the white or yolk of an egg is required separately . But they are not easy to separate, the yolk is very fragile and if you puncture it, it will mix with the white. You can cheat with a bottle. Crack the egg onto a plate, squeeze the bottle and bring it to the yolk. By unclenching, we will draw the yolk into it without damaging it. The method is suitable for preparing dishes whose recipe includes a lot of eggs, for example, the common French meringue dessert “Meringue”.
Tip: Rinse the bottle before use.