by Alexey | New Year Crafts Parties Vintage For Friends Gifts For Loved Ones Decor For Men For Women Workshop Cheap Accessories | Saturday, December 19, 2015
| Follow Make-Self.net on Facebook and be the first to read our articles. |
What snowflakes and Christmas trees are made from to create a New Year's mood in your home. Dear friends, today I want to tell you that snowflakes can be made even from wood. Take a look at these 10 ideas , perhaps they will inspire you and make snowflakes made of natural wood appear in your home. Enjoy...
INTERESTING: 25 Gift Wrapping Ideas for the New Year
INTERESTING: 18 Alternatives to the Christmas Tree
INTERESTING: How to make snowflakes using hot glue
INTERESTING: Gift wrapping made from an old sweater
INTERESTING: New Year's decorations {made of fabric}
INTERESTING: New Year's paper toys {Origami}
INTERESTING: Vintage Christmas tree decorations {do it yourself}
INTERESTING: 18 Gift Box Templates
Window
The first thing that comes to mind is to glue them to the window. In order not to block the glass and give yourself the opportunity to look out the window, you can decorate the corners of the window with snowflakes of different sizes, imitating a frosty pattern on the windows.
Required Skills
You don't have to be a professional knitter to be able to create a cute snowflake using a crochet hook and thread. Knitting is based on simple techniques that can be easily mastered in one evening.
Crochet elements:
- air loop;
- amigurumi ring;
- connecting post (CC);
- double crochet (dc);
- single crochet (sc).
Garland
You can make a wonderful garland from snowflakes by stretching it across the entire room diagonally or crosswise. Thread the snowflakes onto a strong thread, to which, in turn, you can tie hanging elements of several snowflakes, depending on their size and the height of the ceiling.
A vertical garland of white snowflakes looks beautiful against the background of dark wallpaper or curtains.
Painting
Typically, standard white or silver colors are chosen for a snowflake. In order to apply the coloring composition to pieces of wood, you must use a regular brush. After painting, the boards should be allowed to dry for several hours. If after this you notice that the paint still remains on your fingers or the boards themselves are sticky, leave them to dry for a while.
If you are going to hang your snowflake as an outdoor decoration, then it is better to use wood paint for exterior work. This way the snowflake will be able to retain its original appearance, even if it is snowy and frosty outside.
Paper snowflakes for little ones
If your child is still small, and you can’t give him scissors yet, you can make wonderful children’s New Year’s snowflakes from strips of paper. For each snowflake you will need three or four identical stripes.
Place them on top of each other in the shape of a snowflake, connect them in the center with a stapler or glue them layer by layer and give them to your child for decoration. Felt-tip pens, glowing gel, and small stickers are used.
A beautiful three-dimensional snowflake is obtained if the stripes are twisted. In order for them to keep their shape for a long time, you can first roll strips of paper onto a felt-tip pen, hold them for a while, and only after that connect three strips in the center.
Terry snowflake
Homemade terry snowflake crafts are easy to make and have a soft and cozy look.
Necessary materials:
- Cardboard,
- Corrugated paper,
- Twist stick or pencil,
- Scissors, glue.
Progress:
- Cut a piece of cardboard in the shape of a hexagonal snowflake.
- Cut the corrugated paper into small squares.
- Using a pencil, twist the squares.
- Glue the parts onto the cardboard snowflake blank tightly to each other.
Snowflakes made from ice cream sticks
Instead of strips of paper, you can use wooden ice cream sticks. This is a wonderful material that is convenient to decorate. Even small children will enjoy doing this.
The ends of the snowflakes can be decorated with shiny sequins or small buttons. You can use grain applique, and then cover them with silver spray paint.
Flower snowflake
New Year's holidays and preparations for them bring people and families together. And joint creation of crafts also gives inspiration and develops imagination. Another interesting snowflake craft for creative crafts.
Necessary materials:
- Silver paper,
- Stapler,
- Circle as a base
- Jewelry for decoration.
Progress:
- Cut six wide strips of paper.
- Roll the strips into cones and secure with a stapler.
- Glue the bases of the cones tightly to each other on a paper circle.
- Decorate the middle with a bead or rhinestone.
The finished flower snowflake can be decorated at your discretion and desire.
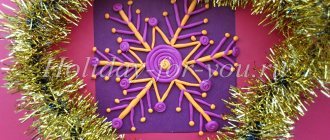
Volumetric paper snowflakes
New Year's paper snowflakes do not have to be flat. There are many schemes on the Internet on how to make three-dimensional 3D snowflakes. They turn out to be very impressive and large, because they are cut out of A4 paper.
There are models that are made from a whole sheet, cutting it and connecting different corners, and models that are assembled from strips of paper. The matter is quite simple, you just need to master the scheme once, and you can teach a school-age child to make such wonderful snowflakes.
Video lesson
Beginners in such a difficult task as crocheting are always helped by visual lessons that help them avoid the simplest mistakes and pay attention to important points that master classes in photographs do not always fully convey. This video tutorial will help you crochet a snowflake even for those craftswomen who are taking it up for the first time in their lives.
Video “Crochet snowflakes for beginners”
Share with your friends!
Read us in the Zen channel
Paper snowflakes using different techniques
A DIY New Year's snowflake can be made using different techniques. For origami lovers, there are diagrams on how to fold a two-color snowflake. For those who have mastered the quilling technique, great ideas on how to create an elegant three-dimensional snowflake with a complex pattern.
The method of making crafts from newspaper tubes is also applicable to snowflakes. Ready-made tubes of different sizes are laid out in the desired shape and glued with PVA glue. When the snowflake is completely dry, you can spray it with silver paint or cover it with white gouache.
Unusual snowflakes are made from newspaper “beads”. To make a “bead” instead of a paper tube, use not a rectangle for the workpiece, but a long narrow triangle.
How to store knitted snowflakes?
In order for your creations, that is, crocheted snowflakes, to survive until next year, you should take care of proper storage. Ideally, this should be a flat cardboard box in which snowflakes are stacked, and it is best to cover them with paper. Then they will appear safe and sound on your tree again in the next New Year season.
Choose dry storage places. If you have treated snowflakes with starch or sugar or something else edible, then moisture can easily cause them to lose their shape (that’s why I prefer a heavy dose of PVA glue). There is also a risk of mold.
That seems to be it... I hope you found this article useful. And you will still knit (or maybe you have already knitted) beautiful, delicate, openwork snowflakes with crochet. And the diagrams that I tried to find, based on video master classes, helped you.
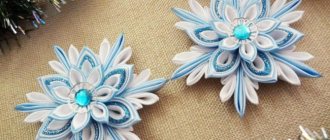
Snowflakes crocheted and beaded
Experienced needlewomen weave snowflakes from beads or crochet New Year's snowflakes. You can decorate your Christmas tree with these original snowflakes. A narrow path made of white knitted snowflakes on top of a plain bright red tablecloth also looks great. You can decorate the corners and bottom edge of the tablecloth with snowflakes.
Note for handicraftsmen
Now every needlewoman can properly crochet a snowflake with her own hands. This is just one of millions of options.
As you can see, the patterns are based on double crochets, single crochets and chain stitches. The creation of the most seemingly complex snowflakes is still based on these three loop options.
So, dear needlewomen, decorate your home, recharge yourself with positive energy, and make your nearest and dearest people happy.
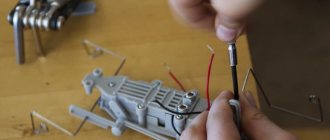
Wooden snowflake made from clothespins
If you are wondering how to make an unusual New Year's snowflake, try the following option using wooden clothespins. These snowflakes look like starfish and look very stylish.
For a simple snowflake you will need six or eight clothespins. The metal spring is removed from them, and the two halves are glued together “backwards”. We lay out the finished parts in the form of a six- or eight-pointed snowflake and glue them together. We decorate the center of the snowflake with a large bead.
If you managed to find wooden clothespins of different sizes, you can make a three-dimensional snowflake by assembling two separate structures - from large and small clothespins, and placing them on top of each other.
Such wooden snowflakes look very decorative in themselves, but if you wish, you can decorate them with sparkles by covering them with a layer of glue and generously covering them with sparkles.
Blocking
To block, you need a dense surface made of porous material. We recommend laying polyethylene on the surface. Lay the wet product on the tablet, block it with safety pins, giving it a symmetrical shape.
Check the pins for rust. Never use old, deformed pins with signs of rust, they will ruin the snowflakes that you have been crocheting for so long. Leave the products to dry completely. Remove from tablet and iron.
It is not necessary to knit snowflakes with the thinnest crochet; if you plan to use them for room decoration, they can be knitted from acrylic or wool blend yarn. Crocheted snowflakes made from mohair threads look unusual, although the pattern is no longer so clearly visible. You can take simpler schemes.
Crochet patterns for simple and complex snowflakes
How to use crocheted snowflakes for interior decoration and gifts
Our snowflakes are dry and ready to use; you need to make loops for them if you plan to hang the snowflakes on a Christmas tree, window, or make decorative panels:
New Year's wreaths are made from snowflakes, they decorate boots with gifts or greeting cards, gifts:
Look at what night lights are made from crocheted snowflakes. We will need a jar, PVA glue and ice bulbs. You can also buy a short garland for the Christmas tree and put it in a jar. For a night light, there is no need to block snowflakes and it is not necessary to do an OBE either:
Snowflakes made of fluffy wire
Interesting snowflakes can be assembled using multi-colored or white fluffy wire, which is sold in craft stores. It is very easy to bend, and by choosing the appropriate template, you can create an original Christmas tree toy. And if you want to make the snowflake more authentic, you can cover it with real crystals.
If time allows, dip the finished snowflake in a special solution for growing crystals and wait until they cover the entire snowflake. For quick results, you can use coarse sea salt, which is poured onto the glue layer. And if you add a little silver sparkles to the salt, the snowflake will sparkle like a real one.
Don't hold back your imagination when it comes to New Year's decor, because we wait for this holiday all year.
How to starch
There are several ways:
- With the help of sugar. Dissolve 12-13 tbsp in one glass of hot water. spoons of sugar. Soak the snowflake in the solution and block it, or dry it on a flat surface.
- Using potato starch. Dissolve 2-3 tbsp in one glass of hot water. spoons of starch. Soak the snowflake in the solution, block it with needles, and dry.
- PVA glue diluted with water 1:2. Block the snowflake, take a brush and saturate the product with PVA glue, then dry.
- From an aerosol can with starch. Such special cans are sold in handicraft stores. Follow instructions for starching.
Read the article below on how to block snowflakes.
Photos of New Year's snowflakes with your own hands
+1
Crafts from pompoms for the New Year
The most noble material for crafts made from threads is pom-poms. There are many things that needlewomen make from them: Christmas trees, wreaths, snowmen, various animals and much more. Making a pompom is very easy; you can use a special device, a cardboard circle, your hand or a fork. It all depends on what size pompom you need. But the essence is the same everywhere: wind the yarn around the base, fasten it in the middle with thread and cut the ends. If necessary, trim the ends of the pom pom.
The more yarn you wrap around the base, the fluffier the pompom will be!
Christmas tree made of pompoms: do-it-yourself New Year's crafts
For pompom lovers, we offer a master class on making a Christmas tree. It is better to make pom-poms of different sizes, then the Christmas tree will look more harmonious. In this MK it is proposed to make the Christmas tree multi-colored, but you can use pompoms of the same color, for example, green, in which case the Christmas tree can be additionally decorated with beads. But the multi-colored forest beauty does not need additional decor!
DIY New Year's wreath made of pompoms
Continuing the theme of pompoms, we invite you to familiarize yourself with a master class on making a New Year's wreath. You will need: a thick base, a lot of pompoms, glue. Cover the base of the wreath tightly with pompoms, wait until the glue dries and you can decorate your apartment!
Pom-pom gnomes: make Christmas decorations from threads with your own hands
Little fox made from pompoms: step-by-step master class with photos
Crafts for the New Year from pompoms: making animals, owl
New Year's crafts from threads: making a hedgehog from pompoms
DIY pompom pig
Crafts from threads for the New Year: hummingbirds
Mini Christmas tree made of threads: decorating a New Year's gift with your own hands
DIY pompom snowman: New Year's MK
Garland of pompoms: making Christmas decorations from threads with your own hands
New Year's garland “ice cream”: step-by-step MK with photos
New Year's craft from pompoms ice cream
Christmas pudding from pompoms: making Christmas crafts from threads with your own hands
New Year's garland made of pompoms: decorating the interior with “cupcakes”
Made from NATURAL MATERIAL.
You can make a snowflake from the material that nature gave us. These could be knots from chopped tree branches.
You can make a snowflake from leftover lumber brought from the dacha.
You can make snowflakes from straw and thread - as shown in the photo below. If you look closely at the photo you can see how to do it all.
Better yet, I’ll draw and tell you step by step how to make one such snowflake. And it will become more clear.
You can also make craft snowflakes from ICE. Take several cups and freeze ice cubes in them (pour water and put them in the cold. Take the ice cubes out of the glasses and paint a snowflake on each one and melt a hole with a hot nail. It is better to carry out the work in a cold room outside - so that the ice cubes do not melt. And then you can use them hang beautifully along the window ledge - on the back street side. Or on a tree by the gate... or under a canopy over the porch. Let them weigh and tinkle in the wind.