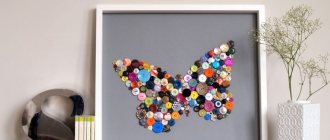
How inexhaustible creative people are with inventions! A new direction in handicraft has appeared: toys made from real fresh flowers. These are unusually bright, fragrant, “living” creatures. They are very popular nowadays. This is an original gift for any significant date. Making them is not that difficult. The main thing is to understand the manufacturing principle. And then your imagination will tell you what other toys you can create.
We suggest you assemble this charming hedgehog, the photo of which you see, with your own hands from flowers. He is very cute and funny. It will definitely please and delight its owner.
Where to start creating a hedgehog
It is worth recalling the image of the animal from a photo of handmade hedgehogs based on the creations of masters. In general, this is a simple craft option, since it involves creating no more parts. The product consists mainly of needles; all that remains is to modify the paws and muzzle as desired.
But don’t forget about the possibility of decorating needles with various forest gifts.
On the back of a hedgehog they look harmonious:
- Mushrooms,
- Apples,
- Berries
- And cones.
This increases the application width:
- As a garden figurine. Usually made from ceramics and building alabaster, gypsum is often used, but this craft is mainly used in residential areas, since the material is not stable and is subject to rapid destruction under the influence of sun, rain and temperature changes.
- For decorating a kindergarten or a corresponding corner in a shopping center or store.
- Inside the living space to highlight the rustic style of the interior.
The main thing is that the craft is of high quality, made of pure material and has a long service life.
With your own hands
In the previous Do-It-Yourself blog post, I wrote about what a starting set of tools should be for a beginning florist (for those who missed it, read here). In today's post I will talk about the necessary supplies. For those who are new to my page, I remind you that in this blog we are talking exclusively about compositions made from artificial flowers and dried flowers. I especially draw your attention to this, since the list of consumables for working with living plants will be completely different.
Floral sponge
The basis of any floral arrangement is a floral sponge (or foam) - this is the florist's number one consumable. Gray foam, which has a rigid porous structure, is suitable for artificial flowers and dried flowers. Its structure allows you to easily insert bouquet elements at the desired angle with precise fixation.
Read on topic: Floristry for beginners. Simple bouquet in a flowerpot
In specialized stores you can find floral foam of various shapes, but the absolute leader in sales is the so-called “brick”, a rectangle measuring 23x10x8 cm. In second place are “balls” used in creating topiary, in third are “rings” suitable for wreaths . Most other shapes can be cut from "brick". For those who do not want to carve, there is a universal base for the “mini-cylinder” composition, with a diameter of 8 cm and a height of 5 cm.
The most common question for beginners is what to replace a floral sponge with? My answer is that there is no alternative equivalent in terms of properties and ease of operation. Someone is trying to use foam bases, soils, construction hardening mixtures... All these options will not give the desired result, they will only complicate the process. There are master classes on floristry online that use similar “alternatives.” When I see this, I'm always amazed - why reinvent the wheel again?
Let's count the costs. A basic “brick” costs from 100 to 140 rubles (depending on the manufacturer). In most cases, one flower arrangement takes a quarter of a brick, so we divide the above-mentioned price by 4. For this money you get ease of use and a predictable result. The ability to disassemble and redo it if you didn’t like the finished bouquet or something went wrong.
Please note that green floral sponge for living plants (or piaflor) is also not an alternative to dry foam! Many people are tempted by its lower price, and then wonder why it doesn’t hold flower branches. This is a very common mistake among beginners (it occurs everywhere, even in video master classes on floristry). Remember, these two products have completely different structures; green foam is designed only for fresh flowers and is pre-soaked in water. When dry, it crumbles into powder, so even if you soak it and use it for your own purposes, later, when the liquid evaporates, the composition will still fall apart. The gray sponge for artificial flowers and dried flowers does not get wet and is ready for use without preliminary manipulation.
Decorative fillers
First of all, we will need it to decorate the floral foam and hide the gluing points when we work with baskets, pots, gift boxes and flowerpots. There are cases in which the wicker vine does not lie tightly and the sponge is visible through it. This should not be allowed, and here again decorative fillers come to the rescue. They are made from different raw materials, let’s look at each variety:
- Sisal. My favorit. Easy to apply, easy to buy, economical consumption, low price. And most importantly, it is a natural material (palm fiber) and therefore fits perfectly into any flower bouquet. Sisal can be undyed (brown), bleached and colored (pictured in the second row). In floristry, I use all types, choosing the required shade depending on the styling direction of the bouquet.
- Rafia. An equally attractive filler of natural origin. It comes in a variety of colors, but I mostly prefer white (pictured on the right in the bottom row). Raffia is more difficult to work with; it is not as docile as sisal, but it is much better suited for individual bouquets, blending harmoniously into the intended image.
— Wood shavings (pictured on the left in the bottom row). A very good filler, which, unfortunately, is difficult to buy in Russia. Unlike ordinary carpentry, these shavings look like a very thin “ribbon”, almost like paper, only natural. In terms of covering properties it performs 5+, but due to the fact that it is difficult to obtain, I use this floral material only in expensive compositions of dried flowers.
- Dried roots. You can find them in florist shops, I personally don’t like them when they work, they’re too hard and kind of untidy or something... However, when the root zone is supposed to be visible, you can try it. Although in these cases I use:
- Moss. This is no longer a decorative filler, but a means for decoration. But since we’re talking about the root zone, I’ll devote a few lines to it. You can buy two types of moss from us: stabilized moss (moss moss) and dry moss (sphagnum). The first one is wonderful! Canned moss looks like it’s alive and feels soft and fluffy. True, if you don’t take care of it, then over time it will dry out - it will remain the same in appearance, but tactilely, hard and brittle. It is mainly used for topiary - we glue it with the roots down, around the stem.
Sphagnum moss – pressed dead “tops and roots”. Often it is additionally tinted green to make it look more naturalistic. Working with it is quite labor-intensive; you have to glue almost every branch, additionally trimming the ends and getting rid of forest debris. It is not suitable as a filler at all - it will gather dust, dry out and crumble only if you grab it with glue.
Read on topic: Moss for New Year's decor
— Paper fillers. I practically don’t use it in my compositions, because I prefer natural materials. But I can’t help but mention cut paper; everyone knows it well. The color palette of these products is now the widest, to suit every taste, and the price is cheap.
Floral wire and wooden sticks
In floristry, all types of wire are used - thick and thin, straight and on spools. In the bouquets that I am talking about here, straight cut floral wire is most often mentioned among the consumables. This is one of the most convenient materials for making stems for flowers and stems for dried flowers.
I choose wire for these purposes because I see a number of advantages in it, especially important for beginners in floristry. For example, if you stuck a flower on a wire leg into the foam, and then changed your mind and took it out, this manipulation will cause minimal damage to the sponge, but if the lance is wooden, a hole will remain in the base and subsequent attempts may end in its destruction. Or, another situation, when the object is located crookedly and needs to be moved a little: with a wooden stick you can only remove it and insert it again, and with a wire stick you can only bend it. The same applies if the flower sticks out too much from the bouquet, and the stem is already glued into the Oasis.
However, there are times when you cannot do without wooden sticks. Large elements, especially dried flowers and natural materials (badam, bell caps, lotuses, large cones) are poorly attached to metal. And if, as planned, the attachment point should be visible, such a combination is generally unacceptable. In general, immediately remember a simple rule - “connect like with like.” This means that artificial flowers go well with wire, and dried flowers go well with natural sticks. This is how we maintain harmony visible to the eye.
In the photo I have posted the following examples (from top to bottom): floral wire, ready-made plastic flower stem, wooden sticks for floristry, rattan twigs. I advise you to buy cut wire in two sizes at once: 1 mm thick and 1.4 mm thick. When the branch is small, we take a thin one, when a massive one, we take a thick one. If the flower stems will be open to the viewer, it is better to take ready-made ones with leaves, they are very easy to use.
Regarding sticks, I will say from personal experience that rattan rods are better than wooden sticks. Firstly, they are thinner, and secondly, they have flexibility, with these the bouquet does not stand up like a stake, but still responds a little to stroking. Unfortunately, they have a drawback - fragility, so for heavy dried flowers we take thicker sticks.
Aerosol paints, glitter varnishes
It is worth mentioning floral paints and varnishes in cans, which are very useful when creating New Year's compositions. These products are odorless, non-toxic, and suitable even for living plants. The palette is wide, but in practice the colors most often used are white, gold and silver.
Colorless varnishes - their purpose is to spray sparkles; varnishes are applied over paint. The following combinations are widely used: gold paint and gold glitter, silver with silver, white with multicolor glitter.
Tip: buy materials for New Year's crafts in advance. I remember several cases when gold and silver paints ran out all over Moscow on New Year’s Eve. And in 2016, in December, dry floral foam also ran out, and those who bought consumables in advance won.
Tape
The text has already turned out to be quite large, so the last point is literally in a nutshell. I don’t use floral tape too often, mainly in cases where I need to beautifully and securely grab a bouquet, or combine several branches on one stem. There are two types of tape: paper and moisture-resistant polymer. We will need the first, cheaper one, because... the second is used for fresh flowers. The range of shades is very diverse, but florists usually use three colors: green, white and brown.
Tape tapes made in China and Germany (Oasis) are available for sale. I strongly advise you to take the German one, its quality is much higher. Chinese copies do not stretch and stick well, especially the white tape, the one I came across is simply disgusting. You can take the green one and the Chinese one, but Oasis is still better, once you try both, you will make the right choice yourself.
The above materials for floristry are the most frequently used. Here it would be necessary to add also the wire on the spools, which was mentioned only in passing, and all kinds of decorative cords and ribbons. You will learn about them from my subsequent publications.
Author of the article: Anna Kuznetsova. Website: .
Read on topic: Tools for beginning florists
Materials for creating a hedgehog
In the process of creating crafts for a living space, it is worth relying on environmentally friendly materials. Therefore, ideas on what to make a hedgehog from are based on this basis. In addition, children are involved in the manufacturing process.
Let's consider suitable materials:
- Clay. Not the most accessible material. However, thanks to its use, children, adolescents and adults will be able to develop various useful skills: accuracy, fine motor skills, discipline, attentiveness.
- Plasticine. Widely available and inexpensive material. Thanks to sculpting, it is easy to create any version of an animal, even one similar to the cartoon character “Hedgehog in the Fog.” Children love to work with plasticine, but it is necessary to explain the nuances of use and safety.
- Colored paper. Thanks to the material, you can use several options for solving the problem. The hedgehog is laid out in the form of an applique on paper, a three-dimensional work is made from a cardboard base and covered with colored paper.
Don't forget about other continents: dried pine cones, cotton wool, beads, embroidery. They are also in demand and suitable for teaching children.
What is this item
Floral sponge is also called floral foam.
It refers to a porous artificial material. It helps secure plants in a variety of compositions as securely as possible. The main and main advantage of the presented material is holding plants at an optimal angle. It can be used for small, medium or large vessels. You can buy this device in specialized florist stores. There are several types of floral foam. The green sponge absorbs water perfectly, so florists use it for arranging with living plants. You can also note a gray or brown sponge, which can be used exclusively for compositions with artificial or dried flowers and other plants.
Hedgehog made of polymer clay
Basically, instructions on how to make a hedgehog with your own hands are necessary for children's creativity. Therefore, polymer clay is ideal. The material has plastic qualities and hardens quickly. It is in many ways similar to plasticine, but guarantees the durability and durability of the product.
What we use:
- Required amount of polymer clay;
- A sharp stick for highlighting details;
- Primer;
- Acrylic paint, gouache, brush.
How to make a hedgehog:
- Take a piece of material and knead it with your hands. This is necessary to get rid of internal air voids.
- We divide it into 2 parts to make the body of a hedgehog and a mushroom for decoration.
- The hedgehog's face stretches out. It is created in an authentic cone shape.
- Roll into 3 small balls. They are needed to highlight the animal’s 2 eyes and nose. Attach to the appropriate places on the workpiece.
- Thanks to a brush soaked in water, uneven parts of the surface of the workpiece are leveled.
- Thanks to a stack or stick, the needle-like covering of the animal’s body is squeezed out.
- We fashion a beautiful mushroom to place on the hedgehog’s back.
- We are looking for a suitable place on the body to add the mushroom. And we connect two elements of the craft.
- Any uneven areas must be smoothed out with a brush.
- The product is left to dry. If possible, it is fired in an appropriate spiral kiln for ceramic or clay products. But with polymer clay you can do without this step, since it hardens well.
- The hedgehog can be painted in appropriate colors. The entire craft is ready for use.
This method is not the easiest. But for the older group of schoolchildren it is suitable for general development.
Rules for preparing green foam for the composition
Having selected the container, you need to cut out the desired shape from the foam. Piaflor can be cut either dry or wet. Dust flies from dry material when cutting. Therefore, if you have allergies, you should take precautions. After this, the floral sponge should be placed in the liquid. This can be plain water or a special solution for preserving the bouquet. Piaflor should soak on its own. You cannot forcefully drown it; it may fill unevenly with liquid, and the flowers will quickly wither. As soon as the floral sponge is saturated with water, it is placed in the prepared container.
If the stand for the composition allows liquid to pass through, then the foam should be wrapped in film or foil, leaving open the places where the flowers will be inserted. After use, piaflor can be saved for the next composition. In this case, the material must not be allowed to dry out. The sponge should be stored in an airtight container, for example, wrapped in plastic or foil.
Plasticine hedgehog
Plasticine is considered a great answer to how to easily make a hedgehog for beginners using available materials. Even the little ones will enjoy sculpting a charming animal with needles, since they could see it many times in its natural environment.
What to prepare for the lesson:
- Set of soft children's plasticine;
- Scissors with sharp ends;
- Specialized knife;
- Board for plasticine;
- Skewer.
Important: Usually the necessary tools are offered in a children's plasticine set for creativity for preschoolers and elementary school children.
Manufacturing stages:
- We start by creating the muzzle. We use a light shade of plasticine. The ball rolls off. A cone shape is created. The workpiece is set aside.
- Create the body of a hedgehog. Dark color is used. The material is kneaded to form a ball. It is pressed on the sides to form an oval.
- We connect the face with the body of the hedgehog. Brown plasticine is added along the joint.
- Let's add details: ears and paws made of brown plasticine.
- Using scissors we form spines. A skewer is needed to press the middle part between the spines to create the volume of these elements of the craft.
- Let's complete the muzzle. Use a stack to create a recess to highlight the contour of the eyes. Use a small ball to form a nose. It is added to the muzzle. The mouth is formed with scissors.
To make the crafts more beautiful, needles can be decorated with leaves, a mushroom, an apple, or a pear made from the appropriate color of plasticine.
Master class Craft product Modeling design Hedgehog in flowers + mini Mk Tapes
I got such a positive hedgehog in flowers. I was inspired to create the same creation, only from fresh flowers
To create we need: 1. Ribbons of various colors (depending on your imagination) 2. Two forms of polyurethane foam 3. Felt 4. Hot gun
On a sheet of paper (I have an A4 format) use polyurethane foam to make an oval. I only realized later that I should have first made something like a fence so that the foam would not spread. I ended up with a flat hedgehog.
We make a cone and also fill it with polyurethane foam. Be guided by the scale of the hedgehog’s body.
We cut off unnecessary things, constantly trying them on
We cover the nose with felt, glue it to the body and decorate it with flowers. I made roses according to my design and gerberas with a reduced number of petals
After decorating (or you can do it before, but it’s easier for me) we turn it over and align the nose and body, cutting off the excess
We glue the bottom (I have a fom), trim off the excess
And we decorate. Between the shape and the flowers I have green corrugated paper. The ruffles under the muzzle imitate grass. The eyes are cut out of felt and the whole hedgehog is decorated with beads
Source
Let's make a paper hedgehog
To create a toy or decorative hedgehog, it is beneficial to use paper. To do this, we will make the body in the form of an accordion, since it will add volume and increase the attractiveness of the craft.
We will need:
- Brown paper with light and dark shades;
- Pieces of red, green, yellow paper;
- Black marker;
- Glue stick.
Stages of work:
- We start by using dark brown paper. We use half the sheet. Folds using the transverse method.
- A narrow strip should form. This is necessary to create bends. They will allow you to form an accordion.
- We cut off the edges of the workpiece at an angle. The accordion folds in half. The bends are lubricated with glue.
- Draw a hedgehog's face on light brown paper.
- The workpiece is cut with scissors. We leave a margin on the right side. This is necessary for applying glue and connecting to the body in the form of an accordion.
- Create a decoration in the shape of an apple and a pear. They are made from red, green, yellow paper.
- The fruits are glued to the product. The entire craft is ready for use.
This is the simplest of the options considered. It is suitable for very young children. The instructions will help kindergarten teachers.
Now we understand how to make a hedgehog in various simple ways accessible to specific age groups. But we looked at simple examples available to children without experience who have just begun to explore the wonderful world of hand made. In the future, after gaining experience, you can move on to more complex ways of creating this craft.
Who is this gift suitable for?
It has always been customary to give flowers; this is a universal gift for all celebrations, when going on a visit. They can be presented to your beloved girlfriend, sister, mother, etc.
But bouquets are gradually fading into the background, and figures made from flower heads are becoming more and more in demand. Such flower sculptures are much more original, they are an interior decoration, and the joy that cute little animals bring is enormous!
Of course, it’s a shame to part with the toy. Few people know that with proper care and care, such a composition can stand for a long time without fading.
Photo of a homemade hedgehog
How to make an arrangement using the OASIS floral sponge
The question of where to buy a floral sponge cannot always be answered quickly.
Although in reality everything is simpler than it seems at first glance. The florist shop has everything you need to create a flower arrangement, and this is where the OASIS sponge is sold. Before you start creating a composition, you need to prepare all the materials. If you are working with artificial flowers, you will need to use a gray or brown sponge. It is worth noting that the green sponge is used only for living plants. First you need to choose the optimal vessel where the finished composition will stand. The sponge is quickly cut to the desired shape or size. The material must lie firmly in the vessel, after which tattoos can be created. They are needles that are collected in several rows. They are attached using a sticky mass.
When everything is ready, you can install flowers, branches, leaves and other materials. Next, the vessel is masked so that all fasteners and other auxiliary materials are not visible. When buying products for floristry, you should pay special attention to the manufacturer, since the quality of the created composition depends on him.