The article will tell you in as much detail as possible about scrapbooking and the technique of making greeting cards.
Everyone made cards with their own hands as a child. They were cut out of cardboard, decorated with colored paper, ribbons and painted with felt-tip pens. With age, due to lack of time and inspiration, many left this activity. However, you will agree that it is much more pleasant to give something that is made with love. The person to whom the gift is addressed will also highly appreciate such a postcard.
- Creativity develops in all directions. And one of the most common areas is scrapbooking. This direction includes making crafts from paper, cardboard and wood, and decorating them
- For example, the results of creativity in this direction are handmade photo albums, notebooks and postcards. For those who are just getting acquainted with scrapbooking, you should start with postcards. Firstly, they do not require a lot of material. Secondly, they will allow you to experiment and look for new approaches
- Also, I would like to note that scarpuking is not only a hobby for thousands of people. For some, it has turned into quite a successful business. After all, handmade goods are always at the peak of popularity
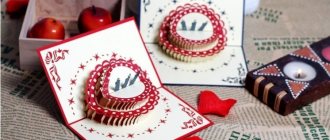
Postcard
Making scrapbooking cards
- The first thing you need to do is come up with an idea for a postcard. What holiday is it dedicated to? What kind of person is it made for?
- If nothing comes to mind, look for inspiration in the work of others. You can find thousands of ideas and master classes on the Internet.
- Consider what materials you might need
- Standard materials include colored paper, cardboard and PVA glue. You can also use ribbons and lace, artificial flowers, beads
- Prepare the base of the card. It shouldn't be soft. Visit a craft store in your city. There is soft colored double-sided cardboard. Sometimes it comes with patterns. This cardboard would be an excellent base for a postcard.
- If you choose a dark color base, think about how you will write the inscriptions. A blue or black pen will be difficult to see against a dark background. For the area where the wish will be written, cut off a piece of light-colored paper. It doesn't have to be rectangular
- Use templates to cut out clear shapes. This will make it much neater
- Don't be afraid to experiment. Perhaps your postcard will become a masterpiece
Postcard
What materials will be needed for work?
The base for the postcard is made from special cardboard - cardstock, or medium-density paper. If it is too tight, creases will be visible when folded. Sheets for pastels are suitable. The sheet size depends on the postcard format, on average it is 15x15 or 13x18 cm, but you can choose any other. To create the base you will need:
- Scrappaper. This is decorative paper that is sold in special sets or one sheet at a time. It can be of different densities, textures (for example, embossed), matte or glossy, with different patterns. In addition, sheets can be single-sided or double-sided.
- Paper for insert. On such a piece of paper you can place small pictures and text of congratulations.
- Decorative elements. You can decorate the card to your taste.
Most often used:
- satin ribbons;
- lace;
- stickers;
- rhinestones, buttons, beads;
- flowers made of paper and fabric;
- decorative carnations.
Decor for cards
[Show slideshow]
Advice from the master on what materials are needed for beginners
Set for scrapbooking cards
For those new to scrapbooking, it is convenient to use a card making kit. It is sold in craft stores and, sometimes, in office supply stores. The sets are themed. For example, dedicated to the New Year, Birthday or March 8th. This set includes:
- Cardboard base. It can be bilateral or unilateral. Usually, a set contains several options for the basics
- Colored paper. It is slightly softer than cardboard and may have patterns or themed designs on it.
- Ribbons and lace
- Half beads that are easy to attach to paper
- Additional elements: wooden figures, flowers, three-dimensional figures, frames and much more
The kit contains everything you need to make your own card. All you need is inspiration, glue and scissors.
Kit
Tips for composing compositions on postcards
The scrapbooking technique for beginning needlewomen is an opportunity to show their imagination and create a unique craft.
Composition - example for postcard design
However, beginners often make mistakes that prevent them from developing creatively. Therefore, at the beginning of your journey, it will be useful to learn a few simple rules:
- In each composition, you need to highlight the main accents, which are also called semantic elements. There should be no more than three of them: for example, in a postcard this could be text, a frame and decoration.
- Don't overload your work with too much decor. This is one of the most common problems for beginning scrapbookers. The best solution would be to limit yourself to just a few elements and place them correctly.
- To create successful combinations from different materials, you need to choose those that have something in common with each other in color, texture or type of pattern. Similar prints on paper and fabric, the same decor with beads and beads will make the work a single whole.
- The parts of the composition on the left and right, above and below must be balanced. If the volumetric decor is only on one side of the card, the composition will look unstable. However, there may be exceptions here when the designer intentionally creates an asymmetrical and slightly pretentious composition.
- Many beginners find it helpful to create simple pencil sketches. One of the simple and winning solutions is to draw straight lines horizontally, vertically and diagonally and place decorative elements on them.
Basic elements of scrap work
Types of postcards scrapbooking
There is no clear classification of postcards, because each artist uses his own imagination and mixes many elements. However, you can divide scrapbooking postcards into several varieties:
- Depending on the shape: square, round, oval, rectangular and curly.
- Flat and voluminous
- Textile (types where fabric is used as much as possible)
- Holiday cards
- Postcards “just because”
- Postcards-books
- Postcards-photo albums
Idea for a postcard
Scrapbooking style templates for cards
If your creative ideas go far beyond the standard scrapbooking kit, use templates.
- Templates for cutting out individual parts
Part templates
Part templates Part templates
- Background templates
Background Background
Background
Background
Unusual cards in scrapbooking style
Below are some ideas for inspiration. Absolutely anyone can make such unusual cards with their own hands.
Bright postcard
Spring card Volume card Card with a surprise
How to make a wedding card in scrapbooking style?
- Browse wedding card ideas online
- A wedding card should be light in color. The background may be slightly darker than the decor. Ideal base colors: pink, peach or coral
- The decor should be airy and delicate, use pearls, beads, lace, fabrics of different factors
- Prepare wedding templates: doves, hearts, rings and figurines of the newlyweds.
- Consider an element of surprise in your card. For example, so that it opens unusually. Or to have some special surprise inside?
- Choose or come up with a touching wish yourself. Write it inside using a beautiful font. You can also print your wish
- Place the card in a beautiful envelope. It will preserve small details on the postcard and prevent it from being damaged.
Wedding card ideas:
Wedding card
Wedding card Wedding card
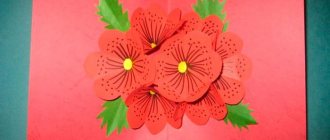
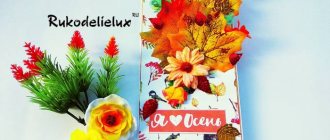
Romantic autumn card
A beautiful romantic autumn-themed card is offered in this master class, and this romance is given by a unique inscription that adorns the front part. You can come up with your own version and write it in beautiful handwriting, also print it out or find some great popular quotes.
Additionally, the card is decorated with an autumn bouquet, and there is no doubt about it, because yellowed leaves and bright orange flowers are the companions of autumn, this is what we can see outside the window at this time. We invite you to make such a wonderful craft to cheer yourself up or the one to whom you give it.
To make a postcard, prepare:
- paper of different densities and textures, including colored ones;
- decorative elements for creating autumn compositions: flowers and leaves made of foamiran, plastic or fabric;
- lace and satin ribbon;
- stamens;
- scissors;
- glue;
- ruler.
How to make a beautiful autumn card step by step
- Take the necessary materials for work and come up with a form. It can be either a folding bed, or a stand, or just a single sheet, which will be easy to sign on the back and decorate the front part.
- You also need to attach 2-3 layers on top of the substrates, and decorate the back part as well. For example, use beautiful paper with fall motifs.
- Decorate both walls. You can make either a fold-up card or a fold-out card. In this case, the front part is decorated with a white sheet with leaves, and the back part is decorated with pink checkered paper. This is thick cardboard.
- Then all that remains is to decorate your masterpiece. Apply beautiful lace of a suitable color and satin ribbon. A beautiful romantic inscription is very important. Print it out or write it down.
- Place the lace on both sides, departing from the bottom edge by about 3 cm. Glue the picture higher in the center.
- Use satin ribbon, such as fall orange or green. Form loops from small pieces and attach at the bottom. Prepare the stamens.
- Near the satin loops, stick leaves made of plastic or foamiran or other material. Prepare an autumn flower.
- Complete the unique composition that has already been formed with bunches of stamens. Glue a flower in the center.
- Glue a few leaves in the upper part - under the bottom and on top, to echo the leaves that can be seen in the picture. This creates an effect and the card will look harmonious.
- A bright and romantic autumn card is ready - very elegant and unique.
Which of the presented postcards did you like? What other elements would you like to add? Leave a comment if you have already made a postcard on the theme of autumn using our master classes. Share on social networks, offering to make such crafts. Bookmark this article so you don’t forget these cool autumn paper cards.
DIY scrapbooking happy birthday card
One of the most joyful holidays is Birthday. If you are tired of giving purchased postcards, show your imagination and make a gift yourself.
- For your birthday, use original card ideas. You can make a card that will hint at the hobby or profession of the birthday person. For example, if a person is interested in sewing, a postcard in the shape of a sewing machine would be appropriate.
- For a birthday party, use bright colors in the decor: red, green, pink and blue
- Think about the age of the birthday person. If it's an anniversary, it's appropriate to decorate it in the form of numbers.
- When making a card, you need to consider who the gift is being given to. For a child, husband or mother, the card can be more personal. But for a boss or colleague, it’s better to make a card with a neutral meaning
- Don't forget about your sincere wishes
Birthday Card Ideas:
Birthday Card Ideas Birthday Card Ideas Birthday Card Ideas
Volumetric cards made of colored paper
A very interesting version of postcards in 3D format. This craft is fun to make for both adults and children. By using your imagination and sense of taste, you can create a real masterpiece. Volumetric cards look stylish, festive, and impressive.
To make such a postcard you do not need any special skills or materials. For example, to create a holiday card with a snowman for the New Year in this style, you need to prepare:
- colored cardboard;
- white, yellow, brown, red colored paper;
- scissors;
- a simple pencil and a black felt-tip pen;
- glue.
You need to print a snowman template from the Internet or make it yourself. To do this, you need to draw a snowman from two circles, and cut off exactly the upper part of the smaller upper circle. Draw or print a top hat for the snowman.
Using the template, cut out 5 snowmen from white paper and 5 cylinders from red paper. Fold each snowman blank in half. Apply glue to one side of the folded piece and carefully glue the other piece. Using this method, glue all 5 templates together, carefully trimming the edges so that the snowman is beautiful.
Glue the cylinder in the same way. To make a broom, you need to fold brown paper into a thin tube. Cut a small strip of yellow paper, make small cuts along the wide edge in the form of a fringe, and carefully wrap it around the brown piece.
Take a sheet of cardboard, fold it in half, and glue a snowman with a broom to the very center along the fold line. Use a felt-tip pen to draw eyes, a mouth, and buttons. If desired, decorate the card with snowflakes, sparkles, draw a Christmas tree, write a congratulation...
A wide range of ways to create greeting cards with your own hands can be found on the Internet, in specialized books and magazines. You can go to master classes, watch online lessons, because there are a lot of different techniques for creating these wonderful crafts. You can use many available materials as the basis for a postcard: buttons, pompoms, knitting threads, ribbons, cotton pads and much more.
The main thing is to use your imagination, set aside time, be patient and prepare the necessary materials to create a masterpiece. A handmade postcard carries a piece of soul, care, love and is sure to please the owner!
https://youtu.be/OJvInlo7BAEhttps://youtu.be/30EVel5aKV4
_
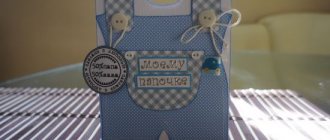
Scrapbooking postcard jacket, master class
A card in the shape of a jacket is an original idea for a gift. This could be a postcard for a man for his birthday, February 23, or simply as a reminder of some event. Making such a card is easy, even a beginner can do it.
Examples of postcards:
Example
Example 2
Sample:
Sample
Required parts:
Details
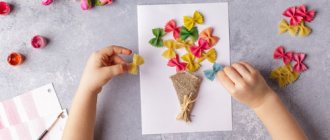
Children's applique on the theme of Autumn flowers + templates
And now I offer the final information, as they say, the most interesting in the end. Make an autumn voluminous composition of flowers, and you can make the template yourself from an ordinary sheet of paper (line it in the form of squares), and how cool it will turn out. Wow!
Here's a video tutorial that will show you how your work will become a wonderful masterpiece and will captivate everyone at any exhibition, whether in kindergarten or school.
Or take ready-made coloring books and decorate them with natural resources and paint them with any colors.
Popular articles Pincushion
Write which idea you liked the most and which of these you would like to repeat. And be sure to teach your children to be creative: they will thank you in the future. At least for a developed imagination. I hope you enjoyed reading it as much as I did researching it for you! I wish you all success in realizing your plans and good mood.
Children's cards in scrapbooking style, master class
Children's cards have their own characteristics in production:
- If you are giving a card for the birth of a baby, be sure to find out his gender
- Accordingly, for a girly card, use pink, beige, cream colors. A card for a boy can be made in blue, blue or light green
- Add decor that symbolizes the birth of a child: a stork, cradle or stroller
- If the card is made for an older child, you can focus on the baby’s hobbies
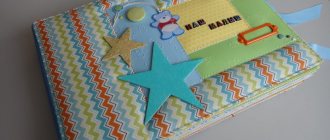
Examples of postcards:
Children's card Children's card
Children's card
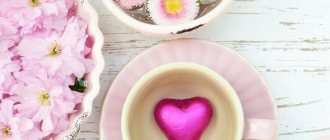
Scrapbooking: Valentine cards using scrapbooking techniques
Valentine's Day is a holiday on which you want to give a special gift to your loved one. A DIY postcard is the best option.
- Valentine's Day colors: red and deep pink. Even for men on this day it is recommended to make cards in these colors
- Remember the symbol of the holiday - the heart. You can make a card in the shape of a heart, or use appropriate decor
- Write a sincere, or even frank, wish that your soulmate will remember.
Examples of Valentine's cards:
Valentine's card
Mini photo album (scrapbooking)
The dimensions of this notebook are approximately 18*24 cm, but you can choose the size that suits you.
1. Prepare a sheet of thick paper and divide it into 12 squares. Use a ruler and pencil to do this.
2. Now you need to make two cuts on opposite sides, leaving 1 square to the end of the paper. Look carefully at the image to see how this is done.
3. Fold all three resulting strips into one, gluing the places indicated by the arrows.
4. Now fold the workpiece like an accordion. The arrows indicate the places where you need to apply glue to connect these parts into one page.
*You can also cut these pieces to make more pages.
5. Fold the accordion and connect all the pages with washi tape or a regular paper strip, which you need to glue to the ends of the pages.
6. Once you have a mini photo album, you can decorate it to your liking. Use paper of various shapes and colors, markers, stickers, small memorable souvenirs that can be pasted, etc.
How to make an interesting postcard using scrapbooking technique for March 8
- March 8 is a holiday of spring, International Women's Day. Therefore, the card should be bright and tender at the same time.
- The most optimal colors for a postcard for March 8: red, pink, light green and white
- Make the most of floral decor and floral motifs
- You can make a postcard in an original shape, for example in the form of a basket of flowers
Examples of postcards for March 8:
Postcard for March 8 Postcard for March 8
How to make a simple card using scrapbooking technique. Tips and reviews.
- Try not to copy other people's postcards. You can take the idea, but add something of your own
- Start making your card with careful preparation. Accuracy in work is the key to a quality product
- Before gluing decorative elements, lay them out on the surface of the card. Evaluate whether they look harmonious
- Don't make the card too cluttered. Many details will only worsen the overall picture.
- For your first cards, do not use expensive materials. You will need practice to master scrapbooking.
- Combine techniques and learn new things. To make original and unique cards, learn new techniques for working with paper. For example. quilling and origami
Tools for beginner scrapbookers
There are a large number of special tools for working in the scrapbooking technique: from figured hole punches and cutters to sewing machines. Beginners are advised to purchase only the essentials and gradually add to their kit.
What will you need first to get started?
First of all you will need:
- Scissors. They come in regular and curly different types. You can do without the latter at first, or buy 1-2 pairs of the most original ones.
- Double-sided tape: it can be used to secure photos and decorations, except for small parts and background paper.
- Glue: PVA and “moment” will be the most useful.
- Hole punches: curb (they are used most often) or other shaped ones. For beginners, one or two are enough, over time it will become clear what exactly you need.
- Stationery knife. In the future, it is better to purchase special cutters.
- Cutting mat. It is convenient with its centimeter markings, but at the initial stage you can replace it with any thick cardboard or an old magazine.
- Sewing machine. It is necessary for professionals, but you can sew a small amount of stitching by hand using a regular needle and awl.
- Rubber or silicone stamps with ink pads. Beginners are also not recommended to buy them in large quantities; it is better to limit themselves to two or three and add to the collection as needed.
- Rulers. The most suitable for such work are metal ones. With their help you can cut through paper with a knife.
Useful tools part 1
Useful tools part 2
Useful tools part 3