What is scrapbooking technique and what is it used for?
Initially, “scrapbooking” was based on the individual design of family photo albums and books. Later, craftsmen began to decorate photo frames, document covers, wallets, and bags. Ribbons, lace, beads, buttons, themed stickers, dried flowers and leaves, plastic or wooden inscriptions are used as decorations.
As a result, an ordinary album for storing memorable photos can be turned into an exclusive encyclopedia of family adventures, your favorite photos can be signed and marked with icons, and the cover can be decorated.
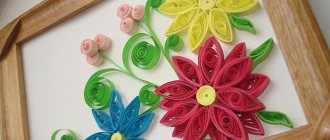
Scrapbooking is a unique type of creativity in which you can combine all available handicraft techniques (origami, macrame, crocheting, embroidery, quilling, decoupage, patchwork, rainbow folding, sewing). In order for beginners not to get lost in the wide variety, it is worth learning basic needlework techniques, which can be used as a starting point in creating a unique gift.
Types of techniques:
- Distressing is the artificial aging of pages (when paper is tinted, torn or burnt edges, cracks, abrasions, scratches are made using special ink and withered or dried flowers.
- Embossing is the creation of three-dimensional elements (convex patterns, letters, using stencils or special powder for heating and melting).
- Stamping – decoration with ink, stamps, creating various effects.
Templates
Templates (sketches) for scrapbooking will help beginners come up with a special style and use them as scrap paper.
What you need for scrapbooking
Before you begin, you must:
- Determine the direction of action, that is, what is to be created (album, book, frame, cover).
- Make sketches (drawings) on paper of the finished product in order to understand what tools and materials to stock up on.
- Write a list of the necessary components and purchase them in handicraft stores or through online stores (purchasing everything you need sometimes takes several months if you order rare elements from abroad).
- Beginning needlewomen should look at the advice of experienced scrapbooking masters, preferably step-by-step with photos.
Materials
What you might need for creative design (the set depends on the idea):
- special colored paper with patterns or cotton fabric with bright prints;
- carved multi-colored adhesive tapes (this is a kind of paper lace on adhesive tape);
- stickers on the chosen topic (children's, wedding, travel, animals);
- wooden or plastic inscriptions placed on the cover (or volumetric letters);
- fabric lace (braid) with Velcro or sewn on;
- satin ribbons of different widths;
- buttons, beads, beads (curly and regular);
- dried natural flowers and leaves (twigs);
- metal corners for fixing the edges of the cover;
- small pompoms (about 1-2 cm in diameter) of different colors (they can act as snow or flowers);
- scraps of fur or leather (natural or artificial);
- sewing accessories (fasteners, fastenings, pendants, rhinestones, eyelets, buttons, iron-on stickers, chains);
- colored thick cardboard (chipboard);
- shells, flat stones, wheels from a clock mechanism;
- transfers (children's tattoos), patterns, tags from clothes or from the maternity hospital;
- cut out paper pictures (parts of photographs) or ultrasound images of a woman during pregnancy (they are often used in the design of albums for newborns).
Options for combinations of materials are shown in the photographs:
Inscriptions on photo albums for newborns with photos of a boy and a girl
Don't know what to write next to your baby's photos? Then you can print (if you don’t know calligraphy) tags, poems or inscriptions that will very emotionally and accurately convey the mood to those who are looking at the photo album.
Options:
Inscriptions for a children's photo album
Inscriptions for a children's photo album
Inscriptions and inserts for a children's photo album
Inscriptions for a children's photo album and captions Cuttings and pastes for a children's photo album Cut-out pictures for a children's photo album Cut-out template for a children's photo album
Cover and photo clippings for a children's photo album Cuttings and drawings for a children's photo album Clippings with drawings and captions for a children's photo album
Tools
In order for the final work to be preserved for a long time (and possibly passed on by inheritance), all elements must be securely fastened.
The following set of tools will help with this:
- Sewing kit (needles, threads, scissors of different sizes).
- Sewing machine (if fabric and sewing lace are used).
- Transparent glue, which is selected depending on the type of connecting surfaces.
| Glue name | Purpose |
| Universal | For small metal and plastic parts |
| Clerical | For paper parts and photographs |
| In spray form | For volumetric surfaces |
| Sticky pads | To raise elements above the surface |
| Gun | For large volumes of work |
| Double-sided tape | Gluing fabric and small elements |
- Scissors with curly edges (for original cutting).
- A shaped hole punch (makes holes in the shape of a leaf, flower, square, snowflake) can be useful for cutting out decorative details from colored paper yourself.
- Non-fading writing instruments (varnish markers, watercolor pencils, archival colored pens, paints).
Types of sketchbook
There are mainly several categories:
- for markers (drawing with art markers);
- for watercolors (in such notebooks the paper is a little thicker, a little rougher, and holds water well);
- universal (drawing with watercolors, ink, pastels, pencils...)
Sketchbooks come in different shapes: square, rectangular, elongated.
Ready-made sketches for pages
Scrapbooking for beginners (all important details are described step by step with photos) is difficult to imagine without sketches. In other words, without a draft or sketch of the finished work. This will allow you to see what should happen in the end.
You can come up with sketches yourself or use ready-made options that were created by specialists and posted on the Internet.
When drawing your own drawing, it is useful to indicate the required material. And using a sketch created by other masters, you can modify or add something, guided by your taste.
What types of sketches for scrap can be:
- Rectangular (created for pages, frames, document covers, notebooks), in which the base is square. Example in the photo:
- Rounded sketches (drawn to design plates, cards, round or oval frames). Example image:
- Sketches of irregular shape , combining different geometric shapes (for creating postcards, complex photo frames), as in the picture:
When creating your own sketch, you also need to decide on your working style. It can be a delicate vintage (from aged images, old coins, yellowed lace), a strict and restrained European style (with minimal decoration and many cut-up photographs on one page).
There is also “shabby chic” (which is characterized by frayed edges of ribbons, calm shades of design, torn edges, scuffs) or a mixture of favorite styles from different eras.
The very first photo of the baby
It's great if it happens almost immediately after giving birth. You can tell how the baby was born, what time, how joyfully the sun was shining that day, or that it was severely frosty, but next to mommy it was very warm and cozy (you can paste a newspaper clipping from that day with the weather). How much did the cub weigh and how tall was it? Who was nearby at that moment? Or how dad stood under the windows and waited, and then jumped for joy and wrote words of gratitude on the asphalt.
A few more first photos - and we continue the story about the baby, about his name: how they chose the name, what it means, maybe they named it after someone. In what year was he born according to the eastern calendar, what is his zodiac sign - write down a few interesting qualities from the horoscope, because even while sitting in the tummy, the baby was already showing his character and temperament. Or you can list celebrities who were born under the same signs or on the same day.
Step-by-step master class
To create a universal children's album suitable for a boy and a girl, it is necessary to divide the process into stages:
Planning of all work
If you have ideas about the desired result, then you need to sketch in detail the layout of the cover and each page in a notebook or album. Or download ready-made page sketches from the Internet and print them out with notes on where everything will be located and what material is needed.
How to do scrapbooking for beginners. Photo step by step.
In order to more accurately assemble a sketch, it is worth deciding in advance on the number of photographs to place in the album (the size of the album, the dimensions of the pages and the method of attaching the photographs will depend on this). For example, if you plan to place a lot of photographs, then envelopes will be attached to each page, which will accommodate several photos of the same period.
When viewing such an album, you need to open each envelope and take out the images, then put them away. It is much more interesting to paste photographs directly to the pages, but such an album will not accommodate a large number of photographs. On the other hand, if the author likes the manufacturing process, you can make another album for an older child.
How to make an album cover
The cover can be made of bright fabric, leather or leather substitute, paper, oilcloth.
Consumables (for an album measuring 26*26 cm and 5 cm thick):
- Fabric flaps (the size depends on the author’s idea; if a solid cut is intended for the entire cover, then its size should be at least 40 * 70 cm).
- Stitched synthetic padding lining (to add thickness and softness).
- Single-sided adhesive fabric (single piece size 55*10 cm).
- Iron.
- Suitable type of glue and double-sided tape.
- 3 pieces of cardboard (2 mm thick) and measuring 27*27 cm (2 parts for pages) and 5.5*27 cm (1 part for the spine). If the author is going to sew the cover on a sewing machine, then thinner cardboard must be used.
- Stationery (ruler, scissors, pencil, layout knife, glue brush).
Manufacturing stages:
1. Connection of 3 parts of the cover:
Take 2 large pieces of cardboard and a spine. Place them so that the spine is in the center between the sheets and move the sheets close to each other. Place adhesive fabric on top of the spine to capture parts of the pages (the adhesive side of the fabric faces the paper). Iron. The fabric will glue all parts of the cardboard together.
Photo reference:
Then carefully turn over all the parts, wrap the spine with adhesive cloth and do the same work with an iron, as in the photo:
Then carefully turn over all the parts, wrap the spine with adhesive cloth and do the same work with an iron. The finished product will be movable and look like this:
- Creating thickness and softness of the cover:
To do this, you will need to cut one piece of padding polyester the same size as the cover and glue it on the outside (coated well with PVA glue). Trim off the excess.
Next, the main cover fabric is prepared. If it is planned that it will consist of different cuts, then you need to sew all the pieces of fabric. Iron the resulting base and place a cardboard blank on it (a padding pad between the cardboard and the fabric), leaving 3 cm of material for allowances. Example in the photo:
Then double-sided tape is glued along the top and bottom edges of the pages and the edges of the fabric are folded. Then the same tape is glued to the side edges and the folds of the fabric are formed in the same way. How to beautifully and quickly decorate the corners is shown in the following pictures:
In the end it should look like this:
Glue the free edges with glue for better fixation, as in the photo:
Then decorate the front part of the cover with decorative elements and make ties. And finally, glue a thin piece of cardboard onto the inside of the cover in one piece (spread liberally with glue). Leave to dry for several hours. Decorate as desired.
Suitable materials for designing the cover of a children's album:
- fabric or paper of delicate colors (with animals, toys);
- knitted lace, braid, satin ribbons;
- silk flowers, feathers, pompoms;
- buttons and beads in the shape of a stroller, pacifier, baby, animal;
- children's themed stickers;
- wooden inscriptions, small soft felt toys;
- figured tapes with drawings of garlands and toys.
Possible album cover design options for boys and girls:
Pages and binding
To create a binding (size 26 cm by 26 cm with 10 sheets) from scratch you will need:
- Thick white cardboard (2 mm thick) size 50*70 cm.
- Stationery knife.
- Ruler and pencil.
Sequencing:
1. Draw and cut out 5 stripes from cardboard:
- 1st – 26*52.5 cm;
- 2nd – 26*53.5 cm;
- 3rd – 26*54.5 cm;
- 4th – 26*55.5 cm;
- 5th – 26 by 56.5 cm.
2. In the center of each strip, draw the future spine, for which you need to set aside 26 cm from the short sides and draw lines. As a result, a strip of varying widths (from 0.5 cm to 4.5 cm) should appear in the center on all sheets.
3. Fold each strip inward along two lines and collect it in a notebook, as in the photo:
4. You will get a voluminous notebook. Free space between the sheets is necessary for subsequent decoration of each page. Looks like that:
5. Number each page in pencil and set aside.
The next stage is creating page decor.
To do this you need to prepare in advance:
- scrap paper (purchased as a set in the same style or assembled to your taste);
- decorative elements of the album (ribbons, beads, buttons, accessories, stickers, tape);
- 20 transparent office files;
- rubber roller for better gluing of sheets and squeezing out air;
- small stickers (sticky paper) in the amount of 20 pcs.
Algorithm of actions:
- Number the files (one file – one page), example in the photo:
- Include a page background in each file.
- Assemble the layouts of all pages according to the drawn plan (sketches). For convenience, place the necessary details in each file. As a result, each sheet will become clearly visible.
- Take one file with the set, take out all the component parts and connect them together, focusing on the created plan (everything is glued to the background paper, which will subsequently be attached to the cardboard pages. At this stage of the work, it is worth attaching only all the flat components, and attaching the convex ones to final steps of assembling the album (otherwise it will be difficult to stick the background to the cardboard page). Put it back into file.
- Repeat with the remaining files, slowly completing each part. Don’t forget to put it back into the files so as not to get confused and mix up the parts.
- Next, the connection of blanks from files and cardboard pages begins.
- Take the 1st file and the 1st sheet of notebook, lay it out as in the photo:
- Paste the contents of the 1st file onto the page numbered “1”.
- Take the 20th file and transfer its contents to the 20th page.
- So on, transfer the finished parts from each file to a cardboard page with the same number. The spine on the sheets remains white and undecorated (this is important).
- During the process, be sure to number each page again (this can be done with bright stickers) so as not to lose the order of the pages in the album.
- Put it all together. The finished result looks like this:
- Finish decorating the pages by attaching the raised elements (buttons, frames, fasteners, bows, inscriptions, flowers) that remained in the files. In this case, you should try to arrange the volumetric parts evenly on the spreads so that the album closes well and there is no deformation of the sheets during storage.
Information that is recommended to be reflected on the pages of a children's album:
- birth of a child (place, date, time, weight, height, who was present, first photos from the maternity hospital or from discharge);
- unusual events that occurred on the baby’s birthday;
- the dynamics of the child’s growth and development by month and his achievements during these periods (one page – one month);
- first complementary foods with images of your favorite foods;
- first haircut (with a bunch of hair in an envelope);
- first words, first steps;
- communication with parents, relatives and peers, as well as with pets (in the form of photographs);
- be sure to capture the baby’s first transport (stroller, crib, walker, jumper, gurney);
- favorite toys and short stories associated with them;
- walks in different seasons (in the park in autumn, in winter with a snowman, in summer on the beach, in spring with puddles);
- going to kindergarten or other preschool institution, memorable moments;
- child's birthdays.
There can be several children's albums, divided by age (from birth to 1 year, from 12 months to kindergarten, primary school and for older ages). This division will allow the mother to reflect each period of the child’s life and growing up in the appropriate album.
Examples of simple interior design of children's album pages:
Assembling all parts of the album (cover and binding)
To connect the binding to the cover you will need glue, an awl, satin ribbon, and a needle. Take the first double sheet (with the widest spine), coat it well with glue and press it to the inner middle part of the cover. Gradually glue the remaining sheets in order of decreasing spine width. It should look like what is shown in the photo:
Leave until completely dry, fixing all glued parts as recommended in the figure:
Once dry, all that remains is to flash the album. To do this, you need to punch several holes in the center of the spine with an awl, insert the tape and make stitches. Tie a bow on the outside.
Final touches
The very last steps are to attach the metal corners to the cover so that they do not tear or get dirty. To do this, drop a little glue inside the part and carefully place it on the corners of the cover, pressing on them for reliable fixation. As a result, you will get a finished album, approximately as in the pictures:
Assembly of elements
When everything is ready, you need to glue the resulting block of paper to the spine.
To do this, the spine must be glued with glue. Then put all the elements together.
You need to fold the sketchbook and clamp it with special clamps so that the block does not move out during the drying process.
Family photo album
Scrapbooking (for beginners, making an album step by step with a photo will not be difficult) allows you to create a beautiful family book using accessible and inexpensive materials.
Features in the design of family albums:
- It is recommended to choose a vintage style (if there are a large number of very old photographs) or European (for the younger generation).
- Family albums are usually viewed frequently. Therefore, it is better to make a soft cover from thick fabric or leather with a lining and metal corners. There should be a lot of pages (30 - 40) and, accordingly, a strong stitched binding (or on rings).
- The cover on the outside should be practical with a minimum of fragile parts. An example of the design of a denim book for a young creative family is shown in the photo:
- Inner pages can be of different sizes (for particularly valuable photographs), for example:
- If there are a lot of photos and there is a desire to fit them all in one album, then on each inner page you need to attach envelopes for 3-4 photos. To prevent them from opening and the cards spilling out, it is worth considering the locks.
Options for locks on envelopes:
- ribbon tie;
- an elastic band stretched across the entire page;
- brads;
- buttons or buttons.
Algorithm for creating a family album (similar to the children's album described above):
- Draw a layout yourself or borrow ready-made sketches from the Internet.
- Register the necessary materials and tools.
- Prepare everything you need.
- Start by creating pages.
- Make the cover and binding.
- Connect all parts of the album and insert photos.
Information that should be reflected on the pages of the family album:
- a general photograph of all family members and relatives with a brief description (for this it is better to take the first spread);
- close relatives (parents, brothers, sisters, uncles, grandparents) in the form of a family tree;
- important events related to family holidays;
- signature recipes from the best family chefs;
- weddings, birthdays, other holidays with date marks;
- travel map, trips to nature, to see friends;
- working moments (indicating the professions and positions of relatives);
- favorite family songs with their lyrics;
- relics, traditions, awards;
- letter to the future.
How to make a postcard using scrapbooking technique
Scrapbooking (for beginners it’s easy to create an unusual gift with your own hands step by step with a photo) is actively used in decorating postcards. Today they are not as popular as they were several decades ago, but weddings, birthdays, Valentine's Day - these are the very events where postcards have a magical effect and give a piece of spiritual warmth.
To create a postcard, you can use ready-made kits from handicraft stores or pick up everything you need yourself.
Some tips for creating a postcard layout:
- If the birthday boy has a hobby, it is worth reflecting this in the style of the gift (for example, a woman likes to knit, then use knitted decorative elements. Another example, if a man has a passion for watches, then he will like it if the card has wheels from a clock mechanism).
- When celebrating the anniversary of the birthday person, it is logical to use three-dimensional numbers and an inscription with wishes on the card (reflect the achievements of the hero of the day and wishes inside).
- If the author gives money and knows its purpose (for example, buying household appliances), then it would be original to play with this in a postcard (for example, make an envelope in the form of a washing machine, where the so-called “drum” opens and bills are folded inside, and leave it on the next spread humorous wish.
- For your boss or work colleague, you can make a postcard with a hint of professional achievements (for example, the base of the postcard is in the form of a business suitcase with the inscription “to the best employee of the office”, and inside there are small “order sheets” about awarding a bonus, unscheduled leave, promotion, increase in salary, accompanied by wishes).
Step-by-step description of creating a postcard - a castle for a girl (as in the photo)
Necessary materials:
- Pink cardboard as a base.
- Multi-colored paper with a pattern (for the design on the doors) and green paper for the leaves.
- Ribbon, 3 types of paper lace (for turrets).
- Ready-made or homemade roses.
- Office supplies (glue, scissors, hole punch).
Sequencing:
- Draw the base of the lock and door with a pencil on plain paper.
- Cut out the template and transfer it to cardboard, cut out 2 identical parts of the castle (face and back) and 2 doors.
- Cut out leaves and twigs from green paper.
- Use a hole punch to make holes in the doors.
- Decorate the castle turrets with paper lace, gluing it with glue.
- Cut and glue the window above the doors.
- Cut out lace curls from multi-colored paper and glue them to the doors.
- Glue the doors along the inside seam.
- Attach a card with a wish to the space between the doors.
- Thread the ribbon through the holes and tie a bow.
- Decorate the facade of the castle with roses and leaves in the form of a rim, placing them on glue.
- Glue the back side of the castle with the second base, while covering the seams from the lace on the towers. The card is ready after complete drying.
Wedding cards
When creating wedding cards with your own hands, you must adhere to the basic rules:
- light shades (pink, peach or coral colors);
- airiness of the decor (pearl beads, lace, paper curls);
- the use of doves, rings, figurines of newlyweds;
- silk or satin flowers;
- an unexpected surprise inside the card;
- packaging for an envelope so as not to damage voluminous decorations.
An example of the design of an unusual postcard-album (with a cash gift inside)
Photo of an example work:
This gift card will be remembered by all guests of the celebration and will definitely make a lasting impression on the young couple. Its special feature is several pages containing humorous information about opening a lifelong account in the joint surname of the newlyweds, an envelope for banknotes, wishes and parting words for a long and happy family life.
Necessary materials:
- cardboard, 2 mm thick;
- ready-made satin roses or made yourself;
- ribbon;
- scrapbooking paper;
- stationery.
- halves of pearls.
Making a “Savings Book” (dimensions at the discretion of the master):
- Make the base of the cover based on the model from the children's album described above.
- Decorate the front of the cover with blue paper and the first page of the passbook printed on a color printer (take a template from the Internet), attach flowers and inscriptions on top.
- Make a binding of 2 double sheets (as in a children's album, described above), arrange them as follows: 1st page - information about opening an account (as in a real book), 2nd - an envelope for banknotes with a ribbon tie (if banknotes not much, you can staple them directly to the page), the 3rd and 4th are wishes and parting words.
- Assemble the postcard album together and pack it in a gift box.
Ideas
Scrapbooking has no limits. You can create a gorgeous album with your own hands. Browse the photo gallery and get inspired with scrapbooking ideas!
Before starting work, consider the style, size and design of your future masterpiece. Get creative and combine your favorite colors. The most important thing is to come up with a theme, it could be moments of life, a love story, travel or a hobby. A photo album made with your own hands using the scrapbooking technique will be a delightful gift for loved ones. Feel free to experiment and everything will work out!
Notepad scrapbooking technique
To make a unique notebook at home (using the photo as an example), you must have:
- split rings - 2 pcs. (or a spring from a common notebook) and special metal clips for rings (4 pcs.), which are inserted into the cover;
- hole puncher;
- scissors, glue;
- scrap paper;
- cardboard (1 mm thick) for the cover;
- sheets for notes (plain A4 paper is suitable);
- decorative elements for designing the cover of a notebook (lace, brads, badge, wooden butterfly);
- sewing machine.
Sequencing:
- Cut the inner sheets to the same size (20*25 cm).
- Use a hole punch to make holes at equal distances from the edge.
- Cut out 2 sheets of cardboard, measuring 21*26 cm (covers).
- Decorate the cover:
- Glue background paper onto 2 pieces of cardboard, leaving 2 cm allowances on all sides;
- seal the corners and all allowances from the inside of the cover;
- make holes at the location of the rings with a hole punch and insert clamps on both parts of the cover;
- Attach a window to the front part of the cover, along the edges of which sew lace folded in 2 layers with a machine;
- to close the seams on the lace, sew a frame of braid on top, not forgetting to sew in a tie for the notepad;
- Place lace flowers in the corner of the window and secure them in the center with brads (first make a through hole with an awl);
- attach the badge and wooden butterfly;
- After finishing the decoration, finish the inside of the cover by gluing scrap paper of your choice.
- Put the notebook together and thread the rings.
- Make a bow from the ties.
Block Alignment
The paper along the edges of the sketchbook will be uneven in any case, since the edges gradually move. To align them, you need to use a metal ruler and cut off the emerging leaves with a knife.
Panel for photographs
Scrapbooking (for beginners, you can make interior decorations step by step using photos) allows you to create large works, for example, a wall panel with photographs. The panel can be different - in the form of one photograph or several, framed in a single frame or connected to each other.
Example in the photo:
For an economical option for making panels from simple materials you need:
- cardboard sheet (from a TV box or washing machine), size at the discretion of the master;
- foam corners of two sizes (they are sold in hardware stores) will serve as a baguette and frames;
- spray paint (for painting foam plastic);
- scrapbooking paper;
- Whatman paper;
- white lace or white paint;
- background paper the size of a sheet of cardboard (you can use gift paper);
- satin ribbons, decorative elements (buttons, shells, animal figurines, steering wheel, anchor, stroller);
- colored cardboard for children's appliques, glue, scissors, tape, rubber roller.
Sequencing:
- Stretch whatman paper onto the cardboard and secure it (with tape or glue) using a roller.
- Paste the background paper and arrange the photos.
- Glue scrap paper under the photographs, and fix the photographs on top (so that the images can be changed, you need to make cuts in the paper or attach braid or special corners at the corners).
- Glue decorative elements and ribbon bows.
- Create a baguette. From small foam corners, cut out 4 pieces with beveled corners (45 degrees) and form an inner baguette for each photo. Paint it with paint and glue it to the panel. Repeat baguettes for all pictures. Also make a large frame for the panel and glue it around the edge.
- Glue white lace onto the large frame (it can be replaced with a pattern using white paint or paper curly tape).
- Make flowers and butterflies yourself (the technique is described below), and also cut out green leaves from cardboard.
- Decorate the frame with flowers, butterflies, white lace and greenery.
- After completing the main work, turn the panel over and glue a sheet of white paper or newspaper on the back side and make fasteners for hanging on the wall.
- In the end you will get this masterpiece:
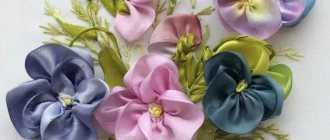
Flowers and butterflies for scrapbooking
To make paper flowers with your own hands, you need to prepare:
- Colored cardboard (what is used for children's appliques is suitable).
- Awl and scissors.
- Buttons, carnations or brads for the center of the flower.
How to make:
- make a flower template;
- cut out 3 identical blanks for 1 flower from cardboard of the same color (photo A);
- bend the petals inward (photo B);
- put 3 parts in one pile (photo C);
- cut out the core of a flower from cardboard of a different color and place it in the center of the workpiece (photo D);
- Use an awl to make a hole in the center and insert a nail, secure (photo E);
- if a stem is required, then make it from green wire, and the leaves from green cardboard.
To make your own butterflies, you need to take:
- colored or white cardboard (1 mm thick);
- paints, brush and scissors;
- half pearls, beads for antennae.
Algorithm of actions:
- using the template below, cut out 2 parts of each butterfly from cardboard (one part should be slightly smaller than the second);
- paint both parts of one butterfly as desired;
- Form antennae from thin wire, place beads on the ends;
- glue the antennae to the bottom of the butterfly in the head area (on top of the paper);
- connect the two parts of the butterfly in the center (the smaller one on top), securing them with glue;
- Glue halves of pearls in the center;
- Sticky double-sided pads or tape are suitable for attaching insects to work.
The template and method of coloring butterflies is shown in the pictures:
Making a paper block
In order to make the base of the basics - a paper block - you need to fold the sketchbook paper and fold it in half. Eight sheets must be combined in one block. The number of such blocks depends on desire and opportunity. If the format of the selected sheets is A4, then you should not make more than three blocks, as they will be difficult to stitch.
Interesting scrapbooking ideas
A passion for scrap metal will allow you to create very unique, beautiful things for home use or as gifts.
Variations of interesting ideas:
- Boxes for jewelry and jewelry.
- Cross stitch design (instead of the usual baguette).
- Wallet, laptop bag.
- Dollhouse for girls to play.
- Watch as pictured:
- Boxes for storing albums or other things.
- Cookbook with recipes.
- Baby's box (containing photographs, hair, pacifier, first socks), example:
- Bookmarks in books, as in the photo:
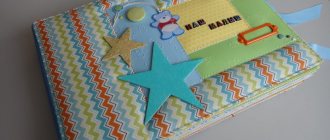
- Developmental materials for teaching children (for example, a book with letters), as in the photo:
- Decorating a children's room with soft felt frames for drawings, photographs, and lesson schedules.
- Complex home decorations.
Creativity scrapbooking is for romantic and enthusiastic people, allowing them to turn their fantasies into work, while experiencing harmony in their souls. And you don’t have to be a professional or study for a long time.
Beginning needlewomen who have become acquainted with the ancient craft for the first time, using step-by-step descriptions of master classes with supported photos, will cope without difficulty.
The main thing is to have patience and the desire to surprise your loved ones with a hand-made masterpiece.
Author: Polovnikova Lyubov
Article design: Anna Vinnitskaya