Quilling for beginners, a paper rolling training master class, what equipment is needed - you will learn about all this today from our section. So, quilling is a modern art form using thin strips of paper formed into small patterns or large patterns. The technique is accessible to everyone, and the process captivates both adults and children.
Before you get acquainted with the technique and main elements in the quilling style, thoroughly study what is needed for this.
Features of quilling and types of products
Quilling is useful for both children and adults. All the features and distinctive features of this type of handicraft are presented in the following table.
| Children | Adults |
| Development of fine motor skills and imagination | Paper rolling calms the nervous system |
| Developing accuracy, perseverance and dexterity | Products made using the quilling technique are an original solution for interior decoration and gifts for loved ones and friends. |
| Formation of spatial thinking | Having achieved certain success in the art of paper rolling, you can make it a source of additional income |
| Availability and cost-effectiveness of materials used in the work | |
| Ease of execution of basic elements from which various compositions and figures are made | |
Quilling for beginners (it’s easier to do the work step by step with photo instructions) can be done using the following techniques:
- Hasting - laying out a mosaic panel on a flat base. It is used to decorate cards, albums, boxes, as well as to create paintings and portraits.
- Three-dimensional technique consists of creating three-dimensional figures (toys, souvenirs, interior items) from simple elements.
- Corrugated quilling is a technique for creating volumetric works that have stability and increased strength, which is achieved when using corrugated cardboard in the work.
- Contour (graphic) quilling is a type of paper-based quilling based on working with paper strips that form the contour of a figure and its volume. Paper tapes are not folded into closed elements, but rather bent, giving the required shape and fixed on a plane at a right angle.
- Loop quilling is a paper rolling technique, the main element of which is openwork loops created using a comb.
Let's start with the basics
As in the art of folding paper, there are basic types of figures that serve as a kind of base, we cannot do without it. Any instructions for creating quilling crafts will be based specifically on them, so we need to learn how to execute them accurately.
Materials and tools for work
A set of materials and tools for quilling can be purchased in specialized stores. But novice craftsmen can use improvised materials for their work.
Paper
The main material for quilling is paper strips with a width of 0.3 to 1.5 cm. The final result depends on the quality and density of the source material. The standard density of quilling paper is 120-140 mg/m2.
It is initially cut into strips of a certain width and length, which is usually 30 or 60 cm. On sale you can find sets consisting of multi-colored or plain strips of the same length.
Novice authors often use office colored paper, which has a slightly lower density but has a number of advantages:
- optimal ratio of cost and quantity of material received;
- accessibility, as it is sold in any office supply store;
- various colors;
- the ability to prepare many strips of various thicknesses and lengths.
Cutting sheets of paper is carried out using a sharp stationery knife along pre-marked lines. To speed up the work, several sheets are connected with paper clips and placed on the tablet. Using a metal ruler as a limiter, cut the required amount of material.
In addition to paper of various densities, the following materials are used to create crafts using the quilling technique:
- textured and corrugated cardboard;
- various types of paper for creativity;
- foil;
- film of varying degrees of transparency.
Twisting tool
Paper strips are rolled using a special tool, which is a metal rod that is inserted into a comfortable wooden or metal handle. The European school of quilling uses a tool with a forked end. Eastern craftsmen use a device similar to an awl.
Beginning authors should start working with a European tool, as it is more convenient to use. The tip of the strip is inserted between the metal teeth, bent and rolled into a roll.
You can make a working tool yourself from scrap materials.
There are several options for a homemade device:
- The end of a thin wooden skewer or toothpick is cut 1-1.5 cm with a sharp stationery knife.
- For children's creativity, you can make a safe tool from a used pen refill. Its metal part is cut off, and the remaining part is split with a stationery knife.
- From a large needle, use pliers to remove part of the eye and the sharp end. The resulting blank is inserted into an eraser at the end of a simple pencil and fixed with a drop of glue.
Auxiliary tools and materials
The following are used as creative aids:
- PVA glue in a small jar with a thin spout. Also, a thin brush is used to apply glue to parts.
- Stencil with round or shaped holes. It is used to make many elements of the same size.
- Tweezers with pointed ends are used for manipulating small parts.
- To work, you will need several types of scissors. Small scissors with sharp ends for cutting fringe in children's creativity are replaced by a tool with rounded blades.
- Safety pins are necessary for securing parts in large compositions.
- A rubberized mat is used for cutting paper strips yourself.
- A sheet of cork or foam plastic will be needed for modeling compositions and gluing parts.
- Metal ruler.
- Stationery knife.
Paper strips
The main part of the work is the selection of high-quality material - paper. There are a large number of manufacturers, with a lot of colors and shades. Their main difference is the width of the stripes (they range from 2 mm to 1 cm) and the density of the sheet.
For convenience, beginners are recommended to purchase a special set for this type of needlework and use a medium size of strips. It includes a basic kit with all the materials and diagrams for making various structures.
You should know that the production of high-quality figures is influenced by the thickness of the paper; it depends on:
- how ductile it will behave when bent and twisted;
- whether deformation of the made elements will occur;
- During the process of twisting products, delamination of the product may occur.
Cardboard density is characterized by weight in grams per square meter of paper material. For example, a suitable option for work is a material whose density is from 120 grams per square meter to 140. All other numbering has some disadvantages in operation.
Also, training can take place with individually cut paper tapes from 20 cm to 50 cm in length, using colored double-sided paper. Of course, you can make the cuts yourself if you spend enough time, or you can use a special machine.
Basic forms of quilling and how to make them
Quilling is made from various small elements, which are divided into closed and open parts. For a step-by-step description, photographs are provided to help beginners do the job correctly.
Closed parts
In closed quilling elements, the end of the twisted strip is glued to the main part:
- Tight roll - the main quilling detail, on the basis of which all subsequent elements are formed. To make it, a strip of paper is fixed in a twisting tool and wound tightly around it.
It is necessary to level the paper with your fingers as you work to prevent the formation of bulges. The free end of the twisted strip is glued to the roll without removing it from the tool. - The bagel is formed from a tight roll. The formed spiral, without gluing the end, is removed from the tool and slightly unraveled so that a hole is formed in the center. The remaining layers should be tightly distributed along the edges of the part. Using tweezers, carefully glue both the inner and outer ends of the tape.
- The donut with a spiral is made similarly to the previous part, but a loose free spiral remains in the center. Only the outer end of the strip is fixed with glue.
- The oval is made on the basis of a donut, twisted using the handle of a working tool or a pencil. Having formed a donut and secured the end of the tape, the part is removed from the twisting device. Gently pressing the ring with your fingers, give it an oval shape.
- A free roll is the basic part on which most of the basic elements in quilling are made. The tightly twisted roll is removed from the tool and unrolled to the required size. After this, glue the end and, if necessary, adjust the inner layers of the part using tweezers.
- A drop. The center of the free spiral is carefully pulled away from the center, and the opposite side is squeezed with two fingers.
- Making a curved drop is similar to the previous method, but the sharp side is shifted from the center, while simultaneously giving the part a bend.
- The petal is formed on the basis of the drop by making a small pinch on the rounded side of the part.
- Eye (petal). The free roll is compressed on both sides until sharp, symmetrical corners are formed. All quilling crafts are made from simple elements. Beginners are recommended to study the weaving patterns of these elements
- Curved petal. The base part is slightly compressed, forming an oval. Then its ends are pinched and bent in opposite directions.
Open elements
In open elements, the end of the paper tape is not secured. Such details are used for additional decoration of products made using the quilling technique.
- Curl formed from a strip of paper rolled into a tight roll that unravels naturally.
- S-element. The tape is twisted at both ends into tight rolls directed in different directions.
- C-element. It is formed similarly to the previous one, but the twisting occurs in one direction.
- V-element. A strip of paper is folded in half and rolled into tight rolls, making an outward movement.
- Heart. The ends of the strip folded in half are folded inward. Contacting parts can be secured with glue.
- Twig. A strip of paper is arbitrarily bent into two parts and twisted in one direction. Spirals can also twist in opposite directions.
Flower arrangement “Lupins in a vase”
For beginners, we suggest making a quilling craft “Lupins” on skewers using the proposed flower pattern. To complete it, basic skills and basic paper elements are suitable.
Materials:
- Polystyrene foam, size 10x10x10 cm for making a stand, vase;
- Wooden skewers, 5 pieces, 15-20 cm long. You can use wire pre-wrapped in paper;
- Strips of pink and green paper;
- Tools for forming rolls: pen, tweezers;
- Glue.
Basic geometric elements
Rolled paper strips can be used to form many geometric shapes.
All of them are formed on the basis of a basic part - a free spiral (roll).
- Square, rhombus, rectangle. The roll of the required size is squeezed with your fingers. If you press evenly on all sides, you will get a square. If you press harder on two opposite sides, you will get a rectangle.
- A trapezoid will be obtained if, when forming a rectangle, the parallel sides are shifted relative to each other.
- Triangle. The loose roll is squeezed with three fingers, forming a triangle. The shape of the triangle depends on the force of pressure.
- Semicircle. One side of the free spiral is leveled, while simultaneously sharpening the adjacent corners.
- Arrow. The base of the triangle in the middle is pressed into the element and the corners are sharpened.
The examples of elements given are the basis for creativity. By showing your imagination, you can create many new shapes that will make your craft using the quilling technique unique.
"Free Spiral"
The next workpiece is wound using a similar method, but after removing it from the tool, let it unwind. Only after the required diameter we glue the end of the strip.
All further elements are created on the basis of such loosely twisted ovals.
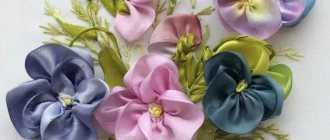
Flowers
Quilling for beginners is mastered step by step with photo instructions by creating simple compositions. Flowers are a common subject for many crafts. To make your first works, you should choose crafts from a small number of elements.
Cornflowers
To create a composition you need the following elements:
- 15 parts blue arrow;
- 2 bagels with a spiral;
- 6 green drops;
- 1 green month;
- 3 strips of green paper 5 mm wide;
- a sheet of cardboard in a pastel shade.
Progress:
- On cardboard, using a simple pencil, draw a sketch of a bouquet of two flowers and one bud.
- The sketch is attached with safety pins to a cork board.
- The details that make up the composition are laid out in the drawing. To ensure that all the parts remain in place, they are secured with pins.
- The gluing work begins with flowers. 6 arrow petals are glued to the donut located in the middle at a short distance. At the same time, the flower is glued to the base.
- The concave part of the month is covered with a small amount of glue and three arrows are attached.
- One edge of the paper strip is covered with glue and fixed to the appropriate place in the composition.
- Droplet leaves are distributed in random order on the stems and glued.
Dandelions
A small composition of dandelions is used to decorate postcards, frames, boxes, or used as a magnet.
Required items:
- 3 yellow stripes 1.5 cm wide;
- 6 green elements in the form of an eye;
- cardboard circle with a diameter of 3 cm.
Progress:
- Yellow paper ribbons are cut into small fringes, not reaching the edge 5 mm;
- The prepared strips are rolled into a tight roll using a tool.
- Trefoils are formed from green eyes. The corners of the two petals are glued together. The third element is glued between them. A second trefoil is also formed.
- Dandelion buds are glued in the center of the cardboard circle, leaving a small distance between them.
- Trefoils are glued to opposite sides.
simple flower
Now it's time to make your own quilling craft. We'll start with a simple flower.
Make six spirals from stripes of the same color, then form them into droplets, which you will then turn into leaves.
Your base elements should be the same size.
Glue one of the petals to the paper, then take the second one and place it opposite.
Glue the rest, leaving a space in the middle where you place the bead - your first job is finished.
Volumetric flowers
Flowers made using the quilling technique can be given volume. Such buds are used both as part of a large composition and as an independent product.
simple rose
A paper rose bud is used to create various panels and paintings. The technique for making it is slightly different from traditional quilling.
Materials:
- paper circle with a diameter of 10 cm;
- green stripes 5 mm wide and 30 cm long;
- thin wooden skewer.
Progress:
- Cut the circle in the shape of a flower and draw a wavy spiral inside, twisting towards the center of the part.
- Cut the workpiece along the marked line.
- Using a stick, a green stripe is twisted into a tight roll, from which a convex cone is formed.
Rose Flower is a simple quilling craft for beginners - The end of the stick is covered with glue, onto which the outer end of the workpiece is fixed. The bottom edge of the paper tape is smeared with glue and rolled into a tight roll.
- The concave part of the cone is coated with glue and put on a stick, pressing tightly to the bottom of the bud.
- A thin green ribbon is coated with glue and wrapped around a skewer.
Peony
A fluffy delicate flower made from simple modules is used to decorate crafts. You can assemble a bouquet from them and place it in an elegant basket.
Materials:
- 20 stripes of pink color 5 mm wide;
- 2-3 stripes 2.5 cm wide.
Progress:
- Glue narrow strips in pairs. The size of the joint should not exceed 4 mm.
- The resulting blanks are twisted into tight spirals and, pressing on the middle with a finger, a small bulge is made.
- The resulting parts are glued in two rows of 5 pieces.
- The rows are connected by shifting them relative to each other so that the components of the upper row cover the seams of the lower tier.
- The middle of the flower is made from a wide ribbon, cut into fringe 1.5 cm high. It is rolled into a tight roll and glued into the middle of the workpiece.
Lilies
To make a lily, a craftsman should arm himself with:
- a set of stripes of pink, white, yellow and black;
- diagram or sketch;
- PVA;
- a special tool for twisting strips;
- a tube of acrylic glossy varnish;
- wires;
- rings with a diameter of 0.7 cm for connection;
- a base for rings that can be expanded to any diameter;
- transparent glue.
The list of actions looks like this:
- First of all, you should make earrings and a pendant.
- Next, you should take pink strips with a width of 3 mm, a length of 95 mm and glue them to white strips with an identical width size, but the length will be 100 mm longer. The edges are glued together. In total, you will need to make 18 stripes for the flower.
- Paper ribbons are wound onto a special quilling tool or toothpick until spirals are obtained. You should start with pink so that these ribbons end up in the middle of the flower.
- The rolls are stretched to form an oval shape and bent at the tips on each side.
- Then a flower is formed by gluing 6 petals.
- To form the core of the lily, you need to take black and yellow strips, 0.15 cm wide and 40 mm long, and twist them into tight spirals (6 pieces yellow and 3 pieces black).
- 1 dark and 2 light spirals are glued together to form the middle of the flower. It should be glued to the center of the future lily.
Using the steps listed above, you can make a flower for a ring. The difference will be the size of the stripes. So, pink ones will be only 40 mm, and white ones will be 95 mm. For the middle, it is necessary to use smaller spirals (the length of the black and yellow stripes will be reduced to 30 mm).
To make jewelry with flowers, all the resulting lilies are coated on both sides with acrylic varnish, and the flower is set aside until completely dry. A smaller flower is fixed to the ring base with polymer glue.
When making earrings, you need to take earrings and, using a connecting ring, attach 2 large flowers to them.
Snowflakes
Quilling for beginners step by step with photos demonstrating the creative process clearly can be done by children of senior preschool age for the New Year holidays. To work on openwork snowflakes, you need to draw or print a round template with 6 rays and put it in a transparent file.
Snowflake made from tight rolls
To make a simple elegant snowflake, you need to prepare a large number of tight white spirals. For the first work, take simple diagrams.
For example, the following:
- For each beam of the template, lay out 3 rolls, which are secured with pins.
- Two parts are attached to the top of the last circle so that there is a distance between them equal to the diameter of one roll.
- The next row of beam repeats the previous level.
- The resulting fork is connected with one roll.
- Then 2 more spirals are laid out on the beam, between which 1 circle is glued on each side.
- According to the described scheme, 5 more rays are laid out.
- All parts are fastened with spirals located at the level of the 4th row.
Openwork snowflake
When starting to work on an openwork snowflake, you need to draw or print a diagram and attach it to a file. It is better for novice authors to use schemes consisting of 3-4 repeating modules.
Materials:
- 1 blue bagel;
- 12 tight blue spirals;
- 6 large blue drops;
- 6 large and 6 small white eyes;
- 6 V-elements blue.
Progress:
- All parts are distributed in appropriate places in accordance with the diagram and secured with pins.
- Glue the central part of the figure, consisting of a donut and 6 drops.
- Large eyes are glued between the drops.
- The end of the beam is assembled separately and then connected to the base. The end of the V-element is glued together. Between the free ends is the middle eye. The end of the part is placed between tight rolls and fastened together.
- The resulting part is glued to the top of the drop part.
Carnations
A quilling fake for beginners, such as carnation flowers, can be made armed with the following tools:
- Wide red stripe.
- Green paper.
- Cutting tool.
- Toothpicks.
- Glue.
The work sequence looks like this:
- Cuts are made on the red strip in a vertical direction.
- The toothpick is wrapped in green paper and secured with PVA.
- The beginning of the red strip is glued to the finished stem. Next, you need to screw it on and secure the end with glue.
The last step will be straightening the finished flower.
Trees
Quilling for beginners will help you realize many different ideas. Trees, made step by step with photos using traditional techniques or combining several directions, help to consolidate basic working techniques and master new techniques.
Birch
Materials:
- a stack of strips of white paper 5 mm wide;
- 50-60 regular and curved petals in green, yellow and orange;
- black marker.
Progress:
- Strips of white paper are folded into a stack, the edges are aligned and glued together.
- One side of the resulting workpiece is glued and connected to the base (sheet of cardboard).
- The upper part of the part, consisting of individual strips, is carefully straightened into a thick crown and glued.
- Multi-colored petals are randomly distributed among the branches and glued.
- Use a marker to draw vertical black stripes on the table.
Oak
Wood using traditional techniques can be done by any novice author.
Materials:
- brown and black eyes and curved petals;
- tight spirals of different diameters, green and dark green;
- cardboard base.
Progress:
- On the base, draw a silhouette of the trunk and branches with a simple pencil.
- The entire space of the picture is filled with brown and black modules.
- Use a pencil to sketch the approximate volume of the crown.
- The crown is filled with spirals in random order.
It is necessary to ensure that during operation the parts are located at a minimum distance from each other.
Master class on contour quilling: bunch of grapes
To create a bunch of grapes, you need 15-20 blanks of tightly twisted spirals of purple-lilac flowers. They must be glued to paper in the form of a bunch of grapes.
If desired, it can be made more voluminous, in several layers. Grape leaves are cut out of green colored paper and glued at the base of the bunch.
Animals
Animals made using the quilling technique can be either flat applications or voluminous functional toys.
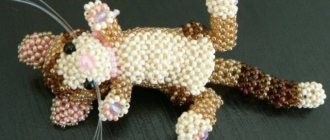
Cat
An example of a simple application using the quilling technique is the Scientist Cat, which can be placed under an oak tree and get a beautiful illustration for a famous fairy tale.
Materials:
- black and gray elements of various shapes (eye, drop, free roll, triangle);
- toy or paper glued eyes, nose and tongue.
Progress:
- A sketch of a cat figure is drawn on a piece of paper, which is placed in a file and placed on a cork board.
- Select the necessary parts to fill the silhouette, fixing them with pins.
- All parts are connected sequentially, starting with the large components of the figure.
- Glue the eyes, nose and tongue onto the muzzle.
Piglet
Beginners learning quilling techniques can easily make a small toy. For example, a pig is a symbol of the approaching New Year.
Materials:
- pink corrugated cardboard strips measuring 30*1 cm (36 pcs.), 30*0.5 cm (3 pcs.);
- red corrugated cardboard 4*1 cm (1 pc.), 30*1 cm (1 pc.).
- 4 rectangles of burgundy cardboard 0.5*0.5 cm;
- 2 plastic eyes.
Progress:
- Glue 2 tapes, each of which consists of 15 strips 30*1 cm.
- Roll one long strip into a tight roll.
- Cut pink and burgundy blanks measuring 30*1 cm in half and glue 2 multi-colored strips.
- Roll each of them into a tight roll, starting from the dark part.
- Glue the resulting parts together, forming the nostrils of the piglet.
- The end of the long pink strip is glued to the nose and started to be twisted tightly.
- After 6 turns, glue a 4*1 cm strip (mouth) onto the turn under the nose and continue twisting the part. Both circles should have the same diameter.
- The resulting blanks are bent into a high dome. On the front, you need to lift the nose up.
- The inside of both parts is coated with glue.
- 4 strips of 30*1 cm are rolled into tight rolls and formed into cones of equal height.
- 2 ribbons 30*0.5 cm are rolled into a loose spiral and given the shape of ears (a concave triangle). The parts are given a small volume and lubricated with glue.
- A strip of 30*0.5 is coated with glue, folded in half and wound around a pencil, giving the shape of a spiral. The end of the resulting tail is bifurcated for attachment to the body.
- The parts of the body are glued together and their joint is masked with 30*1 cm tape.
- Using pins, mark the locations of the legs and secure them with glue.
- Glue the tail, ears and plastic eyes into place.
- V-shaped hooves are cut out of rectangles and glued to the legs.
Tulips
To make tulips using the quilling technique you will need:
- A flat wooden stick or a special fork (you can use a manicure stick instead of a fork).
- White sheet of paper and gray cardboard.
- Green and pink paper for stripes.
- Zigzag scissors.
- PVA.
The process of making a tulip follows the following sequence:
- The end of one pink strip is wound around a stick until a ring shape appears.
- An indentation is made from the folded edge. The element is bent in half.
- Next, you should twist the bend in the opposite direction from the bent tip. The master should end up with a figure similar to the letter “S”.
- The strip is twisted further at the fold in both directions. So you should make several figures and set them aside.
- Next, take 3 more pink strips and turn them into droplets by gluing the ends together.
- On a white sheet used as a base, the edges are trimmed with scissors. Drops are fixed in the middle of the paper with glue, and S-shaped curls are attached to them.
- 2 drops are glued together, and the third is fixed on them.
- The remaining petal is filled with an S-shaped element. The flower head is ready.
- A light green stripe is attached to the tulip head, symbolizing the stem.
- Several green stripes stick together and become curls. Depending on the artist’s imagination, the curls can be shaped into rings, pointed at both ends, and glued to one another. The finished tulip leaf is glued to the stem.
- Another 3-4 strips turn into S-shaped blanks placed inside the sheet.
To create a complete picture of the flower, it is worth making more leaves in an identical way.
Postcards
Quilling cards for beginners consist of simple elements that are assembled into elementary patterns.
Valentine's Day card
Quilling (for beginners, it’s easier to do the details correctly step by step with a photo) made in the form of a Valentine’s card will be an original gift for a loved one.
Materials:
- a sheet of thick white paper, size A 4;
- 20-30 red loose spirals with a diameter of 10 mm;
- 15 light pink and dark pink stripes 1.5*30 cm;
- the same number of strips 0.5*30 cm.
Progress:
- A sheet of paper is folded in half along the long side.
- Draw a silhouette of a heart with a pencil, placing its upper points on the fold line.
- Using curly scissors with wavy blades, cut out the workpiece.
- Stepping back 5 mm from the edge of the figure, lay out a frame of free spirals.
- Wide strips are cut into fine fringes 10 mm high.
- Two-color ribbons are glued together, consisting of a wide fringe and a narrow ribbon.
- Using a tool, roll up a tight roll, starting with a narrow strip.
Without removing it from the device, the end of the fringe is secured. In a similar way, 30 multi-colored small flowers are formed. - The resulting flowers are glued in random order inside the frame, filling the entire space.
New Year card
The traditional quilling technique is ideal for creating New Year's decor and decorating greeting cards.
To create a simple New Year's card you will need the following materials:
- a sheet of cardboard white or any pastel color;
- 15 green elements in the form of a drop;
- 5 brown drops;
- 10 pearl beads;
- stars made of shiny cardboard.
Progress:
- On a sheet of paper, draw a sketch of a triangular Christmas tree with a rectangular trunk.
- The sketch is placed on a cork board and a Christmas tree shape is formed. Its Bottom row consists of five drops, located with the sharp part up. Each subsequent row is reduced by one piece.
- The barrel consists of two rows of elements. I attach one brown drop to the middle part of the lower tier of the crown on both sides. 3 similar parts are placed in the next row. All elements are glued together and the figure is allowed to dry.
- A sheet of cardboard is folded in half. A Christmas tree shape is glued to the center of the front side.
- The crown of the tree is decorated with beads, and a shiny cardboard star is glued to the top.
- Several of the same stars are placed on the surface of the postcard.
Paintings
Paintings made using the quilling technique are a fun activity that is suitable for people of any age and skill level. The plot of such paintings can be devoted to various topics. With children you can make a painting “Goldfish”
Materials:
- A4 sheet of blue cardboard;
- blue and blue elements in the form of a curved eye;
- yellow semicircles and drops;
- orange, red, green curved petals and tight spirals.
Progress:
Composing pictures using the traditional quilling technique is reminiscent of making a mosaic.
- The entire surface of the cardboard sheet is filled with curved blue and blue petals. The elements are distributed as close to each other as possible. The prepared base is left to dry.
- On a separate sheet draw a sketch of a goldfish with a crown on its head. It is placed on a working cork surface and, using pins, a figure is formed from yellow, red and orange elements. The head is made from a large diameter free roll, slightly sharpening it on one side.
- Having composed the figure, all its elements are carefully glued together.
- Algae threads are formed from green parts.
- Individual elements of the composition are fixed on a blue background.
droplet
To make a droplet, which is also a fairly common form, you need to wind the strip not very tightly, then remove it and squeeze one of the sides on which the end of the tape was located with your fingers.
If you also squeeze the droplet from the reverse side, you will get the third basic element of the figure, which will resemble either a tree leaf or an eye.
Interesting ideas for the interior
Quilling for beginners is not limited to decorative crafts.
This technique allows you to create functional interior items:
- candlesticks;
- caskets;
- Photo frame;
- candy makers;
- baskets;
- vases
A box for small items is a simple interior craft. It consists of tight rolls of various diameters, twisted from strips 0.5 cm wide. You can use a plastic lid for jars as a template.
Progress:
- Several strips are glued into a long strip, from which they are rolled into a tight roll with a diameter equal to the internal size of the template. This part is used as the bottom of the craft.
- One side of the bottom is well coated with glue and left to dry.
- The walls of the box are made using a template. Parts of two contrasting colors are laid out along the inner diameter of the template, forming the first ring.
- The parts of the second ring are laid offset, placing the middle of the roll at the junction of the elements of the previous row.
- Five more levels are formed using the same principle. The wall of the box is left to dry.
- Making the lid begins with laying out round elements in multi-colored rows, alternating with each other. The lid is covered with glue and a number of elements are laid out on top of the second ring of the lid.
- The bottom and walls are connected using glue.
- The main part of the product and the lid are coated with aerosol varnish.
What else can be made from quilling
Using the quilling technique you can make original jewelry and accessories. Beginning craftsmen can easily cope with making a small New Year's crown for a girl.
- Making a crown begins with creating a sketch of the product, which consists of a rim and 5 identical segments.
- In accordance with the sketch, the required number of elements is prepared (drop, eye, s and v elements, free spirals, tight rolls). The color of the parts is selected in accordance with the author's idea.
- Measurements are taken from the child’s head and a template ring of the appropriate size is made.
- Using a template, a rim is formed, consisting of free spirals, which are laid out in three rows. The inner part is glued for reliability.
- Five segments are formed according to the sketch and glued on one side.
- After all the components have dried, assembly begins. The segments are glued together in the shape of a fan, securing them with paper clips while they dry.
- The rim and the top part are connected with glue and secured with pins.
- The dried product is coated with varnish, after which the fixing pins are removed.
Quilling is interesting for both beginners and people who have been interested in needlework for a long time. Beginners should rely on step-by-step instructions and photos of products.
Article design: Vladimir the Great
Butterfly
It is made very simply from five parts. The base is a ribbon twisted in the shape of a petal, to the sides of which the wings are glued. They are made in the form of droplets, the lower ones are glued with sharp ends outward, and the upper ones with blunt ends. You can make antennae from the black stripe.
If you wish, you can use an interesting technique where you take short strips of different colors and glue them together one by one. As a result, wings are formed from them, a very interesting effect is obtained.